


文章目录
黑马头条-day04&day05
自媒体文章自动审核
1、自媒体文章审核需求分析
1.1 文章数据流
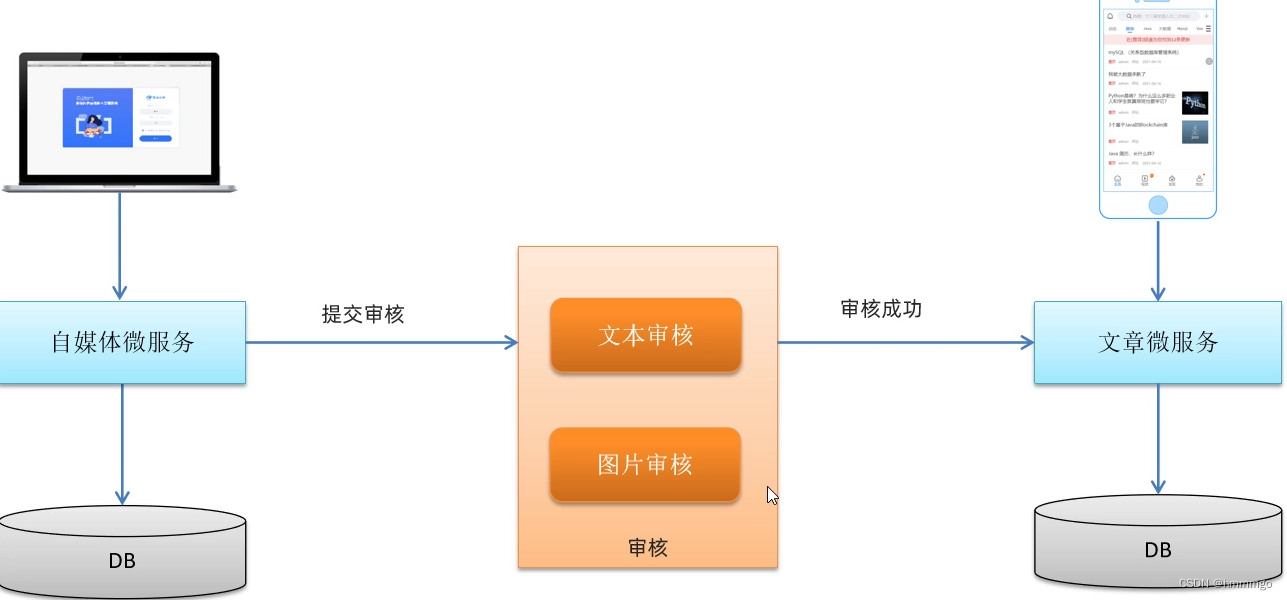
1.2 审核方式
- 自动审核
文章发布之后,系统自动审核,主要是通过第三方接口对文章内容进行审核(成功、失败、不确定) - 人工审核
待自动审核返回不确定信息时,转到人工审核,由平台管理员进行审核。
1.3 自媒体文章自动审核流程-(注意状态变化)
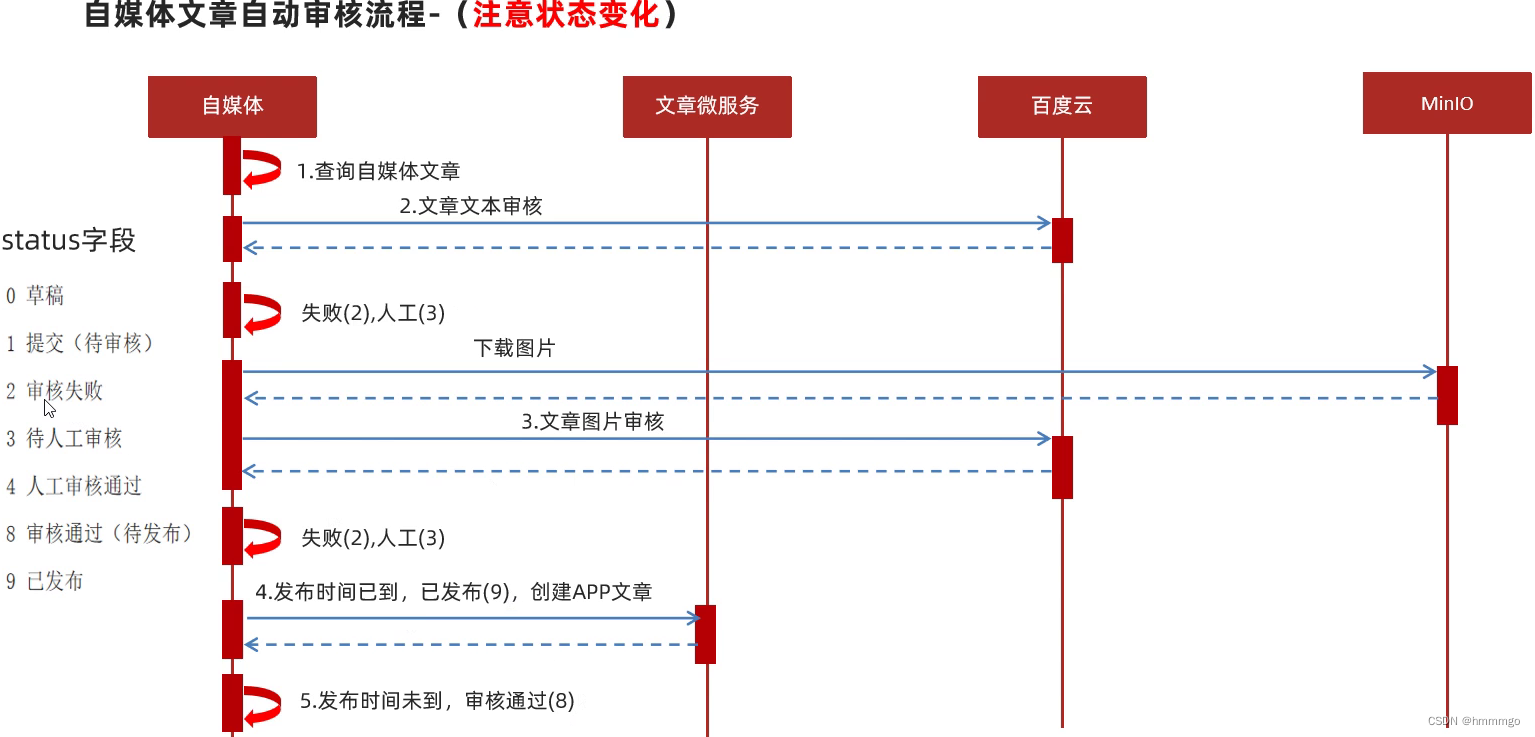
1、查询自媒体文章,并且判断自媒体文章存在不存在
2、文章文本审核,通过百度云审核,审核失败返回2状态码,不确定,返回3状态码,人工审核
3、文章文本审核通过,对图片进行审核,先去MinIO下载图片,再进行审核,当有图片审核失败,直接返回2状态码,不确定返回3状态码,人工审核
4、文本和图片都审核通过了,和发布时间做比较,发布时间到了,返回9状态码,让文章微服务,创建app文章,发布时间未到,返回8状态码,审核通过,待发布
1.4 表结构说明
wm_news 自媒体文章表

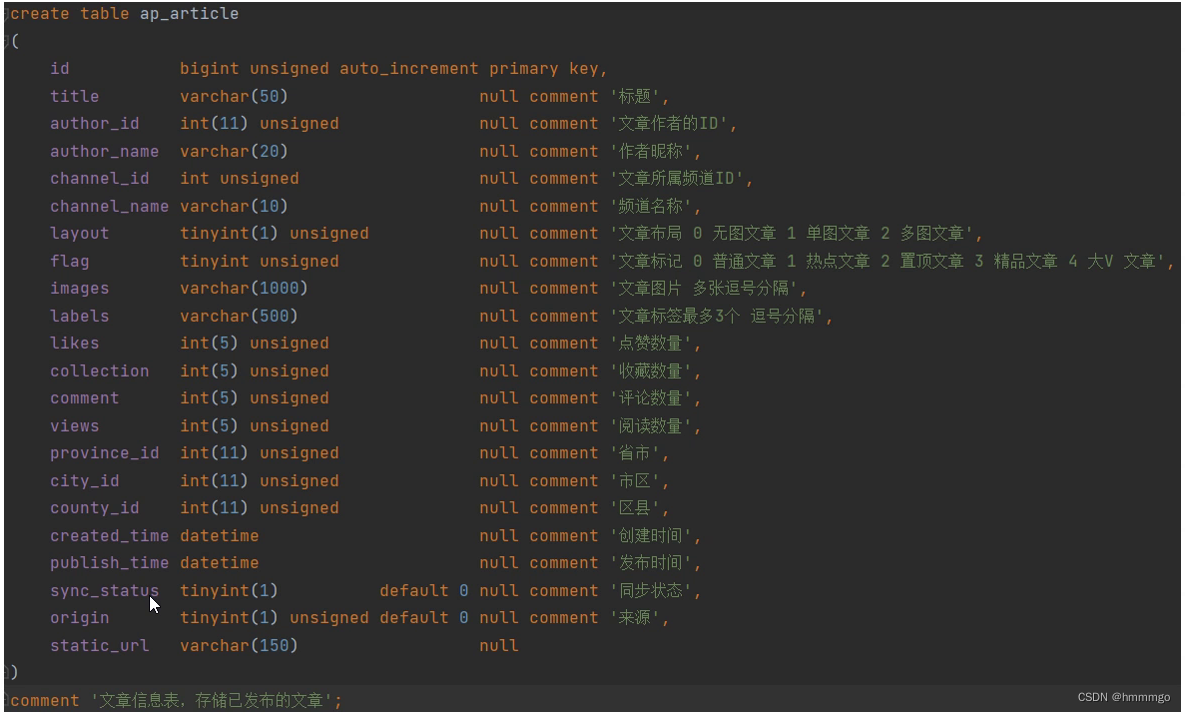
ap_article app文章信息表
ap_article_config app文章配置表

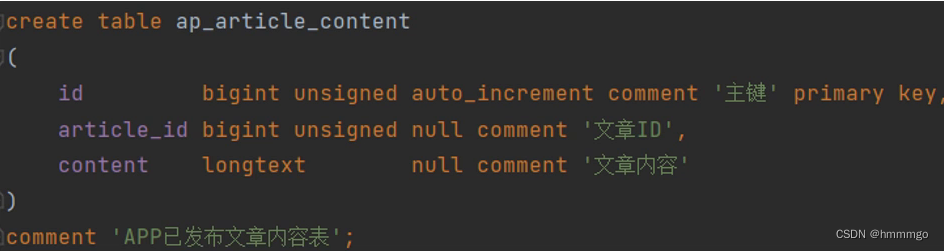
ap_article_content app文章内容表
2、创建APP文章
2.1 分布式id
随着业务的增长,文章表可能要占用很大的物理存储空间,为了解决该问题,后期使用数据库分片技术。将一个数据库进行拆分,通过数据库中间件连接。如果数据库中该表选用ID自增策略,则可能产生重复的ID,此时应该使用分布式ID生成策略来生成ID。
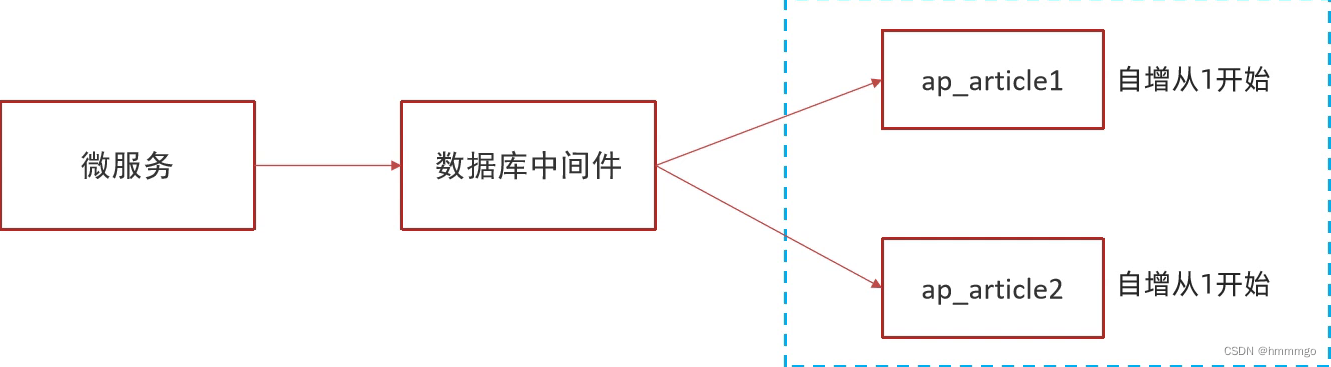
UUID为什么不合适:如果建索引的话,数字要比字符串的效率高,UUID128位,通常以32位字符串表示,而且,UUID也不方便排序,不是自增长的,只满足唯一性
什么是分库分表
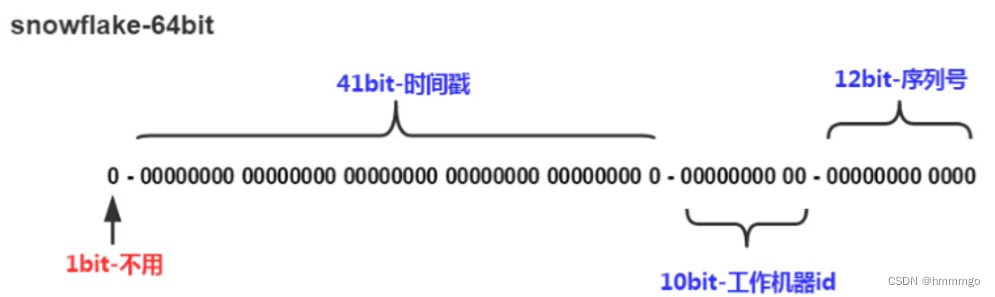
2.2 分布式id-雪花算法
snowflake是Twitter开源的分布式ID生成算法,结果是一个long型的ID。其核心思想是:使用41bit作为毫秒数,10bit作为机器的ID(5个bit是数据中心,5个bit是机器ID),12bit作为毫秒内的流水号(意味着每个节点在每毫秒可以产生4096个ID),还有一个符号位-0。
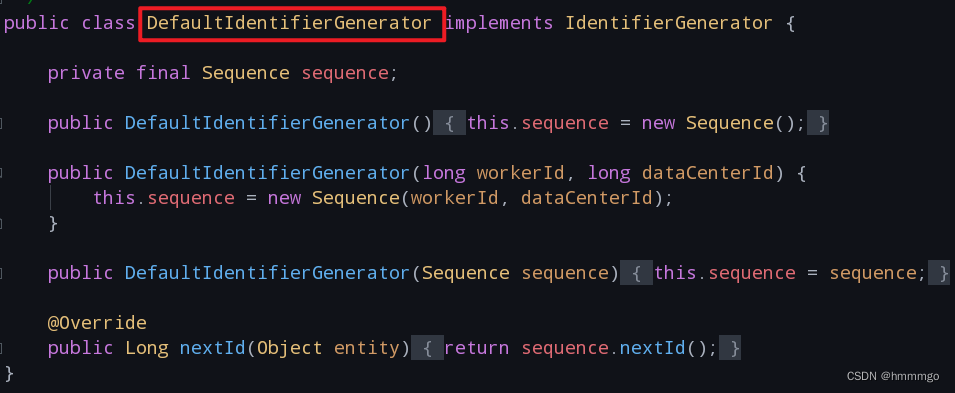
在mybatisplus雪花算法的代码实现
其他几种id生成算法
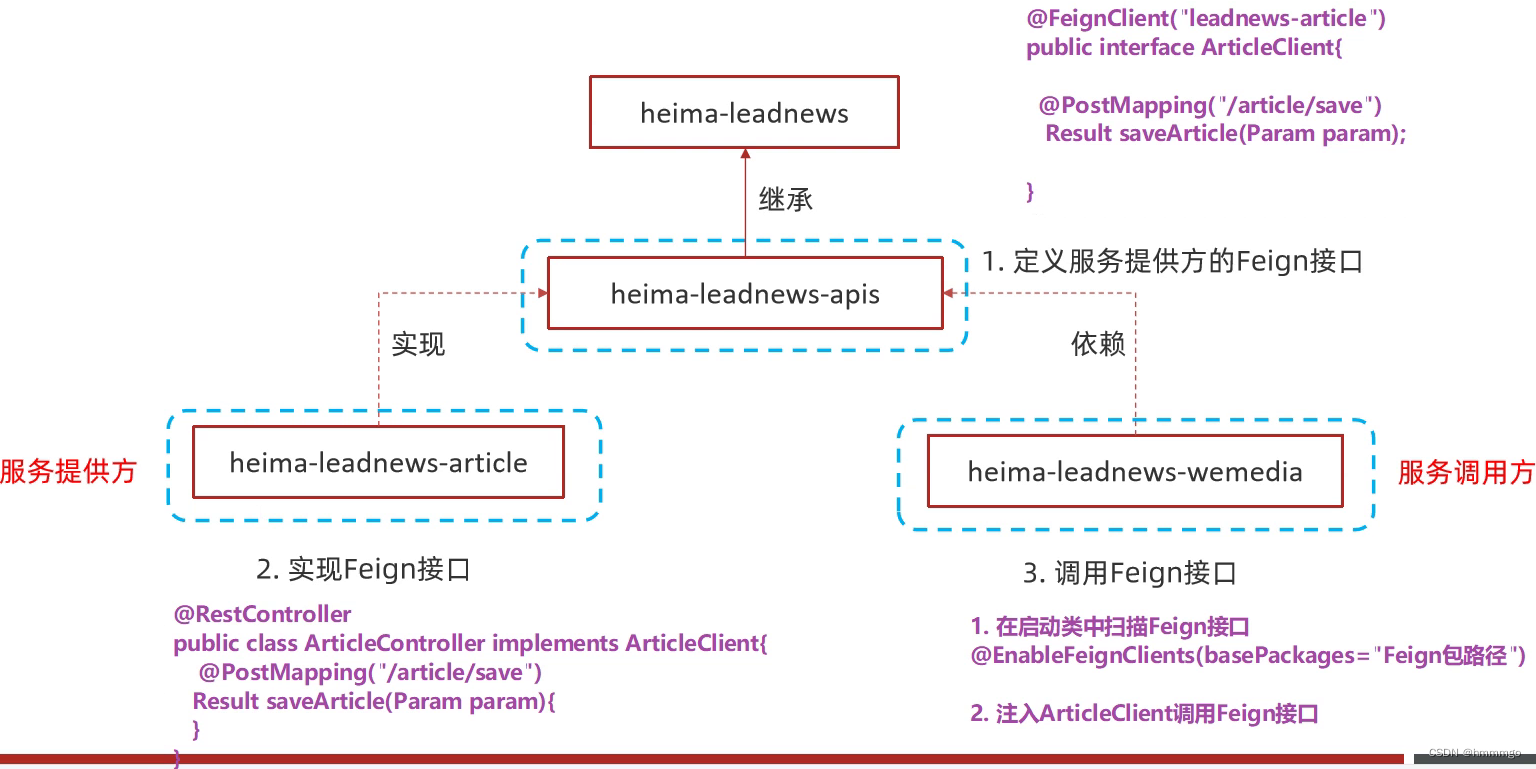
3、项目中feign接口定义与实现规范
1、定义feign接口
2、定义跟feign接口对应的controller接口
3、调用feign接口
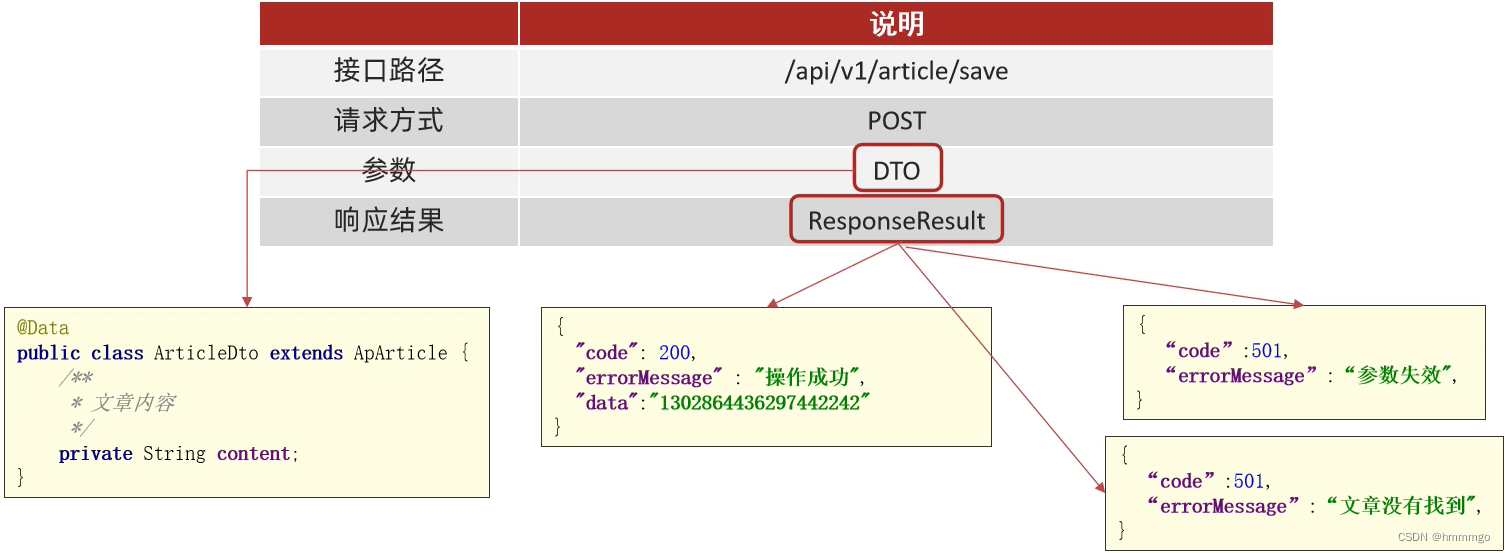
4、保存app端文章-feign接口
5、保存app端文章-思路分析
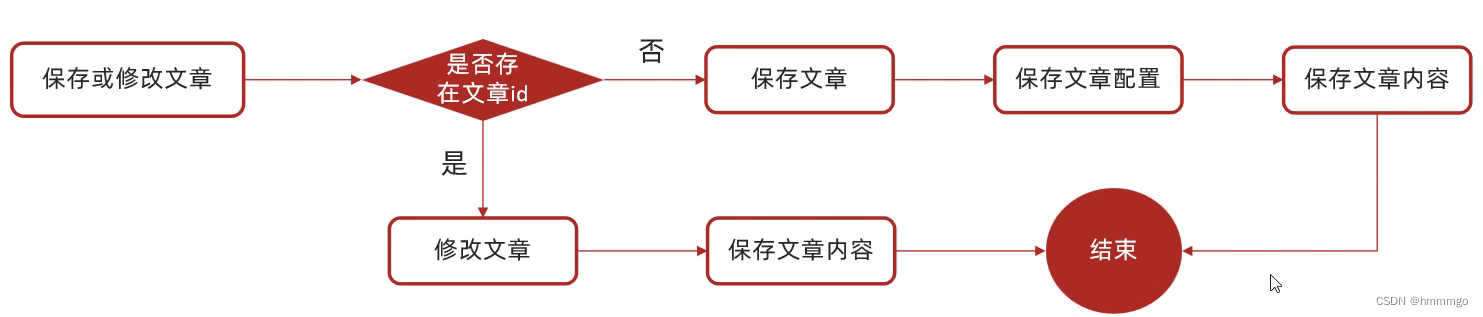
修改文章时,不用修改配置信息。
6、代码实现
6.1 编写feign接口
// 写服务提供者的名称
@FeignClient("leadnews-article")
public interface IArticleClient {

	// 写完整路径
	@PostMapping("/api/v1/article/save")
	public ResponseResult saveOrUpdateApArticle(@RequestBody ArticleDto dto);

}
6.2 编写服务提供者代码
编写feign包下的ApArticleController:
// 别忘了加这个注解,这也是个controller
@RestController
// 实现feign接口
class ApArticleController implements IArticleClient {

	@Autowired
	private ApArticleService apArticleService;

	@Override
	@PostMapping("/api/v1/article/save")
	public ResponseResult saveOrUpdateApArticle(@RequestBody ArticleDto dto) {
		return apArticleService.saveorupdateApArticle(dto);
	}
}
编写业务层代码:
package com.heima.article.service.impl;

import com.baomidou.mybatisplus.core.toolkit.Wrappers;
import com.heima.article.mapper.ApArticleMapper;
import com.heima.article.service.ApArticleConfigService;
import com.heima.article.service.ApArticleContentService;
import com.heima.article.service.ApArticleService;
import com.baomidou.mybatisplus.extension.service.impl.ServiceImpl;
import com.heima.model.article.dtos.ArticleDto;
import com.heima.model.article.dtos.ArticleHomeDto;
import com.heima.model.article.pojos.ApArticle;
import com.heima.model.article.pojos.ApArticleConfig;
import com.heima.model.article.pojos.ApArticleContent;
import com.heima.model.common.dtos.ResponseResult;
import com.heima.model.common.enums.AppHttpCodeEnum;
import lombok.extern.slf4j.Slf4j;
import org.checkerframework.checker.units.qual.A;
import org.springframework.beans.BeanUtils;
import org.springframework.stereotype.Service;
import org.springframework.transaction.annotation.Transactional;
import org.springframework.beans.factory.annotation.Autowired;

import java.util.List;

/**
 * <p>
 * 文章信息表,存储已发布的文章 服务实现类
 * </p>
 *
 * @author itheima
 */
@Slf4j
@Service
public class ApArticleServiceImpl extends ServiceImpl<ApArticleMapper, ApArticle> implements ApArticleService {

	@Autowired
	private ApArticleMapper apArticleMapper;
	@Autowired
	private ApArticleConfigService apArticleConfigService;
	@Autowired
	private ApArticleContentService apArticleContentService;


	@Override
	public ResponseResult saveorupdateApArticle(ArticleDto dto) {

		// 1. 复制dto给pojo
		ApArticle apArticle = new ApArticle();
		BeanUtils.copyProperties(dto,apArticle);

		// 2. id无值则创建App端文章数据
		if (apArticle.getId() == null) {
			// 保存文章
			this.save(apArticle);
			// 保存文章配置
			ApArticleConfig apArticleConfig = new ApArticleConfig(apArticle.getId());
			apArticleConfigService.save(apArticleConfig);
			// 保存文章内容
			ApArticleContent apArticleContent = new ApArticleContent();
			apArticleContent.setArticleId(apArticle.getId());
			apArticleContent.setContent(dto.getContent());
			apArticleContentService.save(apArticleContent);

		} else {
			// 3. id有值则修改App端文章数据
			// 根据文章id查询文章信息是否存在
			int articleCount = this.count(Wrappers.<ApArticle>lambdaQuery().eq(ApArticle::getId, apArticle.getId()));
			if (articleCount <= 0) {
				return ResponseResult.errorResult(AppHttpCodeEnum.DATA_NOT_EXIST,"app文章不存在");
			}
			// 修改文章主表信息
			this.updateById(apArticle);
			// 根据文章id查询文章内容是否存在
			int contentCount = this.apArticleContentService.count(Wrappers.<ApArticleContent>lambdaQuery().eq(ApArticleContent::getArticleId, apArticle.getId()));
			if (contentCount <= 0) {
				return ResponseResult.errorResult(AppHttpCodeEnum.DATA_NOT_EXIST,"app文章内容不存在");
			}
			// 修改文章内容
			this.apArticleContentService.update(Wrappers.<ApArticleContent>lambdaUpdate()
					.eq(ApArticleContent::getArticleId,apArticle.getId())
					.set(ApArticleContent::getContent, dto.getContent())
			);
		}

		// 4. 响应App文章主键id
		return ResponseResult.okResult(apArticle.getId());
	}

	/**
	 * 文章显示
	 * @param type	1-加载更多,2-加载更新
	 * @param dto
	 * @return
	 */
	@Override
	public ResponseResult loadArticleList(int type, ArticleHomeDto dto) {
		List<ApArticle> apArticles = apArticleMapper.loadArticleList(type, dto);
		return ResponseResult.okResult(apArticles);
	}
}
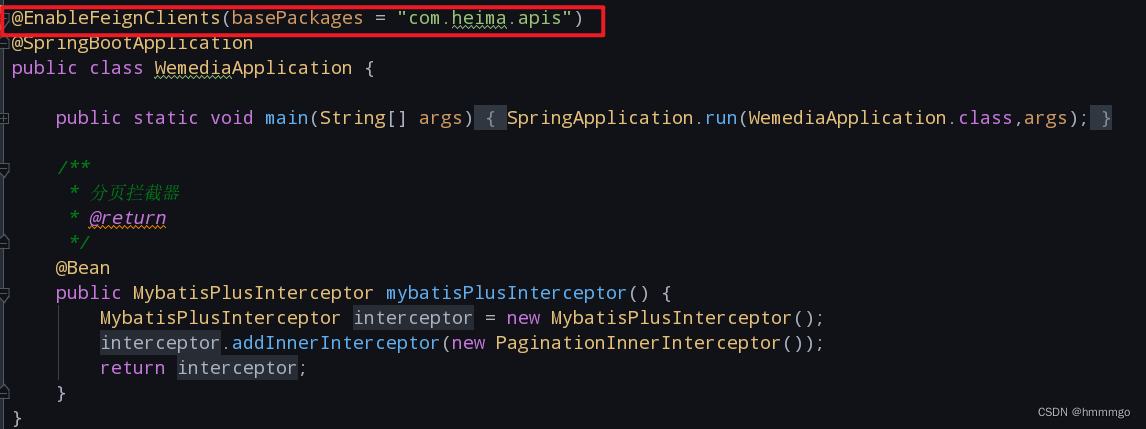
6.3 在服务调用者的启动类扫描feign接口的包
7、 自媒体自动审核第三方接口集成
百度智能云-内容安全第三方接口
7.1 准备工作
1、前往【百度云官网】(https://cloud.baidu.com/)注册账号并完成实名认证
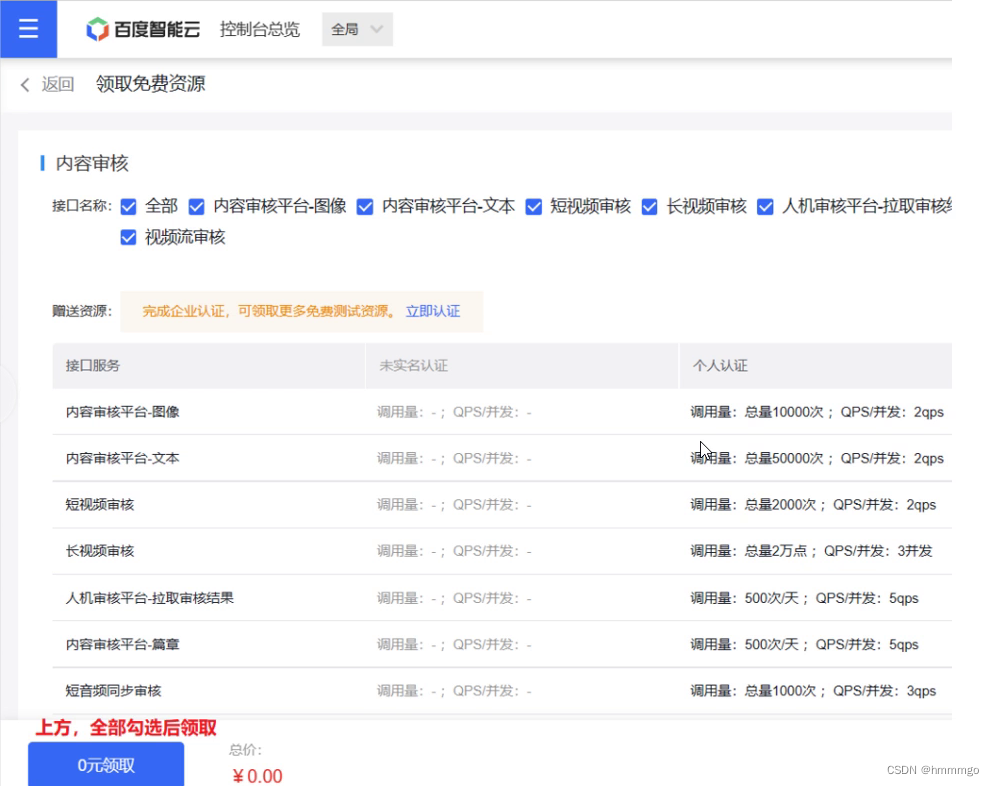
2、打开控制台:https://console.bce.baidu.com/ai/#/ai/antiporn/overview/index按照操作指引的第一步和第二部操作。
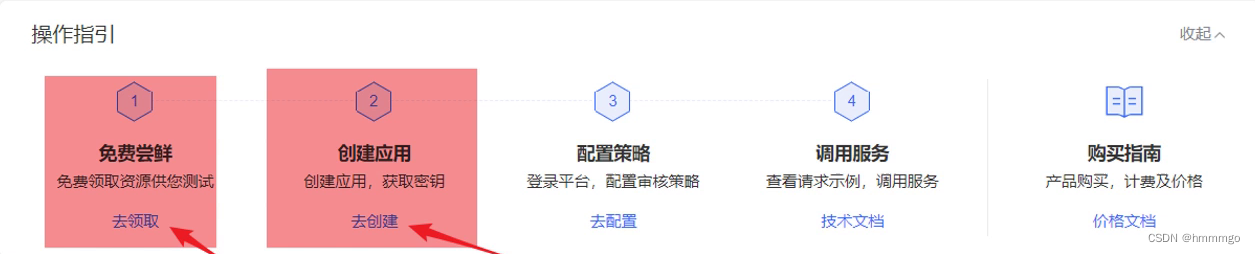
操作指引第一步-领取:
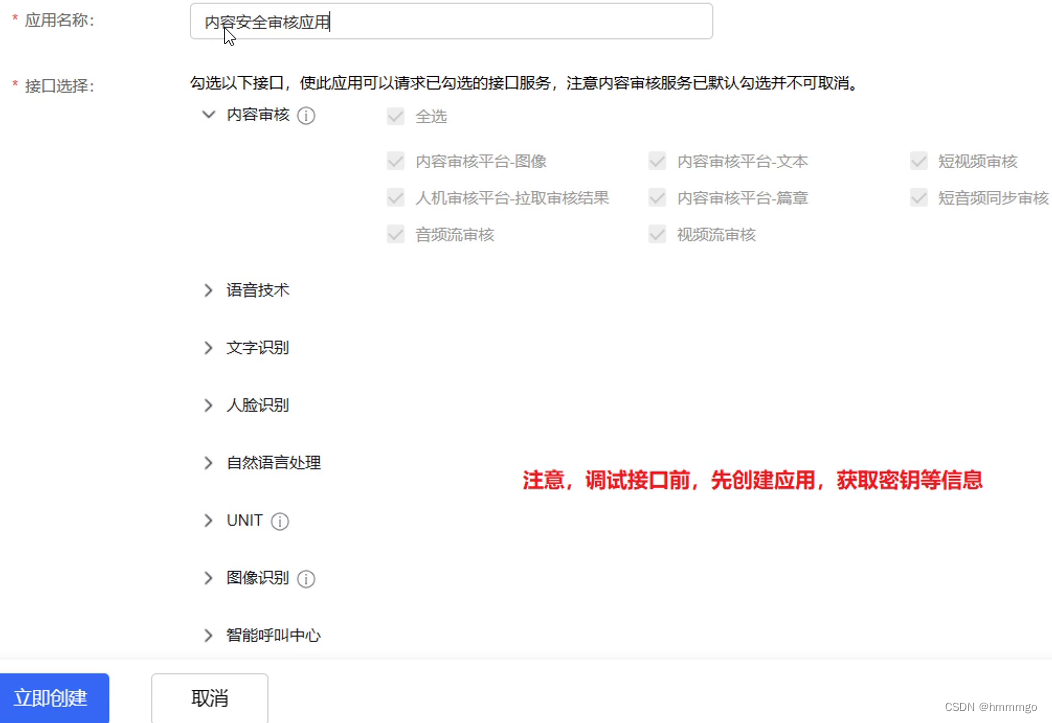
操作指引第2步-创建应用:
操作指引第2步-创建完应用后:
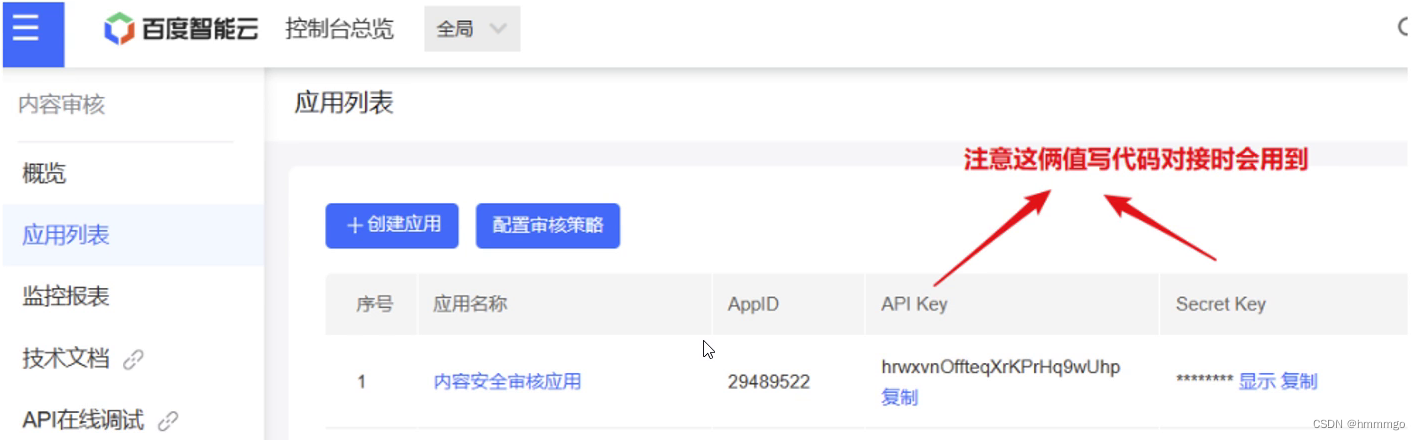
API Key:表示你是哪个客户端
Secret Key:加密时的密钥
7.2 百度云内容审核-文本审核接口在线调试

7.3 项目集成
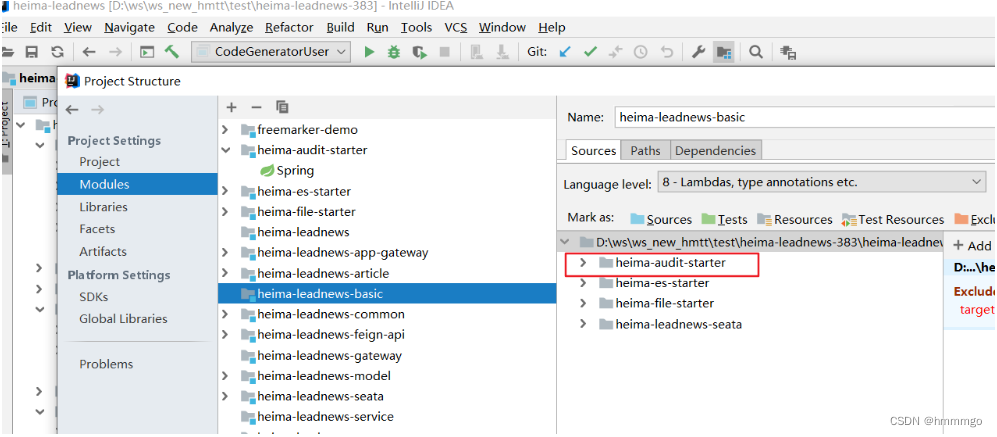
1、导入资料中heima-audit-starter模块到heima-leadnews-basic中
2、在heima-leadnews-wemedia的pom.xml添加依赖
<dependency>
    <groupId>com.heima</groupId>
    <artifactId>heima-audit-starter</artifactId>
    <version>1.0-SNAPSHOT</version>
</dependency>
3、在heima-leadnews-wemedia中的nacos配置中心添加配置:
baidu:
  apiKey: 你自己百度云的应用对应的API Key的值
  secretKey: 你自己百度云的应用对应的Secret Key的值
4、在wemedia中新建BaiduTest
@SpringBootTest
@RunWith(SpringRunner.class)
public class BaiduTest {


    @Autowired
    private FileStorageService fileStorageService;

    @Autowired
    private BaiduImageScan baiduImageScan;

    @Autowired
    private BaiduTextScan baiduTextScan;

    @Test
    public void testAuditImage() throws IOException {
        byte[] bytes  = fileStorageService.downLoadFile("http://192.168.200.130:9000/leadnews/2023/01/03/ak47.jpg");
        Integer result = baiduImageScan.imageScan(bytes);
        if(result==1){
            System.out.println("合规,内容安全");
        } else if(result==2){
            System.out.println("不合规,内容违规");
        } else if(result==3){
            System.out.println("疑似,内容不确定");
        } else {
            System.out.println("审核失败,出现问题");
        }
    }

    @Test
    public void testAuditText() {
        Integer result = baiduTextScan.textScan("我爱Java,我喜欢看技术类图书");
        if(result==1){
            System.out.println("合规,内容安全");
        } else if(result==2){
            System.out.println("不合规,内容违规");
        } else if(result==3){
            System.out.println("疑似,内容不确定");
        } else {
            System.out.println("审核失败,出现问题");
        }
    }
}
8、自媒体自动审核业务集成
8.1 自动审核流程编写
**准备:**提取全部文本和图片
审核文本:
如果审核过程中百度云返回2状态,修改文章为审核失败状态2,后续审核流程终止
如果审核过程中百度云返回3状态,修改文章为带人工审核状态3,后序审核流程终止
审核图片:
如果审核过程中百度云返回2状态,修改文章为审核失败状态2,后续审核流程终止
如果审核过程中百度云返回3状态,修改文章为带人工审核状态3,后序审核流程终止
审核全部通过:
如发布时间已到,创建APP文章(调用远程接口fegin),修改自媒体文章为已发布状态
如发布时间未到,修改自媒体文章为自动审核通过状态。
联调测试
8.2 在WmNewsServiceImpl类中实现自动审核业务
文章的审核应该是在提交文章后才进行文章的审核,而在文章保存为草稿状态下不用审核。
这段代码应该写在提交审核功能的接口,且文章状态不能是草稿。
public ResponseResult submitArticle(WmNewsDto wmNewsDto, Integer status) {
	// 前面的代码这里就不做赘述了
	...
	// 执行前提:当前必须是提交审核请求
	// 状态码为提交的状态码
	if (status.equals(WmNews.Status.SUBMIT.getCode())) {
		// 保存封面图片与文章的关系方法
		responseResult = this.saveRelationForCover(wmNewsDto, wmNews, contentImageList);
		// 如果responseResult的值为null的话,说明这个方法都执行完成了
		if (responseResult != null) {
			return responseResult;
		}
		// 第五部分:执行文章自动审核流程
		responseResult = auditWmNews(wmNews, contentImageList);
	}
	return ResponseResult.okResult(AppHttpCodeEnum.SUCCESS);
}
/**
 * 完成文章的自动审核
 *
 * @param wmNews
 * @param contentImageList
 * @return
 */
private ResponseResult auditWmNews(WmNews wmNews, List<String> contentImageList) {
	// 1. 准备待审核的数据(文本和图片地址列表)
	// 1.1 准备全部待审核的文本(标题+内容文本+标签)
	// 这里的prepareAllText方法是自定义的准备审核的所有文本的方法
	String allText = prepareAllText(wmNews);
	// 1.2 准备全部待审核的图片地址列表
	// 考虑到图片去重,用set集合存储
	// 自定义的准备所有审核图片的方法
	Set<String> allImage = prepareAllImage(wmNews, contentImageList);
	// 2. 百度云文本审核
	boolean flag = true;
	// 自定义的百度云文本审核方法
	flag = baiduTextScan(wmNews, allText);
	if (!flag) {
		return ResponseResult.errorResult(AppHttpCodeEnum.SERVER_ERROR, "百度云文本审核结果-违规或者不确定");
	}
	// 3. 百度云图片审核
	// 自定义的百度云图片审核方法
	flag = baiduImageScan(wmNews, allImage);
	if (!flag) {
		return ResponseResult.errorResult(AppHttpCodeEnum.SERVER_ERROR, "百度云图片审核结果-违规或者不确定");
	}
	// 4. 决定文章是否发布
	// 获取文章发布时间
	long publishTime = wmNews.getPublishTime().getTime();
	// 获取系统当前时间
	long currentTime = DateTime.now().getMillis();
	// 4.1 发布时间未到,修改文章状态为自动审核通过
	if (publishTime > currentTime) {
		wmNews.setStatus(WmNews.Status.SUCCESS.getCode());
		wmNews.setReason("发布时间未到,修改状态为自动审核通过");
		this.updateById(wmNews);
		return ResponseResult.okResult(AppHttpCodeEnum.SUCCESS);
	}
	// 4.2 发布时间未到,修改文章状态为已发布且调用Feign解耦创建或修改App文章
	// 4.2.2 调用Feign接口创建或修改app文章
	// 自定义的处理文章发布的方法
	ResponseResult responseResult = doArticlePublish(wmNews);
	if (responseResult != null) {
		return responseResult;
	}
	return ResponseResult.okResult(AppHttpCodeEnum.SUCCESS);
}
/**
 * 准备全部待审核的文本(标题+内容文本+标签)
 *	就是把wmnews的title、context、label相组合
 * @param wmNews
 * @return
 */
private String prepareAllText(WmNews wmNews) {
	StringBuffer allText = new StringBuffer();
	allText.append(wmNews.getTitle());    // 文本来源1:标题
	allText.append(wmNews.getLabels());    // 文本来源2:标签
	if (StringUtils.isNotBlank(wmNews.getContent())) {
		List<Map> mapList = JSON.parseArray(wmNews.getContent(), Map.class);
		if (CollectionUtils.isNotEmpty(mapList)) {
			for (Map<String, String> map : mapList) {
				String type = map.get("type");
				if (type.equals("text")) {
					String contextText = map.get("value");
					allText.append(contextText); // 文本来源3:内容文本
				}
			}
		}

	}
	// 返回类型为String类型
	return allText.toString();
}
/**
 * 准备全部待审核的图片地址列表
 *
 * @param wmNews
 * @param contentImageList
 * @return
 */
private Set<String> prepareAllImage(WmNews wmNews, List<String> contentImageList) {
	Set<String> allImage = new HashSet<>();
	allImage.addAll(contentImageList); // 图片地址来源1:内容图片地址列表
	// 获取封面图片
	if (StringUtils.isNotBlank(wmNews.getImages())) {
		String[] coverImageArr = wmNews.getImages().split(",");
		List<String> coverImageList = Arrays.asList(coverImageArr);
		allImage.addAll(coverImageList);    //图片地址来源2:封面图片地址列表
	}
	return allImage;
}

@Autowired
	private BaiduTextScan baiduTextScan;
/**
 * 百度云文本审核
 *
 * @param wmNews
 * @param allText
 * @return
 */
private boolean baiduTextScan(WmNews wmNews, String allText) {
	boolean flag = true;
	Integer type = baiduTextScan.textScan(allText);
	if (type == 2) {
		log.error("[文章自动审核]百度云文本审核结果-内容违规,文章ID:{}",wmNews.getId());
		flag = false;
		wmNews.setStatus(WmNews.Status.FAIL.getCode());
		wmNews.setReason("百度云文本审核结果-内容违规");
		this.updateById(wmNews);
	} else if (type == 3) {
		log.error("[文章自动审核]百度云文本审核结果-内容不确定,文章ID:{}",wmNews.getId());
		flag = false;
		wmNews.setStatus(WmNews.Status.ADMIN_AUTH.getCode());
		wmNews.setReason("百度云文本审核结果-内容不确定");
		this.updateById(wmNews);
	}
	return flag;
}

@Autowired
private BaiduImageScan baiduImageScan;
@Autowired
private FileStorageService fileStorageService;
/**
 * 百度云图片审核
 *
 * @param wmNews
 * @param allImage
 * @return
 */
private boolean baiduImageScan(WmNews wmNews, Set<String> allImage) {
	boolean flag = true;
	for (String image : allImage) {
		byte[] bytes = fileStorageService.downLoadFile(image);
		Integer type = baiduImageScan.imageScan(bytes);
		if (type == 2) {
			log.error("[图片自动审核]百度云图片审核结果-图片违规");
			flag = false;
			wmNews.setStatus(WmNews.Status.FAIL.getCode());
			wmNews.setReason("百度云图片审核结果-图片违规");
			this.updateById(wmNews);
		} else if (type == 3) {
			log.error("[图片自动审核]百度云图片审核结果-图片不确定");
			flag = false;
			wmNews.setStatus(WmNews.Status.ADMIN_AUTH.getCode());
			wmNews.setReason("百度云图片审核结果-图片不确定");
			this.updateById(wmNews);
		}
	}
	return flag;
}
@Autowired
private IArticleClient articleClient;
@Autowired
private WmChannelService wmChannelService;
@Autowired
private WmUserService wmUserService;
/**
 * 处理文章发布
 * @param wmNews
 * @return
 */
private ResponseResult doArticlePublish(WmNews wmNews) {
	// 4.2.1 修改文章状态
	wmNews.setStatus(WmNews.Status.PUBLISHED.getCode());
	wmNews.setReason("发布时间已到");
	this.updateById(wmNews);
	// 4.2.2 调用Feign接口创建或修改app文章
	// 构建dto数据
	ArticleDto dto = new ArticleDto();
	dto.setId(wmNews.getArticleId());
	dto.setTitle(wmNews.getTitle());
	dto.setContent(wmNews.getContent());
	dto.setLayout(wmNews.getType());
	dto.setImages(wmNews.getImages());
	dto.setPublishTime(wmNews.getPublishTime());
	// 如果app文章id为null,则说明是第一次创建文章,设置创建时间
	if (dto.getId() == null) {
		dto.setCreatedTime(wmNews.getCreatedTime());
	}
	dto.setChannelId(wmNews.getChannelId());
	WmChannel wmChannel = this.wmChannelService.getById(wmNews.getArticleId());
	if (wmChannel != null) {
		dto.setChannelName(wmChannel.getName());
	}
	WmUser wmUser = this.wmUserService.getById(wmNews.getUserId());
	if (wmUser != null) {
		dto.setAuthorId(wmUser.getApAuthorId().longValue());
		dto.setAuthorName(wmUser.getName());
	}
	// 调用feign接口创建或修改app文章
	ResponseResult responseResult = articleClient.saveOrUpdateApArticle(dto);
	if (responseResult.getCode() != 200) {
		throw new CustomException(AppHttpCodeEnum.INVOK_ARTICLE_FEIGN_FAIL);
	}
	// 取出feign接口响应结果中的app文章id更新到自媒体文章表中
	Long articleId = Long.valueOf(String.valueOf(responseResult.getData()));
	wmNews.setArticleId(articleId);
	this.updateById(wmNews);
	return null;
}
9、系统优化
在调用百度云进行文章审核的时候,feign的跨服务调用会出现阻塞,会造成前端用使用的影响。
9.1 同步调用和异步调用
同步:就是在发出一个调用时,在没有得到结果之前,该调用就不返回(实时处理)
异步:调用在发出之后,这个调用就直接返回,没有返回结果(分时处理)
9.2 异步线程池
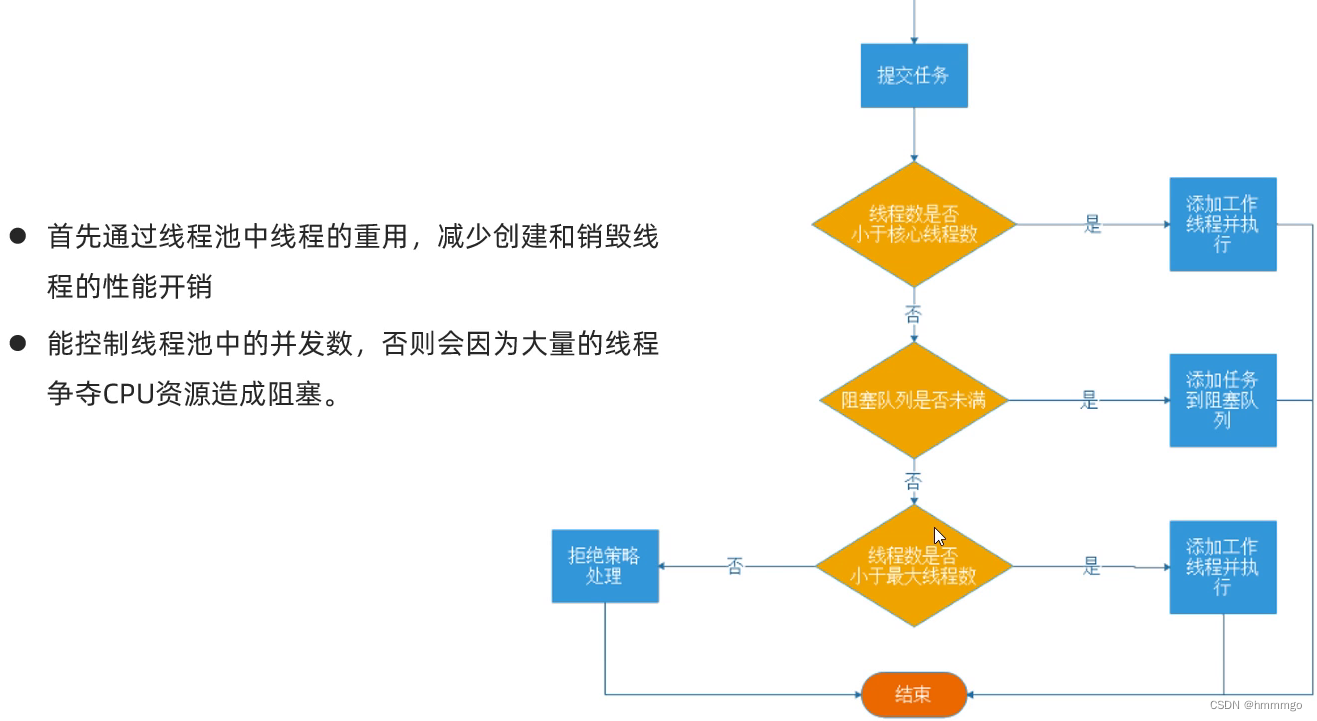
运行流程:
1、线程池创建,准备好 core 数量 的核心线程,准备接受任务
2、新的任务进来,用 core准备好的空闲线程执行
core满了,就将再进来的任务放入阻塞队列中,空闲的core就会自己去阻塞队列获取任务执行- 阻塞队列也满了,就直接开新线程去执行,最大只能开到
max指定的数量 max都执行好了,Max-core数量空闲的线程会在keepAliveTime指定的时间后自动销毁,终保持到core大小- 如果线程数开到了
max数量,还有新的任务进来,就会使用reject指定的拒绝策略进行处理
3、所有的线程创建都是由指定的 factory 创建的。
常见的 4 种线程池
newCacheThreadPool
创建一个可缓存的线程池,如果线程池长度超过需要,可灵活回收空闲线程,若无可回收,则新建线程
newFixedThreadPool
创建一个指定长度的线程池,可控制线程最大并发数,超出的线程会再队列中等待
newScheduleThreadPool
创建一个定长线程池,支持定时及周期性任务执行
newSingleThreadExecutor
创建一个单线程化的线程池,她只会用唯一的工作线程来执行任务,保证所有任务
注意:不要在生产环境中直接使用Executors创建线程,因为会出现OOM(内存溢出)的问题
说明: Executors返回的线程池对象的弊端如下:
1)FixedThreadPool和SingleThreadPool:
允许的请求队列长度为Integer.MAX_VALUE,可能会堆积大量的请求,从而导致OOM。
2)CachedThreadPool:
允许的创建爱你线程数量为Integer.MAX_VALUE,可能会创建大量的线程,从而导致OOM
9.3 SpringBoot集成异步线程调用
①:在线程池配置类中使用@EnableAsync注解开启异步调用
②:在自动审核的方法上加上@Async注解(标明要异步调用)
③:在文章发布成功后调用审核的方法
两个使用规范:
1、当成异步任务提交到线程池的任务,需要抽取到其他类去,不能再当前类出现,如果在调用方的类中出现,这个异步就不生效了
2、每个服务应该使用自己的线程池,不能共用,为了避免各线程之间造成互相影响这种现象,一个线程池出现问题,不能影响其他服务的线程池
9.4 优化代码实现
1、在wemedia服务中加入线程池配置类,并使用@EnableAsync注解标注
package com.heima.wemedia.config;

import org.springframework.context.annotation.Bean;
import org.springframework.context.annotation.Configuration;
import org.springframework.scheduling.annotation.EnableAsync;
import org.springframework.scheduling.concurrent.ThreadPoolTaskExecutor;

import java.util.concurrent.ThreadPoolExecutor;

@Configuration
@EnableAsync//开启异步调用
public class ThreadPoolConfig {

    private static final int corePoolSize = 10;   // 核心线程数(默认线程数)
    private static final int maxPoolSize = 100;   // 最大线程数
    private static final int keepAliveTime = 10;  // 允许线程空闲时间(单位:默认为秒)
    private static final int queueCapacity = 500; // 缓冲队列数

    /**
     * 默认异步线程池
     * @return
     */
    // 线程池的名称
    @Bean("taskExecutor")
    public ThreadPoolTaskExecutor taskExecutor(){
        ThreadPoolTaskExecutor pool = new ThreadPoolTaskExecutor();
        pool.setThreadNamePrefix("--------------全局线程池-----------------");
        pool.setCorePoolSize(corePoolSize);
        pool.setMaxPoolSize(maxPoolSize);
        pool.setKeepAliveSeconds(keepAliveTime);
        pool.setQueueCapacity(queueCapacity);
        // 直接在execute方法的调用线程中运行
        pool.setRejectedExecutionHandler(new ThreadPoolExecutor.CallerRunsPolicy());
        // 初始化
        pool.initialize();
        return pool;
    }

}
2、将业务中需要交给线程池异步处理的方法,抽取到别的接口中
新建业务接口-WmNewsAuditService
并且异步执行的方法,不需要返回值
package com.heima.wemedia.service;

import com.heima.model.wemedia.pojos.WmNews;
import java.util.List;

/**
 * @author tp
 * @since 2024/2/12 22:49
 */

public interface WmNewsAuditService {

	// 异步方法不需要返回值
	/**
	 * 异步审核的业务逻辑
	 * @param wmNews
	 * @param contentImageList
	 */
	void auditWmNews(WmNews wmNews, List<String> contentImageList);
}
3、将方法抽取到实现类中
package com.heima.wemedia.service.impl;

import com.alibaba.fastjson.JSON;
import com.baomidou.mybatisplus.core.toolkit.CollectionUtils;
import com.heima.apis.article.IArticleClient;
import com.heima.audit.baidu.BaiduImageScan;
import com.heima.audit.baidu.BaiduTextScan;
import com.heima.common.exception.CustomException;
import com.heima.file.service.FileStorageService;
import com.heima.model.article.dtos.ArticleDto;
import com.heima.model.common.dtos.ResponseResult;
import com.heima.model.common.enums.AppHttpCodeEnum;
import com.heima.model.wemedia.pojos.WmChannel;
import com.heima.model.wemedia.pojos.WmNews;
import com.heima.model.wemedia.pojos.WmUser;
import com.heima.wemedia.service.WmChannelService;
import com.heima.wemedia.service.WmNewsAuditService;
import com.heima.wemedia.service.WmNewsService;
import com.heima.wemedia.service.WmUserService;
import lombok.extern.slf4j.Slf4j;
import org.apache.commons.lang3.StringUtils;
import org.joda.time.DateTime;
import org.springframework.beans.factory.annotation.Autowired;
import org.springframework.scheduling.annotation.Async;
import org.springframework.stereotype.Service;

import java.util.*;
import java.util.concurrent.TimeUnit;

/**
 * @author tp
 * @since 2024/2/12 22:51
 */

@Service
@Slf4j
public class WnNewsAuditServiceImpl implements WmNewsAuditService {

	@Autowired
	private WmNewsService wmNewsService;
	@Override
	@Async("taskExecutor") // 将当前的方法当做异步任务提交到指定的线程池中
	public void auditWmNews(WmNews wmNews, List<String> contentImageList) {

		// try {
		// 	TimeUnit.SECONDS.sleep(10);	// 模拟高并发情况下,审核耗时超过10秒
		// } catch (InterruptedException e) {
		// 	throw new RuntimeException(e);
		// }
// 1. 准备待审核的数据(文本和图片地址列表)
		// 1.1 准备全部待审核的文本(标题+内容文本+标签)
		String allText = prepareAllText(wmNews);
		// 1.2 准备全部待审核的图片地址列表
		// 考虑到图片去重,用set集合存储
		Set<String> allImage = prepareAllImage(wmNews, contentImageList);

		// 2. 百度云文本审核
		boolean flag = true;
		flag = baiduTextScan(wmNews, allText);
		if (!flag) {
			return;
		}
		// 3. 百度云图片审核
		flag = baiduImageScan(wmNews, allImage);
		if (!flag) {
			return;
		}
		// 4. 决定文章是否发布
		// 获取文章发布时间
		long publishTime = wmNews.getPublishTime().getTime();
		// 获取系统当前时间
		long currentTime = DateTime.now().getMillis();
		// 4.1 发布时间未到,修改文章状态为自动审核通过
		if (publishTime > currentTime) {
			wmNews.setStatus(WmNews.Status.SUCCESS.getCode());
			wmNews.setReason("发布时间未到,修改状态为自动审核通过");
			this.wmNewsService.updateById(wmNews);
			return;
		}
		// 4.2 发布时间未到,修改文章状态为已发布且调用Feign解耦创建或修改App文章
		// 4.2.2 调用Feign接口创建或修改app文章
		doArticlePublish(wmNews);
	}

	@Autowired
	private IArticleClient articleClient;
	@Autowired
	private WmChannelService wmChannelService;
	@Autowired
	private WmUserService wmUserService;
	/**
	 * 处理文章发布
	 * @param wmNews
	 * @return
	 */
	private ResponseResult doArticlePublish(WmNews wmNews) {
		// 4.2.1 修改文章状态
		wmNews.setStatus(WmNews.Status.PUBLISHED.getCode());
		wmNews.setReason("发布时间已到");
		this.wmNewsService.updateById(wmNews);
		// 4.2.2 调用Feign接口创建或修改app文章
		// 构建dto数据
		ArticleDto dto = new ArticleDto();
		dto.setId(wmNews.getArticleId());
		dto.setTitle(wmNews.getTitle());
		dto.setContent(wmNews.getContent());
		dto.setLayout(wmNews.getType());
		dto.setImages(wmNews.getImages());
		dto.setPublishTime(wmNews.getPublishTime());
		// 如果app文章id为null,则说明是第一次创建文章,设置创建时间
		if (dto.getId() == null) {
			dto.setCreatedTime(wmNews.getCreatedTime());
		}
		dto.setChannelId(wmNews.getChannelId());
		WmChannel wmChannel = this.wmChannelService.getById(wmNews.getArticleId());
		if (wmChannel != null) {
			dto.setChannelName(wmChannel.getName());
		}
		WmUser wmUser = this.wmUserService.getById(wmNews.getUserId());
		if (wmUser != null) {
			dto.setAuthorId(wmUser.getApAuthorId().longValue());
			dto.setAuthorName(wmUser.getName());
		}
		// 调用feign接口创建或修改app文章
		ResponseResult responseResult = articleClient.saveOrUpdateApArticle(dto);
		if (responseResult.getCode() != 200) {
			throw new CustomException(AppHttpCodeEnum.INVOK_ARTICLE_FEIGN_FAIL);
		}
		// 取出feign接口响应结果中的app文章id更新到自媒体文章表中
		Long articleId = Long.valueOf(String.valueOf(responseResult.getData()));
		wmNews.setArticleId(articleId);
		this.wmNewsService.updateById(wmNews);
		return null;
	}

	@Autowired
	private BaiduImageScan baiduImageScan;
	@Autowired
	private FileStorageService fileStorageService;

	/**
	 * 百度云图片审核
	 *
	 * @param wmNews
	 * @param allImage
	 * @return
	 */
	private boolean baiduImageScan(WmNews wmNews, Set<String> allImage) {
		boolean flag = true;
		for (String image : allImage) {
			byte[] bytes = fileStorageService.downLoadFile(image);
			Integer type = baiduImageScan.imageScan(bytes);
			if (type == 2) {
				log.error("[图片自动审核]百度云图片审核结果-图片违规");
				flag = false;
				wmNews.setStatus(WmNews.Status.FAIL.getCode());
				wmNews.setReason("百度云图片审核结果-图片违规");
				this.wmNewsService.updateById(wmNews);
			} else if (type == 3) {
				log.error("[图片自动审核]百度云图片审核结果-图片不确定");
				flag = false;
				wmNews.setStatus(WmNews.Status.ADMIN_AUTH.getCode());
				wmNews.setReason("百度云图片审核结果-图片不确定");
				this.wmNewsService.updateById(wmNews);
			}
		}
		return flag;
	}

	@Autowired
	private BaiduTextScan baiduTextScan;

	/**
	 * 百度云文本审核
	 *
	 * @param wmNews
	 * @param allText
	 * @return
	 */
	private boolean baiduTextScan(WmNews wmNews, String allText) {
		boolean flag = true;
		Integer type = baiduTextScan.textScan(allText);
		if (type == 2) {
			log.error("[文章自动审核]百度云文本审核结果-内容违规,文章ID:{}",wmNews.getId());
			flag = false;
			wmNews.setStatus(WmNews.Status.FAIL.getCode());
			wmNews.setReason("百度云文本审核结果-内容违规");
			this.wmNewsService.updateById(wmNews);
		} else if (type == 3) {
			log.error("[文章自动审核]百度云文本审核结果-内容不确定,文章ID:{}",wmNews.getId());
			flag = false;
			wmNews.setStatus(WmNews.Status.ADMIN_AUTH.getCode());
			wmNews.setReason("百度云文本审核结果-内容不确定");
			this.wmNewsService.updateById(wmNews);
		}
		return flag;
	}


	/**
	 * 准备全部待审核的图片地址列表
	 *
	 * @param wmNews
	 * @param contentImageList
	 * @return
	 */
	private Set<String> prepareAllImage(WmNews wmNews, List<String> contentImageList) {
		Set<String> allImage = new HashSet<>();
		allImage.addAll(contentImageList); // 图片地址来源1:内容图片地址列表
		// 获取封面图片
		if (StringUtils.isNotBlank(wmNews.getImages())) {
			String[] coverImageArr = wmNews.getImages().split(",");
			List<String> coverImageList = Arrays.asList(coverImageArr);
			allImage.addAll(coverImageList);    //图片地址来源2:封面图片地址列表
		}
		return allImage;
	}

	/**
	 * 准备全部待审核的文本(标题+内容文本+标签)
	 *
	 * @param wmNews
	 * @return
	 */
	private String prepareAllText(WmNews wmNews) {
		StringBuffer allText = new StringBuffer();
		allText.append(wmNews.getTitle());    // 文本来源1:标题
		allText.append(wmNews.getLabels());    // 文本来源2:标签
		if (StringUtils.isNotBlank(wmNews.getContent())) {
			List<Map> mapList = JSON.parseArray(wmNews.getContent(), Map.class);
			if (CollectionUtils.isNotEmpty(mapList)) {
				for (Map<String, String> map : mapList) {
					String type = map.get("type");
					if (type.equals("text")) {
						String contextText = map.get("value");
						allText.append(contextText); // 文本来源3:内容文本
					}
				}
			}

		}
		return allText.toString();
	}
}
注入所需要的类,并且,因为异步执行的方法,不需要返回值,所以return;即可,并且将有返回值的方法,直接调用即可。
10、自媒体自动审核其他解决方案
为了节省成本,先在本地做审核,再去百度云审核。
10.1 本地文本审核-敏感词-过滤
为什么不做本地图片审核?
成本太大,要基于大数据、机器学习、数据挖掘、海量数据分析实现的。
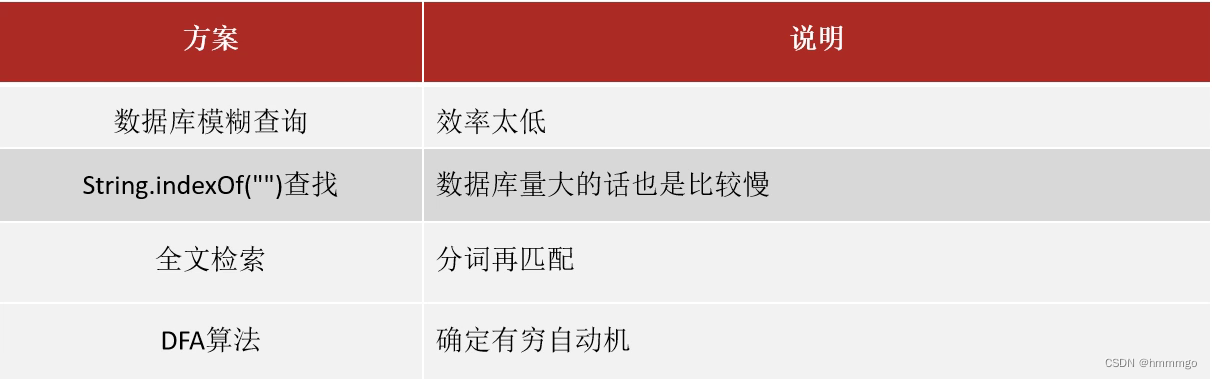
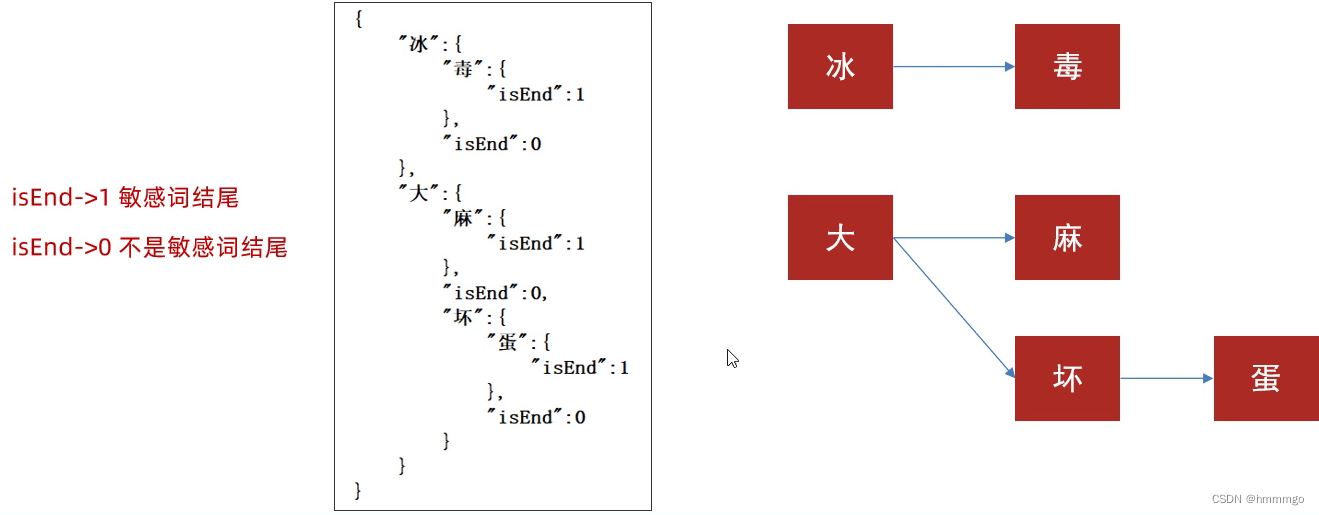
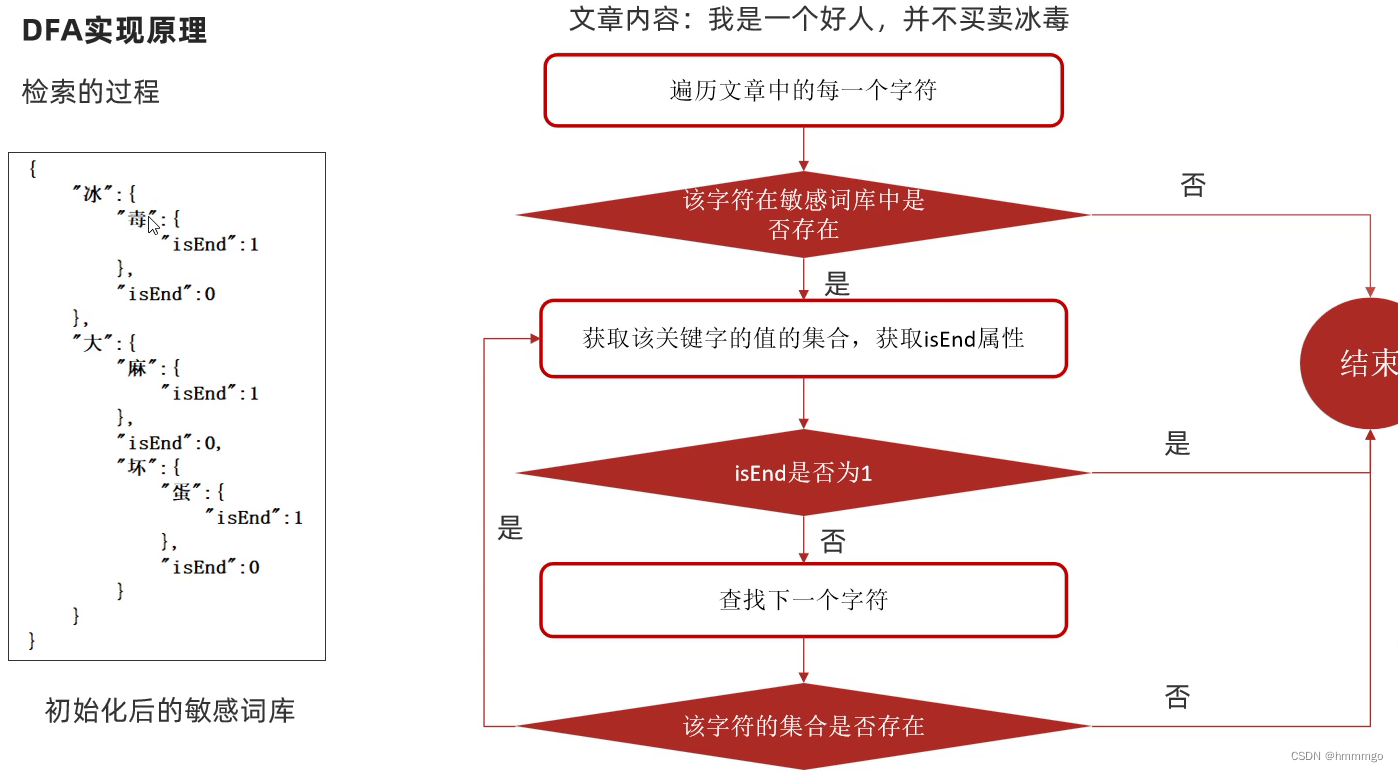
10.2 DFA实现原理
DFA全称为:Determininstic Finite Automaton,即确定有穷自动机。
存储:一次性的把所有的敏感词存储到了多个map中,就是下图的这种结构
10.3 自管理敏感词集成到文章审核中
在进行百度云文本审核前,加入DFA的审核代码
// 第一阶段审核:DFA文本审核
boolean flag = true;
flag = dfaTextScan(wmNews, allText);
if (!flag) {
	return;
}
@Autowired
	private WmSensitiveService wmSensitiveService;
	/**
	 * DFA文本审核
	 * @param wmNews
	 * @param allText
	 * @return
	 */
	private boolean dfaTextScan(WmNews wmNews, String allText) {
		// 1. 查询表中的全部敏感词
		List<WmSensitive> wmSensitiveList = wmSensitiveService.list(Wrappers.<WmSensitive>lambdaQuery().select(WmSensitive::getSensitives));
		List<String> sensitiveList = wmSensitiveList.stream().map(WmSensitive::getSensitives).collect(Collectors.toList());
		// 2. 初始化DFA词库
		SensitiveWordUtil.initMap(sensitiveList);
		// 3. 对文本进行审核
		Map<String, Integer> result = SensitiveWordUtil.matchWords(allText);
		// 4. 处理审核结果
		if (result.size() > 0) {
			wmNews.setStatus(WmNews.Status.FAIL.getCode());
			wmNews.setReason("DFA审核命中敏感词");
			wmNewsService.updateById(wmNews);
			return false;
		}
		return true;
	}
10.4 图片中文本识别技术-OCR
需求分析
文章中包含的图片要识别文字,过滤掉图片文字的敏感词
图片文字识别
什么是OCR?
OCR(Optical Character Recognition,光学字符识别)是指电子设备(例如扫描仪)检查纸上打印的字符,通过监测暗、亮的模式确定其形状,然后用字符识别方法将形状翻译成计算机文字的过程。
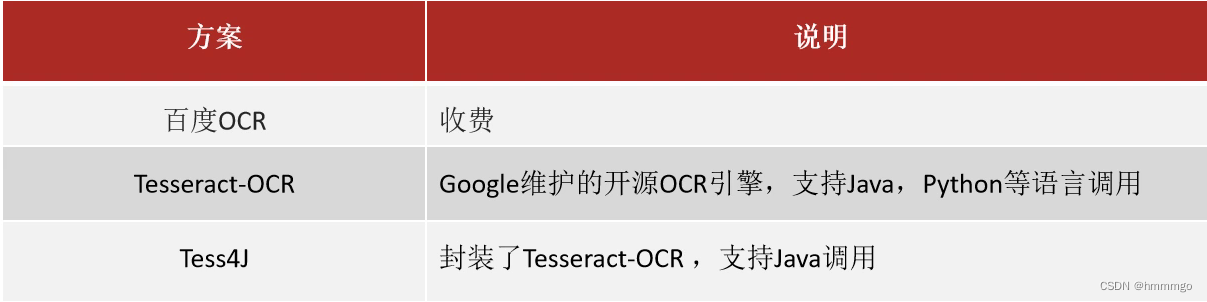
Tess4j案例
①在heima-audit-starter中创建工具类,简单封装一下tess4j
需要先导入pom
net.sourceforge.tess4j
tess4j
4.1.1
工具类
在spring.factories配置中添加该类,完整如下:
org.springframework.boot.autoconfigure.EnableAutoConfiguration=\
  com.heima.audit.baidu.BaiduTextScan,\
  com.heima.audit.baidu.BaiduImageScan,\
  com.heima.audit.tess4j.Tess4jClient
②:在heima-leadnews-wemedia中的配置中添加两个属性
tess4j:
  data-path: E:\workspace\tessdata
  language: chi_sim
③导入中文字体库,把资料中的tessdata文件拷贝到自己的工作空间下
④编写测试类进行测试
import com.heima.audit.tess4j.Tess4jClient;
import com.heima.file.service.FileStorageService;
import com.heima.wemedia.WemediaApplication;
import org.junit.Test;
import org.junit.runner.RunWith;
import org.springframework.beans.factory.annotation.Autowired;
import org.springframework.boot.test.context.SpringBootTest;
import org.springframework.test.context.junit4.SpringRunner;

import javax.imageio.ImageIO;
import java.awt.image.BufferedImage;
import java.io.ByteArrayInputStream;
import java.io.FileInputStream;

@SpringBootTest(classes = WemediaApplication.class)
@RunWith(SpringRunner.class)
public class Tess4jClientTest {

    @Autowired
    Tess4jClient tess4jClient;

    @Autowired
    FileStorageService fileStorageService;

    @Test
    public void upload() throws Exception {
        String uploadImgFile = fileStorageService.uploadImgFile("", "test.png", new FileInputStream("D:\\143.png"));
        System.out.println(uploadImgFile);
    }

    /**
     * 测试文本内容审核
     */
    @Test
    public void testScanText() throws Exception {

        byte[] bytes = fileStorageService.downLoadFile("http://192.168.200.130:9000/leadnews/2021/11/19/test.png");

        //图片识别文字审核---begin-----

        //从byte[]转换为butteredImage
        ByteArrayInputStream in = new ByteArrayInputStream(bytes);
        BufferedImage imageFile = ImageIO.read(in);
        //识别图片的文字
        String result = tess4jClient.doOCR(imageFile);
        System.out.println("图片文字识别结果 "+result);
    }
}
业务代码实现
在准备好的全部待审核的图片地址列表的代码下,加入:
// 识别所有图片中的文本,作为待审核文本的第四种来源
for (String imageUrl : allImage) {
	// 需要先通过地址去MinIO中下载图片
	byte[] bytes = fileStorageService.downLoadFile(imageUrl);
	//图片识别文字审核---begin-----
	//从byte[]转换为BufferedImage
	ByteArrayInputStream in = new ByteArrayInputStream(bytes);
	BufferedImage imageFile = null;
	try {
		// 转为BufferedImage
		imageFile = ImageIO.read(in);
		String result = tess4jClient.doOCR(imageFile);
		if (StringUtils.isNotBlank(result)){
			allText = allText + result;
		}
	} catch (Exception e) {
		throw new RuntimeException(e);
	}
}
11、app端文章详情页展示
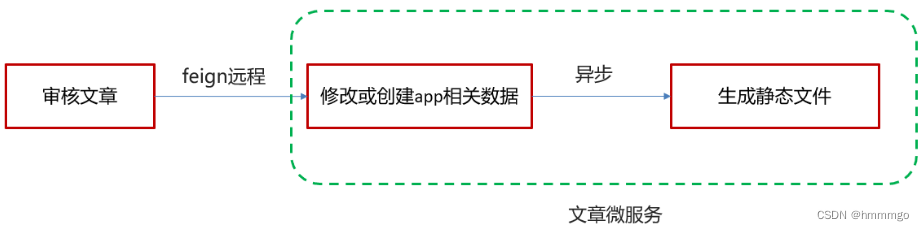
使用线程池异步生成详情页
①:添加线程池配置类
②:抽取方法到ApArticleHtmlService接口中
package com.heima.article.service;

import com.heima.model.article.pojos.ApArticle;

/**
 * @author tp
 * @since 2024/2/13 14:01
 */
public interface ApArticleHtmlService {
	/**
	 * 异步生成文章页
	 * @param apArticle
	 * @param contentStr
	 */
	void  generatorHtml(ApArticle apArticle, String contentStr);
}
③:实现接口
package com.heima.article.service.impl;

import com.alibaba.fastjson.JSONArray;
import com.baomidou.mybatisplus.core.toolkit.Wrappers;
import com.heima.article.service.ApArticleHtmlService;
import com.heima.article.service.ApArticleService;
import com.heima.file.service.FileStorageService;
import com.heima.model.article.pojos.ApArticle;
import com.heima.model.article.pojos.ApArticleContent;
import freemarker.template.Configuration;
import freemarker.template.Template;
import freemarker.template.TemplateException;
import lombok.extern.slf4j.Slf4j;
import org.apache.commons.collections.map.HashedMap;
import org.springframework.beans.factory.annotation.Autowired;
import org.springframework.scheduling.annotation.Async;
import org.springframework.stereotype.Service;

import java.io.ByteArrayInputStream;
import java.io.IOException;
import java.io.StringWriter;
import java.nio.charset.StandardCharsets;
import java.util.Map;

/**
 * @author tp
 * @since 2024/2/13 14:02
 */

@Slf4j
@Service
public class ApArticleHtmlServiceImpl implements ApArticleHtmlService {

	@Autowired
	private Configuration configuration;

	@Autowired
	private FileStorageService fileStorageService;

	@Autowired
	private ApArticleService apArticleService;

	@Async("taskExecutor")
	@Override
	public void generatorHtml(ApArticle apArticle, String contentStr) {
		//1.2 将content字符串转为数组对象
		JSONArray content = JSONArray.parseArray(contentStr);

		//1.3 将数组对象封装到MAP中
		Map data = new HashedMap();
		data.put("content",content);


		//2. 使用template生成详情页数据到输出流
		//2.1 构建空的输出流
		try {
			StringWriter out = new StringWriter();
			//2.2 使用configuration获取template对象
			Template template = configuration.getTemplate("article.ftl");
			//2.3 生成数据写入到输出流
			template.process(data,out);

			//3. 使用fileStorageService将文件输入流上传,得到URL
			//3.1 将输出流转为输入流
			ByteArrayInputStream in = new ByteArrayInputStream(out.toString().getBytes(StandardCharsets.UTF_8));

			//3.2 上传输入流获取URL
			String url = fileStorageService.uploadHtmlFile("", apArticle.getId() + ".html", in);

			//4.更新URL到ap_article表
			ApArticle apArticleDB = new ApArticle();
			apArticleDB.setId(apArticle.getId()); //更新条件
			apArticleDB.setStaticUrl(url); //更新的内容
			boolean result = apArticleService.updateById(apArticleDB);// update ap_article set static_url=? where id=?
			log.info("[异步生成文章详情页]结果:{}",result);
		} catch (IOException e) {
			e.printStackTrace();
		} catch (TemplateException e) {
			e.printStackTrace();
		}

	}
}
④:在ApArticleServiceImpl类中调用方法
在文章创建或更新的代码后,在返回结果的代码前,加入
// 异步生成文章详情页
		apArticleHtmlService.generatorHtml(apArticle,dto.getContent());
12、分布式事务的控制
12.1 Seata Server端环境准备
1、seata配置文件
registry.conf 对应配置如下:
registry {
  # file 、nacos 、eureka、redis、zk、consul、etcd3、sofa
  # 指定注册中心类型,这里使用 file 类型
  type = "file"
  # 各种注册中心的配置
  nacos {
    application = "seata-server"
    serverAddr = "127.0.0.1:8848"
    group = "SEATA_GROUP"
    namespace = ""
    cluster = "default"
    username = ""
    password = ""
  }
  eureka {
    serviceUrl = "http://localhost:8761/eureka"
    application = "default"
    weight = "1"
  }
  redis {
    serverAddr = "localhost:6379"
    db = 0
    password = ""
    cluster = "default"
    timeout = 0
  }
  zk {
    cluster = "default"
    serverAddr = "127.0.0.1:2181"
    sessionTimeout = 6000
    connectTimeout = 2000
    username = ""
    password = ""
  }
  consul {
    cluster = "default"
    serverAddr = "127.0.0.1:8500"
  }
  etcd3 {
    cluster = "default"
    serverAddr = "http://localhost:2379"
  }
  sofa {
    serverAddr = "127.0.0.1:9603"
    application = "default"
    region = "DEFAULT_ZONE"
    datacenter = "DefaultDataCenter"
    cluster = "default"
    group = "SEATA_GROUP"
    addressWaitTime = "3000"
  }
  file {
    name = "file.conf"
  }
}
# 配置文件方式,可以支持 file、nacos 、apollo、zk、consul、etcd3
config {
  # file、nacos 、apollo、zk、consul、etcd3
  type = "file"

  nacos {
    serverAddr = "127.0.0.1:8848"
    namespace = ""
    group = "SEATA_GROUP"
    username = ""
    password = ""
  }
  consul {
    serverAddr = "127.0.0.1:8500"
  }
  apollo {
    appId = "seata-server"
    apolloMeta = "http://192.168.1.204:8801"
    namespace = "application"
  }
  zk {
    serverAddr = "127.0.0.1:2181"
    sessionTimeout = 6000
    connectTimeout = 2000
    username = ""
    password = ""
  }
  etcd3 {
    serverAddr = "http://localhost:2379"
  }
  file {
    name = "file.conf"
  }
}
这个文件主要配置两个内容:
- 注册中心的类型及地址,本例我们选择file做注册中心
- 配置中心的类型及地址,本例我们选择本地文件做配置,就是当前目录的file.conf文件
file.conf 配置文件:
transport {
  # tcp udt unix-domain-socket
  type = "TCP"
  #NIO NATIVE
  server = "NIO"
  #enable heartbeat
  heartbeat = true
  #thread factory for netty
  thread-factory {
    boss-thread-prefix = "NettyBoss"
    worker-thread-prefix = "NettyServerNIOWorker"
    server-executor-thread-prefix = "NettyServerBizHandler"
    share-boss-worker = false
    client-selector-thread-prefix = "NettyClientSelector"
    client-selector-thread-size = 1
    client-worker-thread-prefix = "NettyClientWorkerThread"
    # netty boss thread size,will not be used for UDT
    boss-thread-size = 1
    #auto default pin or 8
    worker-thread-size = 8
  }
}

service {
  # 修改vgroup_mapping
  #vgroup->rgroup【注意这里的分组名为heima_leadnews_tx_group】
  vgroup_mapping.heima_leadnews_tx_group = "default"

  #only support single node
  #修改连接TC Seata server 端地址【注意修改这里seata服务端的地址】
  default.grouplist = "192.168.200.130:8091"

  #degrade current not support
  enableDegrade = false
  #disable
  disable = false
}
## transaction log store, only used in seata-server
store {
  ## store mode: file、db、redis
  mode = "file"

  ## file store property
  file {
    ## store location dir
    dir = "sessionStore"
    # branch session size , if exceeded first try compress lockkey, still exceeded throws exceptions
    maxBranchSessionSize = 16384
    # globe session size , if exceeded throws exceptions
    maxGlobalSessionSize = 512
    # file buffer size , if exceeded allocate new buffer
    fileWriteBufferCacheSize = 16384
    # when recover batch read size
    sessionReloadReadSize = 100
    # async, sync
    flushDiskMode = async
  }

  ## database store property
  db {
    ## the implement of javax.sql.DataSource, such as DruidDataSource(druid)/BasicDataSource(dbcp)/HikariDataSource(hikari) etc.
    datasource = "druid"
    ## mysql/oracle/postgresql/h2/oceanbase etc.
    dbType = "mysql"
    driverClassName = "com.mysql.jdbc.Driver"
    url = "jdbc:mysql://127.0.0.1:3306/restkeeper_seata"
    user = "root"
    password = "root"
    minConn = 5
    maxConn = 30
    globalTable = "global_table"
    branchTable = "branch_table"
    lockTable = "lock_table"
    queryLimit = 100
    maxWait = 5000
  }

  ## redis store property
  redis {
    host = "127.0.0.1"
    port = "6379"
    password = ""
    database = "0"
    minConn = 1
    maxConn = 10
    queryLimit = 100
  }

}
2、seata server启动
12.2 项目集成seata
如果使用docker安装并且使用的是默认的 file 模式只需要运行docker命令即可:
如无容器则创建容器:
docker run --name seata --restart=always -p 8091:8091 -e SEATA_IP=192.168.200.130 -e SEATA_PORT=8091 -id seataio/seata-server:1.3.0
如有容器则启动:
docker start seata
查看日志
docker logs -f seata
1、创建日志表undo_log
分别在leadnews_article、leadnews_wemedia两个库中都创建undo_log表
注意此处seata版本是0.7.0+ 增加字段 context
CREATE TABLE `undo_log`
(
    `id`            BIGINT(20)   NOT NULL AUTO_INCREMENT,
    `branch_id`     BIGINT(20)   NOT NULL,
    `xid`           VARCHAR(100) NOT NULL,
    `context`       VARCHAR(128) NOT NULL,
    `rollback_info` LONGBLOB     NOT NULL,
    `log_status`    INT(11)      NOT NULL,
    `log_created`   DATETIME     NOT NULL,
    `log_modified`  DATETIME     NOT NULL,
    `ext`           VARCHAR(100) DEFAULT NULL,
    PRIMARY KEY (`id`),
    UNIQUE KEY `ux_undo_log` (`xid`, `branch_id`)
) ENGINE = InnoDB
  AUTO_INCREMENT = 1
  DEFAULT CHARSET = utf8;
2、导入依赖包
因为有多个工程都需要引入seata,建立 heima-leadnews-basic 基础模块 pom 打包,在heima-leadnews-basic 下新建一个工程heima-leadnews-seata专门来处理分布式事务
<dependencies>
    <dependency>
        <groupId>com.heima</groupId>
        <artifactId>heima-leadnews-common</artifactId>
    </dependency>
    <dependency>
        <groupId>com.alibaba.cloud</groupId>
        <artifactId>spring-cloud-starter-alibaba-seata</artifactId>
        <version>2.1.0.RELEASE</version>
    </dependency>
    <dependency>
        <groupId>io.seata</groupId>
        <artifactId>seata-all</artifactId>
        <version>1.3.0</version>
        <exclusions>
            <exclusion>
                <groupId>com.alibaba</groupId>
                <artifactId>druid</artifactId>
            </exclusion>
        </exclusions>
    </dependency>
    <dependency>
        <groupId>com.alibaba</groupId>
        <artifactId>druid</artifactId>
        <version>1.1.21</version>
    </dependency>
</dependencies>
3、创建代理数据源
因为多个工程都需要依赖与seata,所以在heima-leadnews-seata模块下创建seata的配置类
package com.heima.seata.config;

import com.alibaba.druid.pool.DruidDataSource;
import com.baomidou.mybatisplus.autoconfigure.MybatisPlusProperties;
import com.baomidou.mybatisplus.core.MybatisConfiguration;
import com.baomidou.mybatisplus.core.parser.ISqlParser;
import com.baomidou.mybatisplus.extension.parsers.BlockAttackSqlParser;
import com.baomidou.mybatisplus.extension.plugins.PaginationInterceptor;
import com.baomidou.mybatisplus.extension.spring.MybatisSqlSessionFactoryBean;
import io.seata.rm.datasource.DataSourceProxy;
import org.apache.ibatis.plugin.Interceptor;
import org.mybatis.spring.transaction.SpringManagedTransactionFactory;
import org.springframework.boot.context.properties.ConfigurationProperties;
import org.springframework.boot.context.properties.EnableConfigurationProperties;
import org.springframework.context.annotation.Bean;
import org.springframework.context.annotation.Configuration;
import org.springframework.context.annotation.Primary;
import org.springframework.core.io.support.PathMatchingResourcePatternResolver;

import javax.sql.DataSource;
import java.util.ArrayList;
import java.util.List;

@Configuration
@EnableConfigurationProperties({MybatisPlusProperties.class})
public class DataSourcesProxyConfig {

    @Bean
    @ConfigurationProperties(prefix = "spring.datasource")
    public DataSource druidDataSource() {
        return new DruidDataSource();
    }
    //创建代理数据源

    @Primary//@Primary标识必须配置在代码数据源上,否则本地事务失效
    @Bean
    public DataSourceProxy dataSourceProxy(DataSource druidDataSource) {
        return new DataSourceProxy(druidDataSource);
    }

    private MybatisPlusProperties properties;

    public DataSourcesProxyConfig(MybatisPlusProperties properties) {
        this.properties = properties;
    }

    //替换SqlSessionFactory的DataSource
    @Bean
    public MybatisSqlSessionFactoryBean sqlSessionFactory(DataSourceProxy dataSourceProxy) throws Exception {

        // 这里必须用 MybatisSqlSessionFactoryBean 代替了 SqlSessionFactoryBean,否则 MyBatisPlus 不会生效
        MybatisSqlSessionFactoryBean mybatisSqlSessionFactoryBean = new MybatisSqlSessionFactoryBean();
        mybatisSqlSessionFactoryBean.setDataSource(dataSourceProxy);
        mybatisSqlSessionFactoryBean.setTransactionFactory(new SpringManagedTransactionFactory());

        mybatisSqlSessionFactoryBean.setMapperLocations(new PathMatchingResourcePatternResolver()
                .getResources("classpath*:/mapper/*.xml"));

        MybatisConfiguration configuration = this.properties.getConfiguration();
        if(configuration == null){
            configuration = new MybatisConfiguration();
        }
        mybatisSqlSessionFactoryBean.setConfiguration(configuration);

        // 设置分页插件****
        MybatisPlusInterceptor mybatisPlusInterceptor = new MybatisPlusInterceptor();
        mybatisPlusInterceptor.addInnerInterceptor(new PaginationInnerInterceptor());
        Interceptor[] plugins = { mybatisPlusInterceptor };
        mybatisSqlSessionFactoryBean.setPlugins( plugins );

        return mybatisSqlSessionFactoryBean;
    }
}
在 resources 目录下创建 META-INF/spring.factories 配置文件
org.springframework.boot.autoconfigure.EnableAutoConfiguration=\
com.heima.seata.config.DataSourcesProxyConfig
4、配置seata-server链接和注册中心信息
将上述讲解的file.conf和registry.conf 配置文件直接复制到 heima-leadnews-seata微服务的 resources 目录下。
具体结构如下:
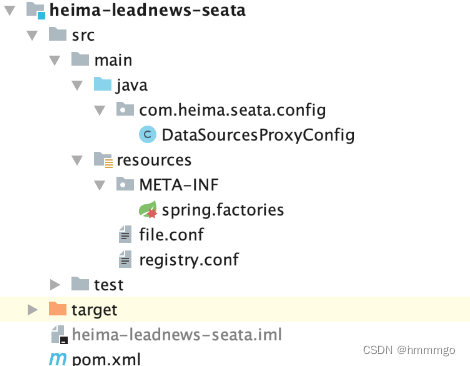
5、指定事务分组
分别在heima-leadnews-article、heima-leadnews-wemedia微服务的application.yml文件中添加如下配置:
spring:
  cloud:
    alibaba:
      seata:
        tx-service-group: heima_leadnews_tx_group
  autoconfigure:
  	# 要排除掉springboot自带的数据源配置
    exclude: org.springframework.boot.autoconfigure.jdbc.DataSourceAutoConfiguration
- 配置 tx 事务分组名称需要和 heima-leadnews-seata 配置文件的分组保持一致
- 排除SpringBoot的 数据库的自动化配置类
6、添加注解@GlobalTransactional
分别在heima-leadnews-article、heima-leadnews-wemedia微服务的pom.xml文件中添加seata工程坐标:
<dependencies>
   <dependency>
        <groupId>com.heima</groupId>
        <artifactId>heima-leadnews-seata</artifactId>
        <version>1.0-SNAPSHOT</version>
    </dependency>
</dependencies>
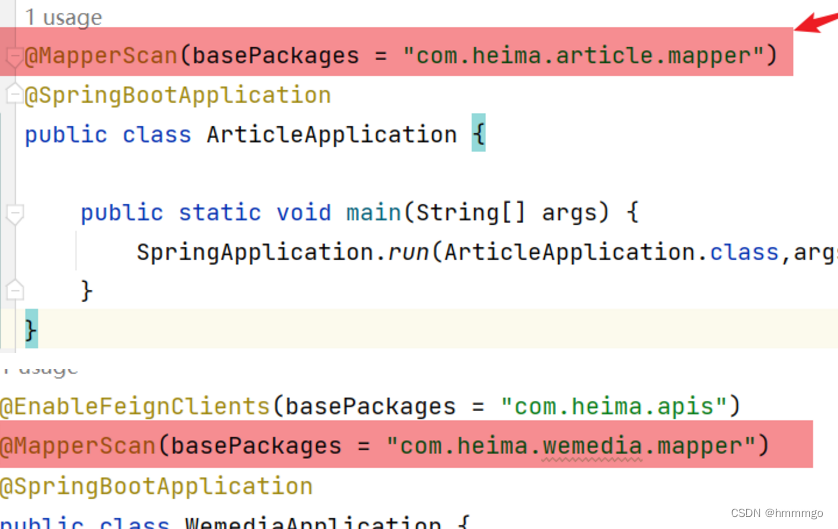
注意,此时@Mapper注解不起作用了,必须使用@MapperScan注解统一扫描Mapper,在启动类添加扫描:
在事务开启的地方、在被feign调用的方法上,并且只要是被调用里,出现了任何异步的方法,都要加上@GlobalTransactional注解
在WmNewsAuditServiceImpl类的auditWmNews方法上加上@GlobalTransactional注解
在ApArticleServiceImpl类的saveOrUpdateArticle方法上加上@GlobalTransactional注解
在ApArticleHtmlServiceImpl类的generatorHtml方法上加上@GlobalTransactional注解
7、测试
对应的微服务启动成功后观察 seata server 日志,执行命令docker logs --tail 100 -f seata:
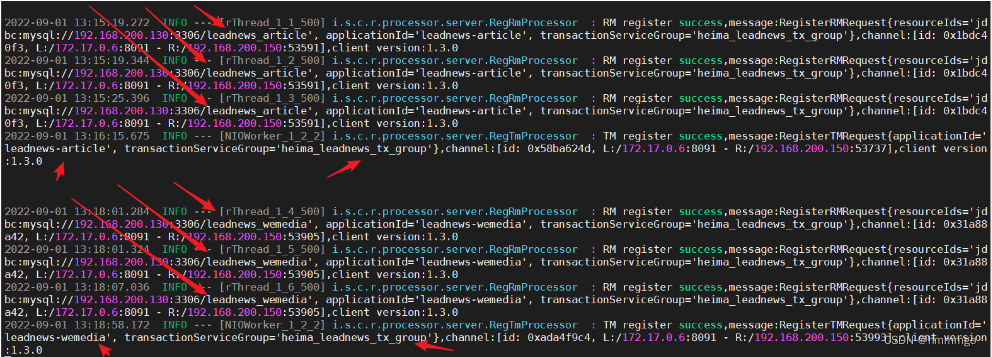
- 查看RM注册情况
- 查看发生异常后,有没有Rollback


 1409
1409


 被折叠的 条评论
为什么被折叠?
被折叠的 条评论
为什么被折叠?
 到【灌水乐园】发言


