一、编写验证码工具类
package yaq.util;

import java.awt.*;
import java.awt.image.BufferedImage;
import java.util.Random;

/**
 * @author scy 2018/9/4
 */
public class VerifyUtil {
    /**验证码字符集*/
    private static final char[] chars = {
            '0', '1', '2', '3', '4', '5', '6', '7', '8', '9',
            'a', 'b', 'c', 'd', 'e', 'f', 'g', 'h', 'i', 'j', 'k', 'l', 'm', 'n',
            'o', 'p', 'q', 'r', 's', 't', 'u', 'v', 'w', 'x', 'y', 'z',
            'A', 'B', 'C', 'D', 'E', 'F', 'G', 'H', 'I', 'J', 'K', 'L', 'M', 'N',
            'O', 'P', 'Q', 'R', 'S', 'T', 'U', 'V', 'W', 'X', 'Y', 'Z'};
    /**字符数量*/
    private static final int SIZE = 4;
    /**干扰线数量*/
    private static final int LINES = 5;
    /**宽度*/
    private static final int WIDTH = 80;
    /**高度*/
    private static final int HEIGHT = 40;
    /**字体大小*/
    private static final int FONT_SIZE = 30;

    /**
     * 生成随机验证码及图片
     * Object[0]:验证码字符串;
     * Object[1]:验证码图片。
     */
    public static Object[] createImage() {
        StringBuffer sb = new StringBuffer();
        // 1.创建空白图片
        BufferedImage image = new BufferedImage(
                WIDTH, HEIGHT, BufferedImage.TYPE_INT_RGB);
        // 2.获取图片画笔
        Graphics graphic = image.getGraphics();
        // 3.设置画笔颜色
        graphic.setColor(Color.LIGHT_GRAY);
        // 4.绘制矩形背景
        graphic.fillRect(0, 0, WIDTH, HEIGHT);
        // 5.画随机字符
        Random ran = new Random();
        for (int i = 0; i <SIZE; i++) {
            // 取随机字符索引
            int n = ran.nextInt(chars.length);
            // 设置随机颜色
            graphic.setColor(getRandomColor());
            // 设置字体大小
            graphic.setFont(new Font(
                    null, Font.BOLD + Font.ITALIC, FONT_SIZE));
            // 画字符
            graphic.drawString(
                    chars[n] + "", i * WIDTH / SIZE, HEIGHT*2/3);
            // 记录字符
            sb.append(chars[n]);
        }
        // 6.画干扰线
        for (int i = 0; i < LINES; i++) {
            // 设置随机颜色
            graphic.setColor(getRandomColor());
            // 随机画线
            graphic.drawLine(ran.nextInt(WIDTH), ran.nextInt(HEIGHT),
                    ran.nextInt(WIDTH), ran.nextInt(HEIGHT));
        }
        // 7.返回验证码和图片
        return new Object[]{sb.toString(), image};
    }

    /**
     * 随机取色
     */
    public static Color getRandomColor() {
        Random ran = new Random();
        Color color = new Color(ran.nextInt(256),
                ran.nextInt(256), ran.nextInt(256));
        return color;
    }
}
二、controller层使用
/**
 * 登录
 */
@RequestMapping("/login")
@ResponseBody
public Map<String,Boolean> handleLoginByArticleDetail(String userId, String password, String captcha, boolean check, HttpServletResponse response, HttpSession session) {
Map<String,Boolean> map=new HashMap<>();
    //得到验证码
    String imageCode = (String) session.getAttribute("imageCode");
    boolean isLogin=false;
    //校验验证码
    if(!imageCode.equals(captcha)){
        map.put("isCaptcha",false);
    }else{
        map.put("isCaptcha",true);
        //判断数据库是否存在该用户
        isLogin=userService.isUserExit(userId, password);
    }
    map.put("isLogin",isLogin);
    if (isLogin) {
        //处理登录
    }
    return map;
}

@ApiOperation("生成验证码")
@GetMapping("getCode")
public void getCode(HttpServletResponse response, HttpSession session) throws Exception{
    //利用图片工具生成图片
    //第一个参数是生成的验证码,第二个参数是生成的图片
    Object[] objs = VerifyUtil.createImage();
    //将验证码存入Session
    session.setAttribute("imageCode",objs[0]);

    //将图片输出给浏览器
    BufferedImage image = (BufferedImage) objs[1];
    response.setContentType("image/png");
    OutputStream os = response.getOutputStream();
    ImageIO.write(image, "png", os);
}
三、表单代码
<form role="form" id="form" action="#" method="post" enctype="multipart/form-data" onsubmit="return false">
    <div>
        <h3 style="position: center">帐号登录</h3>
    </div>
    <div class="form-group has-feedback">
        <span class="glyphicon glyphicon-user form-control-feedback"></span>
        <input type="text" class="form-control" name="userId" id="phoneForL" placeholder="请输入手机号码" value="${userId1}" required/>
    </div>
    <div class="form-group has-feedback">
        <span class=" glyphicon glyphicon-lock form-control-feedback"></span>
        <input type="password" class="form-control" name="password" id="pswForL" placeholder="请输入密码" value="${password}" required/>
    </div>
    <div class="form-group has-feedback">
        <input type="text" class="form-control" id="captchaForL1" placeholder="请输入验证码" style="width: 70%;display: inline;">
        <img id="loginform:vCode1" src="/getCode" style="display:inline;float: right;" title="看不清?点击换一张试试" onclick="javascript:document.getElementById('loginform:vCode1').src='/getCode?'+Math.random();"/>
    </div>
    <div class="checkbox">
        <label><input type="checkbox" name="check" checked title="选中后可保存密码,七天内直接登录"/>记住密码</label>
        <a data-toggle="modal" data-target="#register" href="" style="margin-left:145px">立即注册</a>
    </div>
    <input type="hidden" name="type" value="1">
    <button type="button" class="btn btn-default btn-success btn-block" onclick="login('phoneForL','pswForL','captchaForL1',1)">登录</button>
</form>
四、login.js(用了ajax)
function login(userIdID, pswID, captchaID, type) {
    var userId = document.getElementById(userIdID).value;
    var password = document.getElementById(pswID).value;
    var captcha = document.getElementById(captchaID).value;
    if (userId.length <= 0) {
        document.getElementById(userIdID).focus();
        return;
    } else if (password.length <= 0) {
        document.getElementById(pswID).focus();
        return;
    } else if (captcha.length <= 0) {
        document.getElementById(captchaID).focus();
        return;
    }
    var check = false;
    check = document.getElementsByName("check")[0].checked;
    $.ajax({
        type: "post",
        url: "/login",
        dataType: "json",
        data: {
            userId: userId,
            password: password,
            captcha: captcha,
            check: check
        },
        cache: false,
        success: function (result) {
            if (result["isLogin"]) {
                alert("登陆成功");
            } else {
                var message = (result["isCaptcha"] ? "账号或密码错误" : "验证码错误");
                alert(message);
                if (result["isCaptcha"]) {
                    document.getElementById("phoneForL").focus();
                    //刷新验证码
                    document.getElementById("loginform:vCode1").click();
                } else {
                    document.getElementById("captchaForL1").focus();
                }
            }
        },
        error: function () {
            alert("出现异常");
        }
    });
}
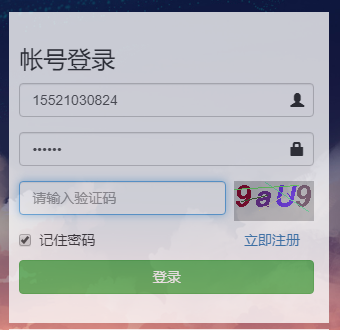
五、页面展示
参考链接:http://www.cnblogs.com/thcy1314/p/9585268.html


 1544
1544


 被折叠的 条评论
为什么被折叠?
被折叠的 条评论
为什么被折叠?
 到【灌水乐园】发言


