


 本文记录了Spring Cloud的初步学习过程,包括搭建微服务架构、配置中心、注册中心、业务服务A和B、服务网关,以及如何进行服务间调用和部署到Linux系统。详细介绍了每个步骤的配置和代码实现。
在网上找了一篇文章,然后跟着编写实例,本着学习的态度,没有去直接下载作者的源码,而是自建工程,复制文章中的代码块。
文章: https://www.jianshu.com/p/7293b148028f
完成编码后,系统无法启动,会出现一些错误,然后针对问题百度查询解决方案。 最终功夫不负有心人,完成了我的第一个spring cloud实例,并成功部署到linux服务器 上
1. 搭建典型微服务架构
创建一个Maven父项目spring-cloud-examples,用于管理项目依赖包版本
pom.xml配置如下:
    <parent>
        <groupId>org.springframework.boot</groupId>
        <artifactId>spring-boot-starter-parent</artifactId>
        <version>2.1.4.RELEASE</version>
    </parent>

    <properties>
        <spring.boot.version>2.1.4.RELEASE</spring.boot.version>
        <spring.cloud.version>Greenwich.SR1</spring.cloud.version>
        <lombok.version>1.18.8</lombok.version>
        <maven.compiler.plugin.version>3.8.1</maven.compiler.plugin.version>
    </properties>


    <dependencyManagement>
        <dependencies>
            <dependency>
                <groupId>org.springframework.cloud</groupId>
                <artifactId>spring-cloud-dependencies</artifactId>
                <version>${spring.cloud.version}</version>
                <type>pom</type>
                <scope>import</scope>
            </dependency>
        </dependencies>
    </dependencyManagement>
2. 搭建服务配置中心
- 在
spring-cloud-examples项目下创建一个子项目spring-cloud-example-config,添加Spring Cloud Config Server端的相关依赖包:
        <dependencies>
		<dependency>
			<groupId>org.springframework.cloud</groupId>
			<artifactId>spring-cloud-config-server</artifactId>
		</dependency>
	</dependencies>

	<build>
		<finalName>spring-cloud-example-config</finalName>
		<defaultGoal>compile</defaultGoal>

		<plugins>
			<plugin>
				<groupId>org.springframework.boot</groupId>
				<artifactId>spring-boot-maven-plugin</artifactId>
				<configuration>
					<executable>true</executable>
				</configuration>
			</plugin>
		</plugins>
</build>- 添加Spring Boot配置文件
application.yml,配置如下:
spring:
  application:
    name: spring-cloud-example-config
  profiles:
    active: native #启用本地配置文件
  cloud:
    config:
      server:
        native:
          search-locations: classpath:/configs/ #配置文件扫描目录
server:
port: 8000 #服务端口- 启动类添加注解
@EnableConfigServer通过启用Config Server服务。
package org.spring.cloud.example.config;

import org.springframework.boot.SpringApplication;
import org.springframework.boot.autoconfigure.SpringBootApplication;
import org.springframework.cloud.config.server.EnableConfigServer;

@SpringBootApplication
@EnableConfigServer
public class App
{
    public static void main( String[] args )
    {
    	SpringApplication.run(App.class, args);
    }
}
3. 搭建服务注册中心
- 在
spring-cloud-examples项目下创建一个子项目spring-cloud-example-registry,在pom.xml中添加Eureka Server相关依赖包:
  <dependencies>
    <dependency>
        <groupId>org.springframework.cloud</groupId>
        <artifactId>spring-cloud-netflix-eureka-server</artifactId>
    </dependency>

    <dependency>
        <groupId>org.springframework.cloud</groupId>
        <artifactId>spring-cloud-starter-config</artifactId>
    </dependency>
  </dependencies>

  <build>
		<finalName>spring-cloud-example-registry</finalName>
		<defaultGoal>compile</defaultGoal>
		<resources>
            <resource>
                <directory>src/main/java</directory>
                <includes>
                    <include>**/*.properties</include>
                    <include>**/*.xml</include>
                </includes>
                <filtering>false</filtering>
            </resource>
            <resource>
                <directory>src/main/resource</directory>
            </resource>
        </resources>
		<plugins>
			<plugin>
		        <groupId>org.springframework.boot</groupId>
		        <artifactId>spring-boot-maven-plugin</artifactId>
		        <configuration>
		            <executable>true</executable>
		        </configuration>
	    	</plugin>
		</plugins>
</build>-
在
spring-cloud-example-config配置中心项目的src/main/resource/configs目录下添加一个服务配置文件spring-cloud-example-registry.yml,配置如下:
spring:
  application:
    name: spring-cloud-example-registry

# Eureka相关配置
eureka:
  client:
    register-with-eureka: false #不注册服务
    fetch-registry: false #不拉去服务清单
    serviceUrl:
      defaultZone: http://localhost:${server.port}/eureka/ #多个通过英文逗号分隔
  instance:
    hostname: localhost
server:
port: 8001-
在
spring-cloud-example-registry项目的src/main/resource/目录添加bootstrap.yml配置文件,配置如下:
spring:
  cloud:
    config:
      name: spring-cloud-example-registry #配置文件名称,多个通过逗号分隔
      uri: http://localhost:8000 #Config Server服务地址
server:
  port: 8001
eureka:
  instance:
    hostname: localhost
  client:
    register-with-eureka: false #是否将eureka自身作为应用注册到eureka注册中心
    fetch-registry: false #为true时,可以启动,但报异常:Cannot execute request on any known server
    serviceUrl:
      defaultZone: http://${eureka.instance.hostname}:${server.port}/eureka/
-
启动类添加注解
@EnableEurekaServer通过启用Eureka Server服务
package org.spring.cloud.example.registry;

import org.springframework.boot.SpringApplication;
import org.springframework.boot.autoconfigure.SpringBootApplication;
import org.springframework.cloud.netflix.eureka.server.EnableEurekaServer;

@SpringBootApplication
@EnableEurekaServer
public class App
{
    public static void main( String[] args )
    {
    	SpringApplication.run(App.class, args);
    }
}
4. 搭建业务服务A
- 在
spring-cloud-examples项目下创建一个业务服务A的子项目spring-cloud-example-biz-a,在pom.xml中添加以下依赖包
  <dependencies>
    <!-- Spring Boot Web Starter -->
    <dependency>
        <groupId>org.springframework.boot</groupId>
        <artifactId>spring-boot-starter-web</artifactId>
    </dependency>

    <!-- feign -->
    <dependency>
        <groupId>org.springframework.cloud</groupId>
        <artifactId>spring-cloud-starter-openfeign</artifactId>
    </dependency>

    <!-- Eureka Client Starter -->
    <dependency>
        <groupId>org.springframework.cloud</groupId>
        <artifactId>spring-cloud-starter-netflix-eureka-client</artifactId>
    </dependency>

    <!-- Config Client Starter -->
    <dependency>
        <groupId>org.springframework.cloud</groupId>
        <artifactId>spring-cloud-starter-config</artifactId>
    </dependency>

    <dependency>
            <groupId>org.springframework.cloud</groupId>
            <artifactId>spring-cloud-config-server</artifactId>
     </dependency>
  </dependencies>

  <build>
	<finalName>spring-cloud-example-biz-a</finalName>
	<defaultGoal>compile</defaultGoal>

	<plugins>
	    <plugin>
	        <groupId>org.springframework.boot</groupId>
	        <artifactId>spring-boot-maven-plugin</artifactId>
	        <configuration>
	            <executable>true</executable>
	        </configuration>
	    </plugin>
	</plugins>
</build>-
在
spring-cloud-example-config配置中心项目的src/main/resource/configs目录下添加一个服务配置文件spring-cloud-example-biz-a.yml,配置如下
spring:
  application:
    name: spring-cloud-example-biz-a

server:
  port: 8010

# Eureka相关配置
eureka:
  client:
    serviceUrl:
      defaultZone: http://localhost:8001/eureka/
  instance:
    lease-renewal-interval-in-seconds: 10      # 心跳时间,即服务续约间隔时间(缺省为30s)
    lease-expiration-duration-in-seconds: 60  # 发呆时间,即服务续约到期时间(缺省为90s)
    prefer-ip-address: true
instance-id: ${spring.application.name}:${spring.application.instance_id:${server.port}}-
在
spring-cloud-example-biz-a项目的src/main/resource/目录添加bootstrap.yml配置文件,配置如下
spring:
  application:
    name: spring-cloud-example-biz-a
  cloud:
    config:
      name: spring-cloud-example-biz-a #配置文件名称,多个通过逗号分隔
      uri: http://localhost:8000 #Config Server服务地址
server:
  port: 8010 #服务端口
eureka:
  instance:
    hostname: localhost
  client:
    serviceUrl:
defaultZone: http://localhost:8001/eureka/-
添加启动类
package org.spring.cloud.example.biz.a;

import org.springframework.boot.SpringApplication;
import org.springframework.boot.autoconfigure.SpringBootApplication;
import org.springframework.cloud.netflix.eureka.EnableEurekaClient;
import org.springframework.cloud.openfeign.EnableFeignClients;

@SpringBootApplication
@EnableEurekaClient
public class App
{
    public static void main( String[] args )
    {
    	SpringApplication.run(App.class, args);
    }
}
-
添加一个示例接口,代码参考
package org.spring.cloud.example.biz.a.controller;

import org.spring.cloud.example.biz.a.service.RemoteService;
import org.springframework.beans.factory.annotation.Autowired;
import org.springframework.web.bind.annotation.GetMapping;
import org.springframework.web.bind.annotation.RequestMapping;
import org.springframework.web.bind.annotation.RestController;

@RestController
@RequestMapping("/hello")
public class HelloController {

    /**
     * 示例方法
     *
     * @return
     */
    @GetMapping
    public String sayHello() {
        return "Hello,This is Biz-A Service.";
    }

}
5. 搭建业务服务B
参考上面业务服务A搭建另外一个业务服务B
- 在
spring-cloud-examples项目下创建一个业务服务B的子项目spring-cloud-example-biz-b,在pom.xml中添加以下依赖包
  <dependencies>
    <!-- Spring Boot Web Starter -->
    <dependency>
        <groupId>org.springframework.boot</groupId>
        <artifactId>spring-boot-starter-web</artifactId>
    </dependency>

    <!-- feign -->
    <dependency>
        <groupId>org.springframework.cloud</groupId>
        <artifactId>spring-cloud-starter-openfeign</artifactId>
    </dependency>

    <!-- Eureka Client Starter -->
    <dependency>
        <groupId>org.springframework.cloud</groupId>
        <artifactId>spring-cloud-starter-netflix-eureka-client</artifactId>
    </dependency>

    <!-- Config Client Starter -->
    <dependency>
        <groupId>org.springframework.cloud</groupId>
        <artifactId>spring-cloud-starter-config</artifactId>
    </dependency>

    <dependency>
            <groupId>org.springframework.cloud</groupId>
            <artifactId>spring-cloud-config-server</artifactId>
     </dependency>
  </dependencies>

  <build>
	<finalName>spring-cloud-example-biz-a</finalName>
	<defaultGoal>compile</defaultGoal>

	<plugins>
	    <plugin>
	        <groupId>org.springframework.boot</groupId>
	        <artifactId>spring-boot-maven-plugin</artifactId>
	        <configuration>
	            <executable>true</executable>
	        </configuration>
	    </plugin>
	</plugins>
</build>-
在
spring-cloud-example-config配置中心项目的src/main/resource/configs目录下添加一个服务配置文件spring-cloud-example-biz-b.yml,配置如下
spring:
  application:
    name: spring-cloud-example-biz-b

server:
  port: 8011

# Eureka相关配置
eureka:
  client:
    serviceUrl:
      defaultZone: http://localhost:8001/eureka/
  instance:
    lease-renewal-interval-in-seconds: 10      # 心跳时间,即服务续约间隔时间(缺省为30s)
    lease-expiration-duration-in-seconds: 60  # 发呆时间,即服务续约到期时间(缺省为90s)
    prefer-ip-address: true
instance-id: ${spring.application.name}:${spring.application.instance_id:${server.port}}-
在
spring-cloud-example-biz-a项目的src/main/resource/目录添加bootstrap.yml配置文件,配置如下
spring:
  application:
    name: spring-cloud-example-biz-b
  cloud:
    config:
      name: spring-cloud-example-biz-b #配置文件名称,多个通过逗号分隔
      uri: http://localhost:8000 #Config Server服务地址
server:
  port: 8011 #服务端口
eureka:
  client:
    serviceUrl:
defaultZone: http://localhost:8001/eureka/-
添加启动类
package org.spring.cloud.example.biz.b;

import org.springframework.boot.SpringApplication;
import org.springframework.boot.autoconfigure.SpringBootApplication;
import org.springframework.cloud.netflix.eureka.EnableEurekaClient;

@SpringBootApplication
@EnableEurekaClient
public class App
{
    public static void main( String[] args )
    {
    	SpringApplication.run(App.class, args);
    }
}
-
添加一个示例接口,代码参考
package org.spring.cloud.example.biz.b.controller;

import org.springframework.web.bind.annotation.GetMapping;
import org.springframework.web.bind.annotation.RequestMapping;
import org.springframework.web.bind.annotation.RestController;

@RestController
@RequestMapping("/hello")
public class HelloController {
    /**
     * 示例方法
     *
     * @return
     */
    @GetMapping
    public String sayHello() {
        return "Hello,This is Biz-B Service.";
    }
}
6. 搭建服务网关
- 在
spring-cloud-examples项目下创建一个业务服务A的子项目spring-cloud-example-gateway,在pom.xml中添加以下依赖包
<dependencies>
    <!-- zuul -->
    <dependency>
        <groupId>org.springframework.cloud</groupId>
        <artifactId>spring-cloud-starter-netflix-zuul</artifactId>
    </dependency>

    <!-- Eureka Client Starter -->
    <dependency>
        <groupId>org.springframework.cloud</groupId>
        <artifactId>spring-cloud-starter-netflix-eureka-client</artifactId>
    </dependency>

    <!-- Config Client Starter -->
    <dependency>
        <groupId>org.springframework.cloud</groupId>
        <artifactId>spring-cloud-starter-config</artifactId>
    </dependency>

    <dependency>
            <groupId>org.springframework.cloud</groupId>
            <artifactId>spring-cloud-config-server</artifactId>
     </dependency>
  </dependencies>

  <build>
		<finalName>spring-cloud-example-gateway</finalName>
		<defaultGoal>compile</defaultGoal>

		<plugins>
			<plugin>
	        <groupId>org.springframework.boot</groupId>
	        <artifactId>spring-boot-maven-plugin</artifactId>
	        <configuration>
	            <mainClass>server.demo.DemoApplication</mainClass>
	        </configuration>
	    </plugin>
		</plugins>
</build>-
在
spring-cloud-example-config配置中心项目的src/main/resource/configs目录下添加一个服务配置文件spring-cloud-example-gateway.yml,配置如下
spring:
  application:
    name: spring-cloud-example-gateway

server:
  port: 8002

# Eureka相关配置
eureka:
  client:
    serviceUrl:
      defaultZone: http://localhost:8001/eureka/
  instance:
    lease-renewal-interval-in-seconds: 10      # 心跳时间,即服务续约间隔时间(缺省为30s)
    lease-expiration-duration-in-seconds: 60  # 发呆时间,即服务续约到期时间(缺省为90s)
    prefer-ip-address: true
    instance-id: ${spring.application.name}:${spring.application.instance_id:${server.port}}
-
在
spring-cloud-example-gateway项目的src/main/resource/目录添加bootstrap.yml配置文件,配置如下
spring:
  application:
    name: spring-cloud-example-gateway
  cloud:
    config:
      name: spring-cloud-example-gateway #配置文件名称,多个通过逗号分隔
      uri: http://localhost:8000 #Config Server服务地址
server:
  port: 8002 #服务端口
eureka:
  client:
    serviceUrl:
defaultZone: http://localhost:8001/eureka/-
启动类添加注解
@EnableZuulProxy通过启用网关代理服务
package org.spring.cloud.example.gateway;

import org.springframework.boot.SpringApplication;
import org.springframework.boot.autoconfigure.SpringBootApplication;
import org.springframework.cloud.netflix.zuul.EnableZuulProxy;

@SpringBootApplication
@EnableZuulProxy
public class App
{
    public static void main( String[] args )
    {
    	SpringApplication.run(App.class, args);
    }
}
7. 启动示例
- 启动顺序
spring-cloud-example-config>>spring-cloud-example-eureka>>spring-cloud-example-biz-a/spring-cloud-example-biz-b/spring-cloud-example-gateway
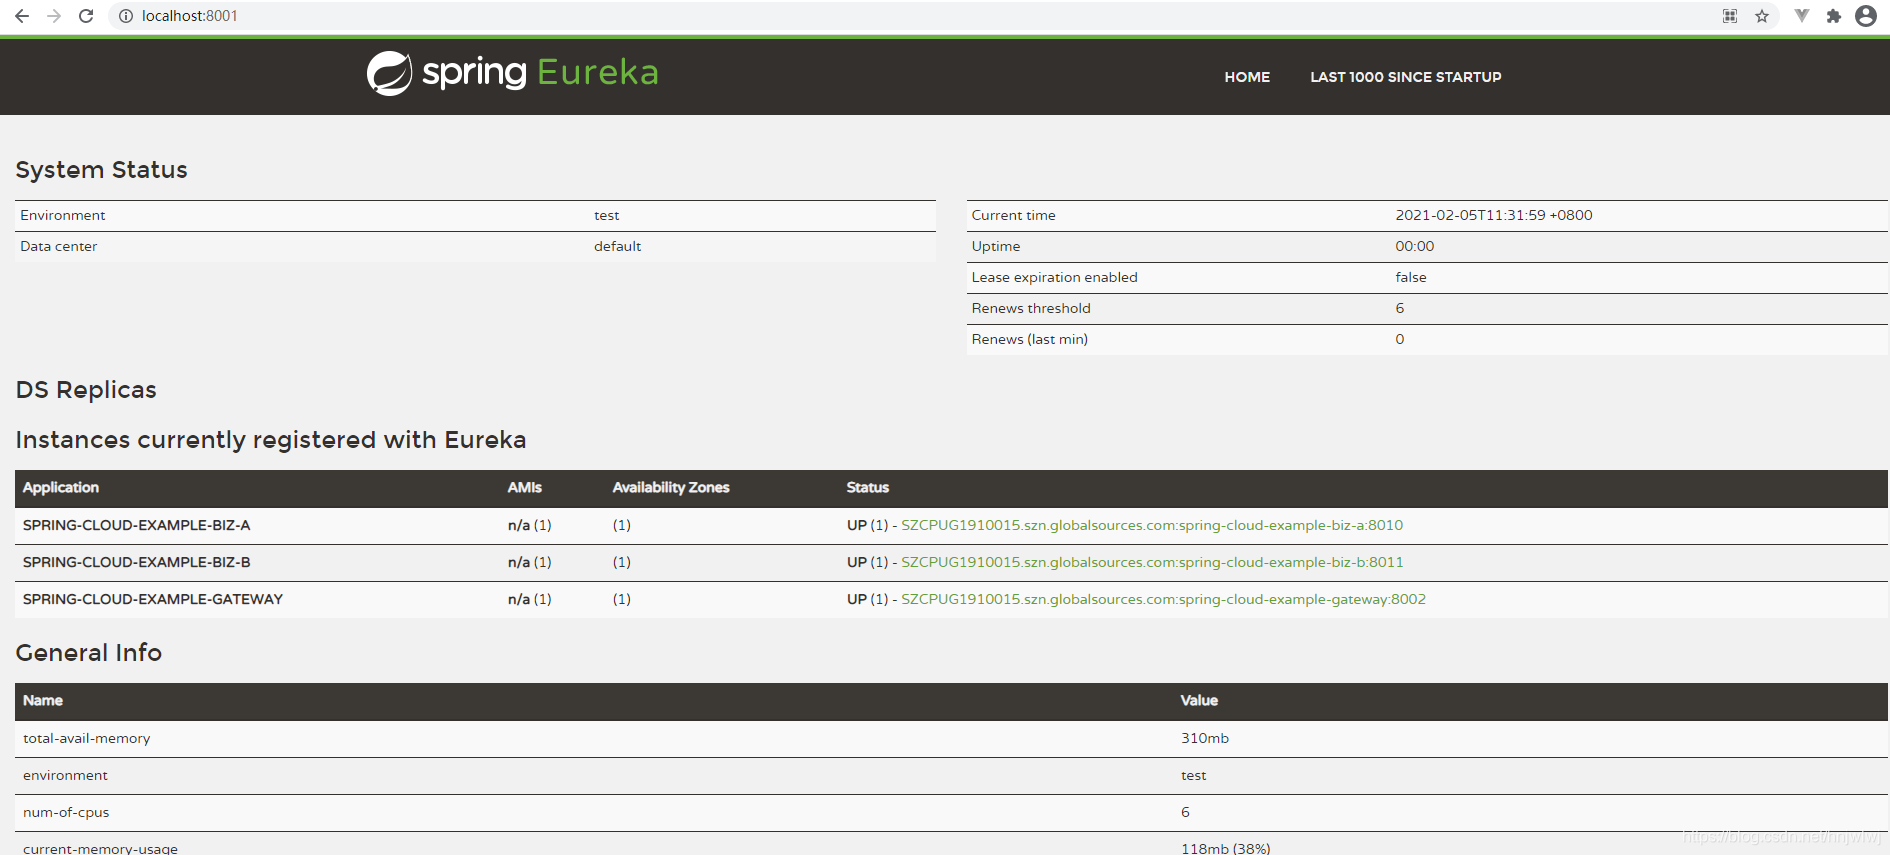
- 访问配置中心 http://localhost:8001/


8. 服务之间调用
- 在业务服务A中添加一个Feign Client Bean,参考代码如下
package org.spring.cloud.example.biz.a.service;

import org.springframework.cloud.openfeign.FeignClient;
import org.springframework.web.bind.annotation.GetMapping;

@FeignClient(name = "spring-cloud-example-biz-b")
public interface RemoteService {

    /**
     * 调用服务B的hello方法
     *
     * @return
     */
    @GetMapping("/hello")
    String sayHello();
}- 在业务服务A启动类中增加注解@EnableFeignClients
package org.spring.cloud.example.biz.a;

import org.springframework.boot.SpringApplication;
import org.springframework.boot.autoconfigure.SpringBootApplication;
import org.springframework.cloud.netflix.eureka.EnableEurekaClient;
import org.springframework.cloud.openfeign.EnableFeignClients;

@SpringBootApplication
@EnableEurekaClient
@EnableFeignClients
public class App
{
    public static void main( String[] args )
    {
    	SpringApplication.run(App.class, args);
    }
}
- 业务服务A示例接口类增加
call2b接口,代码如下
package org.spring.cloud.example.biz.a.controller;

import org.spring.cloud.example.biz.a.service.RemoteService;
import org.springframework.beans.factory.annotation.Autowired;
import org.springframework.web.bind.annotation.GetMapping;
import org.springframework.web.bind.annotation.RequestMapping;
import org.springframework.web.bind.annotation.RestController;

@RestController
@RequestMapping("/hello")
public class HelloController {

	@Autowired
    private RemoteService remoteService;

    /**
     * 示例方法
     *
     * @return
     */
    @GetMapping
    public String sayHello() {
        return "Hello,This is Biz-A Service.";
    }

    /**
     * 示例方法:调用服务B
     *
     * @return
     */
    @GetMapping(path = "/call2b")
    public String sayHello2B() {
        return remoteService.sayHello();
    }
}- 重启业务服务A,通过调用
/hello/call2b接口: http://localhost:8002/spring-cloud-example-biz-a/hello/call2b

9. 将服务部署到Linix系统上
使用maven install将工程打包。 然后发布到Linux某个目录上。 按照下面顺序执行jar文件即可
spring-cloud-example-config>>spring-cloud-example-eureka>>spring-cloud-example-biz-a/spring-cloud-example-biz-b/spring-cloud-example-gateway
启动脚本:java -jar spring-cloud-example-config.jar >> spring-cloud-example-config.log 2>&1 &
启动后将上面localhost替换为服务器的domain/ip访问即可


 751
751

 被折叠的 条评论
为什么被折叠?
被折叠的 条评论
为什么被折叠?
 到【灌水乐园】发言


