


vue后台管理知识点、难点总结
- 1.upload时,png格式的不能上传????(不对)
- 2 js中的项目应用什么时候用async和await
- 3 添加或者编辑的时候报错:Error in v-on handler (Promise/async): "Error: 失败"(解决,其他页的数据正常显示)
- 4 注册全局组件和方法
- 5 深拷贝:
- 6 v-if和v-else之间不能有任何节点,或者失效
- 7 vue中 data的数据都是响应式的,添加到data中的也是
- 8查看模式转为编辑模式时(span-->input)用$nextTick()
- 9 elementui版本问题
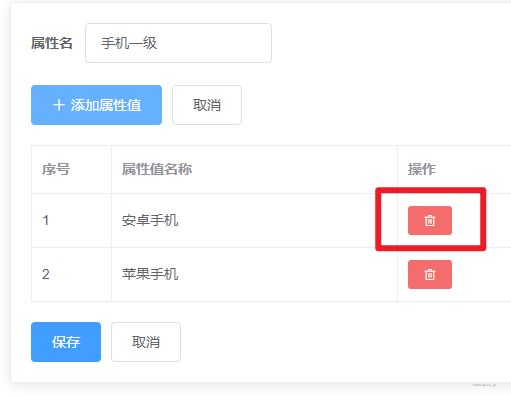
- 10 为什么删除属性值列表不用发送请求(没解决)
- 11 数组中filter
- 12 element ui中分页pagination的汉化
- 13 父组件想要调用子组件的方法(父组件想要获取子组件的属性和方法),可用$ref $childen
- 14 用foreach修改服务器传过来的数据
- 15 vue中的computed
- 16 el-select多选框可以穿多个数据,拼接一下即可
- 17 项目中添加的数据push到收集数据的spu中,判断输入的是否为空
- 18 some every filter 返回的都是布尔值,需要return
- 19 elementui模板请求数据
- 20 在main.js中引入接口和组件等总结
- 21 map 映射,可以把已有的数组数据通过return一个新数组
- 22 取消按钮,清除数据的方法
- 23 删除某一页数据列表时,当也数据删除完毕之后,自动返回都上一页
- 24 form表单中海油form
- 25 获取的数据中不含有某个参数,这个参数需要收集,以后传给服务器
- 26 可以在获取的数据中通过一下形式收集参数
- 27 如何把获取到的部分数据添加到收集(上传服务器所需要的参数)的数据里面 foreach和reduce都可以
- 28 获取列表数据,分页加载
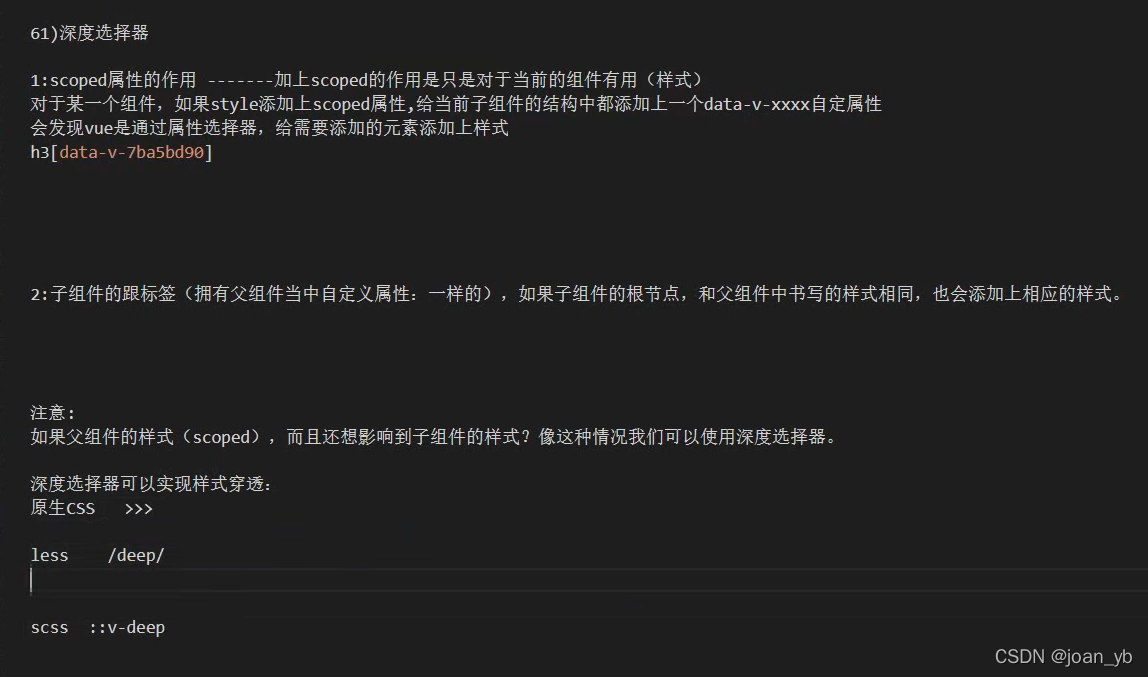
- 29 深度选择器
- 30 在boot cdn找依赖包
- 31 安装echarts
- 32 map()
1.upload时,png格式的不能上传????(不对)
    // 上传相关
    //图片上传成功
    handleAvatarSuccess(res, file) {
      console.log(res, file, 222222);
      this.tmForm.logoUrl = res.data;
    },
    //图片上传之前
    beforeAvatarUpload(file) {
      // const isJPG = file.type === "image/jpeg";
      const isJPG = file.type === 'image/jpg' || file.type === 'image/png'|| file.type === 'image/PNG'|| file.type === 'image/JPG';
      const isLt2M = file.size / 1024 / 1024 < 2;

      if (!isJPG) {
        // this.$message.error("上传头像图片只能是 JPG 格式!");
        this.$message.error("上传头像图片只能是 JPG和PNG 格式!");

      }
      if (!isLt2M) {
        this.$message.error("上传头像图片大小不能超过 2MB!");
      }
      return isJPG && isLt2M;
    },
2 js中的项目应用什么时候用async和await
获取分页数据的时候;获取列表,点击删除数据确定按钮、点击添加和修改的确定按钮的时候;
3 添加或者编辑的时候报错:Error in v-on handler (Promise/async): “Error: 失败”(解决,其他页的数据正常显示)
4 注册全局组件和方法
//引入相关接口API
import API from '@/api';
import CategorySelete from '@/components/CategorySelect'

//(组件实例的原型的原型指向的是Vue.prototype)放在原型上,任意组件都可使用API相关的接口
Vue.prototype.$API=API;
//注册全局组件
Vue.component(CategorySelete.name,CategorySelete)
5 深拷贝:
- // this.attrInfo=JSON.parse(JSON.stringify(row))
- this.attrInfo=cloneDeep(row)
第二种引入elementui中封装的方法:cloneDeep
//按需引入lodash当中的深拷贝
import cloneDeep from 'lodash/cloneDeep'
export default {
  name:'',
  data(){}
  .........
  methods:{
    fn(row){
    ...
    this.attrInfo=cloneDeep(row)
    }
  }
}
6 v-if和v-else之间不能有任何节点,或者失效
7 vue中 data的数据都是响应式的,添加到data中的也是
数组的检测可以通过替换或变更(push也是变更)实现
8查看模式转为编辑模式时(span–>input)用$nextTick()
 //单击span
    toEdit(row,index){
      //点击span时,切换为input,对于浏览器而言,重排重绘需要耗时间,不可能立即取到input键
      //这是用  $nextTick()==>当节点渲染完毕了,会执行一次
      this.$nextTick(()=>{
        this.$refs[index].focus();
      })
      row.flag=true
    },
9 elementui版本问题
在用Popconfirm 气泡确认框时,绑定confirm事件时没有效果,原因是最新的elementui版本号(2.15.x)和模板版本号(2.13.x)不一致,项目低,于是事件绑定改为@onConfirm="deleteAttrValue"即可
 <el-popconfirm :title="`这是一段内容确定${row.valueName}删除吗?`" @onConfirm="deleteAttrValue">
	  <el-button
	     type="danger"
	     size="mini"
	     icon="el-icon-delete"
	     slot="reference"
	        ></el-button>
	 </el-popconfirm>

deleteAttrValue() {
      alert(333);
    },
10 为什么删除属性值列表不用发送请求(没解决)
11 数组中filter
1.会返回一个新的数组
2.过滤的作用,从起始遍历,筛选需要的数据,需要返回的布尔值妖魔真要么假
12 element ui中分页pagination的汉化
main.js中添加:
//element分页组件汉化
import zhLocale from 'element-ui/lib/locale/lang/zh-CN'  //引入中文版
Vue.use(ElementUI,{zhLocale})
13 父组件想要调用子组件的方法(父组件想要获取子组件的属性和方法),可用$ref $childen
每次点击父组件中的按钮(如父组件列表中有修改按钮),点击修改按钮后,展示子组件的页面的同时,同时四个请求),怎么解决?
总结::项目功能需求是,每一次显示SpuForm子组件时,都会发四个请求。
mounted是组件挂载完毕后,只执行一次。
不能在子组件中的mounted中写,因为v-show只是控制SpuForm子组件显示与隐藏,这个子组件并没有卸载,导致mounted只执行一次
<el-table-column prop="prop" label="操作" width="width">
     <template slot-scope="{row,$index}">
          <hint-button type="warning" icon="el-icon-edit" size="mini" title="修改spu" @click="updateSpu(row)"></hint-button>
     </template>
          </el-table-column>
//父组件中封装好的子组件
 <SpuForm v-show="scene==1" @changeScene="changeScene"></SpuForm>
解决思路:每次点击修改按钮时,让子组件发四个请求
可以给子组件加一个ref
<SpuForm v-show="scene==1" @changeScene="changeScene" ref="spu"></SpuForm>
在点击修改时的函数中可以得到子组件的方法
 updateSpu(row){
        this.scene=1
        console.log(this.$refs.spu,999999);//可以获取到子组件spuForm子组件的,那么子组件的数据和方法也可以拿到
    },
接着,在子组件中定义一个初始化方法。那么在父组件中就可以通过$refs接收到方法
 updateSpu(row){
        this.scene=1
        this.$refs.spu.initSpuData()
    },
14 用foreach修改服务器传过来的数据
//获取SPU图标的接口
      let result3 = await this.$API.spu.reqSpuImageList(this.spuId);
      console.log(result3, 113);
      if (result3.code == 200) {
        //由于照片墙显示图片的数据需要数组,数组里面的元素需要有name和url,so进行修改
         let listArr= result3.data;
         listArr.forEach(item => {
           item.name=item.imgName
           item.url=item.imgUrl
         });
        this.spuImageList = listArr;
      }
15 vue中的computed
computed必须有返回值return
every返回布尔值
filter返回的值为布尔值为真的值
computed: {
    unSelectSaleAttr(){
      let result=this.saleAttrList.filter(item=>{
        return this.spu.spuSaleAttrList.every((item2)=>{//不知道为啥是every,用some也可
          return  item2.sale`在这里插入代码片`AttrName!==item.name
        })
      })
      return result
    }
  },
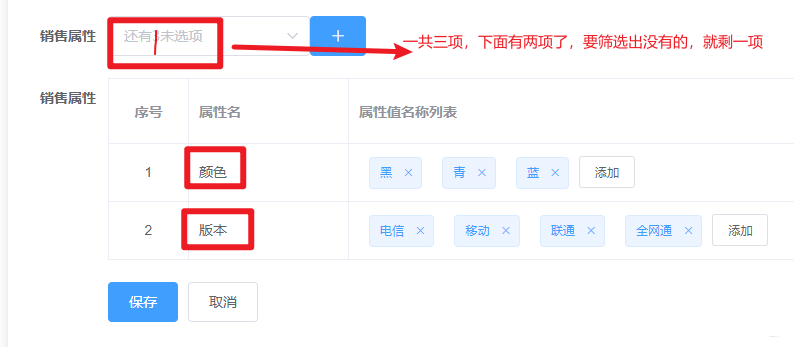
16 el-select多选框可以穿多个数据,拼接一下即可
<el-form-item label="销售属性">
        <el-select :placeholder="`还有${unSelectSaleAttr.length}未选择`" v-model="attrId">
          <el-option :label="item.name" :value="`${item.id}:${item.name}`" v-for="(item,index) in unSelectSaleAttr" :key="item.id"></el-option>
        </el-select>
        <el-button type="primary" icon="el-icon-plus" :disabled="!attrId">添加销售属性</el-button>
      </el-form-item>
17 项目中添加的数据push到收集数据的spu中,判断输入的是否为空
    //添加新的销售属性
    addSaleAttr() {
      //把收集到的销售属性进行分割
      const [baseSaleAttrId, saleAttrName] = this.attrIdAndAttrName.split(":");
      let newSaleAttr = { baseSaleAttrId, saleAttrName, spuSaleAttrValueList: [] };
      this.spu.spuSaleAttrList.push(newSaleAttr);
      this.attrIdAndAttrName = "";
    },
    //添加属性值
    addSaleAttrValue(row) {
      console.log(row, 555);
      // row.inputVisible=true 不是响应式的数据
      this.$set(row, "inputVisible", true);
      this.$set(row, "inputValue", "");
    },
    //el-input失焦事件
    handleInputConfirm(row) {
      console.log(row,8888);
      // this.$set(row, "inputVisible", false);  已经是响应式的了
      const {baseSaleAttrId,inputValue}=row
        if(inputValue.trim()==''){
          this.$message('属性值不能为空')
          return
      }
      let newSaleAttrValue={baseSaleAttrId,saleAttrValueName:inputValue}
      row.spuSaleAttrValueList.push(newSaleAttrValue)

      row.inputVisible=false

    },
18 some every filter 返回的都是布尔值,需要return
      //不能为空
      if (inputValue.trim() == "") {
        this.$message("属性值不能为空");
        return;
      }
      //不能重复
      // every和some都可,some更合理一些
      let result = row.spuSaleAttrValueList.every((item) => {
        return item.saleAttrValueName != inputValue;
      });
      //或者不写{},也不用return
      // let result = row.spuSaleAttrValueList.every((item) =>
      //    item.saleAttrValueName != inputValue
      // );
      if (!result) {
        this.$message("属性值不能重复,请重新输入");
        return; //不执行
      }
19 elementui模板请求数据
import request from '@/utils/request'

//获取SPU列表数据的接口  /admin/product/{page}/{limit}  get
export const reqSpuList=(page,limit,category3Id)=>request({url:`/admin/product/${page}/${limit}`,method:'get',params:{category3Id}})


//获取SPU信息  /admin/product/getSpuById/{spuId}  get
export const reqSpu=(spuId)=>request({url:`/admin/product/getSpuById/${spuId}`,method:'get'})

//获取品牌的信息  /admin/product/baseTrademark/getTrademarkList  get
export const reqTradeMarkList=()=>request({url:'/admin/product/baseTrademark/getTrademarkList',method:'get'})


//获取SPU图标的接口  /admin/product/spuImageList/{spuId}  get
export const reqSpuImageList=(spuId)=>request({url:`/admin/product/spuImageList/${spuId}`,method:'get'})


//获取平台全部销售属性(3个)  /admin/product/baseSaleAttrList  get  颜色,版本,尺码
export const reqBaseSaleAttrList=()=>request({url:'/admin/product/baseSaleAttrList',method:'get'})

//保存spu数据  修改或者添加 ,携带的参数大致相同,唯一的区别是携带的参数是否带id /admin/product/saveSpuInfo
export const reqAddOrUpdateSpu=(supInfo)=>{
    //有参数,修改
    if(supInfo.id){
        return request({url:`/admin/product/updateSpuInfo`,method:'post',data:supInfo})
    }else{
        //无参数,添加
        return request({url:`/admin/product/saveSpuInfo`,method:'post',data:supInfo})
    }
}
20 在main.js中引入接口和组件等总结
//引入相关接口API
import API from '@/api';
//(组件实例的原型的原型指向的是Vue.prototype)放在原型上,任意组件都可使用API相关的接口
Vue.prototype.$API=API;

//注册全局组件
import CategorySelete from '@/components/CategorySelect'
Vue.component(CategorySelete.name,CategorySelete)

//element分页组件汉化
import zhLocale from 'element-ui/lib/locale/lang/zh-CN'  //引入中文版
Vue.use(ElementUI,{zhLocale})

//引入HintButton组件
import HintButton from '@/components/HintButton'
Vue.component(HintButton.name,HintButton)
21 map 映射,可以把已有的数组数据通过return一个新数组
map()方法定义在JavaScript的Array中,它返回一个新的数组,数组中的元素为原始数组调用函数处理后的值。
注意:
map()不会对空数组进行检测
map()不会改变原始数组
22 取消按钮,清除数据的方法
    cancel(){
     //点击取消按钮,清除数据
     // Object.assign:es6中新增的方法,可以合并对象
     //组件实例this._data可以操作data当中的响应式数据
     //his.$options可以获取配置对象,配置对象的data函数执行,返回的响应式数据为空的
     Object.assign(this._data,this.$options.data())
     console.log(this._data,this.$options.data(),'this.$options');
    },
23 删除某一页数据列表时,当也数据删除完毕之后,自动返回都上一页
  <el-table :data="records" style="width: 100%" border>
          <el-table-column
            align="center"
            type="index"
            prop="prop"
            label="序号"
            width="80"
          >
          </el-table-column>
  </el-table>
    //删除spu
    async deleteSpu(row) {
      let result = await this.$API.spu.reqDeleteSpu(row.id);
      console.log(result, "888888");
      if (result.code == 200) {
        this.$message({ type: "success", message: "删除成功" });
        this.getSpuList(this.records.length>1?this.page:this.page-1);
      }
    },
24 form表单中海油form

 <el-form-item label="平台属性">
        <el-form :inline="true" ref="form" label-width="80px">
          <el-form-item label="屏幕尺寸">
            <el-select  placeholder="请选择" value="value">
              <el-option label="label" value="value"></el-option>
              <el-option label="label" value="value"></el-option>
            </el-select>
          </el-form-item>
          <el-form-item label="无线通信">
            <el-select  placeholder="请选择" value="value">
              <el-option label="label" value="value"></el-option>
              <el-option label="label" value="value"></el-option>
            </el-select>
          </el-form-item>
        </el-form>
      </el-form-item>
25 获取的数据中不含有某个参数,这个参数需要收集,以后传给服务器
收集的过程中进行添加,不能放在收集的图片列表中,因为table列表时复选框,选中后才有
      //获取图片
      let result = await this.$API.sku.reqSpuImageList(spu.id);
      if (result.code == 200) {
        //整理参数,result中午isDefault,循环添加
        let list = result.data;
        list.forEach(item => {
          item.isDefault=0  //0代表设置默认   1代表默认
        });
        this.spuImageList=list
      }
26 可以在获取的数据中通过一下形式收集参数
v-model="attr.attrIdAndValueId"是定义的
 <el-form-item label="平台属性">
        <el-form :inline="true" ref="form" label-width="80px">
          <el-form-item
            :label="attr.attrName"
            v-for="(attr, index) in attrInfoList"
            :key="attr.id"
          >
            <el-select placeholder="请选择" v-model="attr.attrIdAndValueId">
              <el-option
                :label="attrVal.valueName"
                :value="`${attrVal.id}:${attrVal.id}`"
                v-for="(attrVal, index) in attr.attrValueList"
                :key="attrVal.id"
              ></el-option>
            </el-select>
          </el-form-item>
        </el-form>
      </el-form-item>
27 如何把获取到的部分数据添加到收集(上传服务器所需要的参数)的数据里面 foreach和reduce都可以
      save() {
      //整理收集数据
      //平台属性

      //第一种方法
      // const {skuInfo,attrInfoList}=this
      // let arr = [];
      // attrInfoList.forEach((item) => {
      // 当前用户是否进行了选择
      //   if (item.attrIdAndValueId) {
      //     const [attrId, valueId] = item.attrIdAndValueId.split(":");
      //     let obj = {valueId,attrId };
      //     arr.push(obj);
      //   }
      // });
      // skuInfo.skuAttrValueList=arr

      //第二种方法
      const {attrInfoList,skuInfo}=this
      skuInfo.skuAttrValueList=attrInfoList.reduce((prev, item) => {
        //prev初始值[]
        if (item.attrIdAndValueId) {
          const [attrId, valueId] = item.attrIdAndValueId.split(":");
          prev.push({attrId, valueId})
        }
        return prev
      }, []);
    },
28 获取列表数据,分页加载
    // 获取到的spu数据
    async getSpuList(pager = 1) {
      this.page = pager;
      const { page, limit, category3Id } = this;

      let result = await this.$API.spu.reqSpuList(page, limit, category3Id);
      if (result.code == 200) {
        this.records = result.data.records;
        this.total = result.data.total;
      }
    },
29 深度选择器
30 在boot cdn找依赖包
31 安装echarts
npm install --save echarts
32 map()
            if (res.result) {
              res.result.map((item) => {
                const dataObj = {
                  name: "",
                  value: [],
                };
                dataObj.name = item.tag;
                dataObj.value[0] = item.decisionVal;
                dataObj.value[1] = item.loadVal;
                dataObj.value[2] = item.situationVal;
                dataObj.value[3] = item.factorVal;
                dataObj.value[4] = item.communicationVal;
                dataObj.value[5] = item.processVal;
                dataObj.value[6] = item.skillVal;
                dataObj.value[7] = item.applyVal;
                that.radarData.push(dataObj);
              });
            }


 9204
9204


 被折叠的 条评论
为什么被折叠?
被折叠的 条评论
为什么被折叠?
 到【灌水乐园】发言


