UDP(User Data Protocol,用户数据报协议),是与TCP相对应的协议。
它是面向非连接的协议,它不与对方建立连接,而是直接就把数据包发送过去!
“面向非连接”就是在正式通信前不必与对方先建立连接,不管对方状态就直接发送。
这与现在风行的手机短信非常相似:你在发短信的时候,只需要输入对方手机号就OK了。
(简单了解, Socket、HTTP和TCP、UDP )2、AsyncUdpSocket
AsyncUdpSocket是UDP/IP socket网络库,包装自CFSocket,用于处理UDP的。
它包括基于非阻塞队列的发送接收操作,完整的委托支持,基于runloop,自包含的类,以及支持IPV4和IPV6。
1)首先, 下载AsyncUdpSocket2) 将 AsyncUdpSocket.h、AsyncUdpSocket.m 导入 项目中。
这两个文件是支持 ARC 的,若自己项目是不支持ARC,则如下操作,使其在编译时按照ARC条件进行编译:
target -> build phases -> compile sources -> AsyncUdpSocket文件后面加入 -fobjc-arc
编译运行,若报错,则加入CFNetwork.framework 既可。(Xcode早期版本需要加入此框架,后来的貌似不用)3、项目中使用AsyncUdpSocket
1)首先,建立连接
- //建立基于UDP的Socket连接
- -(void)openUDPServer{
- //初始化udp
- self.udpSocket=[[AsyncUdpSocket alloc] initWithDelegate:self];
- //绑定端口
- NSError *error = nil;
- [self.udpSocket bindToPort:SERVER_PORT error:&error];
- if (self.isBroadcast) {
- [self.udpSocket enableBroadcast:YES error:&error]; // 实现群聊用
- }
- //启动接收线程
- [self.udpSocket receiveWithTimeout:-1 tag:0];
- }
2) 发送数据
- NSData *dt = [message dataUsingEncoding:NSASCIIStringEncoding] ;
- BOOL res = NO;
- if (self.isBroadcast) {
- self.strCurrentUserIP = BROADCAST_IP_2;
- }
- //开始发送
- res = [self.udpSocket sendData:dt
- toHost:self.strCurrentUserIP
- port:SERVER_PORT
- withTimeout:-1
- tag:0];
- NSLog(@"send upd complete.");
- if (!res) {
- [self showAlertWhenFaield:@"Send failed"];//发送失败
- }
3)回调方法
- #pragma mark -
- #pragma mark AsyncUdpSocket Delegate Methods
- - (void)onUdpSocket:(AsyncUdpSocket *)sock didSendDataWithTag:(long)tag
- {
- NSLog(@"dataTag: %d",(NSInteger)tag);
- }
- - (BOOL)onUdpSocket:(AsyncUdpSocket *)sock didReceiveData:(NSData *)data withTag:(long)tag fromHost:(NSString *)host port:(UInt16)port
- {
- NSLog(@"Receive Data.");
- //接收到数据回调
- [self.udpSocket receiveWithTimeout:-1 tag:0];
- NSString *info=[[NSString alloc] initWithData:data encoding: NSASCIIStringEncoding];
- //获取到接收的数据后,自己进行的处理
- MessageVO *aVo = [[MessageVO alloc]init];
- aVo.strText = info;
- aVo.strFromUsername = self.strCurrentUser;
- aVo.strFromUserIP = host;
- aVo.msgType = MsgType_Receive;
- NSString *strTime = [Statics getCurrentTime];
- aVo.strTime = strTime;
- [self.arrayChat addObject:aVo];
- [self.tabelViewChat reloadData];
- [self.tabelViewChat scrollToRowAtIndexPath:[NSIndexPath indexPathForRow:[self.arrayChat count]-1 inSection:0]
- atScrollPosition:UITableViewScrollPositionBottom
- animated:YES];
- //已经处理完毕
- return YES;
- }
- - (void)onUdpSocket:(AsyncUdpSocket *)sock didNotSendDataWithTag:(long)tag dueToError:(NSError *)error
- {
- //无法发送时,返回的异常提示信息
- [self showAlertWhenFaield:[error description]];
- }
- - (void)onUdpSocket:(AsyncUdpSocket *)sock didNotReceiveDataWithTag:(long)tag dueToError:(NSError *)error
- {
- //无法接收时,返回异常提示信息
- [self showAlertWhenFaield:[error description]];
- }
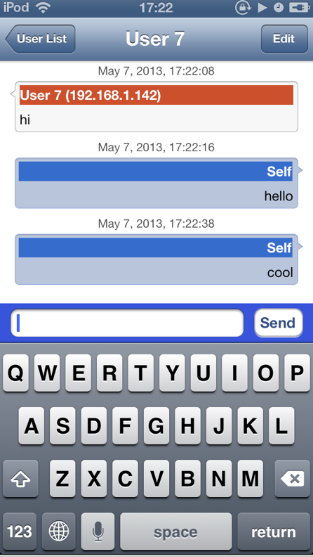
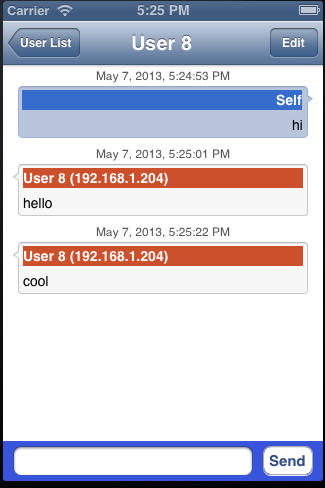
4、效果图 (左边是真机 itouch4,右边是模拟器)
5、源码下载
注:
1、此Demo仅实现了局域网下的即时通信。
2、双方进行通信的前提是在同一个局域网下,请检查IP地址是否符合。(你可以通过手动输入添加IP)
3、在群聊的时候,会出现发送1条信息后,收到2条信息回来的情况,正在研究这种情况是否正常,完了再补充。


 1361
1361

 被折叠的 条评论
为什么被折叠?


