


因为实际在使用中经常会遇到还是很容易搞混,不知道该如何去选择边距的情况,所以单独把这个课题拎出来调查,实践了一番。
1. margin,指的是当前控件和父控件的边距。
举一个例子说明:
<RelativeLayout xmlns:android="http://schemas.android.com/apk/res/android"
  xmlns:tools="http://schemas.android.com/tools"
   android:layout_width="match_parent"
  android:layout_height="match_parent"
  android:background="#000000">		//第一层布局①背景全黑色,并且高和框都是match_parent
  <RelativeLayout
    android:layout_width="wrap_content"
    android:layout_height="match_parent"
    android:background="#FFFFFF"		//第二层布局②设置为全白,并且设置和父控件的边距30dp
    android:layout_marginLeft="30dp">
    <EditText android:text="Hello World!"	//文本框背景是黑色的,文字是白色的。
      android:layout_width="match_parent"	//距离父控件(也就是第二层布局是60dp)
      android:layout_height="wrap_content"
      android:background="#000000"
      android:layout_marginLeft="60dp"
      android:textColor="#FFFFFF" />
  </RelativeLayout>
</RelativeLayout> 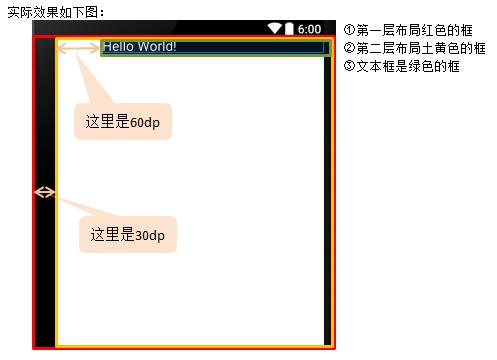
2. padding,指的是当前控件的内边距,即控件中内容距离控件的边缘的距离。
同样举一个例子说明:
<RelativeLayout xmlns:android="http://schemas.android.com/apk/res/android"
xmlns:tools="http://schemas.android.com/tools"
android:layout_width="match_parent"
android:layout_height="match_parent"
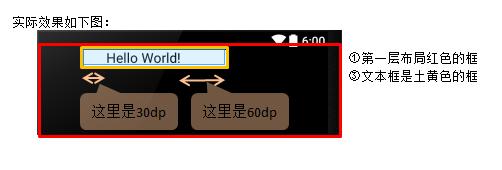
android:background="#000000"> //第一层布局①背景全黑色,并且高和框都是match_parent
<EditText android:text="Hello World!"
android:layout_width="wrap_content" //文本框背景是白色的,文字是黑色的。
android:layout_height="wrap_content" //宽度随内容变化
android:background="#FFFFFF"
android:layout_marginLeft="60dp"
android:paddingLeft="30dp" //设置文字内容距离EditText的左边框是30dp
android:paddingRight="60dp" //设置文字内容距离EditText的右边框是60dp
android:textColor="#000000" />
</RelativeLayout>
从例子上来看,EditText的宽度因为是随内容变化,所以实际宽度是距离左边框的30dp+“Hello World!"文字宽度+距离右边框60dp 三者合在一起的宽度。
3. 以上两个例子基本上可以理解了margin和padding的区别,但是这里引入了一个问题,如何设置两个控件之间的距离呢?
这里我的理解是,对于不同的布局有不同的方法,说法很奇怪,还是以例子进行说明吧。
对于RelativeLayout来说,本来就是相对布局,所以它在控制控件和控件之间的位置有很多属性可以使用,常用的有以下:
3-1. 相对于父布局定位的属性(属性可以结合使用,分别实现左上角,右上角,左下角,右下角等方位)对应的值只有true和false
android:layout_alignParentLeft靠左
android:layout_alignParentTop靠上
android:layout_alignParentRight靠右
android:layout_alignParentBottom靠下
android:layout_centerInParent居中
3-2. 相对于控件定位的属性(属性可以结合使用,分别实现左上角,右上角,左下角,右下角等方位)因为是相对控件定位,所以对应的值是对应控件的id
android:layout_toLeftOf左边
android:layout_above上方
android:layout_toRightOf右边
android:layout_below下方
3-3. 其他一些属性
android:layout_alignLeft="@id/xxx"将控件的左边缘和给定ID控件的左边缘对齐
android:layout_alignRight="@id/xxx"将控件的右边缘和给定ID控件的右边缘对齐
android:layout_alignTop="@id/xxx"将控件的上边缘和给定ID控件的上边缘对齐
android:layout_alignBottom="@id/xxx"将控件的底边缘和给定ID控件的底边缘对齐
android:layout_toLeftOf="@id/xxx"将控件的右边缘和给定ID控件的左边缘对齐
android:layout_toRightOf="@id/xxx"将控件的左边缘和给定ID控件的右边缘对齐
android:layout_centerHorizontal="true"将控件置于水平方向的中心位置
android:layout_centerVertical="true"将控件置于垂直方向的中心位置
android:layout_alignParentLeft="true"将控件的左边缘和父控件的左边缘对齐
android:layout_alignParentTop="true"将控件的上边缘和父控件的上边缘对齐
android:layout_alignParentRight="true"将控件的右边缘和父控件的右边缘对齐
android:layout_alignParentBottom="true"将控件的底边缘和父控件的底边缘对齐
举一个例子说明:
<?xml version="1.0" encoding="utf-8"?>
<RelativeLayout xmlns:android="http://schemas.android.com/apk/res/android"
xmlns:tools="http://schemas.android.com/tools"
android:layout_width="match_parent"
android:layout_height="match_parent"
android:background="#000000">
<EditText
android:id="@+id/helloworld"
android:text="Hello World!"
android:layout_width="wrap_content"
android:layout_height="wrap_content"
android:background="#FFFFFF"
android:layout_marginLeft="30dp"
android:textColor="#000000" />
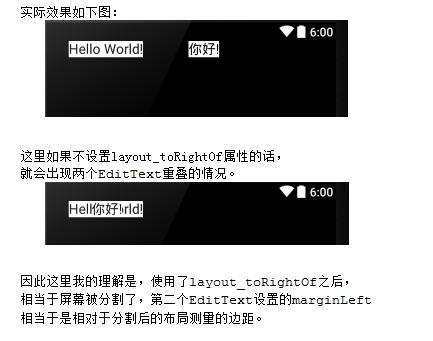
<EditText android:text="你好!" //设置layout_toRightOf
android:layout_width="wrap_content" //让它显示在第一个EditText框的右边
android:layout_height="wrap_content" //然后结合margin设置边距
android:layout_toRightOf="@id/helloworld"
android:background="#FFFFFF"
android:layout_marginLeft="60dp"
android:textColor="#000000" />
</RelativeLayout>
=============================================================================
对于LinearLayout来说,控制两个控件之间的距离我认为还是使用margin。
因为LinearLayout本来就是线性排列,所以只需要设置margin就可以了。
例如:
<?xml version="1.0" encoding="utf-8"?>
<LinearLayout xmlns:android="http://schemas.android.com/apk/res/android"
    xmlns:tools="http://schemas.android.com/tools"
    android:layout_width="match_parent"
    android:layout_height="match_parent"
    android:background="#000000">
    <EditText
        android:text="Hello World!"
        android:layout_width="wrap_content"
        android:layout_height="wrap_content"
        android:background="#FFFFFF"
        android:layout_marginLeft="30dp"
        android:textColor="#000000" />
    <EditText
        android:text="你好!"
        android:layout_width="wrap_content"
        android:layout_height="wrap_content"
        android:background="#FFFFFF"
        android:layout_marginLeft="60dp"
        android:textColor="#000000" />
</LinearLayout>
如果是垂直排列的,使用的是marginTop和marginBottom。
如果只使用的是margin,那就是四个方向全部都设置了边距。


 4388
4388

 被折叠的 条评论
为什么被折叠?
被折叠的 条评论
为什么被折叠?
 到【灌水乐园】发言


