


一、生命周期
二、静态的使用Fragment
直接在布局文件中使用fragment标签,可以将fragment跟其他布局控件一样去使用。
1、Fragment1和Fragment2布局文件
<?xml version="1.0" encoding="utf-8"?>
<LinearLayout xmlns:android="http://schemas.android.com/apk/res/android"
    android:orientation="vertical" android:layout_width="match_parent"
    android:layout_height="match_parent">
    <TextView
        android:layout_width="match_parent"
        android:layout_height="wrap_content"
        android:text="This is fragment #1"
        android:textColor="#000000"
        android:textSize="25sp"/>

</LinearLayout>
<?xml version="1.0" encoding="utf-8"?>
<LinearLayout xmlns:android="http://schemas.android.com/apk/res/android"
android:orientation="vertical" android:layout_width="match_parent"
android:layout_height="match_parent">
<TextView
android:layout_width="match_parent"
android:layout_height="wrap_content"
android:text="This is fragment #2"
android:textColor="#000000"
android:textSize="25sp"/>
</LinearLayout>2、MainActivity布局文件
<?xml version="1.0" encoding="utf-8"?>
<LinearLayout xmlns:android="http://schemas.android.com/apk/res/android"
    xmlns:tools="http://schemas.android.com/tools"
    android:layout_width="match_parent"
    android:layout_height="match_parent"
    android:orientation="horizontal"
    tools:context="com.example.fragmenttest.MainActivity">

    <fragment
        android:name="com.example.fragmenttest.Fragment1"
        android:layout_width="0dp"
        android:layout_height="match_parent"
        android:layout_weight="1"/>

    <fragment
        android:name="com.example.ragmenttest.Fragment2"
        android:layout_width="0dp"
        android:layout_height="match_parent"
        android:layout_weight="1"/>

</LinearLayout>
3、Fragment1和Fragment2源文件
public class Fragment1  extends Fragment {
    @Nullable
    @Override
    public View onCreateView(LayoutInflater inflater, @Nullable ViewGroup container, @Nullable Bundle savedInstanceState) {
        return inflater.inflate(R.layout.fragment1, container, false);
    }
}
public class Fragment2 extends Fragment {
@Nullable
@Override
public View onCreateView(LayoutInflater inflater, @Nullable ViewGroup container, @Nullable Bundle savedInstanceState) {
return inflater.inflate(R.layout.fragment2, container, false);
}
}4、MainActivity源文件
public class MainActivity extends AppCompatActivity {

    @Override
    protected void onCreate(Bundle savedInstanceState) {
        super.onCreate(savedInstanceState);
        setContentView(R.layout.activity_main);
    }
}
三、动态使用Fragment
就是动态的添加Fragment,也就是不需要在布局文件中使用fragment标签。
跟上面静态添加不同的是Activity的布局文件和MainActivity源文件,其他相同。
Activity的布局文件
<?xml version="1.0" encoding="utf-8"?>
<LinearLayout xmlns:android="http://schemas.android.com/apk/res/android"
    xmlns:tools="http://schemas.android.com/tools"
    android:layout_width="match_parent"
    android:layout_height="match_parent"
    android:orientation="horizontal"
    android:id="@+id/fragment"
    tools:context="com.example.fragmenttest.MainActivity">
</LinearLayout>
MainActivity文件
public class MainActivity extends AppCompatActivity {

    @Override
    protected void onCreate(Bundle savedInstanceState) {
        super.onCreate(savedInstanceState);
        setContentView(R.layout.activity_main);

        FragmentManager fragmentManager = getSupportFragmentManager();
        FragmentTransaction fragmentTransaction = fragmentManager.beginTransaction();

        WindowManager wm = getWindowManager();
        Display d = wm.getDefaultDisplay();
        if (d.getWidth() > d.getHeight()) {
            Fragment fragment1 = new Fragment1();
            fragmentTransaction.replace(R.id.fragment, fragment1);
        } else {
            Fragment fragment2 = new Fragment2();
            fragmentTransaction.replace(R.id.fragment, fragment2);
        }
        fragmentTransaction.commit();
    }
}
四、Fragment家族常用的API
Fragment常用的三个类:
android.app.Fragment 主要用于定义Fragment
android.app.FragmentManager 主要用于在Activity中操作Fragment
android.app.FragmentTransaction 保证一些列Fragment操作的原子性
Fragment
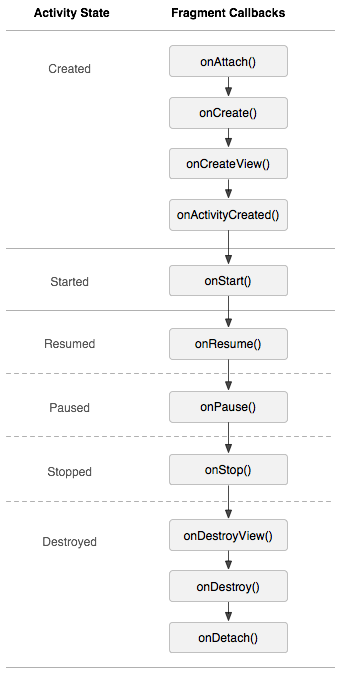
主要掌握声明周期方法
public void onAttach(Activity activity)
public void onCreate(Bundle savedInstanceState)
public View onCreateView(LayoutInflater inflater, ViewGroup container,
                Bundle savedInstanceState)
public void onActivityCreated(Bundle savedInstanceState)
public void onStart()
public void onResume()
public void onPause()
public void onStop()
public void onDestroyView()
public void onDestroy()
public void onDetach()
FragmentManager
为了管理Activity中的fragments,需要使用FragmentManager,调用Activity中的getFragmentManager()方法可以得到FragmentManager,因为FragmentManager的API是在Android 3.0,也即API level 11开始引入的,所以对于之前的版本,需要使用support library中的FragmentActivity,并且使用getSupportFragmentManager()方法。
用FragmentManager可以做的工作有:
- 得到Activity中存在的fragment:使用findFragmentById()或findFragmentByTag()方法。
- 将fragment弹出back stack:popBackStack(),将back stack中最后一次的fragment转换弹出。如果没有可以出栈的东西,返回false。这个函数是异步的,它将弹出栈的请求加入队列,但是这个动作直到应用回到事件循环才会执行。
- 为back stack加上监听器:addOnBackStackChangedListener()
FragmentTransaction
得到FragmentTransaction类的实例:
FragmentManager fragmentManager = getFragmentManager();

FragmentTransaction fragmentTransaction = fragmentManager.beginTransaction();
每个transaction是一组同时执行的变化的集合。
- transaction.add()
- transaction.remove()
- transaction.replace()
- transaction.hide()
- transaction.show()
- transaction.detach()
- transaction.attach()
- transaction.addToBackStack(null);
- transatcion.commit();
当你移除一个fragment的时候,如果commit()之前没有调用addToBackStack(),那个fragment将会是destroyed;如果调用了addToBackStack(),这个fragment会是stopped,可以通过返回键来恢复。
五、Fragment与Activity通信
a、如果你Activity中包含自己管理的Fragment的引用,可以通过引用直接访问所有的Fragment的public方法
b、如果Activity中未保存任何Fragment的引用,那么没关系,每个Fragment都有一个唯一的TAG或者ID,可以通过getFragmentManager.findFragmentByTag()或者findFragmentById()获得任何Fragment实例,然后进行操作。
c、在Fragment中可以通过getActivity得到当前绑定的Activity的实例,然后进行操作。
b、如果Activity中未保存任何Fragment的引用,那么没关系,每个Fragment都有一个唯一的TAG或者ID,可以通过getFragmentManager.findFragmentByTag()或者findFragmentById()获得任何Fragment实例,然后进行操作。
c、在Fragment中可以通过getActivity得到当前绑定的Activity的实例,然后进行操作。
handler方案:
public class MainActivity extends FragmentActivity{
  //声明一个Handler
  public Handler mHandler = new Handler(){
      @Override
       public void handleMessage(Message msg) {
            super.handleMessage(msg);
             ...相应的处理代码
       }
 }
 ...相应的处理代码
}

public class MainFragment extends Fragment{
      //保存Activity传递的handler
       private Handler mHandler;
       @Override
       public void onAttach(Activity activity) {
            super.onAttach(activity);
           //这个地方已经产生了耦合,若还有其他的activity,这个地方就得修改
            if(activity instance MainActivity){
                  mHandler =  ((MainActivity)activity).mHandler;
            }
       }
       ...相应的处理代码
 }
该方案存在的缺点:
- fragment对具体的Activity存在耦合,不利于Fragment复用
- 不利于维护,若想删除相应的Activity,Fragment也得改动
- 没法获取Activity的返回数据
广播方案:
具体的代码就不写了,说下该方案的缺点:
- 用广播解决此问题有点大材小用了,广播的意图是用在一对多,接收广播者是未知的情况
- 广播性能肯定会差
- 传播数据有限制
EventBus方案
可以参考:
Eventbus的基本使用
缺点:
- EventBus是用反射机制实现的,性能上会有问题
- EventBus难于维护代码
- 没法获取Activity的返回数据
接口方案
//MainActivity实现MainFragment开放的接口
  public class MainActivity extends FragmentActivity implements FragmentListener{
        @override
         public void toH5Page(){ }
       ...其他处理代码省略
   }

    public class MainFragment extends Fragment{

         public FragmentListener mListener;
        //MainFragment开放的接口
        public static interface FragmentListener{
            //跳到h5页面
           void toH5Page();
         }

         @Override
        public void onAttach(Activity activity) {
              super.onAttach(activity);
              //对传递进来的Activity进行接口转换
               if(activity instance FragmentListener){
                   mListener = ((FragmentListener)activity);
              }
         }
         ...其他处理代码省略
  }
参考文章:

欢迎关注我的公众号:DroidMind
精品内容,独家发布


 被折叠的 条评论
为什么被折叠?
被折叠的 条评论
为什么被折叠?
 到【灌水乐园】发言


