


.为什么会有跨域问题的出现:
域名,端口,协议不同,localhost和127.0.0.1虽然都指向本机,但也属于跨域。
怎么解决跨域问题,有哪几种方式可以解决:
1.前端方法就用jsonp,jsonp是前端解决跨域最实用的方法
2.document.domain + iframe跨域:两个页面都通过js强制设置document.domain为基础主域,就实现了同域.但是仅限主域相同,子域不同的跨域应用场景
3.跨域资源共享CORS: 只服务端设置Access-Control-Allow-Origin即可,前端无须设置,若要带cookie请求:前后端都需要设置 CORS 需要浏览器和后端同时支持。IE 8 和 9 需要通过 XDomainRequest 来实现。浏览器会自动进行 CORS 通信,实现 CORS 通信的关键是后端。只要后端实现了 CORS,就实现了跨域。 服务端设置 Access-Control-Allow-Origin 就可以开启 CORS。 该属性表示哪些域名可以访问资源,如果设置通配符则表示所有 网站都可以访问资源。
4.nginx反向代理接口跨域:同源策略是浏览器的安全策略,不是HTTP协议的一部分。服务器端调用HTTP接口只是使用HTTP协议,不会执行JS脚本,不需要同源策略,也就不存在跨越问题
5.postMessage :这种方式通常用于获取嵌入页面中的第三方页面数据。一个页面发送消息,另一个页面判断来源并接收消息
6.WebSocket协议跨域
用CORS解决跨域问题
在HBuilder中创建项目,创建与idea中springboot Controller数据交互的js文件,代码如下:
(使用了jquery,记得导包)
<!DOCTYPE html>
<html lang="en">
<head>
<meta charset="UTF-8">
<title>Title</title>
</head>
<body>
<center>
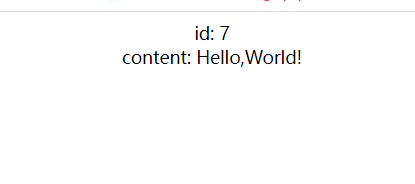
id:
<span id="1"></span><br>
content:
<span id="2"></span>
</center>
<script src="js/jquery-3.5.1.js"></script>
<script>
$.ajax({
type: "get",
url: "http://localhost:8080/greeting",
success: function (data) {
$("#1").text(data.id);
$("#2").text(data.content);
},
});
</script>
</body>
</html>
运行后可以看到端口是8848,记住这个端口

接着idea上创建类对象与Controller:
public class Greeting {
    private final long id;
    private final String content;

    public Greeting(long id, String content) {
        this.id = id;
        this.content = content;
    }

    public long getId() {
        return id;
    }

    public String getContent() {
        return content;
    }
}
先加入依赖:
<dependency>
    <groupId>org.apache.httpcomponents</groupId>
    <artifactId>httpclient</artifactId>
    <scope>test</scope>
</dependency>
GreetingController:
(局部跨域请求,只有特定方法才能跨域)
import com.pefung.demo.dao.Greeting;
import org.springframework.web.bind.annotation.CrossOrigin;
import org.springframework.web.bind.annotation.GetMapping;
import org.springframework.web.bind.annotation.RequestParam;
import org.springframework.web.bind.annotation.RestController;
import java.util.concurrent.atomic.AtomicLong;

@RestController
public class GreetingController {
    private static final String template = "Hello,%s!";
    private final AtomicLong counter = new AtomicLong();
    //注释仅针对此特定方法启用跨域资源共享。
    @CrossOrigin(origins = "http://127.0.0.1:8848")
    @GetMapping("/greeting")
    //•@Autowired(required=false):表示忽略当前要注入的bean,如果有直接注入,没有跳过,不会报错。
     public Greeting greeting(@RequestParam(required = false,defaultValue = "World" ) String name){
        System.out.println("=========get greeting===========");
        return new Greeting(counter.incrementAndGet(),String.format(template,name));
     }
}
AtomicLong.incrementAndGet():id递增
@CrossOrigin中写上刚刚HBuilder上的地址,就可访问成功
Cors全局:
在启动类中加入配置:
import org.springframework.boot.SpringApplication;
import org.springframework.boot.autoconfigure.SpringBootApplication;
import org.springframework.context.annotation.Bean;
import org.springframework.web.servlet.config.annotation.CorsRegistry;
import org.springframework.web.servlet.config.annotation.WebMvcConfigurer;

@SpringBootApplication
public class DemoApplication {

    public static void main(String[] args) {
        SpringApplication.run(DemoApplication.class, args);
    }
    @Bean
    public WebMvcConfigurer corsConfigurer(){
        return new WebMvcConfigurer() {
            @Override
            public void addCorsMappings(CorsRegistry registry) {
            	// /greeting-javaconfig改成 /** 表示所有请求
                registry.addMapping("/greeting-javaconfig").allowedOrigins("http://127.0.0.1:8848");
            }
        };
    }
}
前端新建hello.html:
<!DOCTYPE html>
<html>
<head>
<meta charset="utf-8">
<title></title>
</head>
<body>
<center>
<div>
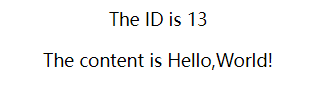
<p class="greeting-id">The ID is </p>
<p class="greeting-content">The content is </p>
</div>
</center>
<script src="js/jquery-3.5.1.js"></script>
<script>
$(document).ready(function() {
$.ajax({
url: "http://localhost:8080/greeting"
}).then(function(data, status, jqxhr) {
$('.greeting-id').append(data.id);
$('.greeting-content').append(data.content);
console.log(jqxhr);
});
});
</script>
</body>
</html>
运行hello.html:
1 RequestMapping 的属性
这个注解会将 HTTP 请求映射到 MVC 和 REST 控制器的处理方法上
属性:
method : 定义接受浏览器发来的请求 如请求不是定义类型则会报错 可以同时指定多个请求{ , }用逗号隔开
params: 表示请求的参数 用于限制参数,对参数进行过滤,接受指定参数
headers: 表示请求头 可以用于限制客户端发来的请求
2.几种请求方式的区别以及其他几种请求方式常用的地方
@GetMapping:get(查),提交的数据最多只能是2KB字节,数据会暴露在url地址上
@PostMapping:post(增),对提交的数据大小没有限制,数据不会暴露在url上
@PutMapping:put(改),用于向服务端更新数据,与post的使用很相似
@DeleteMapping:delete(删),用于删除服务端的资源,可以理解为delete操作
@PatchMapping :put方式是可以更新.但是更新的是整体.patch是对局部更新;


 2889
2889


 被折叠的 条评论
为什么被折叠?
被折叠的 条评论
为什么被折叠?
 到【灌水乐园】发言


