


转载于:http://blog.csdn.net/Adali/archive/2007/08/27/1761028.aspx
一。NetBeans 5.5.1 中的样例:
在NetBeans 5.5.1中自带了一个“文件上载“的例子,使用这个例子,请先下载并安装以下软件:
-
JAVA SE 5 (JDK 1.5) 及以上版本(http://java.sun.com/javase/downloads/index.jsp )
-
NetBeans 5.5.1(http://zh-cn.netbeans.org/index_zh_CN.html )
-
Sun Application Server 9.0(https://glassfish.dev.java.net/)
2+3也可以下载“NetBeans IDE 5.5.1 with Java EE Application Server 9.0 U1 Patch 1 bundle ”(http://www.netbeans.info/downloads/index.php?rs=22&p=3)
在NetBeans中,选择菜单“新建项目”-〉“类别”中选择“样例”-〉“Java BluePrint Solution” ->AJAX编程模型。项目中选择“文件上载”。项目名缺省为“fileupload”
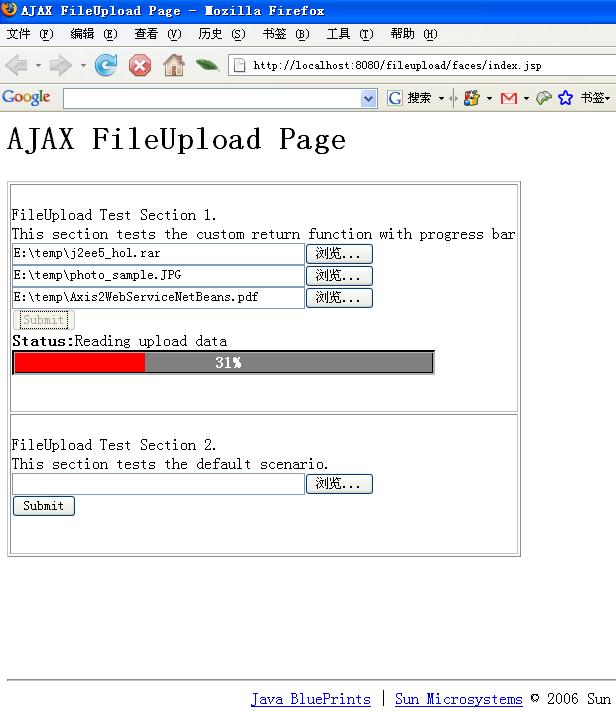
运行项目“fileupload”, 并且选择几个上传文件,文件类型可以多种多样,比如pdf, jar, ra, zip, jpeg, gif等等。可以看到如下界面。
传输完毕,可以看到如下结果。
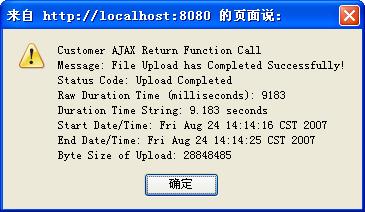
显示了上传文件开始,结束的的时间,上传文件总的字节数目等等。
项目“fileupload”的/web/docs/下有一个fileupload.html 的文档,解释了这个上传文件的参数及使用(English)。文件上载是一个JSF控件,开发者需要了解的除了如何在服务器端处理请求中的参数,如何在客户端显示响应信息外,所需要了解的仅仅是一些参数的设置。如这个例子中的代码所示:
| <ui:fileUploadTag id="TestFileuploadForm0" retFunction="testRetFunction" retMimeType="text/xml" postProcessingMethod="#{FileUploadCustomBean.postProcessingMethod}" progressBarDivId="progress1x" progressBarSubmitId="submit1x" progressBarSize="40"> <input type="file" size="40" name="fileToUpload0" id="fileToUpload0Id"/><br/> <input type="file" size="40" name="fileToUpload1" id="fileToUpload1Id"/><br/> <input type="file" size="40" name="fileToUpload2" id="fileToUpload2Id"/><br/> <input type="submit" id="submit1x" name="submit1x" value="Submit"/><br/> <div id="progress1x"></div><br/> </ui:fileUploadTag> |
参数如下:
| id | 文件上载JSF控件的标识 |
|---|---|
| serverLocationDir | 文件上载的目标目录。在示范例子中未给出这个参数的应用。缺省的情况下,文件会上载到Sun application Server 的domains/domain1/lib/upload目录下。 |
| retFunction | JavaScript 的回调函数,用于客户端出来服务器返回的响应信息。 |
| retMimeType | 服务器端返回响应信息的类型,缺省的是“text/xml ” |
| postProcessingMethod | 服务器端用来处理请求信息的方法。 |
| progressBarDivId | 进度条的Id |
| progressBarSubmitId | 和进度条关联的触发文件上载的id。示范例子中是“submit”按钮 |
| progressBarSize | 进度条的大小 |
二。使用FileUpload控件建立实例PhotoAlbum
下面给出另外一个使用这个上传文件的小例子PhotoAlbum,最主要是为了说明如何提取上传后的文件名,以及如何用AJAX技术来部分刷新上传页面。另外想借这个例子用 NetBeans开发JSF程序的一般流程。
1。NetBeans中选择菜单“新建项目”。“类别“中选择“Web”, 项目中选择“Web应用程序”。
2。“新建Web应用程序”窗口中,输入及选择以下内容:
项目名称:PhotoAlbum
源代码结构:Java BluePrints
服务器:Sun Java System Application Server 9
Java EE 版本:Java EE 5
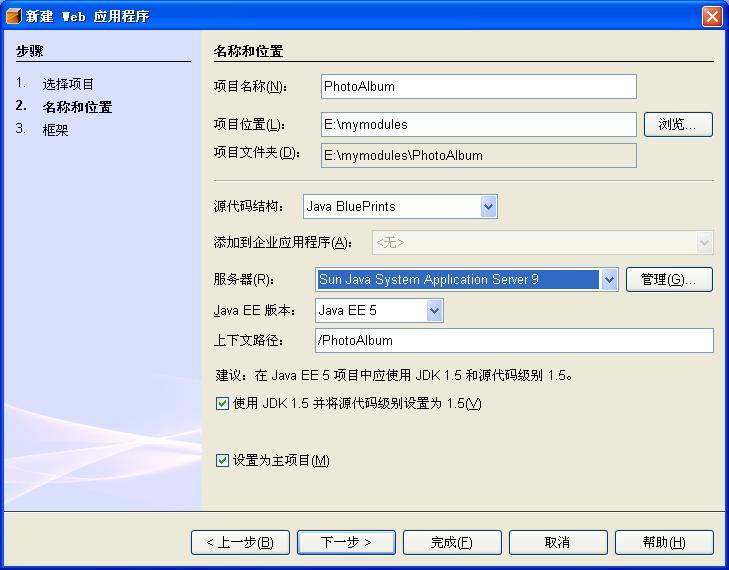
注意:如果服务器选择中没有出现“Sun Java System Application Server 9”。请在NetBeans中,选择菜单” 窗口”->“ 运行时”. 在”运行环境”窗口中,鼠标右键选择”服务器”, 点击”添加服务器”。在”平台文件夹位置”中选择安装”Sun Java System Application Server 9”的目录。在下一个窗口中,输入服务器的管理用户名和密码(缺省管理用户名和密码是“ admin/adminadmin”)。
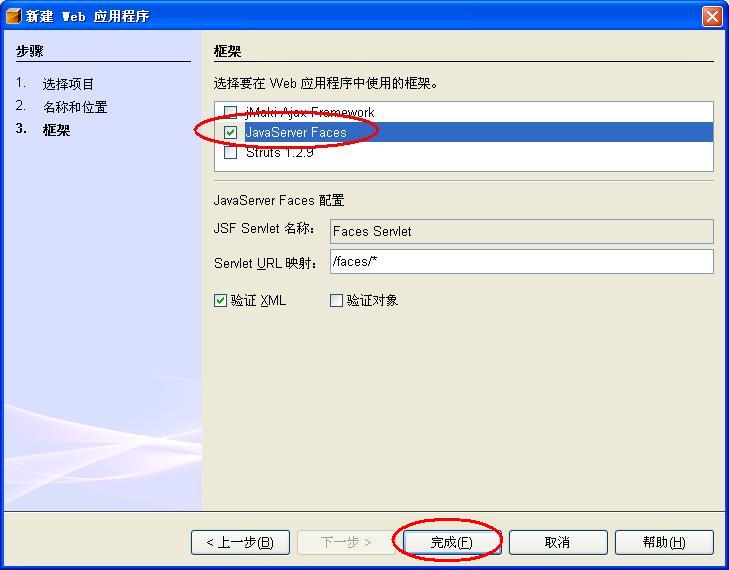
3。下一个窗口中,选择“Java Server Faces”框架。点击“完成”
4。选择项目“PhotoAlbum”中的库,右键选择“添加jar/文件夹”,加入文件上载所需要的几个jar文件。在NetBeans安装目录下,例如C:/Java/netbeans-5.5.1/enterprise3/modules/ext/blueprints,加入以下五个jar文件
shale-remoting.jar
bp-ui-5.jar
commons-logging-1.1.jar
commons-io-1.2.jar
commons-fileupload-1.1.1.jar
需要注意的是: 为了完成下面的例子,有两个jar文件需要比较新的版本,并且需要加入库rome-0.8.jar. 为方便起见,本文给出下载的jar文件,
最后的库文件为六个:
shale-remoting-1.0.4.jar (http://download.csdn.net/source/236129)
bp-ui-5-0.8.jar (http://download.csdn.net/source/236127)
rome-0.8.jar (http://download.csdn.net/source/236128)
commons-logging-1.1.jar
commons-io-1.2.jar
commons-fileupload-1.1.1.jar
5。在项目“PhotoAlbum”中的Web目录下,手工创建一个目录images. 如果PhotoAlbum的工作目录是e:/mymodules/PhotoAlbum, 那么这个目录的绝对路径是:E:/mymodules/PhotoAlbum/web/images.
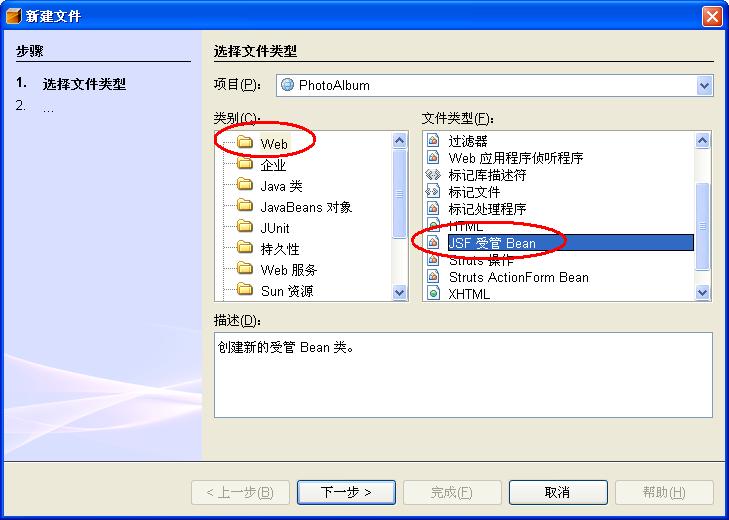
6。创建JSF Bean, 鼠标右键点击项目“PhotoAlbum”中,选择“新建文件/文件夹”。在类别中选择“Web”, 在“文件类型”中选择“JSF受管Bean”
7。“新建JSF受管Bean”窗口中,输入:
类名:FileUploadBackBean
包:com.sun.sdn.demo.jsf

这步创建完之后,可以查看项目“PhotoAlbum”中“配置文件“下的“faces-config.xml”, 可以看到刚创建的“FileUploadBackBean”已经自动加入到配置文件中。
 <
managed-bean
>
<
managed-bean-name
>
FileUploadBackBean
</
managed-bean-name
>
<
managed-bean-class
>
com.sun.sdn.demo.jsf.FileUploadBackBean
</
managed-bean-class
>
<
managed-bean-scope
>
request
</
managed-bean-scope
>
</
managed-bean
>
<
managed-bean
>
<
managed-bean-name
>
FileUploadBackBean
</
managed-bean-name
>
<
managed-bean-class
>
com.sun.sdn.demo.jsf.FileUploadBackBean
</
managed-bean-class
>
<
managed-bean-scope
>
request
</
managed-bean-scope
>
</
managed-bean
>
8。在 FileUploadBackBean 加入如下代码:

 /**/
/*
/**/
/* * FileUploadBackBean.java * * Created on 2007年8月27日, 下午2:48 * * To change this template, choose Tools | Template Manager * and open the template in the editor.
 */
package
com.sun.sdn.demo.jsf;
import
java.util.Enumeration;
import
java.util.Hashtable;
import
java.io.IOException;
import
javax.faces.context.FacesContext;
import
javax.faces.context.ResponseWriter;
import
javax.servlet.ServletContext;
import
org.apache.shale.remoting.faces.ResponseFactory;
import
com.sun.javaee.blueprints.components.ui.fileupload.FileUploadStatus;
/** */
/** * * @author Ada Li */
public
class
FileUploadBackBean
...
{
*/
package
com.sun.sdn.demo.jsf;
import
java.util.Enumeration;
import
java.util.Hashtable;
import
java.io.IOException;
import
javax.faces.context.FacesContext;
import
javax.faces.context.ResponseWriter;
import
javax.servlet.ServletContext;
import
org.apache.shale.remoting.faces.ResponseFactory;
import
com.sun.javaee.blueprints.components.ui.fileupload.FileUploadStatus;
/** */
/** * * @author Ada Li */
public
class
FileUploadBackBean
...
{
 /** *//** * <p>Factory for response writers that we can use to construct the * outgoing response.</p>
 */ private static ResponseFactory factory = new ResponseFactory(); private String serverLocationDir = "E:/mymodules/PhotoAlbum/build/web/images"; String imageRootUrl = "../images"; /** *//** Creates a new instance of FileUploadBackBean */ public FileUploadBackBean() ...{ } public void postProcessingMethod(FacesContext context, Hashtable htUpload, FileUploadStatus status) ...{ // set custom return enabled so Phaselistener knows not to send default response status.enableCustomReturn(); // Acquire a response containing these results ResponseWriter writer = factory.getResponseWriter(context, "text/xml"); try ...{ writer.startElement("response", null); String imageFileLocation = ""; for (Enumeration e = htUpload.keys() ; e.hasMoreElements() ;) ...{ String key = (String)e.nextElement(); //System.out.println(key.substring(0, 13)); if (key.substring(0, 13).equals("fileLocation_"))...{ imageFileLocation = (String)htUpload.get(key); String fileName = imageFileLocation.replaceFirst(getServerLocationDir(), ""); String imageFileUrl = imageRootUrl + fileName; writer.startElement("imageFileUrl", null); writer.write(imageFileUrl); writer.endElement("imageFileUrl"); } } writer.endElement("response"); writer.flush(); } catch (IOException iox) ...{ System.out.println("FileUploadPhaseListener error writting AJAX response : " + iox); } } public String getServerLocationDir() ...{ return serverLocationDir; } public void setServerLocationDir(String serverLocationDir) ...{ this.serverLocationDir = serverLocationDir; } }
FileUploadBackBean中有两个参数需要根据情况设定,即 serverLocationDir 和 imageRootUrl 。因为PhotoAlbum缺省部署完成后,项目在应用服务器中的部署位置就是/build目录。在这个例子中,文件上载到/build/images目录下,因此还需要手工在PhotoAlbum的web目录下建立一个images目录,PhotoAlbum部署完成后,在/build/目录下自动会建立images目录。
上载后的文件放在/build/images目录下,通过浏览器访问的话,URL是http://localhost:8080/PhotoAlbum/images/XXXX.jpg, 因此,获得上传的文件名之后,之前要加上相对路径“../images”.
文件中方法 postProcessingMethod 的主要作用是提取上传文件名,并生成xml格式的响应信息。信息的格式如下:
<
response
>
<
imageFileUrl
>
../images/Bike.jpg
</
imageFileUrl
>
<
imageFileUrl
>
../images/Bungee.jpg
</
imageFileUrl
>
<
imageFileUrl
>
../images/Duke.in.City.jpg
</
imageFileUrl
>
<
imageFileUrl
>
../images/Pointing.jpg
</
imageFileUrl
>
<
imageFileUrl
>
../images/Thiniing.jpg
</
imageFileUrl
>
</
response
>
9。现在开始写JSP页面。在PhotoAlbum项目中,加入JSF框架之后,项目中自动加入了一个WelcomJSF.jsp页面。修改后的WelcomJSF.jsp代码如下:
<%
@page contentType
=
"
text/html
"
%>
<%
@page pageEncoding
=
"
UTF-8
"
%>
<%
@taglib uri
=
"
http://java.sun.com/jsp/jstl/core
"
prefix
=
"
c
"
%>
<%
@taglib uri
=
"
http://java.sun.com/jsf/html
"
prefix
=
"
h
"
%>
<%
@taglib uri
=
"
http://java.sun.com/jsf/core
"
prefix
=
"
f
"
%>
<%
@taglib uri
=
"
http://java.sun.com/blueprints/ui
"
prefix
=
"
ui
"
%>
<
html
>
<
head
>
<
title
>
AJAX与JSF实现带进度条的批量文件上载
</
title
>
<
script
>
function props(namex)
...
{ var listx=""; var ob=dojo.byId(namex); for(xx in ob) ...{ listx += xx + " = " + ob[xx] + "<br/>" } //document.write(listx); alert(listx); }
function testRetFunction(type, data, evt)
...
{ // handle successful response here var photoAlbum = document.getElementById("photo_album"); var resultx = data.getElementsByTagName("response")[0]; if(resultx) ...{ var photoAlbum = document.getElementById("photo_album"); var tb = document.createElement("table"); tb.setAttribute("border", 1); var tbody = document.createElement("tbody"); var tr = document.createElement("tr"); tb.insertBefore(tbody, null); tbody.insertBefore(tr, null); photoAlbum.insertBefore(tb, null); var imageUrls = resultx.getElementsByTagName("imageFileUrl"); for (var i=0; i<imageUrls.length; i++)...{ var td = document.createElement("td"); td.setAttribute("width", "20%"); td.setAttribute("valigh", "top"); var url = imageUrls[i].childNodes[0].nodeValue; var image = document.createElement("img"); image.setAttribute("src", url); image.setAttribute("width", "100"); td.insertBefore(image, null); tr.insertBefore(td, null); } } }
</
script
>
</
head
>
<
body
>
<
h1
>
AJAX与JSF实现带进度条的批量文件上载
</
h1
>
<
f:view
>
<
table border
=
"
1
"
colspacing
=
"
5
"
colpadding
=
"
5
"
>
<
tr
>
<
td
>
<
br
/>
<
ui:fileUploadTag id
=
"
TestFileuploadForm0
"
serverLocationDir
=
"
#{FileUploadBackBean.serverLocationDir}
"
retFunction
=
"
testRetFunction
"
retMimeType
=
"
text/xml
"
postProcessingMethod
=
"
#{FileUploadBackBean.postProcessingMethod}
"
progressBarDivId
=
"
progress1x
"
progressBarSubmitId
=
"
submit1x
"
progressBarSize
=
"
40
"
>
<
input type
=
"
file
"
size
=
"
40
"
name
=
"
fileToUpload0
"
id
=
"
fileToUpload0Id
"
/><
br
/>
<
input type
=
"
file
"
size
=
"
40
"
name
=
"
fileToUpload1
"
id
=
"
fileToUpload1Id
"
/><
br
/>
<
input type
=
"
file
"
size
=
"
40
"
name
=
"
fileToUpload2
"
id
=
"
fileToUpload2Id
"
/><
br
/>
<
input type
=
"
file
"
size
=
"
40
"
name
=
"
fileToUpload3
"
id
=
"
fileToUpload3Id
"
/><
br
/>
<
input type
=
"
file
"
size
=
"
40
"
name
=
"
fileToUpload4
"
id
=
"
fileToUpload4Id
"
/><
br
/>
<
input type
=
"
submit
"
id
=
"
submit1x
"
name
=
"
submit1x
"
value
=
"
Submit
"
/><
br
/>
<
div id
=
"
progress1x
"
></
div
><
br
/>
</
ui:fileUploadTag
>
</
td
>
</
tr
>
</
table
>
<
br
><
br
>
<
div id
=
"
photo_album
"
></
div
>
</
f:view
>
</
body
>
</
html
>
在welcomeJSF.jsp页面中,重点就是JavaScript函数 testRetFunction(), 它作为AJAX中客户端的回调函数, 接受来自服务器端的响应信息后,通过DOM技术, 在原有页面上,动态地创建了table及img 对象,来显示上传的图像.
在 FileUploadBackBean 声明了属性 serverLocationDir ,并且有对这个属性的set和get方法,那么在JSF中,对这个属性的调用可以直接是#{FileUploadBackBean.serverLocationDir}。
10。运行的结果如下

三。小结
JSF(JavaServer Faces)主要的目的是把表示和动作分开。在通常的JSP开发中, Http请求映射到事件处理器,在服务器端操作页面控件,都不是很方便。而JSF技术分离了动作和表示,可以让开发者更专注于自己的领域,而把一些映射的工作或者底层的工作交给框架来实现。
JSF提供了大量的tab library, 前面的文件上载的控件就是其中之一。在使用这个控件的时候,可以注意到,编写Bean时,并不需要直接从HttpRequest中读取参数值,并且在返回响应信息时候,也并没有在代码中直接指定具体的页面。AJAX在JSF的应用中,体现在增加了JavaScript回调函数的接口,就是WelcomJSF.jsp中的函数testRetFunction()。
PhotoAlbum作为一个示例,代码中缺少一些必要的环节,比如对文件类型的判断,比如返回出错信息给客户端。这些留给读者来完成吧。对AJAX应用在JSF上感兴趣的朋友,可以参考开源软件Java[TM] BluePrints Solutions Catalog for Java EE 5 (https://blueprints.dev.java.net/bpcatalog/ee5/index.html)


 235
235


 被折叠的 条评论
为什么被折叠?
被折叠的 条评论
为什么被折叠?
 到【灌水乐园】发言


