


一 文件路径配置
自定义标签及过滤器也有自己的存放目录”templatetags"。
(1)在项目目录中新建python package命名为common并在主目录settings.py中进行注册
(2)在common下新建python package命名为“templatetags"
(3)在templatetags中新建python文件命名为”common_custom"
二、自定义过滤器
方式一:装饰器注册
(1)在新建好的common_custom文件中编写自定义函数
#!/usr/bin/env python
# -*- coding:utf-8 -*-
__author__ = 'IT小叮当'
__time__ = '2019-01-18 20:13'
from django import template

#创建注册器
register = template.Library()

#装饰器的方法注册自定义过滤器
@register.filter
#实现首字母变大写其余字母均小写的功能
def my_lowercap(value):
    return value.capitalize()
在建好的template中movie主页index模版中测试
首先加载自定义过滤器文件,之后在使用自定义过滤器
{% load common_custom %}
<!DOCTYPE html>
<html lang="en">
<head>
<meta charset="UTF-8">
<title>movie主页</title>
</head>
<body>
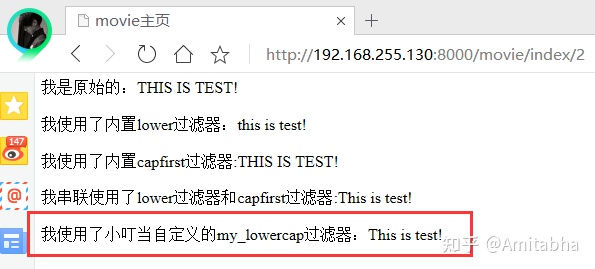
我是原始的:{{ test }}<br><br>
我使用了内置lower过滤器:{{ test|lower }}<br><br>
我使用了内置capfirst过滤器:{{ test|capfirst }}<br><br>
我串联使用了lower过滤器和capfirst过滤器:{{test|lower|capfirst }}<br><br>
我使用了小叮当自定义的my_lowercap过滤器:{{ test|my_lowercap}}<br><br>
</body>
</html>浏览器中显示:
可见,虽然内置的过滤器不能直接实现“首字母变大写,其余字母变小写。”但是,我们可以通过自定义过滤器的方法一步到位。
值得注意的是,使用装饰器注册自定义过滤器时,还可通过在装饰器中传参的方式,重命名自定义的过滤器名字。
#!/usr/bin/env python
# -*- coding:utf-8 -*-
__author__ = 'IT小叮当'
__time__ = '2019-01-18 20:13'
from django import template

#创建注册器
register = template.Library()

#装饰器的方法注册自定义过滤器
@register.filter('Mystyle')
#实现首字母变大写其余字母均小写的功能
def my_lowercap(value):
    return value.capitalize()
此时在模版中使用过滤器my_lowercap便会报错

使用重命名后的过滤器Mystyle

代码如下
我使用了小叮当自定义的my_lowercap过滤器:{{ test|Mystyle}}<br><br>在浏览器中查看
方式二:函数调用的方式注册
在common_custom中添加如下代码:
#自定义实现cut过滤器功能
def my_cut(value,arg):
    return value.replace(arg,'')
#函数调用的方法注册自定义过滤器
register.filter(my_cut)
在模版中使用如下
{% load common_custom %}
<!DOCTYPE html>
<html lang="en">
<head>
<meta charset="UTF-8">
<title>movie主页</title>
</head>
<body>
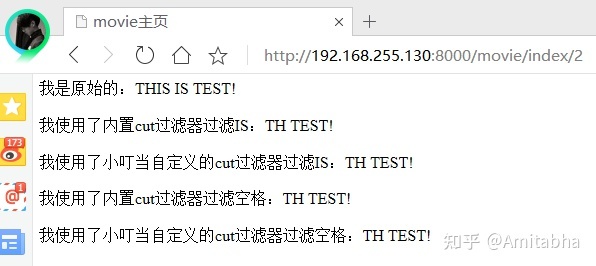
我是原始的:{{ test }}<br><br>
我使用了内置cut过滤器过滤IS:{{ test|cut:'IS'}}<br><br>
我使用了小叮当自定义的cut过滤器过滤IS:{{ test|my_cut:'IS'}}<br><br>
我使用了内置cut过滤器过滤空格:{{ test|cut:'IS'}}<br><br>
我使用了小叮当自定义的cut过滤器过滤空格:{{ test|my_cut:'IS'}}<br><br>
</body>
</html>在浏览器中查看
小结:
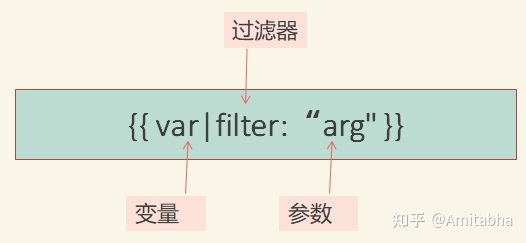
自定义过滤器就是一个带有一个或两个参数的Python 函数:
- (输入的)变量的值 —— 不一定是字符串形式。
- 参数的值 —— 可以有一个初始值,或者完全不要这个参数
三、自定义标签
自定义标签分为简单标签和包含标签。
简单标签django.template.Library.simple_tag()
包含标签django.template.Library.inclusion_tag()
tag()方法有两个参数:
(1) 模板标记的名称 - 字符串。 如果省略,将使用编译函数的名称。
(2)编译的函数 – 一个Python函数(不要把函数名写成字符串)
与过滤器注册一样,也可以将其用作装饰器。
1.简单标签
(1)在"common_custom.py"中自定义简单标签

代码如下:
#自定义简单标签输出当前时间
import datetime

@register.simple_tag
def current_time():
    format_date = '%Y年%m月%d日 %H:%M:%S'
    return datetime.datetime.now().strftime(format_date)
(2)在templates的movie下的index模版中进行测试
{% load common_custom %}
<!DOCTYPE html>
<html lang="en">
<head>
<meta charset="UTF-8">
<title>movie主页</title>
</head>
<body>
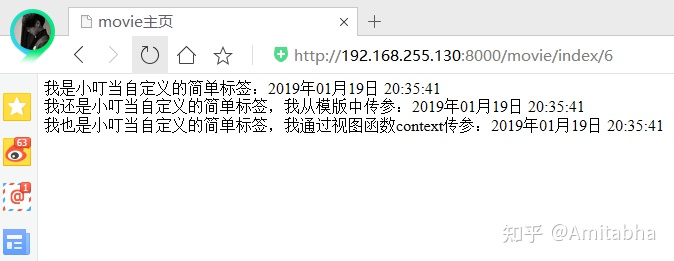
我是小叮当自定义的简单标签:{% current_time %}<br>
</body>
</html>浏览器中查看

简单标签传参--模版中传参
模版标签的传参格式:”标签名称+空格+参数“
自定义可传参的简单标签
@register.simple_tag
def current_time2(format_date):
    return datetime.datetime.now().strftime(format_date)
在模版中传参
我还是小叮当自定义的简单标签,我从模版中传参:{% current_time2 '%Y年%m月%d日 %H:%M:%S' %}<br>到浏览器中查看

简单标签传参--视图函数中通过”上下文“传参
(1)在movie的views.py中的视图函数里通过"context"上下文传参
def index(request,age):
    return render(request,'movie/index.html',
                  context={'format_date':'%Y年%m月%d日 %H:%M:%S',
                                                    }
                  )
(2)在"common_custom.py"中自定义简单标签
@register.simple_tag(takes_context=True)
def current_time3(context):
    format_date=context.get('format_date')
return datetime.datetime.now().strftime(format_date)需要注意的是,通过视图函数上下文传参定义的简单标签,需要在简单标签装饰器中令”takes_context=True"(takes_context默认为False)
(3)在模板中引用
1我是小叮当自定义的简单标签:{% current_time %}<br>
2我还是小叮当自定义的简单标签,我从模版中传参:{% current_time2 '%Y年%m月%d日 %H:%M:%S' %}<br>
3我也是小叮当自定义的简单标签,我通过视图函数context传参:{% current_time3 %}<br>
(4)在浏览器中查看
2.包含标签
#1问题引入
(1)movie主页视图函数
#定义列表
li=['a','b','c']
#定义字典
di={'x':1,'y':2}
tup=('x','y','z')

mytest="THIS IS TEST!"
#导入时间模块
import datetime
def index(request,age):
    return render(request,'movie/index.html',
                  context={'format_date':'%Y年%m月%d日 %H:%M:%S',
                           'strname':'我是字符串',#传递字符串
                           'hello':hello,#传递自定义函数
                           'xdd_say':xdd_info.say,#传递类方法
                           'xdd':xdd_info,#传递类对象
                           'list':li,#传递列表
                           'dict':di,#传递字典
                           'test':mytest,
                           'xdd666':None,
                           'num1':18,
                           'num2':2,
                           'html':'<h1>THIS IS IN HTML!</h1>',
                           'float':3.1415,
                           'now':datetime.datetime.now,
                           'tuple':tup,
                           }
                  )
(2)movie主页模版
{% load common_custom %}
<!DOCTYPE html>
<html lang="en">
<head>
<meta charset="UTF-8">
<title>movie主页</title>
</head>
<body>
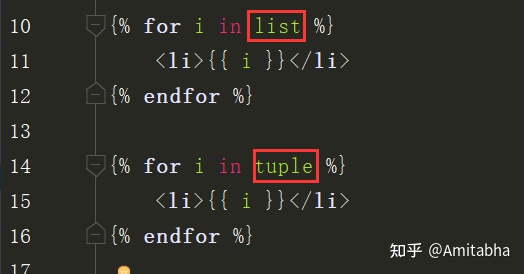
{% for i in list %}
<li>{{ i }}</li>
{% endfor %}
{% for i in tuple %}
<li>{{ i }}</li>
{% endfor %}
</html>(3)浏览器中查看

我们发现,要实现列表list变量和元组tuple变量的显示,for循环模版标签几乎一样,不同的只是传入的对象从list变成了tuple
为了避免代码重复,我们可以使用包含标签的方法。
(4)我们在templates下movie中新建“show_tags"html文件将,重复的代码复制到其中。

代码如下:
{% for i in choice %}
    <li>{{ i }}</li>
{% endfor %}
#2自定义包含标签固定传参
(1)在"common_custom.py"中自定义包含标签
#自定义包含标签并与重复部分的代码绑定
@register.inclusion_tag('movie/show_tags.html')
def custom_for():
    test_list=['ax','ay','az']
    #将固定参数test_list传给自定义模版标签变量choice
    return {'choice':test_list}
(2)在movie模版主页使用
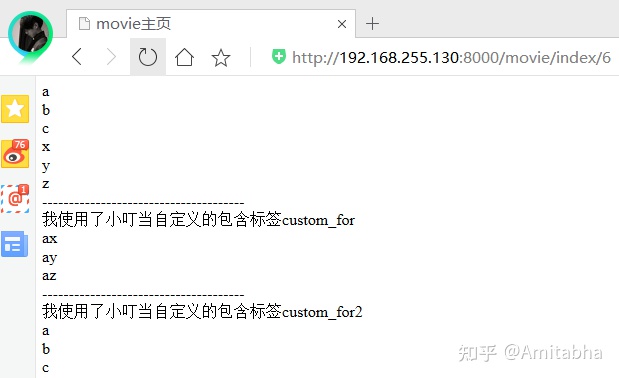
{% for i in list %}
    <li>{{ i }}</li>
{% endfor %}

{% for i in tuple %}
    <li>{{ i }}</li>
{% endfor %}
--------------------------------------<br>
我使用了小叮当自定义的包含标签custom_for
{% custom_for %}
(3)在浏览器中查看

#3自定义包含标签 通过标签自己传参
(1)在"common_custom.py"中自定义包含标签
@register.inclusion_tag('movie/show_tags.html')
def custom_for2(args):
    return {'choice':args}
(2)在movie模版主页使用并传入参数list
{% for i in list %}
    <li>{{ i }}</li>
{% endfor %}

{% for i in tuple %}
    <li>{{ i }}</li>
{% endfor %}
--------------------------------------<br>
我使用了小叮当自定义的包含标签custom_for
{% custom_for %}
--------------------------------------<br>
我使用了小叮当自定义的包含标签custom_for2
{% custom_for2 list %}
(3)在浏览器中查看
#4自定义包含标签 接受上下文传参
(1) 在"common_custom.py"中自定义包含标签
@register.inclusion_tag('movie/show_tags.html',takes_context=True)
def custom_for3(context):
    args=context.get('list')
    return {'choice':args}
传入了对应视图函数中的list

(2)在模版中使用自定义包含标签
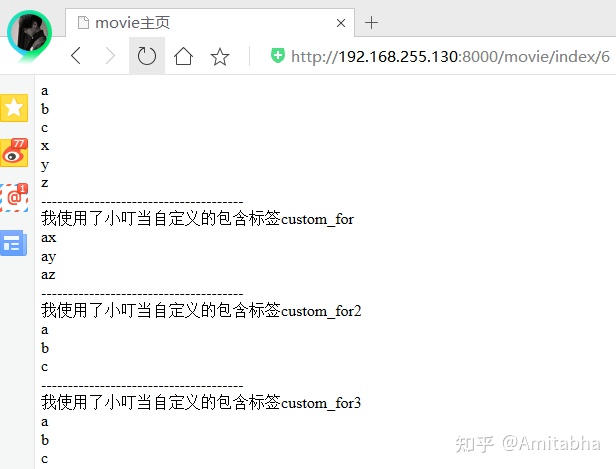
{% for i in list %}
    <li>{{ i }}</li>
{% endfor %}

{% for i in tuple %}
    <li>{{ i }}</li>
{% endfor %}
--------------------------------------<br>
我使用了小叮当自定义的包含标签custom_for
{% custom_for %}
--------------------------------------<br>
我使用了小叮当自定义的包含标签custom_for2
{% custom_for2 list %}
--------------------------------------<br>
我使用了小叮当自定义的包含标签custom_for3
{% custom_for3 %}
(3)在浏览器中查看


 263
263


 被折叠的 条评论
为什么被折叠?
被折叠的 条评论
为什么被折叠?
 到【灌水乐园】发言


