什么是插槽?
插槽(Slot)是Vue提出来的一个概念,正如名字一样,插槽用于决定将所携带的内容,插入到指定的某个位置,从而使模板分块,具有模块化的特质和更大的重用性。插槽显不显示、怎样显示是由父组件来控制的,而插槽在哪里显示就由子组件来进行控制
Vue slot 原理
在web-components中有slot的概念,https://developers.google.com/web/fundamentals/web-components/shadowdom。
<slot> 元素
Shadow DOM 使用 <slot> 元素将不同的 DOM 树组合在一起。Slot 是组件内部的占位符,用户可以使用自己的标记来填充。
通过定义一个或多个 slot,您可将外部标记引入到组件的 shadow DOM 中进行渲染。 这相当于您在说“在此处渲染用户的标记”。
注:Slot 是为网络组件创建“声明性 API”的一种方法。它们混入到用户的 DOM 中,帮助对整个组件进行渲染,从而将不同的 DOM 树组合在一起。
怎么用插槽?
默认插槽
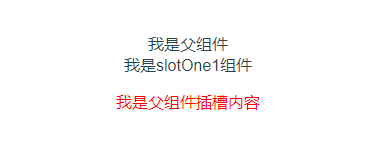
父组件
| 1 2 3 4 5 6 7 8 | <template>
<div>
我是父组件
<slotOne1>
<p style="color:red">我是父组件插槽内容</p>
</slotOne1>
</div>
</template>
|
在父组件引用的子组件中写入想要显示的内容(可以使用标签,也可以不用)
子组件(slotOne1)?
| 1 2 3 4 5 6 | <template>
<div class="slotOne1">
<div>我是slotOne1组件</div>
<slot></slot>
</div>
</template>
|
在子组件中写入slot,slot所在的位置就是父组件要显示的内容
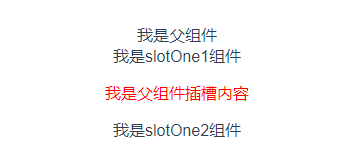
当然再父组件引用的子组件中也可以写入其他组件
父组件
| 1 2 3 4 5 6 7 8 9 | <template>
<div>
我是父组件
<slotOne1>
<p style="color:red">我是父组件插槽内容</p>
<slot-one2></slot-one2>
</slotOne1>
</div>
</template>
|
子组件(slotOne2)
?
| 1 2 3 4 5 | <template>
<div class="slotOne2">
我是slotOne2组件
</div>
</template>
|
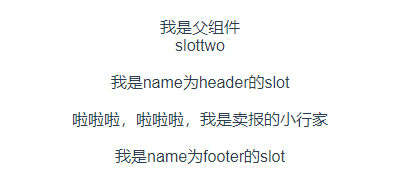
具名插槽
子组件
| 1 2 3 4 5 6 7 8 | <template>
<div class="slottwo">
<div>slottwo</div>
<slot name="header"></slot>
<slot></slot>
<slot name="footer"></slot>
</div>
</template>
|
在子组件中定义了三个slot标签,其中有两个分别添加了name属性header和footer
父组件
?
| 1 2 3 4 5 6 7 8 9 10 11 12 | <template>
<div>
我是父组件
<slot-two>
<p>啦啦啦,啦啦啦,我是卖报的小行家</p>
<template slot="header">
<p>我是name为header的slot</p>
</template>
<p slot="footer">我是name为footer的slot</p>
</slot-two>
</div>
</template>
|
在父组件中使用template并写入对应的slot值来指定该内容在子组件中现实的位置(当然也不用必须写到template),没有对应值的其他内容会被放到子组件中没有添加name属性的slot中
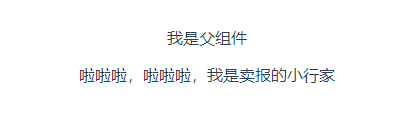
插槽的默认内容
父组件
| 1 2 3 4 5 6 | <template>
<div>
我是父组件
<slot-two></slot-two>
</div>
</template>
|
子组件
| 1 2 3 4 5 | <template>
<div class="slottwo">
<slot>我不是卖报的小行家</slot>
</div>
</template>
|
可以在子组件的slot标签中写入内容,当父组件没有写入内容时会显示子组件的默认内容,当父组件写入内容时,会替换子组件的默认内容
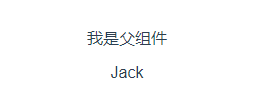
编译作用域
父组件
| 1 2 3 4 5 6 7 8 9 10 11 12 13 14 15 16 17 | <template>
<div>
我是父组件
<slot-two>
<p>{{name}}</p>
</slot-two>
</div>
</template>
<script>
export default {
data () {
return {
name: 'Jack'
}
}
}
</script>
|
子组件
| 1 2 3 4 5 | <template>
<div class="slottwo">
<slot></slot>
</div>
</template>
|
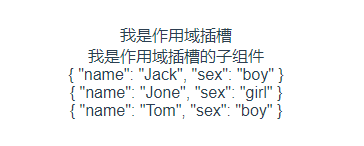
作用域插槽
子组件
| 1 2 3 4 5 6 7 8 9 10 11 12 13 14 15 16 17 18 19 20 21 | <template>
<div>
我是作用域插槽的子组件
<slot :data="user"></slot>
</div>
</template>
<script>
export default {
name: 'slotthree',
data () {
return {
user: [
{name: 'Jack', sex: 'boy'},
{name: 'Jone', sex: 'girl'},
{name: 'Tom', sex: 'boy'}
]
}
}
}
</script>
|
在子组件的slot标签上绑定需要的值
父组件
| 1 2 3 4 5 6 7 8 9 10 11 12 | <template>
<div>
我是作用域插槽
<slot-three>
<template slot-scope="user">
<div v-for="item in user.data" :key="item.id">
{{item}}
</div>
</template>
</slot-three>
</div>
</template>
|
在父组件上使用slot-scope属性,user.data就是子组件传过来的值
总结
以上就是这篇文章的全部内容了,希望本文的内容对大家的学习或者工作具有一定的参考学习价值,如果有疑问大家可以留言交流,谢谢大家对脚本之家的支持。


 3387
3387


 被折叠的 条评论
为什么被折叠?
被折叠的 条评论
为什么被折叠?
 到【灌水乐园】发言


