


目录
xxl-job是一个优秀的分布式任务调度平台,国内很多公司在用,部署简单,使用方便。最近想看看是怎么实现的,于是就研究下他的源码。
一、项目结构
1、项目地址
https://github.com/xuxueli/xxl-job/,项目的介绍,安装以及使用可以查看官网地址。
2、项目结构:
导入IDEA后项目结构如下

doc文件夹保存了说明以及架构图
xxl-job-admin是项目的后台管理系统
xxl-job-core保存一些核心代码
xxl-job-executor-samples是执行器的示例代码
启动xxl-job-executor-sample-springboot后,我们在后台管理界面看到注册上来的执行器

二、思路
2.1、结构图
项目目录下的ppt中有最新的架构图

2.2、问题
从架构图,以及实际使用的过程中,我对客户端有了以下几个疑问,后续的解析也是从这几个疑问出发的
1) 如何触发客户端初始化
2) 如何将客户端注册到调度中心的
3) 如何接收调度中心的调度请求
4) 接收调度中心请求后如何进行调度
三、具体分析
本片文章是基于xxl-job-executor-sample-springboot进行源码分析的
3.1 如何触发客户端初始化
xxl-job-executor-sample-springboot项目非常简单,

一眼可以看出配置的地方在XxlJobConfig这个类,我们对这个类进行分析。这个类是一个配置类,主要的目的是生成了一个 XxlJobSpringExecutor 实例bean。
 @Configuration
public class XxlJobConfig {

    //忽略部分代码

    @Bean
    public XxlJobSpringExecutor xxlJobExecutor() {
        logger.info(">>>>>>>>>>> xxl-job config init.");
        XxlJobSpringExecutor xxlJobSpringExecutor = new XxlJobSpringExecutor();
        xxlJobSpringExecutor.setAdminAddresses(adminAddresses);
        xxlJobSpringExecutor.setAppname(appname);
        xxlJobSpringExecutor.setAddress(address);
        xxlJobSpringExecutor.setIp(ip);
        xxlJobSpringExecutor.setPort(port);
        xxlJobSpringExecutor.setAccessToken(accessToken);
        xxlJobSpringExecutor.setLogPath(logPath);
        xxlJobSpringExecutor.setLogRetentionDays(logRetentionDays);

        return xxlJobSpringExecutor;
    }


}
那XxlJobSpringExecutor是如何完成初始化的过程呢,我们看下类的定义。
public class XxlJobSpringExecutor extends XxlJobExecutor implements ApplicationContextAware, SmartInitializingSingleton, DisposableBean {
    // start
    @Override
    public void afterSingletonsInstantiated() {
        // init JobHandler Repository (for method)
        initJobHandlerMethodRepository(applicationContext);
        // refresh GlueFactory
        GlueFactory.refreshInstance(1);
        // super start
        try {
            super.start();
        } catch (Exception e) {
            throw new RuntimeException(e);
        }
    }

   //忽略代码

}
可以看到XxlJobSpringExecutor类实现了SmartInitializingSingleton这个接口,这个是一个标记形式的接口。
public interface SmartInitializingSingleton {
    /**
	 * Invoked right at the end of the singleton pre-instantiation phase,
	 * with a guarantee that all regular singleton beans have been created
	 * already. {@link ListableBeanFactory#getBeansOfType} calls within
	 * this method won't trigger accidental side effects during bootstrap.
	 * <p><b>NOTE:</b> This callback won't be triggered for singleton beans
	 * lazily initialized on demand after {@link BeanFactory} bootstrap,
	 * and not for any other bean scope either. Carefully use it for beans
	 * with the intended bootstrap semantics only.
	 */
    void afterSingletonsInstantiated();
}
从源码上看,它只有一个方法 void afterSingletonsInstantiated()。这个方法只有在spring中所有的单例类创建完成后才会触发。XxlJobSpringExecutor将需要初始化的方法放到实现的afterSingletonsInstantiated()中,即可完成xxl-job客户端的初始化的过程了。
3.2 如何注册到调度中心的
从上一节,我们知道,客户端通过XxlJobSpringExecutor完成与spring容器的交互,触发afterSingletonsInstantiated()方法完成初始化的过程。那具体是如何将自己注册到调度中心的呢?
我们看到afterSingletonsInstantiated()调用了父类XxlJobExecutor的start()方法,具体是什么作用呢?具体代码如下:
    // ---------------------- start + stop ----------------------
    public void start() throws Exception {

        // init logpath
        XxlJobFileAppender.initLogPath(logPath);
        //启动注册的方法
        // init invoker, admin-client
        initAdminBizList(adminAddresses, accessToken);


        // init JobLogFileCleanThread
        JobLogFileCleanThread.getInstance().start(logRetentionDays);

        // init TriggerCallbackThread
        TriggerCallbackThread.getInstance().start();

        // init executor-server
        initEmbedServer(address, ip, port, appname, accessToken);
    }
可以看到,大部分的初始化过程,是在XxlJobExecutor中完成的。从方法上看最后一个方法的名字,初始化内嵌的服务
initEmbedServer(address, ip, port, appname, accessToken);
最有嫌疑完成注册的过程,我们进去看下
private void initEmbedServer(String address, String ip, int port, String appname, String accessToken) throws Exception {

        // fill ip port 获取可用ip
        port = port>0?port: NetUtil.findAvailablePort(9999);
        ip = (ip!=null&&ip.trim().length()>0)?ip: IpUtil.getIp();

        // generate address
        if (address==null || address.trim().length()==0) {
            String ip_port_address = IpUtil.getIpPort(ip, port);   // registry-address:default use address to registry , otherwise use ip:port if address is null
            address = "http://{ip_port}/".replace("{ip_port}", ip_port_address);
        }

        // accessToken
        if (accessToken==null || accessToken.trim().length()==0) {
            logger.warn(">>>>>>>>>>> xxl-job accessToken is empty. To ensure system security, please set the accessToken.");
        }

        // start
        embedServer = new EmbedServer();
        embedServer.start(address, port, appname, accessToken);
    }
这个方法做了三件事情
1、获取可用的端口号
2、获取本机的IP地址,并且拼成了address地址
3、new 了一个内嵌的服务器EmbedServer实例,完成了start() 过程。
当看到start()就比较兴奋,这个名字就说明是一个初始化的方法。再进去看一下实际的源码,以下代码忽略的部分代码。
public class EmbedServer {
    private Thread thread;
    public void start(final String address, final int port, final String appname, final String accessToken) {
        thread = new Thread(new Runnable() {
            @Override
            public void run() {
                    // start registry
                    startRegistry(appname, address);
            }

        });
        thread.setDaemon(true);	// daemon, service jvm, user thread leave >>> daemon leave >>> jvm leave
        thread.start();
    }
    // ---------------------- registry ----------------------

    public void startRegistry(final String appname, final String address) {
        // start registry
        ExecutorRegistryThread.getInstance().start(appname, address);
    }
}
可以看到,最终是通过ExecutorRegistryThread类来完成注册的过程,具体看下start()方法的实现(忽略了部分代码)。
public void start(final String appname, final String address){
        //忽略代码
        registryThread = new Thread(new Runnable() {
            @Override
            public void run() {
                // registry
                while (!toStop) {
                    try {
                        RegistryParam registryParam = new RegistryParam(RegistryConfig.RegistType.EXECUTOR.name(), appname, address);
                        for (AdminBiz adminBiz: XxlJobExecutor.getAdminBizList()) {
                            try {
                                ReturnT<String> registryResult = adminBiz.registry(registryParam);
                                if (registryResult!=null && ReturnT.SUCCESS_CODE == registryResult.getCode()) {
                                    registryResult = ReturnT.SUCCESS;
                                    break;
                                } else {
                                }
                            } catch (Exception e) {
                            }
                        }
                    } catch (Exception e) {
                        if (!toStop) {
                            logger.error(e.getMessage(), e);
                        }
                    }

                    try {
                        if (!toStop) {
                            TimeUnit.SECONDS.sleep(RegistryConfig.BEAT_TIMEOUT);
                        }
                    } catch (InterruptedException e) {
                        if (!toStop) {
                        }
                    }
                }

                // registry remove
                // 忽略去除注册代码
            }
        });
        registryThread.setDaemon(true);
        registryThread.setName("xxl-job, executor ExecutorRegistryThread");
        registryThread.start();
    }
至此,我们找到了客户端的像注册中心注册的核心代码。这段代码做了几件事情
1、启动了一个后台的线程
2、在后台线程中,启动一个while循环,每隔30s,上报一次当前客户端的信息。
具体上报在AdminBiz的实现类AdminBizClient中执行,使用的是http的post请求
@Override
public ReturnT<String> registry(RegistryParam registryParam) {
return XxlJobRemotingUtil.postBody(addressUrl + "api/registry", accessToken, timeout, registryParam, String.class);
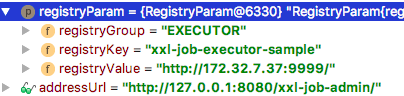
}debug代码,我们看到上报的信息如下:把本机的信息上报给调度中心。
调度中心的代码如下
 @RequestMapping("/{uri}")
    @ResponseBody
    @PermissionLimit(limit=false)
    public ReturnT<String> api(HttpServletRequest request, @PathVariable("uri") String uri, @RequestBody(required = false) String data) {

        // valid
        if (!"POST".equalsIgnoreCase(request.getMethod())) {
            return new ReturnT<String>(ReturnT.FAIL_CODE, "invalid request, HttpMethod not support.");
        }
        if (uri==null || uri.trim().length()==0) {
            return new ReturnT<String>(ReturnT.FAIL_CODE, "invalid request, uri-mapping empty.");
        }
        if (XxlJobAdminConfig.getAdminConfig().getAccessToken()!=null
                && XxlJobAdminConfig.getAdminConfig().getAccessToken().trim().length()>0
                && !XxlJobAdminConfig.getAdminConfig().getAccessToken().equals(request.getHeader(XxlJobRemotingUtil.XXL_JOB_ACCESS_TOKEN))) {
            return new ReturnT<String>(ReturnT.FAIL_CODE, "The access token is wrong.");
        }

        // services mapping
        if ("callback".equals(uri)) {
            List<HandleCallbackParam> callbackParamList = GsonTool.fromJson(data, List.class, HandleCallbackParam.class);
            return adminBiz.callback(callbackParamList);
        } else if ("registry".equals(uri)) {
            RegistryParam registryParam = GsonTool.fromJson(data, RegistryParam.class);
            return adminBiz.registry(registryParam);
        } else if ("registryRemove".equals(uri)) {
            RegistryParam registryParam = GsonTool.fromJson(data, RegistryParam.class);
            return adminBiz.registryRemove(registryParam);
        } else {
            return new ReturnT<String>(ReturnT.FAIL_CODE, "invalid request, uri-mapping("+ uri +") not found.");
        }

    }
这一步非常简单,只是将客户端信息保存到数据库中xxl_job_registry表中即可

3.3 如何接收调度请求
xxl-job使用了netty启动一个服务端接收调度中心的请求的,地址和端口在上一节已经上报给我注册中,实际上,netty启动时机早于注册的时机。
在上一节的代码中,涉及到了一个类EmbedServer,里面的start()方法忽略了部分代码,完整的代码如下:
public void start(final String address, final int port, final String appname, final String accessToken) {
        executorBiz = new ExecutorBizImpl();
        thread = new Thread(new Runnable() {

            @Override
            public void run() {

                // param
                EventLoopGroup bossGroup = new NioEventLoopGroup();
                EventLoopGroup workerGroup = new NioEventLoopGroup();
                ThreadPoolExecutor bizThreadPool = new ThreadPoolExecutor(
                        0,
                        200,
                        60L,
                        TimeUnit.SECONDS,
                        new LinkedBlockingQueue<Runnable>(2000),
                        new ThreadFactory() {
                            @Override
                            public Thread newThread(Runnable r) {
                                return new Thread(r, "xxl-rpc, EmbedServer bizThreadPool-" + r.hashCode());
                            }
                        },
                        new RejectedExecutionHandler() {
                            @Override
                            public void rejectedExecution(Runnable r, ThreadPoolExecutor executor) {
                                throw new RuntimeException("xxl-job, EmbedServer bizThreadPool is EXHAUSTED!");
                            }
                        });


                try {
                    // start server
                    ServerBootstrap bootstrap = new ServerBootstrap();
                    bootstrap.group(bossGroup, workerGroup)
                            .channel(NioServerSocketChannel.class)
                            .childHandler(new ChannelInitializer<SocketChannel>() {
                                @Override
                                public void initChannel(SocketChannel channel) throws Exception {
                                    channel.pipeline()
                                            .addLast(new IdleStateHandler(0, 0, 30 * 3, TimeUnit.SECONDS))  // beat 3N, close if idle
                                            .addLast(new HttpServerCodec())
                                            .addLast(new HttpObjectAggregator(5 * 1024 * 1024))  // merge request & reponse to FULL
                                            .addLast(new EmbedHttpServerHandler(executorBiz, accessToken, bizThreadPool));
                                }
                            })
                            .childOption(ChannelOption.SO_KEEPALIVE, true);

                    // bind
                    ChannelFuture future = bootstrap.bind(port).sync();

                    logger.info(">>>>>>>>>>> xxl-job remoting server start success, nettype = {}, port = {}", EmbedServer.class, port);

                    // start registry
                    startRegistry(appname, address);

                    // wait util stop
                    future.channel().closeFuture().sync();

                } catch (InterruptedException e) {
                    if (e instanceof InterruptedException) {
                        logger.info(">>>>>>>>>>> xxl-job remoting server stop.");
                    } else {
                        logger.error(">>>>>>>>>>> xxl-job remoting server error.", e);
                    }
                } finally {
                    // stop
                    try {
                        workerGroup.shutdownGracefully();
                        bossGroup.shutdownGracefully();
                    } catch (Exception e) {
                        logger.error(e.getMessage(), e);
                    }
                }

            }

        });
        thread.setDaemon(true);	// daemon, service jvm, user thread leave >>> daemon leave >>> jvm leave
        thread.start();
    }
这么一大段代中,关键一行代码如下
.addLast(new EmbedHttpServerHandler(executorBiz, accessToken, bizThreadPool));
这个类的中继承了抽象类SimpleChannelInboundHandler,实现的抽象方法如下:
@Override
        protected void channelRead0(final ChannelHandlerContext ctx, FullHttpRequest msg) throws Exception {

            // request parse
            //final byte[] requestBytes = ByteBufUtil.getBytes(msg.content());    // byteBuf.toString(io.netty.util.CharsetUtil.UTF_8);
            String requestData = msg.content().toString(CharsetUtil.UTF_8);
            String uri = msg.uri();
            HttpMethod httpMethod = msg.method();
            boolean keepAlive = HttpUtil.isKeepAlive(msg);
            String accessTokenReq = msg.headers().get(XxlJobRemotingUtil.XXL_JOB_ACCESS_TOKEN);

            // invoke
            bizThreadPool.execute(new Runnable() {
                @Override
                public void run() {
                    // do invoke
                    Object responseObj = process(httpMethod, uri, requestData, accessTokenReq);

                    // to json
                    String responseJson = GsonTool.toJson(responseObj);

                    // write response
                    writeResponse(ctx, keepAlive, responseJson);
                }
            });
        }

        private Object process(HttpMethod httpMethod, String uri, String requestData, String accessTokenReq) {

            // valid
            if (HttpMethod.POST != httpMethod) {
                return new ReturnT<String>(ReturnT.FAIL_CODE, "invalid request, HttpMethod not support.");
            }
            if (uri==null || uri.trim().length()==0) {
                return new ReturnT<String>(ReturnT.FAIL_CODE, "invalid request, uri-mapping empty.");
            }
            if (accessToken!=null
                    && accessToken.trim().length()>0
                    && !accessToken.equals(accessTokenReq)) {
                return new ReturnT<String>(ReturnT.FAIL_CODE, "The access token is wrong.");
            }

            // services mapping
            try {
                if ("/beat".equals(uri)) {
                    return executorBiz.beat();
                } else if ("/idleBeat".equals(uri)) {
                    IdleBeatParam idleBeatParam = GsonTool.fromJson(requestData, IdleBeatParam.class);
                    return executorBiz.idleBeat(idleBeatParam);
                } else if ("/run".equals(uri)) {
                    TriggerParam triggerParam = GsonTool.fromJson(requestData, TriggerParam.class);
                    return executorBiz.run(triggerParam);
                } else if ("/kill".equals(uri)) {
                    KillParam killParam = GsonTool.fromJson(requestData, KillParam.class);
                    return executorBiz.kill(killParam);
                } else if ("/log".equals(uri)) {
                    LogParam logParam = GsonTool.fromJson(requestData, LogParam.class);
                    return executorBiz.log(logParam);
                } else {
                    return new ReturnT<String>(ReturnT.FAIL_CODE, "invalid request, uri-mapping("+ uri +") not found.");
                }
            } catch (Exception e) {
                logger.error(e.getMessage(), e);
                return new ReturnT<String>(ReturnT.FAIL_CODE, "request error:" + ThrowableUtil.toString(e));
            }
        }
具体接收服务端请求的方法为process方法,里面的if中,对服务器端多种类型请求进行了处理。


 7157
7157


 被折叠的 条评论
为什么被折叠?
被折叠的 条评论
为什么被折叠?
 到【灌水乐园】发言


