


关于Nightwatch?
Nightwatch.js是一个测试web app和web 站点的自动化测试框架, 使用Node.js编写, 基于Selenium WebDriver API.
它是一个完整的浏览器端真实用户场景测试解决方案, 致力于简化继续集成和编写自动化测试。
Nightwatch got its name from the famous painting The Night Watch by Dutch painter Rembrandt van Rijn. The masterpiece is prominently displayed in the Rijksmuseum, in Amsterdam - The Netherlands.
Overview of Selenium
Selenium 是一个直接运行在浏览器中的非常流行的综合测试工具集, 最初为java 语言编写, 现在已经支持许多语言。
Selenium的主要项目:
* Selenium IDE
* Selenium Remote Control
* Selenium WebDriver
* Selenium Grid
Nightwatch uses the Selenium WebDriver, specifically the WebDriver Wire Protocol to perform the browser automation related tasks.
Nightwatch 使用Selenium WebDriver, 特别是WebDriver Wire Protocol 来执行浏览器自动化测试相关任务。
Theory of Operation
Nightwatch works by sending HTTP requests to the Selenium server with the right parameters and interpreting the response. The restful API protocol is defined by the Selenium JsonWireProtocol. See below for an example workflow for browser initialization.
Nightwatch 发送通过 HTTP 请求发送响应的参数到 Selenium 服务器,并解析服务器响应。restful API 文档见Selenium JsonWireProtocol 。浏览器初始化流程见下图。
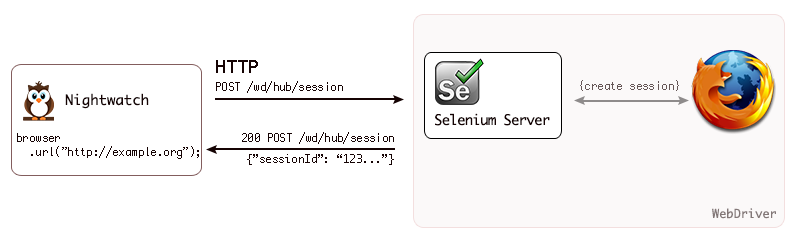
大部分情况下, Nightwatch 执行一条命令或断言,至少要发送2个请求到 Selenium 服务器。 第一个用来定位元素,可以用 CSS 选择器或者Xpath 表达式。 第二个用来在选中的元素上执行命令或断言操作。
Installation
安装Node.js
From nodejs.org:
“Node.js is a platform built on Chrome’s JavaScript runtime for easily building fast, scalable network applications. Node.js uses an event-driven, non-blocking I/O model that makes it lightweight and efficient, perfect for data-intensive real-time applications that run across distributed devices.”
主流操作系统的安装包都可以在nodejs.org上找到。
Install Nightwatch
使用 npm 安装最新的 Nightwatch, 在命令行运行:
npm install -g nightwatch运行 Selenium 服务器
Selenium WebDriver server 是一个简单的 Java servlet 程序,分别运行在本地机器上和你要进行测试的浏览器上。(todo 真的是浏览器上?)
Download Selenium
Download the latest version of the selenium-server-standalone-{VERSION}.jar file from the Selenium downloads page and place it on the computer with the browser you want to test. In most cases this will be on your local machine and typically inside your project’s source folder.
到Selenium downloads page下载最新版的selenium-server-standalone-{VERSION}.jar 包, (todo)具体放在哪里, 等我试一试再说。
也可以通过 npm 安装 selenium server:
npm install selenium-serverA good practice is to create a separate subfolder (e.g. bin) and place it there as you might have to download other driver binaries if you want to test multiple browsers.
Running Selenium Automatically
如果服务器和Nightwatch 运行在同一台机器上, Nightwatch Test Runner可以启动和停止Selenium 服务器。
Running Selenium Manually
To run the selenium server manually, from the directory with the jar run the following:
要手动启动 server 服务器, 在 jar 包所在目录执行:
java -jar selenium-server-standalone-{VERSION}.jar更多关于运行 Selenium 服务器的信息参考:
http://code.google.com/p/selenium/wiki/RemoteWebDriverServer
要获取帮助信息, 执行:
java -jar selenium-server-standalone-{VERSION}.jar -helpConfiguration
测试需要一个配置文件, 默认会使用当前目录下的 nightwatch.json 文件。nightwatch.json 详细配置如下:
{
  "src_folders" : ["tests"],
  "output_folder" : "reports",
  "custom_commands_path" : "",
  "custom_assertions_path" : "",
  "page_objects_path" : "",
  "globals_path" : "",

  "selenium" : {
    "start_process" : false,
    "server_path" : "",
    "log_path" : "",
    "host" : "127.0.0.1",
    "port" : 4444,
    "cli_args" : {
      "webdriver.chrome.driver" : "",
      "webdriver.ie.driver" : ""
    }
  },

  "test_settings" : {
    "default" : {
      "launch_url" : "http://localhost",
      "selenium_port"  : 4444,
      "selenium_host"  : "localhost",
      "silent": true,
      "screenshots" : {
        "enabled" : false,
        "path" : ""
      },
      "desiredCapabilities": {
        "browserName": "firefox",
        "javascriptEnabled": true,
        "acceptSslCerts": true
      }
    },

    "chrome" : {
      "desiredCapabilities": {
        "browserName": "chrome",
        "javascriptEnabled": true,
        "acceptSslCerts": true
      }
    }
  }
}
Basic settings
| Name | type | default | description |
|---|---|---|---|
| src_folders | string|array | none | 测试代码目录(不包含子目录) |
| output_folder (optional) | string | tests_output | 生成的测试报告存放目录 |
| custom_commands_path (optional) | string|array | none | Location(s) where custom commands will be loaded from. |
| custom_assertions_path (optional) | string|array | none | 自定义断言路径 |
| page_objects_path (Optional since v6.0.1) | string|array | none | Location(s) where page object files will be loaded from. |
| globals_path (optional) | string | none | 外部模块路径,为测试一共全局变量. 也可在test_settings中重写 |
| selenium (optional) | object | Selenium Server相关的设置 | |
| test_settings (optional) | object | 与测试相关的测试,下面有详细描述 | |
| live_output (optional) | boolean | false | 是否缓存并持续输出结果 |
| disable_colors (optional) | boolean | false | 控制命令行输出是否带有高亮颜色 |
| parallel_process_delay (optional) | integer | 10 | 在并行模式下启动子进程的时间,单位毫秒 |
| test_workers | boolean|object | false | 是否为运行单个文件测试启动并行模式,如果设置为true,会进入并行模式,并自动设置线程数。如果设置为对象,要指定enable和workers参数,workers接受数值和’auto’。 例如:”test_workers” : {“enabled” : true, “workers” : “auto”} |
| test_runner (optional) | string|object | “default” | 用什么工具运行测试。值可以是”default”或”mocha”. 例如:”test_runner” : {“type” : “mocha”, “options” : {“ui” : “tdd”}} |
Selenium settings
如下是 selenium 的配置选项。Nightwatch可以自动管理 selenium 服务进程,以便你专注于测试工作。
如果要启用 selenium自启动,设置 start_process 为true 并设置 server_path 值为 selenium jar包路径。
| Name | type | default | description |
|---|---|---|---|
| start_process | boolean | false | 是否启用 selenium自启动 |
| start_session | boolean | true | 是否自动启动 Selenium session. |
| server_path | string | none | selenium jar 包路径。如果设置了 start_process 字段,必须设置此字段。例如: node_modules/selenium-server/lib/runner/selenium-server-standalone-2.53.0.jar |
| log_path | string|boolean | none | selenium 生成的 output.log 文件存放位置,默认为当前目录下。设置false可以禁用 Selenium 日志。 |
| host | string | 127.0.0.1 | 设置 selenium 监听地址。不常用到,除非指定了 start_process 为true。 |
| port | integer | 4444 | 设置 selenium 监听端口 |
| cli_args | object | none | 一系列传递给 selenium 的命令行参数。 有许多选项可以设置, 例如: |
| webdriver.firefox.profile: 默认情况下会为每个会话创建一个firefox配置文件,如果想要使用现有配置文件,在这里指定文件名。firefox驱动参数的完整列表见这里 。 | |||
| webdriver.chrome.driver: Nightwatch 也可以在 Chrome 上运行测试,如果要在 chrome 上运行测试需要下载 ChromeDriver binary 并为此字段设置 ChromeDriver 路径。同时要在 desiredCapabilities 对象配置中指定 browserName值为 “chrome”。 更多信息参考ChromeDriver website。 | |||
| webdriver.ie.driver: Nightwatch同时也支持Internet Explorer,要在IE中运行测试,需要下载 IE Driver binary 并为此字段设置 IE Driver 路径。同时要在 desiredCapabilities 对象配置中指定 browserName值为 “internet explorer”。 |
Test settings
下面是一些Nightwatch 实例的配置信息。可以配置多个不同的配置对象,模拟多种测试环境。:
{
  ...
  "test_settings" : {
    "default" : {
      ...
    },
    "integration" : {
      ...
    }
  }
}
只有”default”配置是必须的,其他配置可以按需要覆盖default中的配置信息。
测试环境可以通过 -env 参数传递给 nightwatch:
nightwatch --env integration| Name | type | default | description |
|---|---|---|---|
| launch_url | string | none | 测试时要加载的首页url, 如果有多个测试环境,可以分别指定url。 |
| selenium_host | string | localhost | 指定 selenium server 接受的 hostname/IP。 |
| selenium_port | string | 4444 | 指定 selenium server 接受的端口。 |
| silent | boolean | true | 是否显示 selenium 命令日志。 |
| output | boolean | rue | 是否在命令行显示完整输出。 |
| disable_colors | boolean | false | 命令行输出是否高亮。 |
| string|boolean | none | 已经弃用 | |
| string | none | 已经弃用 | |
| string | none | 已经弃用 | |
| screenshots | object | none | 当发生错误时 Selenium 会生成屏幕截图。如果 on_failure 设置为 true, 发生错误或没有通过测试时也生成屏幕截图。 |
| 从 v0.7.5 版本开始,可以为”on_error”字段设置false来禁止错误时生成截图。 | |||
| 例如:“screenshots”:{“enabled”:true,”on_failure”:true,”on_error”: false,”path”: “”} | |||
| username | string | none | 万一 selenium 需要凭证,该字段用来生成 Authorization header。值可以是系统变量,例如:”username” : “${SAUCE_USERNAME}” |
| access_key | string | none | 与 username 一样用于生成 Authorization header。像 username 一样,值也可以是系统变量。 |
| proxy | string | none | 使用代理访问 selenium server。支持 http, https, socks(v5), socks5, sock4, 和 pac。使用node-proxy-agent。Example: http://user:pass@host:port |
| desiredCapabilities | object | 在新建 session 之前传递给 Selenium WebDriver,可以用来指定浏览器名称和其他功能。例如:“desiredCapabilities” : {“browserName” : “firefox”, “acceptSslCerts” :true}。 完整的功能列表在这里。 | |
| globals | object | 在测试代码中可以访问的全局变量,并且每次切换测试环境时可以重写该值。例如: *”globals” :{“myGlobal” : “some_global”} | |
| exclude | array | 不包含的文件夹,接受字符串或模式字符串(relative to the main source folder)。例如:”exclude” : [“excluded-folder”] 或 :”exclude” : [“test-folder/*-smoke.js”] | |
| filter | string | 接受字符串或模式字符串,与之不匹配的文件会被忽略。 | |
| log_screenshot_data | boolean | false | 是否在日志(verbose模式)中记录屏幕截图的base64编码信息。 |
| use_xpath | boolean | false | 是否用 xpath 做为默认的元素选择策略。 |
| cli_args | object | none | 作用与 selenium 配置中的 cli_args 相同。 你可以在不同的测试环境配置中覆盖 selenium 中的配置。 |
| end_session_on_fail | boolean | true | 在测试终止的时候,自动关闭会话,通常会在断言失败后触发。 |
| skip_testcases_on_fail | boolean | true | 是否在任意测试用例测试失败后,跳过剩余的测试用例。 |
| output_folder | string|boolean | 生成的测试报告存放目录, 该值覆盖 Basic settings 中的配置, 也可以设置为 false 不生成报告。 | |
| persist_globals | boolean | false | Weather or not to persist use the same object instance for holding globals between testsuite runs or a (deep) copy of it. |
Using Nightwatch
Writing Tests
通过css选择器在页面中定位元素,Nightwatch 使得编写 End-to-End 自动测试非常简单。
在你的项目中新建一个文件夹,比如tests,其中的文件会被 NightwatchCreate 加载并运行测试,一个最基本的测试如下所示:
module.exports = {
  'Demo test Google' : function (browser) {
    browser
      .url('http://www.google.com')
      .waitForElementVisible('body', 1000)
      .setValue('input[type=text]', 'nightwatch')
      .waitForElementVisible('button[name=btnG]', 1000)
      .click('button[name=btnG]')
      .pause(1000)
      .assert.containsText('#main', 'Night Watch')
      .end();
  }
};
当你想要停止测试时注意总是要调用 end() 方法,如此 selenium 会话才会正确的停止。
如果需要,一段测试也可以分为多步:
module.exports = {
  'step one' : function (browser) {
    browser
      .url('http://www.google.com')
      .waitForElementVisible('body', 1000)
      .setValue('input[type=text]', 'nightwatch')
      .waitForElementVisible('button[name=btnG]', 1000)
  },

  'step two' : function (browser) {
    browser
      .click('button[name=btnG]')
      .pause(1000)
      .assert.containsText('#main', 'Night Watch')
      .end();
  }
};
测试代码也可以以这种格式来写:
this.demoTestGoogle = function (browser) {
  browser
    .url('http://www.google.com')
    .waitForElementVisible('body', 1000)
    .setValue('input[type=text]', 'nightwatch')
    .waitForElementVisible('button[name=btnG]', 1000)
    .click('button[name=btnG]')
    .pause(1000)
    .assert.containsText('#main', 'The Night Watch')
    .end();
};
Using XPath selectors
Nightwatch 也支持 xpath。 调用 useXpath() 使用 xpath 规则选取元素。要退回 css 规则, 再调用 useCss() 方法。
如果要用 xpath 做为默认的元素选择策略,在配置文件中设置 “use_xpath”为true。
this.demoTestGoogle = function (browser) {
  browser
    .useXpath() // every selector now must be xpath
    .click("//tr[@data-recordid]/span[text()='Search Text']")
    .useCss() // we're back to CSS now
    .setValue('input[type=text]', 'nightwatch')
};
BDD Expect Assertions
从 Nightwatch0.7 版本开始, 引入了新的 BDD风格的断言库,大大提升了灵活性和代码的可读性。
expect 断言是 chai 框架 expect api 的子集,在此对元素类型也能使用。 例如:
module.exports = {
  'Demo test Google' : function (client) {
    client
      .url('http://google.no')
      .pause(1000);

    // expect element  to be present in 1000ms
    client.expect.element('body').to.be.present.before(1000);

    // expect element <#lst-ib> to have css property 'display'
    client.expect.element('#lst-ib').to.have.css('display');

    // expect element  to have attribute 'class' which contains text 'vasq'
    client.expect.element('body').to.have.attribute('class').which.contains('vasq');

    // expect element <#lst-ib> to be an input tag
    client.expect.element('#lst-ib').to.be.an('input');

    // expect element <#lst-ib> to be visible
    client.expect.element('#lst-ib').to.be.visible;

    client.end();
  }
};
expect 接口为断言提供了灵活流畅的短语,比之前的接口有显著的改善。 唯一的缺点是没法链式调用断言,并且自定义消息当前也不支持。
except 完整的 api 点这里。
Using before[Each] and after[Each] hooks
Nightwatch 为测试提供了 befoare/after, beforeEach/afterEach 钩子。
before 和 after 钩子会在每个测试套件运行前后执行。beforeEach 和 afterEach 则会在每个测试用例(测试步骤)执行前后执行。
所有钩子函数都接收一个 NightWatch 实例做为参数。
Example:
module.exports = {
  before : function(browser) {
    console.log('Setting up...');
  },

  after : function(browser) {
    console.log('Closing down...');
  },

  beforeEach : function(browser) {

  },

  afterEach : function(browser) {

  },

  "step one" : function (browser) {
    browser
     // ...
  },

  "step two" : function (browser) {
    browser
    // ...
      .end();
  }
};
上例中方法的调用顺序如下:
before(), beforeEach(), “step one”, afterEach(), beforeEach(), “step two”, afterEach(), after()
Asynchronous before[Each] and after[Each]
所有的 before[Each] 和 after[Each] 钩子函数对异步操作同样适用,用于异步操作时会给函数传递第二个参数 callback .
done 方法必须在异步操作完成时之行,否则会抛出一个 timeOut 错误.
Example:
module.exports = {
  beforeEach: function(browser, done) {
    // performing an async operation
    setTimeout(function() {
      // finished async duties
      done();
    }, 100);
  },

  afterEach: function(browser, done) {
    // performing an async operation
    setTimeout(function() {
      // finished async duties
      done();
    }, 200);
  }
};
指定调用 done 方法的超时时间
默认情况下,done 方法的超时时间设置为 10 秒(2秒用来之行单元测试)。在某些情况下,10 秒钟不够而且会出现 timeOut 错误。 你可以在全局变量配置文件中自己设置 asyncHookTimeout 属性来指定该值,单位为毫秒。 例子。
强制测试失败
要强制使测试失败, 需要在调用 done 方法时,传入一个 Error 对象。
module.exports = {
  afterEach: function(browser, done) {
    // performing an async operation
    performAsync(function(err) {
      if (err) {
        done(err);
      }
      // ...
    });
  }
};
用外部文件定义全局变量
大多数时候,使用外部文件定义全局变量是比较好的实践。为 globals_path 属性指定外部文件路径, 而不是在 nightwatch.json 配置中定义全局变量。
还可以在应用每个 environment 之前重写外部文件中的变量值。
全局钩子
之前提到的钩子函数在全局范围也同样适用,outside the scope of the test。下面的例子给出了详细信息。 在这种情况下,beforeEach 和 afterEach 作用于一个测试集(i.e. test file)。
全局设置
globals文件有许多属性用于控制测试流程。下面的例子给出了详细信息:
module.exports = {
  // this controls whether to abort the test execution when an assertion failed and skip the rest
  // it's being used in waitFor commands and expect assertions
  abortOnAssertionFailure : true,

  // this will overwrite the default polling interval (currently 500ms) for waitFor commands
  // and expect assertions that use retry
  waitForConditionPollInterval : 300,

  // default timeout value in milliseconds for waitFor commands and implicit waitFor value for
  // expect assertions
  waitForConditionTimeout : 5000,

  // this will cause waitFor commands on elements to throw an error if multiple
  // elements are found using the given locate strategy and selector
  throwOnMultipleElementsReturned : true,

  // controls the timeout time for async hooks. Expects the done() callback to be invoked within this time
  // or an error is thrown
  asyncHookTimeout : 10000,

  'default' : {
    myGlobal : function() {
      return 'I\'m a method';
    }
  },

  'test_env' : {
    myGlobal: 'test_global',
    beforeEach : function() {

    }
  },

  // External before hook is ran at the beginning of the tests run, before creating the Selenium session
  before: function(done) {
    // run this only for the local-env
    if (this.isLocal) {
      // start the local server
      App.startServer(function() {
        // server listening
        done();
      });
    } else {
      done();
    }
  },

  // External after hook is ran at the very end of the tests run, after closing the Selenium session
  after: function(done) {
    // run this only for the local-env
    if (this.isLocal) {
      // start the local server
      App.stopServer(function() {
        // shutting down
        done();
      });
    } else {
      done();
    }
  },

  // This will be run before each test suite is started
  beforeEach: function(browser, done) {
    // getting the session info
    browser.status(function(result) {
      console.log(result.value);
      done();
    });
  },

  // This will be run after each test suite is finished
  afterEach: function(browser, done) {
    console.log(browser.currentTest);
    done();
  }
};
运行测试
Test Runner
Nightwatch 包含了一个命令行工具,可以非常简单的运行测试并输出有用的信息。根据你安装的方式,有多种不同的命令形式。
Global
如果你是全局安装 Nightwatch (使用 -g 选项),nightwatch 在所有目录下都是可用的。
$ nightwatch [source] [options]Project specific
如果 Nightwatch 是以工程的依赖形式安装, 要在 node_modules/.bin/ 目录下才能使用 nightwatch 命令。
Linux and MacOSX:
$ ./node_modules/.bin/nightwatch [source] [options]Windows:
创建一个 nightwatch.js 文件并输入下面这行代码:
require('nightwatch/bin/runner.js');然后执行:
C:\workspace\project> node nightwatch.js [source] [options]Tests source
可选的 source 选项可以指定一个或多个文件,也可以直接指定一个文件夹,该选项独立于 src_folders 设置。
Example - single test:
$ nightwatch tests/one/firstTest.jsExample - 2 individual tests:
$ nightwatch tests/one/firstTest.js tests/secondTest.jsExample - 1 individual test and 1 folder:
$ nightwatch tests/one/test.js tests/utils命令行选项
| Name | Shortname | default | description |
|---|---|---|---|
| –config | -c | ./nightwatch.json | nightwatch.json 文件路径 |
| –output | -o | tests_output | JUnit 生成的报告保存路径. |
| –reporter | -r | junit | 指定预定义的生成报告的工具,或是自定义用于生成报告的文件路径 |
| –env | -e | default | 指定测试环境,可以覆盖 nightwatch.json 中的值 |
| –verbose | 是否在命令行输出详细信息 | ||
| –version | -v | 是否显示版本号 | |
| –test | -t | 运行指定的测试文件,默认会运行跟目录下所有测试文件 | |
| –testcase | 与test选项一同使用,指定要运行的测试用例 | ||
| –group | -g | 运行指定组中(子目录)中的所有测试,测试文件按目录分组 | |
| –skipgroup | -s | 跳过指定的一个或多个(以逗号分隔)测试组 | |
| –filter | -f | 指定一个模式字符串用于过滤测试文件 | |
| –tag | -a | 使用tag过滤测试模块,只有带有相应标签的测试模块才被执行 | |
| –skiptags | 指定跳过带有相应标签的模块,多个以逗号隔开 | ||
| –retries | Retries failed or errored testcases up to the specified number of times. Retrying a testcase will also retry the beforeEach and afterEach hooks, if any. | ||
| –suiteRetries | Retries failed or errored testsuites (test modules) up to the specified number of times. Retrying a testsuite will also retry the before and after hooks (in addition to the global beforeEach and afterEach respectively), if any are defined on the testsuite. |
测试集
Nightwatch 允许你以集合的形式组织测试脚本, 并按需运行这些测试集。要把测试文件放在同一文件夹下就可以将它们组合起来,文件夹的名称就是测试集的名称。
Example:
lib/
  ├── selenium-server-standalone.jar
custom-commands/
  ├── loginUser.js
  ├── attachPicture.js
tests/
  ├── logingroup
  |   ├── login_test.js
  |   └── otherlogin_test.js
  ├── addressbook
  |   ├── addressbook_test.js
  |   └── contact_test.js
  ├── chat
  |   ├── chatwindow_test.js
  |   ├── chatmessage_test.js
  |   └── otherchat_test.js
  └── smoketests
      ├── smoke_test.js
      └── othersmoke_test.js
如果只想测试 smoketests , 运行如下命令:
$ nightwatch --group smoketests如果要跳过 smoketests, 运行如下命令:
$ nightwatch --skipgroup smoketests要跳过多个测试集, 以逗号分隔:
$ nightwatch --skipgroup addressbook,chat标签
你也可以选择用标签来管理要运行哪些测试, 那样的话,一个测试可能属于多个标签。例如:有一个 login 测试即属于 login 标签,又属于 sanity 标签。
module.exports = {
  '@tags': ['login', 'sanity'],
  'demo login test': function (client) {
     // test code
  }
};
使用 –flag 命令行选项决定运行那个标签下的测试:
$ nightwatch --tag login指定多个标签:
$ nightwatch --tag login --tag something_else要跳过指定标签, 使用 –skiptags 选项:
$ nightwatch --skiptags login要跳过多个标签, 用逗号隔开:
$ nightwatch --skiptags login,something_else禁用测试
要阻止某个模块执行测试, 只需要设置 disable 属性为true :
module.exports = {
  '@disabled': true, // This will prevent the test module from running.

  'sample test': function (client) {
    // test code
  }
};
在明确某些模块会测试失败时,这很有用。
禁用单独测试用例
禁用模块中单独的测试用例,目前还不支持。 但是有一个变通方法, 将测试方法转化为字符串,Nightwatch 就会忽略它。
module.exports = {
  'sample test': function (client) {
    // test code
  },

  // disabled
  'other sample test': ''+function (client) {
    // test code
  }
};
并行运行
从 v0.5 开始, Nightwatch 支持同时在多个环境中执行测试, 给 -e 参数指定多个值即可:
$ nightwatch -e default,chrome终端输出
每个测试环境以一个子进程运行, 而输出信息会汇集到主进程。
为了使输出信息更易阅读, Nightwatch 默认会缓存所有输出,在最后再以每个环境为一组,一起输出这些信息。
如果你想要禁止缓存输出,在子进程的输出发送到 stdout 后立即可见。需要在 nightwatch.json 文件最外层(e.g selenium属性之后) 中设置 live_output 属性为true。
You can create a separate environment per browser (by chaining desiredCapabilities) and then run them in parallel. In addition, using the filter and exclude options tests can be split per environment in order to be ran in parallel.
Via Workers
从 v0.7 开始引入了一个新特性,


 被折叠的 条评论
为什么被折叠?
被折叠的 条评论
为什么被折叠?
 到【灌水乐园】发言


