JustAuth,如你所见,它仅仅是一个第三方授权登录的工具类库,它可以让我们脱离繁琐的第三方登录SDK,让登录变得So easy! 本专栏将会由浅入深,详细介绍如何使用JustAuth实现第三方登录,以及如何使用JustAuth的高级特性。
使用SpringBoot初始化项目
在教程正式开始前,我们要先准备好相应的软件环境。JustAuth[1]
在IDEA下使用以下方式创建项目:依次点击File-New-Project然后选择Spring Initializr,根据提示进行操作,配置依赖时勾选spring-boot-starter-web和lombok两个依赖,为了方便开发测试,我这儿多选了一个spring-boot-devtools。
按照提示创建完成后,得到POM如下
<?xml version="1.0" encoding="UTF-8"?>
<project xmlns:xsi="http://www.w3.org/2001/XMLSchema-instance" xmlns="http://maven.apache.org/POM/4.0.0"
         xsi:schemaLocation="http://maven.apache.org/POM/4.0.0 https://maven.apache.org/xsd/maven-4.0.0.xsd">
    <modelVersion>4.0.0</modelVersion>
    <parent>
        <groupId>org.springframework.boot</groupId>
        <artifactId>spring-boot-starter-parent</artifactId>
        <version>2.2.6.RELEASE</version>
        <relativePath/> <!-- lookup parent from repository -->
    </parent>
    <groupId>me.zhyd.justauth</groupId>
    <artifactId>justauth-tutorial</artifactId>
    <version>0.0.1-SNAPSHOT</version>
    <name>justauth-tutorial</name>
    <description>Demo project for Spring Boot</description>

    <properties>
        <java.version>1.8</java.version>
    </properties>

    <dependencies>
        <dependency>
            <groupId>org.springframework.boot</groupId>
            <artifactId>spring-boot-starter-web</artifactId>
        </dependency>

        <dependency>
            <groupId>org.springframework.boot</groupId>
            <artifactId>spring-boot-devtools</artifactId>
            <scope>runtime</scope>
            <optional>true</optional>
        </dependency>
        <dependency>
            <groupId>org.projectlombok</groupId>
            <artifactId>lombok</artifactId>
            <optional>true</optional>
        </dependency>
        <dependency>
            <groupId>org.springframework.boot</groupId>
            <artifactId>spring-boot-starter-test</artifactId>
            <scope>test</scope>
            <exclusions>
                <exclusion>
                    <groupId>org.junit.vintage</groupId>
                    <artifactId>junit-vintage-engine</artifactId>
                </exclusion>
            </exclusions>
        </dependency>
    </dependencies>

    <build>
        <plugins>
            <plugin>
                <groupId>org.springframework.boot</groupId>
                <artifactId>spring-boot-maven-plugin</artifactId>
            </plugin>
        </plugins>
    </build>

</project>
等待项目编译完成后,我们开始正式集成JustAuth。
添加JustAuth依赖
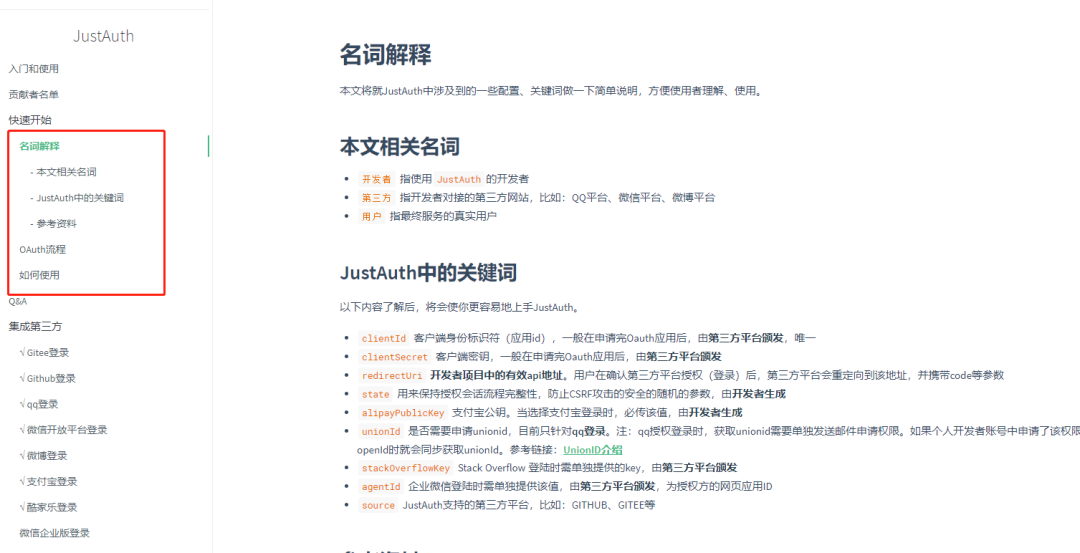
正式开始前,建议朋友们先看一下JustAuth的用户文档:https://docs.justauth.whnb.wang[2], 重点关注快速开始这个章节。

这个章节中包含了关于OAuth和JustAuth相关的重要信息,再次建议优先查看该章节内容。
重申一遍,使用JustAuth总共分三步(这三步也适合于JustAuth支持的任何一个平台):
申请注册第三方平台的开发者账号
创建第三方平台的应用,获取配置信息(
accessKey,secretKey,redirectUri)使用该工具实现授权登陆
当然, 第三步和前两步谁先谁后都无所谓,您可以先实现代码再申请第三方应用,也可以先申请第三方应用,再集成代码。
接下来我们按照文档[3]上的第一步指示,先添加pom依赖。
// ...
        <dependency>
            <groupId>me.zhyd.oauth</groupId>
            <artifactId>JustAuth</artifactId>
            <version>1.15.1</version>
        </dependency>
        // ...
依赖添加完成后,等待项目编译完成,接下来我们就开始正式接入JustAuth。
集成JustAuth的API
注意,以下代码中,我们的请求链接中是通过动态参数{source}去取的,这样可以方便的让我们集成任意平台,比如集成gitee时, 我们的请求地址就是:http://localhost:8080/oauth/render/gitee, 而回调地址就是http://localhost:8080/oauth/callback/gitee。
当然,例子中只是举例告诉大家可以这么用,但如果各位只需要集成单一平台的话, 可以直接将{souce}改为平台名,如gitee
package me.zhyd.justauth;

import me.zhyd.oauth.config.AuthConfig;
import me.zhyd.oauth.model.AuthCallback;
import me.zhyd.oauth.request.AuthGiteeRequest;
import me.zhyd.oauth.request.AuthRequest;
import me.zhyd.oauth.utils.AuthStateUtils;
import org.springframework.web.bind.annotation.RequestMapping;
import org.springframework.web.bind.annotation.RestController;

import javax.servlet.http.HttpServletResponse;
import java.io.IOException;

/**
 * 实战演示如何使用JustAuth实现第三方登录
 *
 * @author yadong.zhang (yadong.zhang0415(a)gmail.com)
 * @version 1.0.0
 * @since 1.0.0
 */
@RestController
@RequestMapping("/oauth")
public class JustAuthController {

    /**
     * 获取授权链接并跳转到第三方授权页面
     *
     * @param response response
     * @throws IOException response可能存在的异常
     */
    @RequestMapping("/render/{source}")
    public void renderAuth(HttpServletResponse response) throws IOException {
        AuthRequest authRequest = getAuthRequest();
        String authorizeUrl = authRequest.authorize(AuthStateUtils.createState());
        response.sendRedirect(authorizeUrl);
    }

    /**
     * 用户在确认第三方平台授权(登录)后, 第三方平台会重定向到该地址,并携带code、state等参数
     *
     * @param callback 第三方回调时的入参
     * @return 第三方平台的用户信息
     */
    @RequestMapping("/callback/{source}")
    public Object login(AuthCallback callback) {
        AuthRequest authRequest = getAuthRequest();
        return authRequest.login(callback);
    }

    /**
     * 获取授权Request
     *
     * @return AuthRequest
     */
    private AuthRequest getAuthRequest() {
        return new AuthGiteeRequest(AuthConfig.builder()
                .clientId("clientId")
                .clientSecret("clientSecret")
                .redirectUri("redirectUri")
                .build());
    }

}
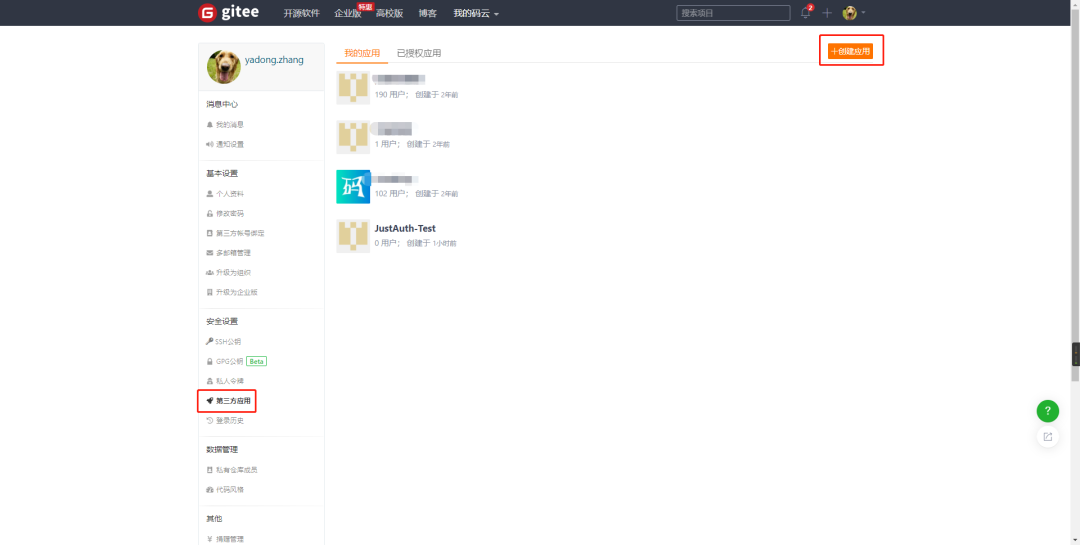
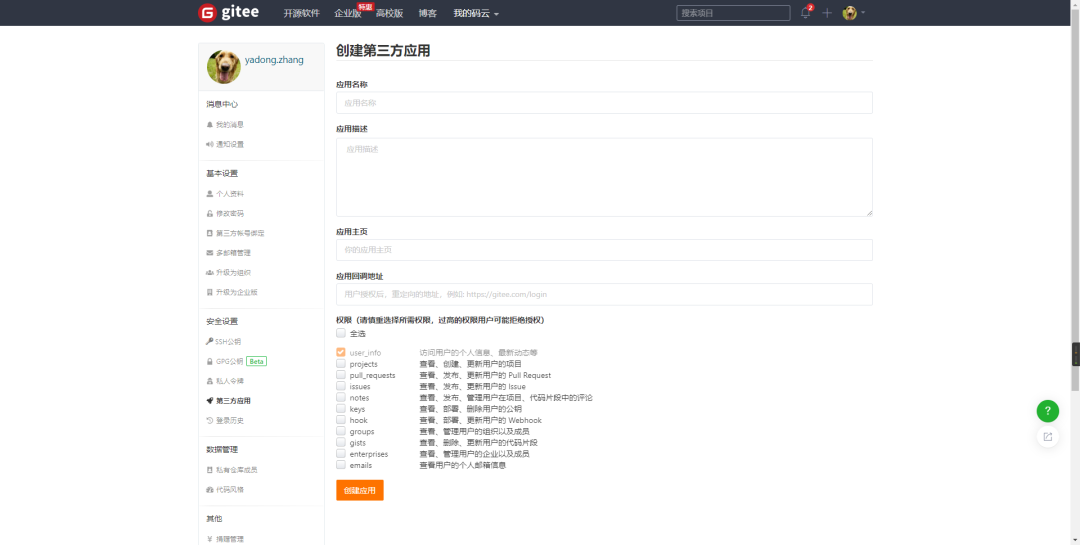
接下来我们就需要去gitee上创建我们的OAuth应用。登录gitee后,我们点击右上角用户头像,选择设置,然后点击第三方应用进入第三方应用管理页面,点击右上角的创建应用按钮,进入应用创建页面


我们按照提示填入我们的应用信息即可。
应用名称: 一般填写自己的网站名称即可
应用描述: 一般填写自己的应用描述即可
应用主页: 填写自己的网站首页地址
应用回调地址: 重点,该地址为用户授权后需要跳转到的自己网站的地址,默认携带一个code参数
权限: 根据页面提示操作,默认勾选第一个就行,因为我们只需要获取用户信息即可
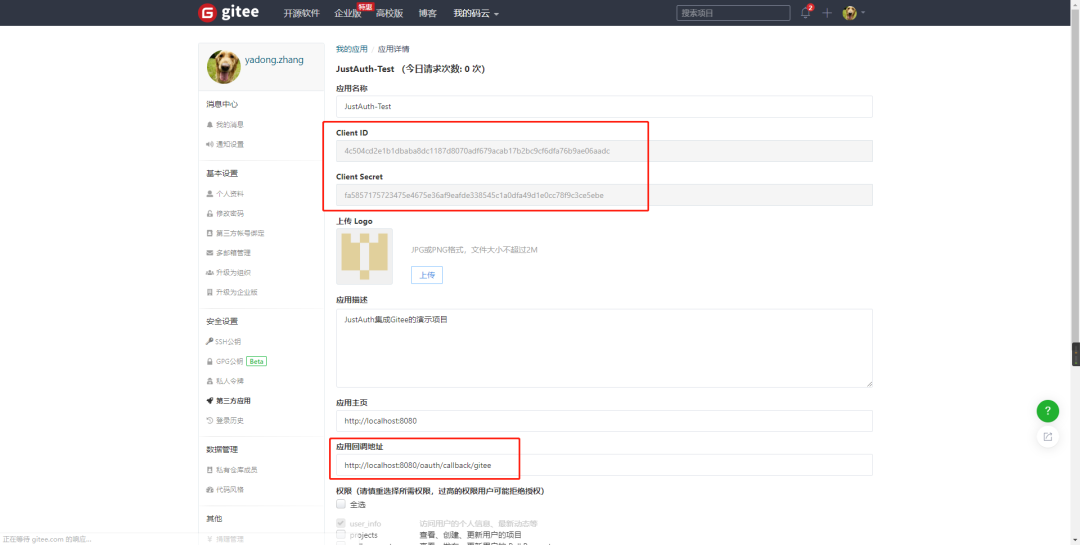
以上信息输入完成后,点击确定按钮创建应用。创建完成后,点击进入应用详情页,可以看到应用的密钥等信息

复制以下三个信息:Client ID、Client Secret和应用回调地址。
自定义HTTP工具
将上一步获取到配置信息配置AuthConfig中,如下:
// ...
     */
    private AuthRequest getAuthRequest() {
        return new AuthGite


 本文详细介绍了如何使用JustAuth第三方登录库,包括SpringBoot项目初始化、添加JustAuth依赖、集成API、自定义HTTP工具和缓存,以及如何实现自有的Gitlab私服登录。通过创建OAuth应用,实现授权登录,自定义AuthSource接口,从而支持Gitlab私服的第三方登录功能。
 最低0.47元/天 解锁文章


 被折叠的 条评论
为什么被折叠?


