


Android 启动速度优化
前序
启动速度优化是一个需要慢工出细活的工作。这里主要记录下几年前在做启动优化时的各种方案,和现在新技术下方案。当时从主流机型(小米8)4.5s左右优化到了1.8s左右,当然这里因为之前没做过优化,所以提升很明显。记录为主。
启动速度的业务定义:首先要明白你要优化的点,是要启动不黑屏等待;还是是要点击图标后启动快,出现闪屏页面就行,不用管后面显示的数据页面;还是要第一个展示功能的页面完全展示给客户的启动时间。是根据自身的业务定义,而我们公司的是支付类app,领导的明确要求就是,点击app启动到点击打开首页上面付款码或首页下面的生活缴费的功能页面控制在2s内完成。
统计
adb测量
该方案只能线下使用,不能带在线上。
- adb shell am start -W 包名/启动类完整路径
- ThisTime 表示一连串启动Activity的最后一个Activity的启动耗时
- TotalTime 所有activity启动耗时
- WaitTime AMS启动activity的耗时包括当前Activity的onPause()和自己Activity的启动)。
手动打点
可带线上,但是结束点比较相对,可有不同参考。
- 开始点:在App的入口
attachBaseContext开始计算开始。争议点就是,错过了包括zygote点fork进程的阶段和dex包加载时间。 - 结束点:
- 1,可以在
onResume()打印。 - 2, 监听绘制完后打印。
- 1,可以在
//view重绘时回调
view.getViewTreeObserver().addOnDrawListener(new OnDrawListener() {
	@Override
	public void onDraw() {
	// TODO Auto-generated method stub
	}
});
方案
预加载
class字节码的预加载
先讨论下java类的加载过程,如图:
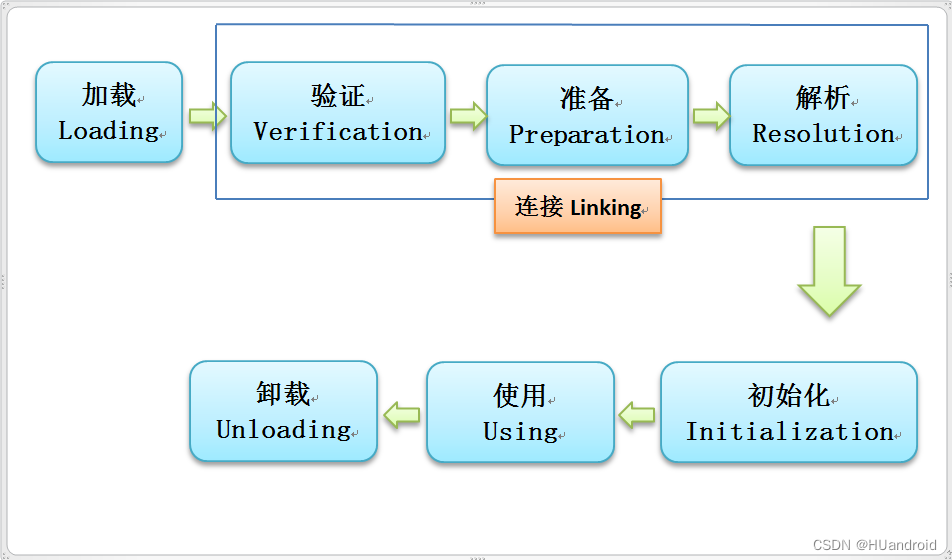
java类的类加载生命周期包括:加载Loading、验证Verification,、准备Preparation、解析Resolution、 初始化Initialization、使用Using和卸载Unloading.
这里就需要了解下Class.forName(className),这个
我们在应用的启动阶段,Application的入口,去做class的预加载操作。而这个操作最好是放在attachBaseContext里面,这个方法调用时候的cpu还没上来,可以利用。
@Override
    protected void attachBaseContext(Context base) {
        super.attachBaseContext(base);
        ThreadUtils.getSinglePool().execute(new Runnable() {
            @Override
            public void run() {
            //是否开启线程,要看时间情况
                Log.d("test","执行class 预加载 开始");
                try {
                    Class.forName("com.xxxxx.xxxxx.TestActivity");
                } catch (ClassNotFoundException e) {
                    e.printStackTrace();
                }
                Log.d("test","执行class 预加载 结束");
            }
        });
    }
Activity预创建
根据上面字节码的预加载原理一样,对象第一次创建的时候,java虚拟机首先检查类对应的Class 对象是否已经加载。如果没有加载,jvm会根据类名查找.class文件,将其Class对象载入。同一个类第二次new的时候就不需要加载类对象,而是直接实例化,创建时间就缩短了。
 @Override
    protected void attachBaseContext(Context base) {
        super.attachBaseContext(base);
        start = System.currentTimeMillis();
        ThreadUtils.getSinglePool().execute(new Runnable() {
            @Override
            public void run() {
                try {
                    Class.forName("com.hozonauto.manual.ui.fragment.TutorialFragment");
                    ManualActivity activity = new ManualActivity();

                } catch (ClassNotFoundException e) {
                    e.printStackTrace();
                }
            }
        });
    }
Glide预初始化
在我们实际用Profiler来看那一块比较耗时,发现Gilde的初始化流程非常耗时,启动速度的感观就是首页的能看见的速度,我们应用中占大头的就是首页的banner图片。同时、是在其他操作也在同时抢占CPU资源的时候会更慢。Glide的初始化会加载所有配置的Module,然后初始化RequestManager、包括网络层、工作线程池和配置项等,比较耗时,最后还要应用一些解码的选项Options。
所以,我们在应用的启动的阶段去初始化glide:
@Override
    protected void attachBaseContext(Context context) {
        super.attachBaseContext(context);

        ThreadUtils.getSinglePool().execute(new Runnable() {
            @Override
            public void run() {
                try {
          //地址假的就行
                    Glide.with(context).load("/sdcard/xxx.jpg").into(1, 1);
                    Glide.with(context).load("http://sdcard/xxx.jpg").into(1, 1);
                } catch (Exception e) {
                    e.printStackTrace();
                }
            }
        });
    }
WebView预加载
对于WebView的优化网上很多方案,简单的思路就是WebView第一次创建非常耗时,可以创建一个WebView的缓存池,提前去创建WebView,提前完成内核初始化。同时可以本地预置html和css,WebView创建的时候先预加载本地html,之后通过js脚本填充内容部分。具体优化方案参考:
webview优化方案参考一
webview优化方案参考二
当然这里,如果你的启动流程不存在使用webview的情况,请不用多余操作。
数据预加载
一般我们的页面展示的数据一般分三种数据:
- 默认数据(一般放在string.xml或者assets里面。有的没有默认)
- 缓存数据
- 网络数据
数据预加载的意义在于启动第一个展示的页面是否正确展示给用户,这是一个主观的启动速度感知。
比如第三方数据库,如果使用到GreenDao,有必要提前初始化并且放在工作线程中,获取获取一次greenDao的DaoSession实例化对象即可。注意这类型的数据库的升级和数据迁移是非常耗时的。
同时还可以在应用入口,提前获取到数据,使用静态变量保存。一种空间换时间的思路。
三方库初始化
这里主要是指启动阶段中,一些第三方框架的耗时。在业务上尽可能做到以下几点:
- 能异步的就异步,在工作线程去初始化
- 能用到再初始化是最好的
- 不要太多异步导致 业务逻辑剧增导致逻辑复杂
- 注意第三方库中ContentProvider的自动初始化
- 注意第三方库的方法总数超标导致分包太多
对于第3点提供一个方案:有向无环图
布局方面
这里要先要找到耗时点在哪?(XML文件的IO解析 和 反射创建View)。
我们能做有什么方案去优化?
我们先看setContentView的代码块:
 @Override
    public void setContentView(int resId) {
    	//1.优化点 自带的系统布局
        ensureSubDecor();
        ViewGroup contentParent = mSubDecor.findViewById(android.R.id.content);
        contentParent.removeAllViews();
        //2.LayoutInflater.inflate 的耗时
        LayoutInflater.from(mContext).inflate(resId, contentParent);
        mAppCompatWindowCallback.getWrapped().onContentChanged();
    }
代码块中的1点,看ensureSubDecor()方法的部分作用,解析主题style文件,根据style生成是否带title、ActionBar、Menu等控件。所以主题的选择会影响绘制流程的时间。
然后跟进看LayoutInflater.from(mContext).inflate方法:
 public View inflate(XmlPullParser parser, @Nullable ViewGroup root, boolean attachToRoot) {
 		//0.parser 是xml解析的工具类,这里的重载方法已经调用类loadXmlResourceParser(id, "layout"),把resid塞到parser里面类
 		//1.保证View的状态可控性加锁
        synchronized (mConstructorArgs) {
            Trace.traceBegin(Trace.TRACE_TAG_VIEW, "inflate");

            final Context inflaterContext = mContext;
            final AttributeSet attrs = Xml.asAttributeSet(parser);
            Context lastContext = (Context) mConstructorArgs[0];
            mConstructorArgs[0] = inflaterContext;
            View result = root;

            try {
            //2.检查resid 的根root 是否合法性
                advanceToRootNode(parser);
                final String name = parser.getName();
			//3.merge标签使用是否合法
                if (TAG_MERGE.equals(name)) {
                    if (root == null || !attachToRoot) {
                        throw new InflateException("<merge /> can be used only with a valid "
                                + "ViewGroup root and attachToRoot=true");
                    }

                    rInflate(parser, root, inflaterContext, attrs, false);
                } else {
                    // Temp is the root view that was found in the xml
                    // 4.根据解析的标签名字去创建view
                    final View temp = createViewFromTag(root, name, inflaterContext, attrs);

                    ViewGroup.LayoutParams params = null;

                    if (root != null) {
                        // Create layout params that match root, if supplied
                        params = root.generateLayoutParams(attrs);
                        if (!attachToRoot) {
                            // Set the layout params for temp if we are not
                            // attaching. (If we are, we use addView, below)
                            temp.setLayoutParams(params);
                        }
                    }
                    // Inflate all children under temp against its context.
                    //5.while循环去创建下一层级的view
                    rInflateChildren(parser, temp, attrs, true);

                    // We are supposed to attach all the views we found (int temp)
                    // to root. Do that now.
                    if (root != null && attachToRoot) {
                    	//6.添加到根布局上
                        root.addView(temp, params);
                    }

                    // Decide whether to return the root that was passed in or the
                    // top view found in xml.
                    if (root == null || !attachToRoot) {
                        result = temp;
                    }
                }

            } catch (XmlPullParserException e) {
                final InflateException ie = new InflateException(e.getMessage(), e);
                ie.setStackTrace(EMPTY_STACK_TRACE);
                throw ie;
            } catch (Exception e) {
                final InflateException ie = new InflateException(
                        getParserStateDescription(inflaterContext, attrs)
                        + ": " + e.getMessage(), e);
                ie.setStackTrace(EMPTY_STACK_TRACE);
                throw ie;
            } finally {
                // Don't retain static reference on context.
                mConstructorArgs[0] = lastContext;
                mConstructorArgs[1] = null;

                Trace.traceEnd(Trace.TRACE_TAG_VIEW);
            }

            return result;
        }
    }
简单的说下流程就是,通过XmlPullParser去解析xml布局文件,while循环和递归一层层往更深层级去创建view,层级越多,遍历时间越长。view的创建最后都是调用的createViewFromTag() 方法。
跟进createViewFromTag() 方法,最后会走到createView()方法(中间的Factory流程这里不做介绍):
public final View createView(@NonNull Context viewContext, @NonNull String name,
            @Nullable String prefix, @Nullable AttributeSet attrs)
            throws ClassNotFoundException, InflateException {
        Objects.requireNonNull(viewContext);
        Objects.requireNonNull(name);
        Constructor<? extends View> constructor = sConstructorMap.get(name);
        if (constructor != null && !verifyClassLoader(constructor)) {
            constructor = null;
            sConstructorMap.remove(name);
        }
        Class<? extends View> clazz = null;

        try {
            Trace.traceBegin(Trace.TRACE_TAG_VIEW, name);

            if (constructor == null) {
                // Class not found in the cache, see if it's real, and try to add it
                //反射创建
                clazz = Class.forName(prefix != null ? (prefix + name) : name, false,
                        mContext.getClassLoader()).asSubclass(View.class);

                if (mFilter != null && clazz != null) {
                    boolean allowed = mFilter.onLoadClass(clazz);
                    if (!allowed) {
                        failNotAllowed(name, prefix, viewContext, attrs);
                    }
                }
                constructor = clazz.getConstructor(mConstructorSignature);
                constructor.setAccessible(true);
                sConstructorMap.put(name, constructor);
            } else {
                // If we have a filter, apply it to cached constructor
                if (mFilter != null) {
                    // Have we seen this name before?
                    Boolean allowedState = mFilterMap.get(name);
                    if (allowedState == null) {
                        // New class -- remember whether it is allowed
                        clazz = Class.forName(prefix != null ? (prefix + name) : name, false,
                                mContext.getClassLoader()).asSubclass(View.class);

                        boolean allowed = clazz != null && mFilter.onLoadClass(clazz);
                        mFilterMap.put(name, allowed);
                        if (!allowed) {
                            failNotAllowed(name, prefix, viewContext, attrs);
                        }
                    } else if (allowedState.equals(Boolean.FALSE)) {
                        failNotAllowed(name, prefix, viewContext, attrs);
                    }
                }
            }

            Object lastContext = mConstructorArgs[0];
            mConstructorArgs[0] = viewContext;
            Object[] args = mConstructorArgs;
            args[1] = attrs;

            try {
                final View view = constructor.newInstance(args);
                //2.ViewStub标签不解析
                if (view instanceof ViewStub) {
                    // Use the same context when inflating ViewStub later.
                    final ViewStub viewStub = (ViewStub) view;
                    viewStub.setLayoutInflater(cloneInContext((Context) args[0]));
                }
                return view;
            } finally {
                mConstructorArgs[0] = lastContext;
            }
        } catch (NoSuchMethodException e) {
            final InflateException ie = new InflateException(
                    getParserStateDescription(viewContext, attrs)
                    + ": Error inflating class " + (prefix != null ? (prefix + name) : name), e);
            ie.setStackTrace(EMPTY_STACK_TRACE);
            throw ie;

        } catch (ClassCastException e) {
            // If loaded class is not a View subclass
            final InflateException ie = new InflateException(
                    getParserStateDescription(viewContext, attrs)
                    + ": Class is not a View " + (prefix != null ? (prefix + name) : name), e);
            ie.setStackTrace(EMPTY_STACK_TRACE);
            throw ie;
        } catch (ClassNotFoundException e) {
            // If loadClass fails, we should propagate the exception.
            throw e;
        } catch (Exception e) {
            final InflateException ie = new InflateException(
                    getParserStateDescription(viewContext, attrs) + ": Error inflating class "
                            + (clazz == null ? "<unknown>" : clazz.getName()), e);
            ie.setStackTrace(EMPTY_STACK_TRACE);
            throw ie;
        } finally {
            Trace.traceEnd(Trace.TRACE_TAG_VIEW);
        }
    }
根据上面的流程分析,总结下耗时的关键点在:
- 加载XML文件是一个IO流程,这个会耗时
- VIew的创建是一个反射过程
从而也能得到一些方案:
- 减少布局层级
- 主题的选择可以减少不需要的控件和布局嵌套
- 不用LayoutInflater
- 异步方案
studio自带布局层级查看工具:
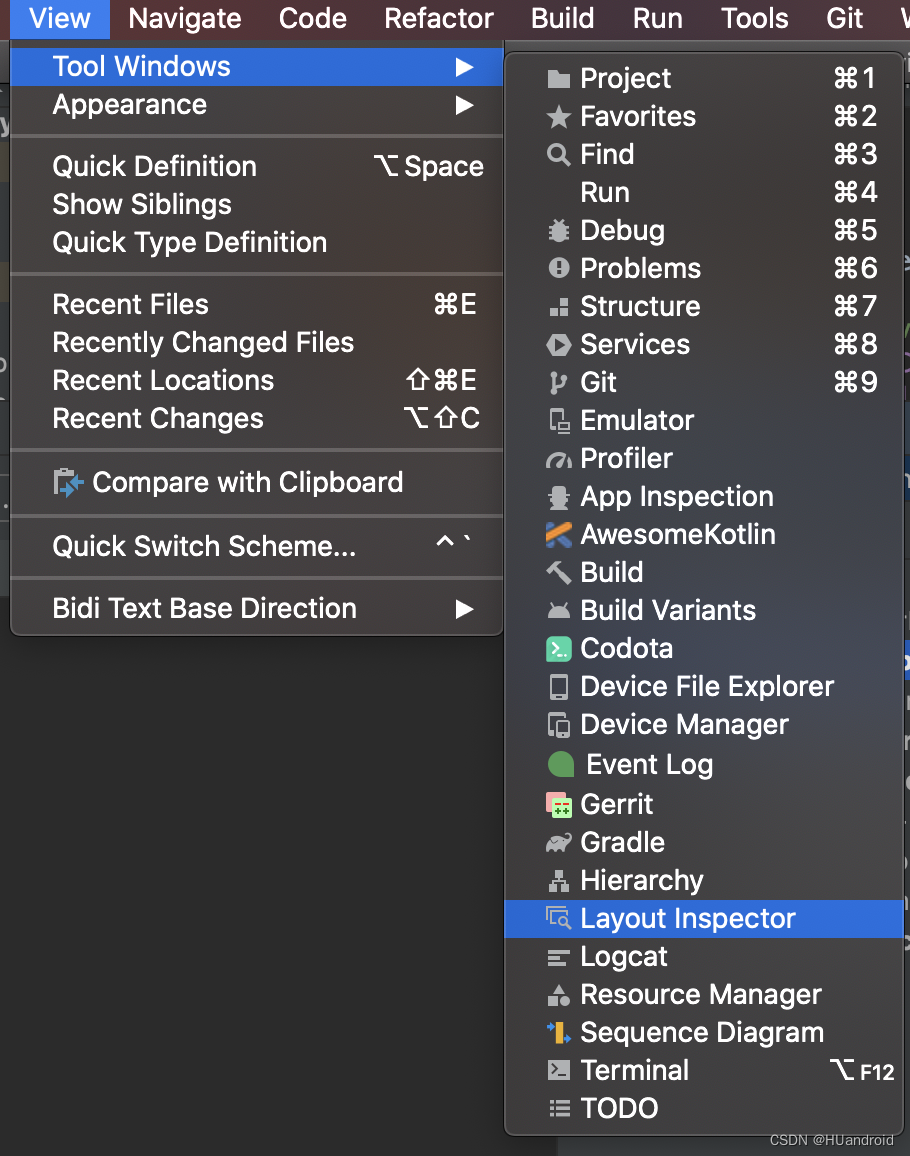
打开View,点击Tool Windows 中 Layout Inspector 项,下方会显示:
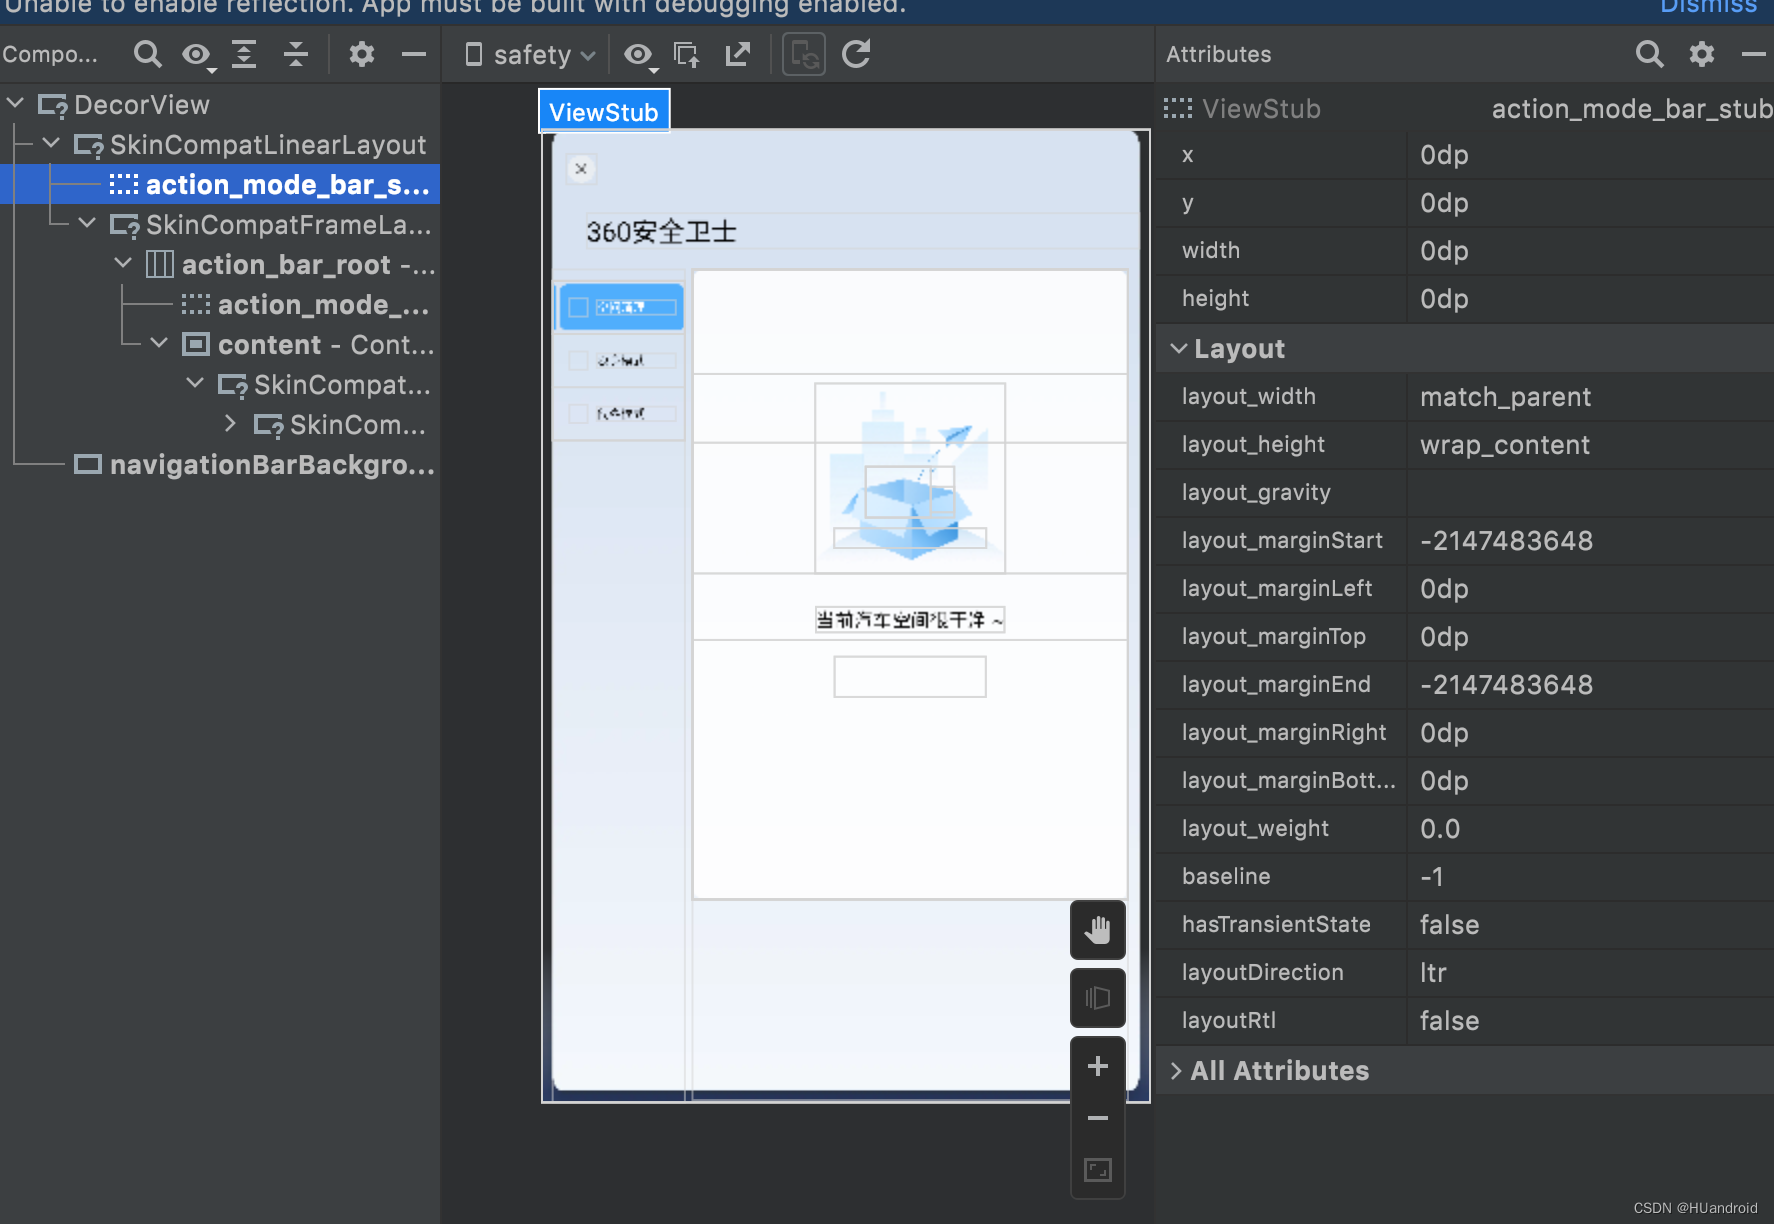
就可以看到view的布局层级了,可以选择优化那些层级过深了。
ViewStub标签
ViewStub 是一种view,是不可见的,实际上是把宽高都设置为0。
根据之前分析的流程,ViewStub标签是不会参与解析和创建的。仅仅做一个占位使用。
 <ViewStub
        android:id="@+id/vs"
        android:layout_width="match_parent"
        android:layout_height="match_parent"
        android:inflatedId="@+id/inflated_id"
        android:layout="@layout/view_stub_layout" />
我们可以根据ViewStub标签来做一些布局的懒加载,android:layout指定的布局为真正的布局,在真正需要的时候调用ViewStub.infalte方法(不要重复调用)。
启动优化中ViewStub使用个人经验分享:
- 对于闪屏页面的广告,可以使用ViewStub把广告布局包住,广告不是每次都有的
- 首页不可见的部分(屏幕下面的内容)
- 对于首页为ViewPager的布局,因为会默认预加载左右各一个fragment。而不是首屏显示的fragment的布局可以用ViewStub包裹住,这样那些非首屏的fragment的布局不会创建耗时,在真正显示的时候再去加载
- 一些状态布局
减少层级
主题的选择
根据上面的源码分析,不同主题会让页面绘制不同的控件(title、bar、menu等)。
这里同一个activity分别测试了:Theme.AppCompat.NoActionBar、Theme.AppCompat.DayNight.DarkActionBar、Theme.AppCompat.Dialog 的style。
得到不同耗时结果从长到短为:Theme.AppCompat.DayNight.DarkActionBar > Theme.AppCompat.Dialog > Theme.AppCompat.NoActionBar
除了系统自带的style有不用的差异,单独设置的属性也存在差异:无背景的、无title的、无动画的会更快。
 <style name="Theme.AppCompat.Translucent" parent="Theme.AppCompat.NoActionBar">
        <item name="android:windowNoTitle">true</item>
        <item name="android:windowBackground">@android:color/transparent</item>
        <item name="android:colorBackgroundCacheHint">@null</item>
        <item name="android:windowIsTranslucent">true</item>
        <item name="android:windowAnimationStyle">@android:style/Animation</item>
    </style>
约束布局使用
ConstraintLayout是一个优化布局的利器,可以把之前的LinearLayout和RelativeLayout嵌套的复杂布局拍平为一个层级,很大程度上减少的布局的层级。使用参考文档:
约束布局的使用文档
X2C方案
先回顾下LayoutInflater加载的耗时点:IO和反射。而X2C方案直接是通过代码创建布局,不去读取xml文件和反射创建布局。
具体可以查看X2C的文档:X2C
小tips:项目中可以不用集成X2C框架,可以在测试demo中集成,然后同X2C框架去生成xml文件的布局代码,然后再拷贝到原项目中。
小tips2: 通过new 的方式创建布局,存在代码量比较多问题。重点这里会略过Factory流程,有的换肤框架会失效。
AsyncLayoutInflater
AsyncLayoutInflater是谷歌提供的异步加载布局方案,使用记得导入库implementation 'androidx.asynclayoutinflater:asynclayoutinflater:1.0.0'
 @Override
    protected void onCreate(@Nullable Bundle savedInstanceState) {
        super.onCreate(savedInstanceState);

        new AsyncLayoutInflater(this).inflate(R.layout.activity_main, null, new AsyncLayoutInflater.OnInflateFinishedListener() {
            @Override
            public void onInflateFinished(@NonNull View view, int resid, @Nullable ViewGroup parent) {
                   setContentView(view);
				//下面可以正常的findviewByid了
            }
        });
    }
源码就一个类:
package androidx.asynclayoutinflater.view;

import android.content.Context;
import android.os.Handler;
import android.os.Handler.Callback;
import android.os.Looper;
import android.os.Message;
import android.util.AttributeSet;
import android.util.Log;
import android.view.LayoutInflater;
import android.view.View;
import android.view.ViewGroup;

import androidx.annotation.LayoutRes;
import androidx.annotation.NonNull;
import androidx.annotation.Nullable;
import androidx.annotation.UiThread;
import androidx.core.util.Pools.SynchronizedPool;

import java.util.concurrent.ArrayBlockingQueue;

public final class AsyncLayoutInflater {
    private static final String TAG = "AsyncLayoutInflater";

    LayoutInflater mInflater;
    Handler mHandler;
    InflateThread mInflateThread;

    public AsyncLayoutInflater(@NonNull Context context) {
        mInflater = new BasicInflater(context);
        mHandler = new Handler(mHandlerCallback);
        mInflateThread = InflateThread.getInstance();
    }

    @UiThread
    public void inflate(@LayoutRes int resid, @Nullable ViewGroup parent,
            @NonNull OnInflateFinishedListener callback) {
        if (callback == null) {
            throw new NullPointerException("callback argument may not be null!");
        }
        InflateRequest request = mInflateThread.obtainRequest();
        request.inflater = this;
        request.resid = resid;
        request.parent = parent;
        request.callback = callback;
        mInflateThread.enqueue(request);
    }

    private Callback mHandlerCallback = new Callback() {
        @Override
        public boolean handleMessage(Message msg) {
            InflateRequest request = (InflateRequest) msg.obj;
            if (request.view == null) {
                request.view = mInflater.inflate(
                        request.resid, request.parent, false);
            }
            request.callback.onInflateFinished(
                    request.view, request.resid, request.parent);
            mInflateThread.releaseRequest(request);
            return true;
        }
    };

    public interface OnInflateFinishedListener {
        void onInflateFinished(@NonNull View view, @LayoutRes int resid,
                @Nullable ViewGroup parent);
    }

    private static class InflateRequest {
        AsyncLayoutInflater inflater;
        ViewGroup parent;
        int resid;
        View view;
        OnInflateFinishedListener callback;

        InflateRequest() {
        }
    }

    private static class BasicInflater extends LayoutInflater {
        private static final String[] sClassPrefixList = {
            "android.widget.",
            "android.webkit.",
            "android.app."
        };

        BasicInflater(Context context) {
            super(context);
        }

        @Override
        public LayoutInflater cloneInContext(Context newContext) {
            return new BasicInflater(newContext);
        }

        @Override
        protected View onCreateView(String name, AttributeSet attrs) throws ClassNotFoundException {
            for (String prefix : sClassPrefixList) {
                try {
                    View view = createView(name, prefix, attrs);
                    if (view != null) {
                        return view;
                    }
                } catch (ClassNotFoundException e) {
                    // In this case we want to let the base class take a crack
                    // at it.
                }
            }

            return super.onCreateView(name, attrs);
        }
    }

    private static class InflateThread extends Thread {
        private static final InflateThread sInstance;
        static {
            sInstance = new InflateThread();
            sInstance.start();
        }

        public static InflateThread getInstance() {
            return sInstance;
        }

        private ArrayBlockingQueue<InflateRequest> mQueue = new ArrayBlockingQueue<>(10);
        private SynchronizedPool<InflateRequest> mRequestPool = new SynchronizedPool<>(10);

        // Extracted to its own method to ensure locals have a constrained liveness
        // scope by the GC. This is needed to avoid keeping previous request references
        // alive for an indeterminate amount of time, see b/33158143 for details
        public void runInner() {
            InflateRequest request;
            try {
                request = mQueue.take();
            } catch (InterruptedException ex) {
                // Odd, just continue
                Log.w(TAG, ex);
                return;
            }

            try {
                request.view = request.inflater.mInflater.inflate(
                        request.resid, request.parent, false);
            } catch (RuntimeException ex) {
                // Probably a Looper failure, retry on the UI thread
                Log.w(TAG, "Failed to inflate resource in the background! Retrying on the UI"
                        + " thread", ex);
            }
            Message.obtain(request.inflater.mHandler, 0, request)
                    .sendToTarget();
        }

        @Override
        public void run() {
            while (true) {
                runInner();
            }
        }

        public InflateRequest obtainRequest() {
            InflateRequest obj = mRequestPool.acquire();
            if (obj == null) {
                obj = new InflateRequest();
            }
            return obj;
        }

        public void releaseRequest(InflateRequest obj) {
            obj.callback = null;
            obj.inflater = null;
            obj.parent = null;
            obj.resid = 0;
            obj.view = null;
            mRequestPool.release(obj);
        }

        public void enqueue(InflateRequest request) {
            try {
                mQueue.put(request);
            } catch (InterruptedException e) {
                throw new RuntimeException(
                        "Failed to enqueue async inflate request", e);
            }
        }
    }
}
细看,发现其实这个源码很简单,就是发送一个异步请求到队列等待执行,然后inflater布局后回回调到主线程的接口。但是也存在很对问题,比如缓存队列最大容量为10个,超过会等待;跳过了LayoutInflater.Factory LayoutInflater.Factory2的处理等问题。
public class AsyncLayoutInflatePlus {
    private static final String TAG = "AsyncLayoutInflatePlus";

    private Pools.SynchronizedPool<InflateRequest> mRequestPool = new Pools.SynchronizedPool<>(10);

    LayoutInflater mInflater;
    Handler mHandler;
    Dispather mDispatcher;


    public AsyncLayoutInflatePlus(@NonNull Context context) {
        mInflater = new BasicInflater(context);
        mHandler = new Handler(mHandlerCallback);
        mDispatcher = new Dispather();
    }

    @UiThread
    public void inflate(@LayoutRes int resid, @Nullable ViewGroup parent,
                        @NonNull OnInflateFinishedListener callback) {
        if (callback == null) {
            throw new NullPointerException("callback argument may not be null!");
        }
        InflateRequest request = obtainRequest();
        request.inflater = this;
        request.resid = resid;
        request.parent = parent;
        request.callback = callback;
        mDispatcher.enqueue(request);
    }

    private Handler.Callback mHandlerCallback = new Handler.Callback() {
        @Override
        public boolean handleMessage(Message msg) {
            InflateRequest request = (InflateRequest) msg.obj;
            if (request.view == null) {
                request.view = mInflater.inflate(
                        request.resid, request.parent, false);
            }
            request.callback.onInflateFinished(
                    request.view, request.resid, request.parent);
            releaseRequest(request);
            return true;
        }
    };

    public interface OnInflateFinishedListener {
        void onInflateFinished(@NonNull View view, @LayoutRes int resid,
                               @Nullable ViewGroup parent);
    }

    private static class InflateRequest {
        AsyncLayoutInflatePlus inflater;
        ViewGroup parent;
        int resid;
        View view;
        OnInflateFinishedListener callback;

        InflateRequest() {
        }
    }


    private static class Dispather {

        //获得当前CPU的核心数
        private static final int CPU_COUNT = Runtime.getRuntime().availableProcessors();
        //设置线程池的核心线程数2-4之间,但是取决于CPU核数
        private static final int CORE_POOL_SIZE = Math.max(2, Math.min(CPU_COUNT - 1, 4));
        //设置线程池的最大线程数为 CPU核数 * 2 + 1
        private static final int MAXIMUM_POOL_SIZE = CPU_COUNT * 2 + 1;
        //设置线程池空闲线程存活时间30s
        private static final int KEEP_ALIVE_SECONDS = 30;

        private static final ThreadFactory sThreadFactory = new ThreadFactory() {
            private final AtomicInteger mCount = new AtomicInteger(1);

            public Thread newThread(Runnable r) {
                return new Thread(r, "AsyncLayoutInflatePlus #" + mCount.getAndIncrement());
            }
        };

        //LinkedBlockingQueue 默认构造器,队列容量是Integer.MAX_VALUE
        private static final BlockingQueue<Runnable> sPoolWorkQueue =
                new LinkedBlockingQueue<Runnable>();

        /**
         * An {@link Executor} that can be used to execute tasks in parallel.
         */
        public static final ThreadPoolExecutor THREAD_POOL_EXECUTOR;

        static {
            Log.i(TAG, "static initializer: " + " CPU_COUNT = " + CPU_COUNT + " CORE_POOL_SIZE = " + CORE_POOL_SIZE + " MAXIMUM_POOL_SIZE = " + MAXIMUM_POOL_SIZE);
            ThreadPoolExecutor threadPoolExecutor = new ThreadPoolExecutor(
                    CORE_POOL_SIZE, MAXIMUM_POOL_SIZE, KEEP_ALIVE_SECONDS, TimeUnit.SECONDS,
                    sPoolWorkQueue, sThreadFactory);
            threadPoolExecutor.allowCoreThreadTimeOut(true);
            THREAD_POOL_EXECUTOR = threadPoolExecutor;
        }

        public void enqueue(InflateRequest request) {
            THREAD_POOL_EXECUTOR.execute((new InflateRunnable(request)));

        }

    }

    private static class BasicInflater extends LayoutInflater {
        private static final String[] sClassPrefixList = {
                "android.widget.",
                "android.webkit.",
                "android.app."
        };

        BasicInflater(Context context) {
            super(context);
            if (context instanceof AppCompatActivity) {
                // 手动setFactory2,兼容AppCompatTextView等控件
                AppCompatDelegate appCompatDelegate = ((AppCompatActivity) context).getDelegate();
                if (appCompatDelegate instanceof LayoutInflater.Factory2) {
                    LayoutInflaterCompat.setFactory2(this, (LayoutInflater.Factory2) appCompatDelegate);
                }
            }
        }

        @Override
        public LayoutInflater cloneInContext(Context newContext) {
            return new BasicInflater(newContext);
        }

        @Override
        protected View onCreateView(String name, AttributeSet attrs) throws ClassNotFoundException {
            for (String prefix : sClassPrefixList) {
                try {
                    View view = createView(name, prefix, attrs);
                    if (view != null) {
                        return view;
                    }
                } catch (ClassNotFoundException e) {
                    // In this case we want to let the base class take a crack
                    // at it.
                }
            }

            return super.onCreateView(name, attrs);
        }
    }


    private static class InflateRunnable implements Runnable {
        private InflateRequest request;
        private boolean isRunning;

        public InflateRunnable(InflateRequest request) {
            this.request = request;
        }

        @Override
        public void run() {
            isRunning = true;
            try {
                request.view = request.inflater.mInflater.inflate(
                        request.resid, request.parent, false);
            } catch (RuntimeException ex) {
                // Probably a Looper failure, retry on the UI thread
                Log.w(TAG, "Failed to inflate resource in the background! Retrying on the UI"
                        + " thread", ex);
            }
            Message.obtain(request.inflater.mHandler, 0, request)
                    .sendToTarget();
        }

        public boolean isRunning() {
            return isRunning;
        }
    }


    public InflateRequest obtainRequest() {
        InflateRequest obj = mRequestPool.acquire();
        if (obj == null) {
            obj = new InflateRequest();
        }
        return obj;
    }

    public void releaseRequest(InflateRequest obj) {
        obj.callback = null;
        obj.inflater = null;
        obj.parent = null;
        obj.resid = 0;
        obj.view = null;
        mRequestPool.release(obj);
    }


    public void cancel() {
        mHandler.removeCallbacksAndMessages(null);
        mHandlerCallback = null;
    }
}
网上也有很多解决方案,源码就一个类,可以直接抄出来改。列如上面代码,甚至还可以加入kotlin的协程但是我不推荐使用AsyncLayoutInflater,他已经过时了。而且调用会导致UI状态的复杂。
过度绘制
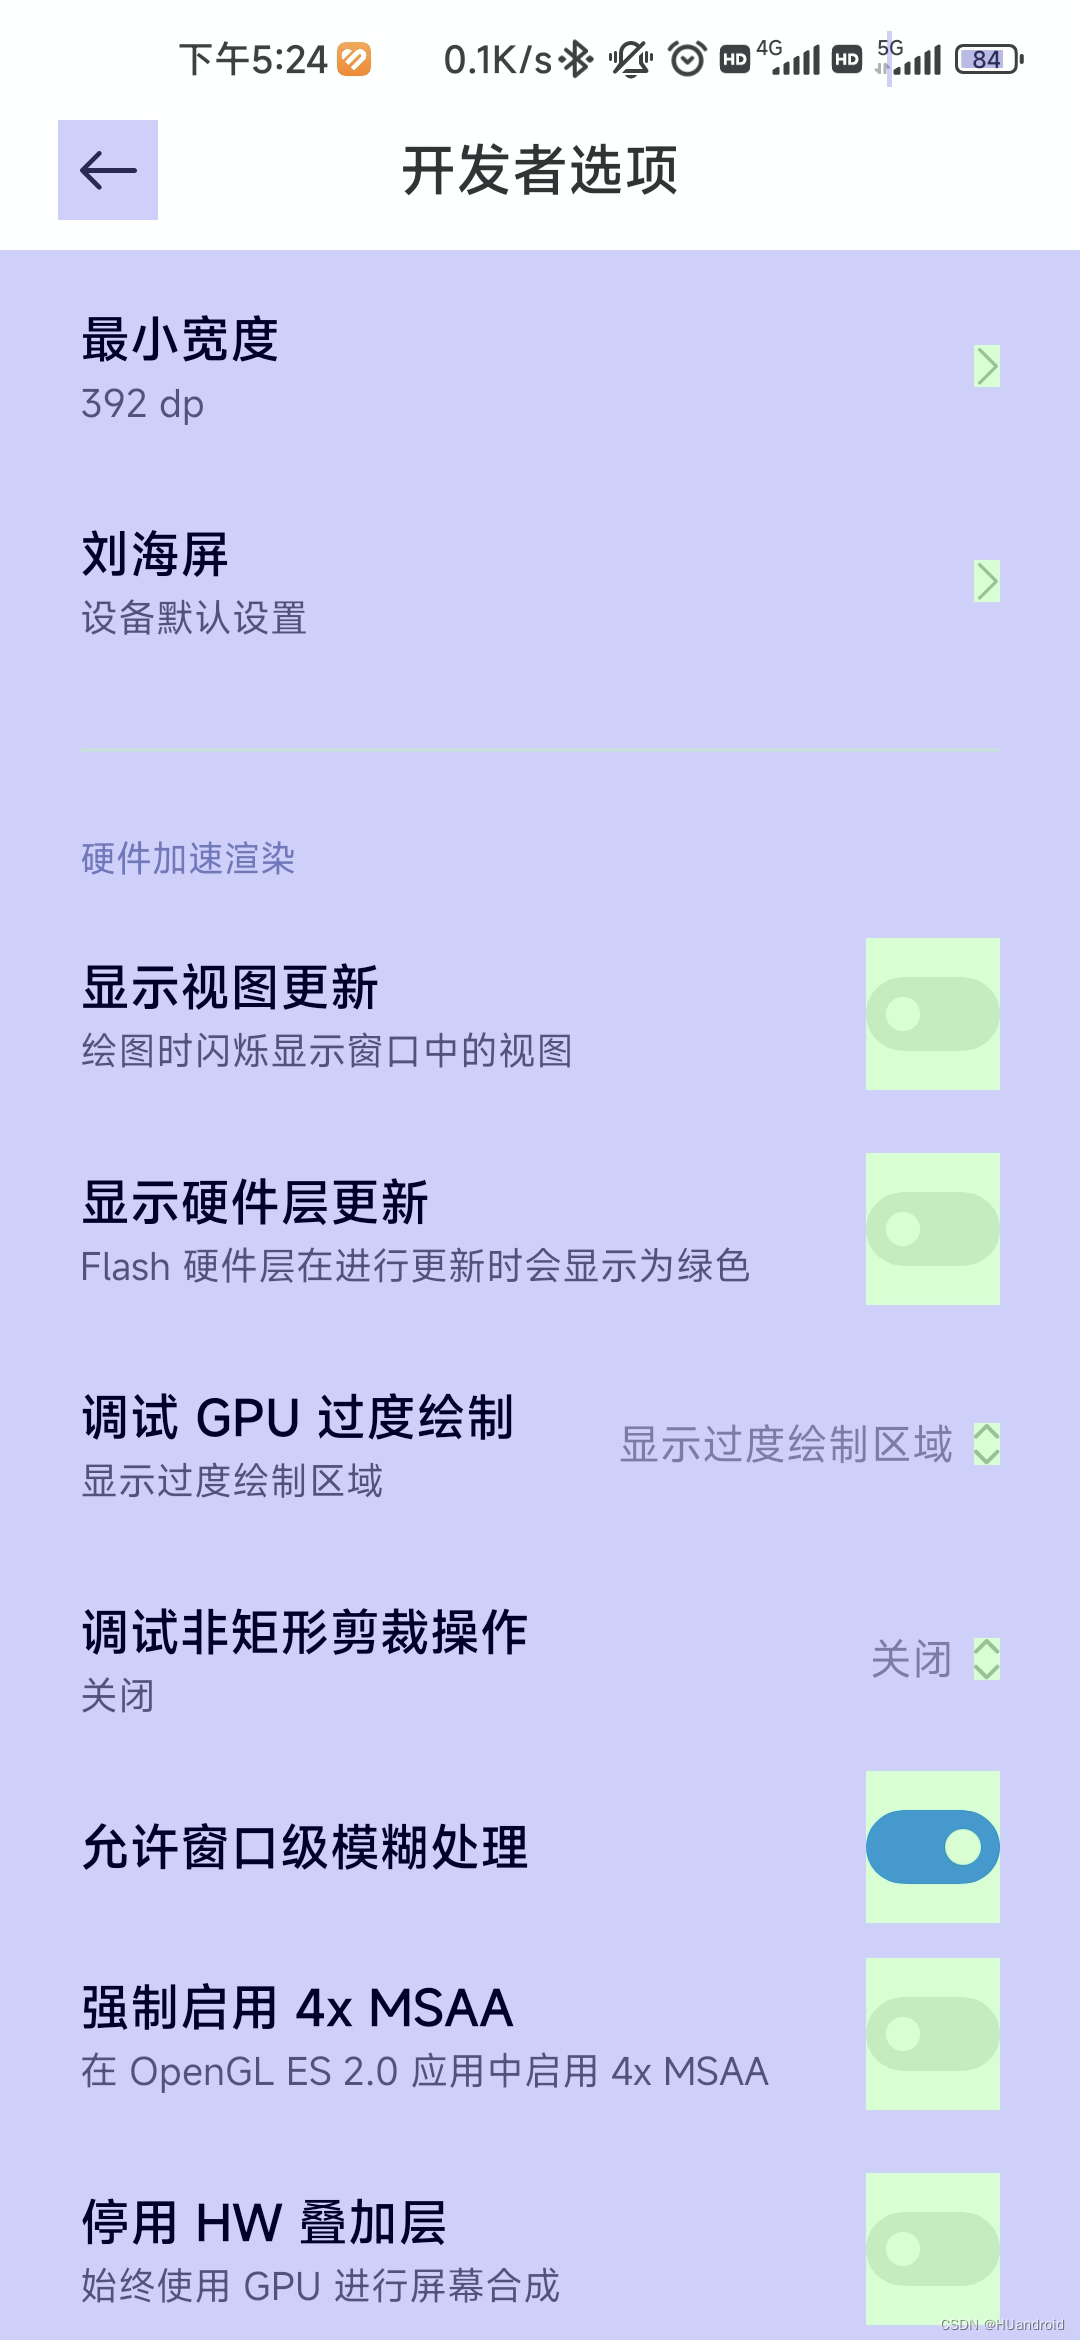
如何检测过度绘制
以小米手机为例子,在手机设置----》开发者选项----》-硬件加速渲染----》调试GPU过度绘制----》选择 显示过度绘制区域:
这里各种颜色代码什么意思了,选用官方贴图:
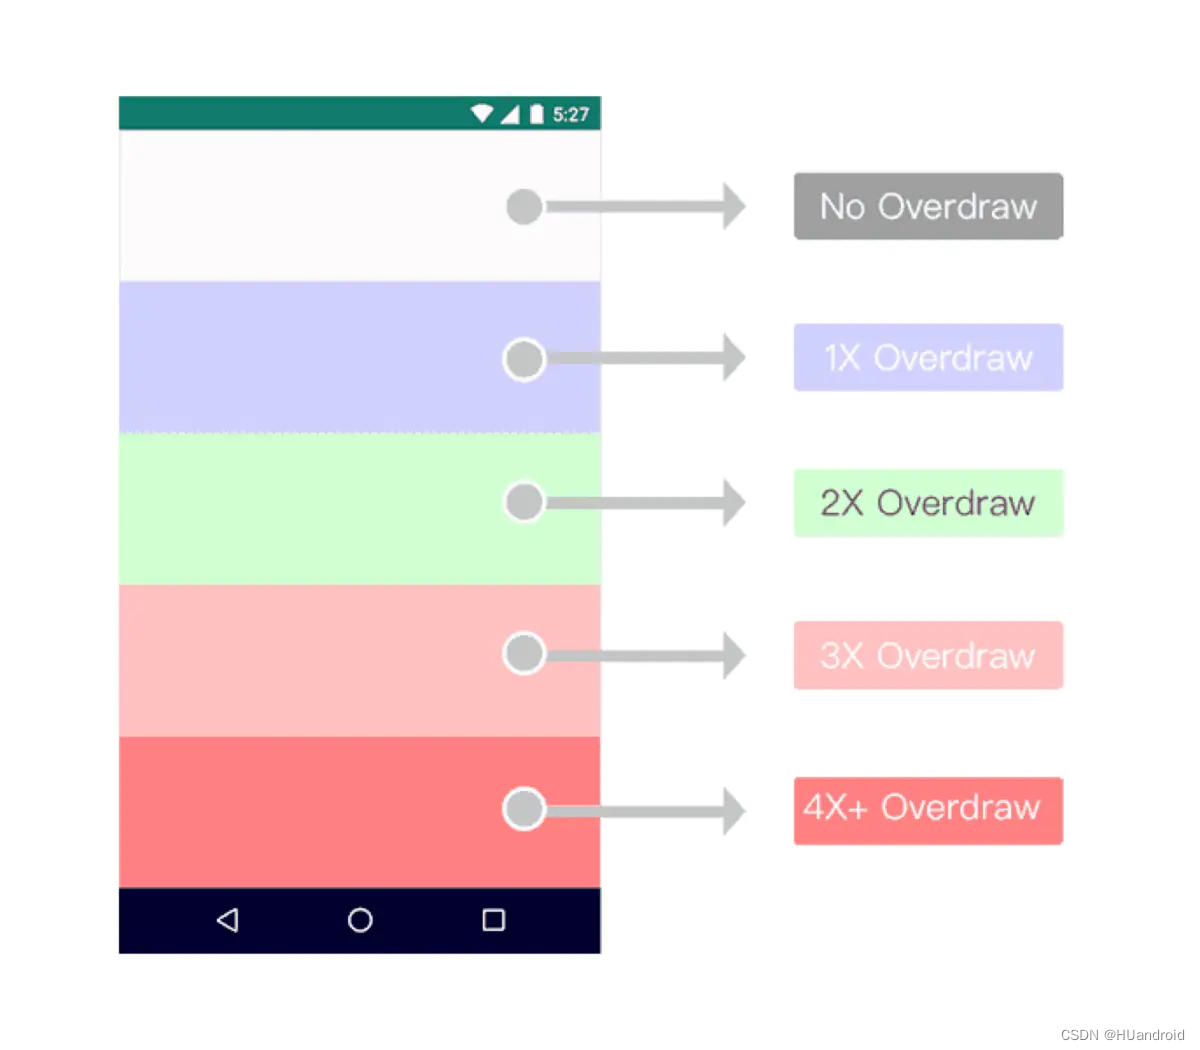
如果页面红色居多,表示同一个快区域存在大量的重复绘制了,不仅浪费了性能,而且会导致加载过长,除了非必要外,就需要检查下我们的代码是否应该如此。
我们应该尽可能的去保留原色或者蓝色,无过度绘制或者一次过度绘制。
如何监控页面的渲染速度
以小米手机为例子,在手机设置----》开发者选项----》监控----》HWUI呈现模式分析----》选择 在屏幕上显示为条线图:
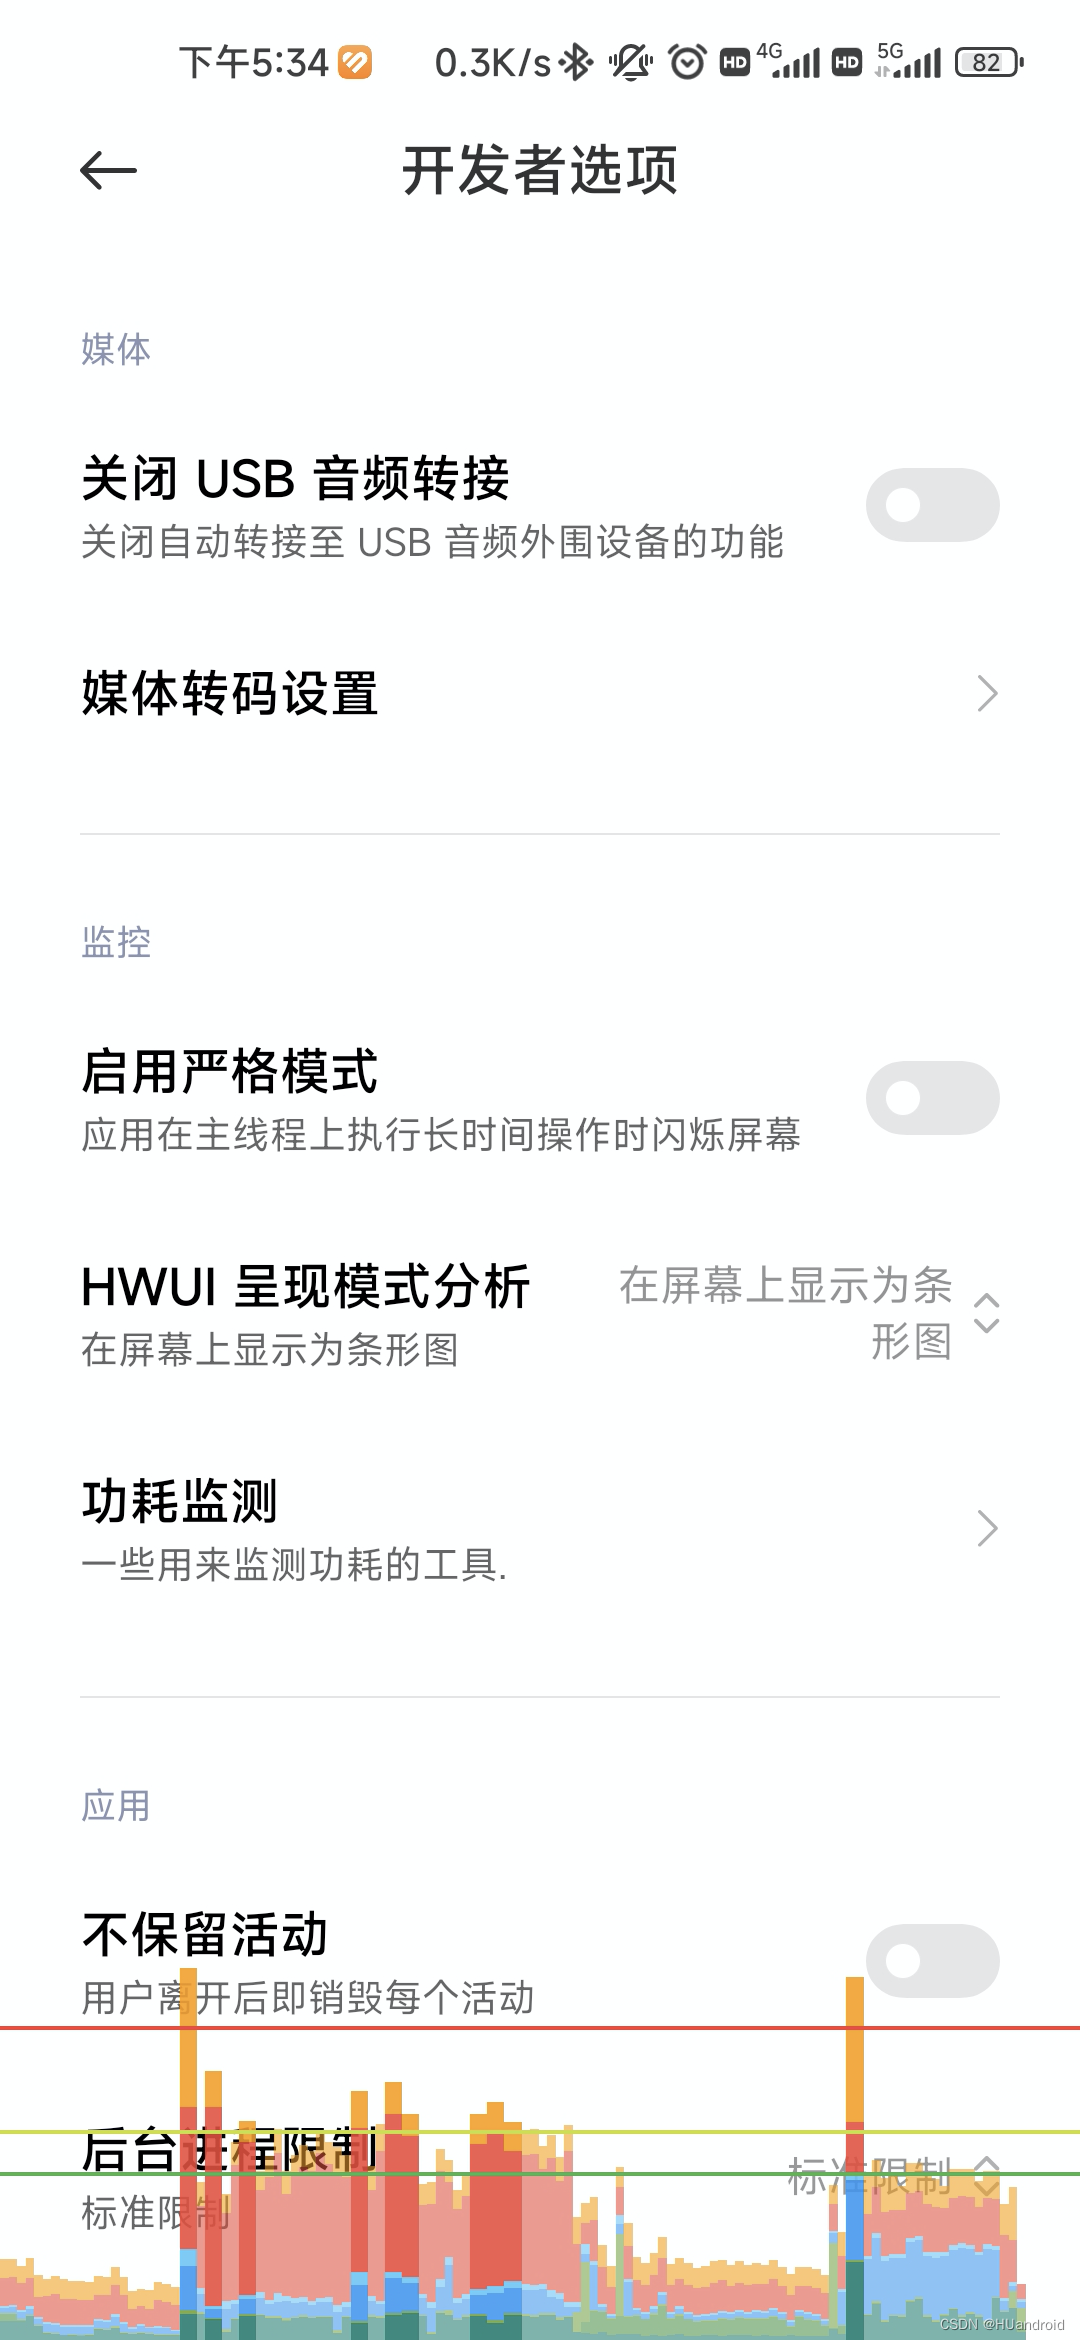
上图中横轴的每一个竖条都代表一帧,而绿色的水平线表示16ms,而android要求每帧的绘制时间不超过16ms。(其他两根颜色水平线可能是高刷屏)
垂直的颜色还是以官方贴图解释下:

adb方式:adb shell setprop debug.hwui.profile true 开关打开 ; adb shell dumpsys gfxinfo 包名 用adb显示
从HWUI呈现模式分析和过度绘制可以看出来,我们能够进行优化的点主要就是测量、布局、绘制、动画和输入处理。
- 测量(onMeasure)、布局(onLayout)、绘制(onDraw)过程是存在自顶而下遍历过程,父View到子View的过层,所以如果布局的层级过多,这会占用额外的CPU资源
- 当屏幕上的某个像素在同一帧的时间内被绘制了多次(Overdraw),这会浪费大量的CPU以及GPU资源,而且是无意义的。
- 在绘制过程中执行的
onDraw()方法中,不要大量的创建局部变量和耗时操作,而onDraw()方法中会一直重复调用。 - 小心使用动画和动画过程中产生的消耗(局部变量和耗时操作)
其实总结还是:减少布局层次、和绘制中的耗时操作、多余布局背景。
移除多余背景
- 如果列表和子元素是相同的背景,可以移除子元素的背景
<item name="android:windowBackground">@android:color/transparent</item>主题可以使用透明背景或者无背景(@null)来代替- 减少透明度的使用:如果这个view带有透明度,它就需要知道它下一层的view的颜色,再进行Blend混色处理,至少绘制2次
- 自定义view中,善于利用
clipRect()来裁剪绘制,而不是画布的叠加。
图片
- 对于图片最最后压缩过
- 能用xml代码解决最好
- 启动背景图最好是xml格式


 831
831


 被折叠的 条评论
为什么被折叠?
被折叠的 条评论
为什么被折叠?
 到【灌水乐园】发言


