Demo2 通过配置文件实现 Validation Application Block 的功能
继续上一个工程,将User 类中的验证的代码都去掉。
步骤
任务1 :建立项目的
1. 新建类库ValidationApp.UserValidation 。
右键单击解决方案,指向“添加”,选择“新建项目”,在弹出的窗口选择“类库”,然后在名称栏输入 ValidationApp.UserValidation 。最后,单击“确定”,如图2.1 。
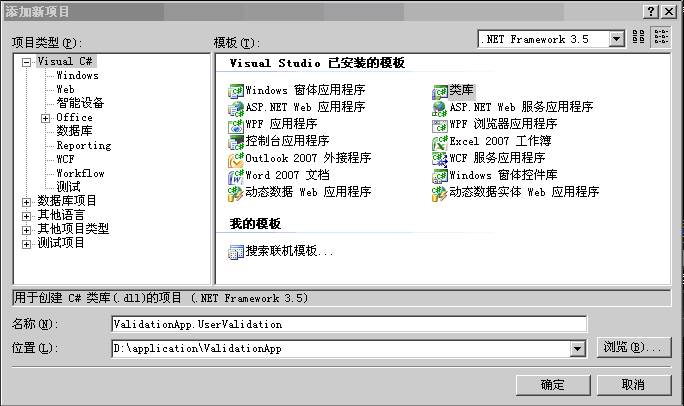
图2.1 添加类库
2. 添加引用Microsoft.Practices.EnterpriseLibrary.Validation 到项目ValidationApp .UserValidation 中。步骤和上个实验一样,右键单击引用文件夹,指向添加引用,单击浏览,按如下相对路径“../application/lib/ ”选择Microsoft.Practices.EnterpriseLibrary.Validation, 然后按下确定。
3. 将User 类直接拖到ValidationApp.UserValidation 项目中,并去除
using ValidationApp.Properties ;
4. 在ValidationApp 项目中添加对ValidationApp.UserValidation 的引用。右键单击“引用”,指向“添加引用”。然后,指向“项目”,选择ValidationApp.UserValidation 项目, 单击“确定”,如图2.2 。
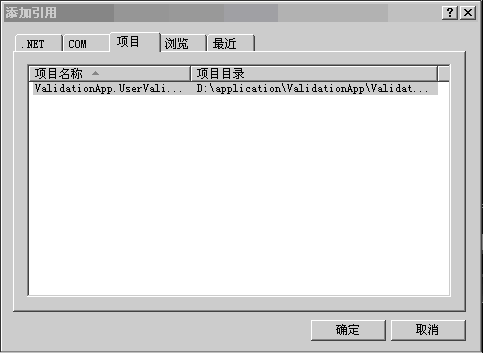
图2.2 添加项目引用
编译并执行一下程序
任务2 :添加应用程序配置文件App.config 。
右键单击ValidationApp 项目, 指向“添加”,单击“新建项”。选中“应用程序配置文件”,单击添加。如图2.3
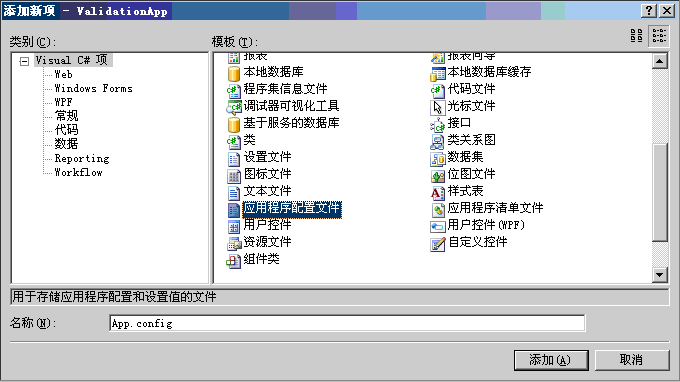
图2.3 添加应用程序配置文件
任务3 :使用配置文件编辑器(Enterprise Library Configuration) 将验证配置信息添加到配置文件。
1. 使用配置文件编辑器(Enterprise Library Configuration) 打开App.config 。
右键单击App.config 文件,选择“Enterprise Library Configuration ”。如图2.4

图 2.4 打开 Enterprise Library Configuration
2. 添加验证配置信息( Validation Application Block )
右键单击配置文件App.config 节点, 指向new, 选择Validation Application Block ,如图2.5

图2.5 增加validation Application Block
任务4 :为User 类增加配置信息
1. 在Validation Application Block 中增加User 类型节点。右键单击Validation Application Block, 选择New ,然后单击Type ,如图2.6 。

图2.6 增加新的类型
选择了Type 之后,将会弹出Type Selector 。这时,我们需要加载User 类到配置文件中来。选择“Load from File ”, 按照以下路径“../application/ValidationApp.UserValidation/bin / debug 找到ValidationApp.UserValidation.dll 文件,然后双击它。然后单击确定,如图2.7
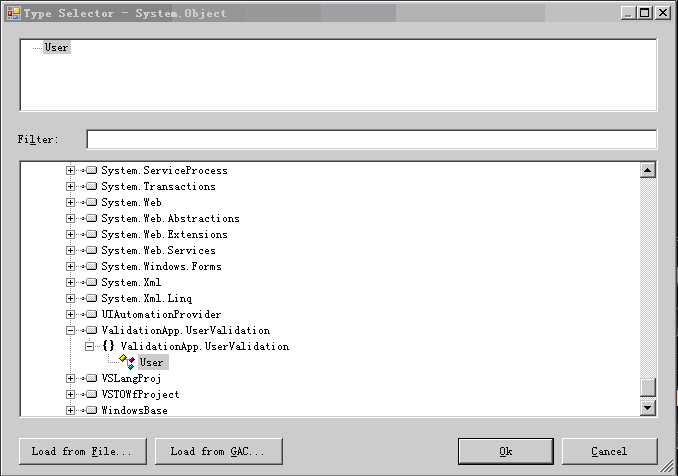
图2.7 选择类型
2. 为User 类型添加一个新的规则集,并把它设置成默认的规则Default 。右键单击User 节点,选择new ,然后单击Rule Set , 如图2.8
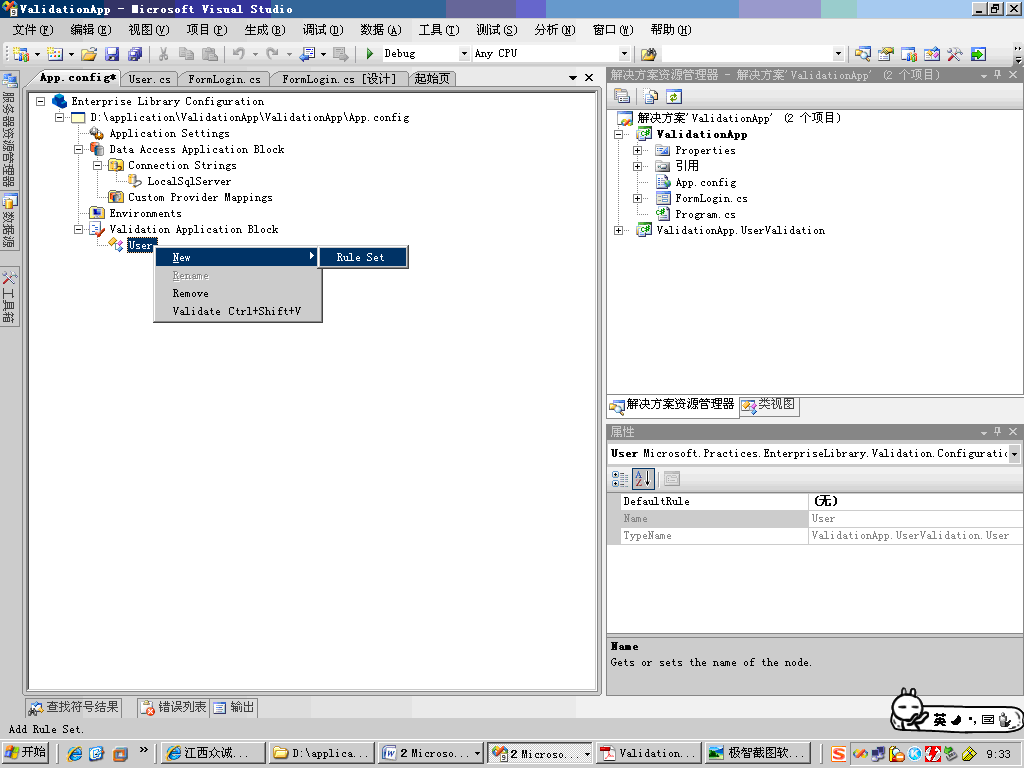
图2.8 添加新的规则
单击User 节点,把属性DefaultRole 设置为Default 。
3. 右键单击Default 节点,指向New , 然后单击Choose Members, 如图2.9 所示 .

图2.9 选择成员
然后选择Properties ,表示选择了所有的属性。如图2.10

图2.10 选择属性
4. 为UserName 属性设置And Composite Validator 。右键单击UserName 节点,指向new ,然后单击And Composite Validator, 如图2.11

图2.11 增加And Composite Validator
为UserName 属性设置String Length Validator 。右键单击And Composite Validator 节点,指向new ,然后单击String Length Validator, 如图2.12 。

图2.12 增加String Length Validation
设置lowerBound 为1 ,upperBound 为20 ,lowerBoundType 为Inclusive 。如图2.13 。

图2.13
为UserName 增加NotNullValidator, 右键单击And Composite Validator 节点,指向new ,然后单击Not Null Validator ,没有任何设置。
5. 配置Password 属性的验证信息。
l 为Password 属性设置And Composite Validator 。右键单击UserName 节点,指向new ,然后单击And Composite Validator 。
l 为Password 属性设置String Length Validator 。右键单击And Composite Validator 节点,指向new ,然后单击String Length Validator 。设置lowerBound 为6 ,upperBound 为12 ,lowerBoundType 为Inclusive 。
l 为Password 增加Regular Expression Validator, 右键单击And Composite Validator 节点,指向new ,然后单击Regular Expression Validator , 设置属性Patton 的值为 ” ^ [A-Za-z0-9]+$ ” ( 不包括双引号 ) 。如图:2.14

图2.14
l 为Password 属性设置Not Null Validator .
6. 配置Email 的验证信息。 为 Email 属性设置Regular Expression Validator 。右键单击And Composite Validator 节点,指向new ,然后单击Regular Expression Validator ,从正则表达式编辑器中选择 ” Internet 电子邮件地址 ” 。如图2.15

图2.15
7. 配置IDcard 验证信息.
l 为IDcard 设置 And Composite Validator 。右键单击UserName 节点,指向new ,然后单击And Composite Validator 。
l 为IDcard 属性设置String Length Validator 。右键单击And Composite Validator 节点,指向new ,然后单击String Length Validator 。设置lowerBound 为18 ,upperBound 为18 ,lowerBoundType 为Inclusive 。
l 为IDcard 设置Regular Expression Validator, 右键单击And Composite Validator 节点,指向new ,然后单击Regular Expression Validator, 设置属性Patton 的值为 ” ^[0-9]*[1-9][0-9]*$ ” ( 不包括双引号 ) 。
任务5 :验证


 811
811

 被折叠的 条评论
为什么被折叠?


