


文章目录
1. Spring Cloud Config 简介
Spring Cloud Config 是一个分布式系统配置管理的解决方案。Spring Cloud Config分为服务端和客户端。其中服务端也称为分布式配置中心,它是一个独立的微服务应用,用来连接配置仓库并为客户端提供获取配置信息、加密/解密信息等访问接口。而客户端则是微服务架构中的各个微服务应用或基础设施,它们通过指定的配置中心来管理应用资源与业务相关的配置内容,并在启动的时候从配置中心获取和加载配置信息。
Spring Cloud Config 主要功能:
- 集中管理各个环境、各个微服务的配置文件
- 提供服务端和客户端支持
- 配置文件修改后,可以快速生效
- 配置文件通过 Git/SVn 进行管理,天然支持版本回退功能。
- 支持高并发查询、也支持多种开发语言
2. Spring Cloud Config基础架构
Spring Cloud Config的基础架构图如下所示:

Spring Cloud Config基础架构组成元素说明:
- 远程Git仓库:用来存储配置文件的地方
- Config Server:分布式配置中心,对应上述创建的config-server工程,在该工程中指定了所要连接的Git仓库位置以及账户、密码等连接信息。
- 本地Git仓库:在Config Server的文件系统中,每次客户端请求获取配置信息时,Config Server从Git仓库中获取最新配置到本地,然后在本地Git仓库中读取并返回。当远程仓库无法获取时,直接将本地内容返回。
- ServiceA-1、ServiceA-2:具体的微服务应用,它们指定了Config Server的地址,从而实现从外部化获取应用自己要用的配置信息。这些应用在启动的时候,会向Config Server请求获取配置信息来进行加载。
- bus-refresh:bus-refresh该接口是Config Server和Config Client接入Spring Cloud Bus后用于通知Config Client刷新配置文件的。
客户端应用从配置管理中获取配置信息的执行流程:
- 应用启动时,根据 bootstrap.properties中配置的应用名{application}、环境名{profile}、分支名{label},向Config Server请求获取配置信息。
- Config Server根据自己维护的Git仓库信息和客户端传递过来的配置定位信息去查找配置文件。
- 通过
git clone命令将找到的配置信息下载到Config Server的文件系统中 - Config Server创建Spring的ApplicationContext实例,并从Git本地仓库中加载配置文件,最后将这些配置内容读取出来返回给客户端应用。
- 客户端应用在获取外部配置文件后加载到ApplicationContext实例,该配置内容的优先级高于客户端Jar包内部的配置内容,所以在Jar包中重复的内容将不再被加载。
Config Server巧妙地通过git clone将配置信息存于本地,起到缓存的作用,即使当Git服务端无法访问的时候,依然可以取Config Server中的缓存内容进行使用。
3. 使用示例
下面演示如何构建基于Git存储的分布式配置中心,在客户端中演示如何通过配置指定微服务应用的所属配置中心,并让其能够从配置中心获取配置信息并绑定到代码中的过程。
3.1 准备工作
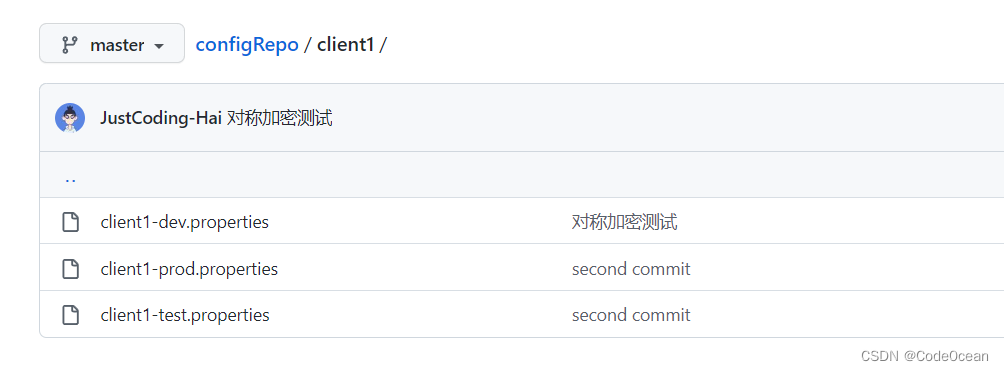
在GitHub上创建一个项目,项目名:configRepo,该项目的client1目录下存放client1-dev.properties、client1-prod.properties、client1-test.properties配置文件。
3.2 创建配置中心
基于Spring Boot 2.2.6.RELEASE 版本,创建一个名为ConfigServer的基础的Spring Boot项目作为配置中心,pom.xml添加如下依赖:
<?xml version="1.0" encoding="UTF-8"?>
<project xmlns="http://maven.apache.org/POM/4.0.0" xmlns:xsi="http://www.w3.org/2001/XMLSchema-instance"
         xsi:schemaLocation="http://maven.apache.org/POM/4.0.0 https://maven.apache.org/xsd/maven-4.0.0.xsd">
    <modelVersion>4.0.0</modelVersion>
    <parent>
        <groupId>org.springframework.boot</groupId>
        <artifactId>spring-boot-starter-parent</artifactId>
        <version>2.2.6.RELEASE</version>
        <relativePath/> <!-- lookup parent from repository -->
    </parent>
    <groupId>top.javahai.learn.springcloud</groupId>
    <artifactId>config-server</artifactId>
    <version>0.0.1-SNAPSHOT</version>
    <name>config-server</name>
    <description>Demo project for Spring Boot</description>
    <properties>
        <java.version>1.8</java.version>
        <spring-cloud.version>Hoxton.SR6</spring-cloud.version>
    </properties>
    <dependencies>
        <dependency>
            <groupId>org.springframework.boot</groupId>
            <artifactId>spring-boot-starter-web</artifactId>
        </dependency>
        <dependency>
            <groupId>org.springframework.cloud</groupId>
            <artifactId>spring-cloud-config-server</artifactId>
        </dependency>

        <dependency>
            <groupId>org.springframework.boot</groupId>
            <artifactId>spring-boot-starter-test</artifactId>
            <scope>test</scope>
        </dependency>
    </dependencies>
    <dependencyManagement>
        <dependencies>
            <dependency>
                <groupId>org.springframework.cloud</groupId>
                <artifactId>spring-cloud-dependencies</artifactId>
                <version>${spring-cloud.version}</version>
                <type>pom</type>
                <scope>import</scope>
            </dependency>
        </dependencies>
    </dependencyManagement>

    <build>
        <plugins>
            <plugin>
                <groupId>org.springframework.boot</groupId>
                <artifactId>spring-boot-maven-plugin</artifactId>
            </plugin>
        </plugins>
    </build>
</project>
在项目启动类上添加注解@EnableConfigServer,开启Spring Cloud Config的服务端功能。
@SpringBootApplication
@EnableConfigServer
public class ConfigServerApplication {

    public static void main(String[] args) {
        SpringApplication.run(ConfigServerApplication.class, args);
    }
}
在application.properties配置文件中配置基本的服务信息和存储配置文件的Git仓库信息
spring.application.name=config-server
server.port=8081
# 配置文件仓库地址
spring.cloud.config.server.git.uri=https://github.com/JustCoding-Hai/configRepo.git
# 仓库路径下配置文件的目录,可以配置多个
spring.cloud.config.server.git.search-paths=client1
# 访问Git仓库的用户名和密码
spring.cloud.config.server.git.username=12598161612@aliyun.com
spring.cloud.config.server.git.password=
启动项目后访问地址:http://localhost:8081/client1/dev,可以读取到配置文件的信息。
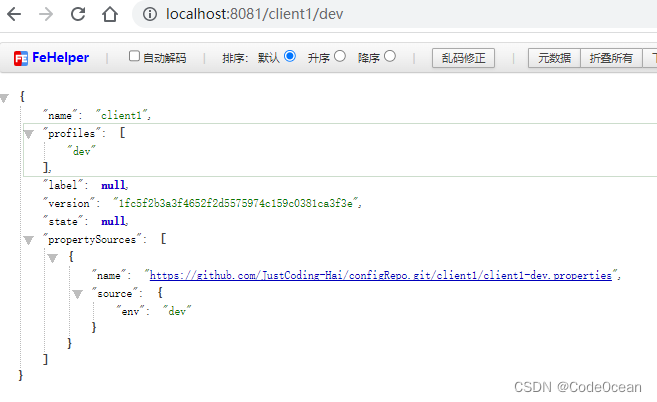
请求配置文件的访问地址有如下规则:
/{application}/{profile}/[{label}]
/{application}-{profile}.yml
/{application}-{profile}.properties
/{label}/{application}-{profile}.yml
/{label}/{application}-{profile}.properties
参数说明:
- applicaiton 表示配置文件名
- profile 表示配置文件 profile,例如 test、dev、prod
- label 表示git 分支,参数可选,默认就是master
接下来可以修改配置文件,并且提交到 GitHub仓库中,然后刷新 ConfigServer 接口,就可以及时获取最新的配置内容。
3.3 客户端配置
基于Spring Boot 2.2.6.RELEASE 版本,创建一个名为ConfigClient的Spring Boot项目,用于使用ConfigServer对应的配置文件。pom.xml添加如下依赖:
<?xml version="1.0" encoding="UTF-8"?>
<project xmlns="http://maven.apache.org/POM/4.0.0" xmlns:xsi="http://www.w3.org/2001/XMLSchema-instance"
         xsi:schemaLocation="http://maven.apache.org/POM/4.0.0 https://maven.apache.org/xsd/maven-4.0.0.xsd">
    <modelVersion>4.0.0</modelVersion>
    <parent>
        <groupId>org.springframework.boot</groupId>
        <artifactId>spring-boot-starter-parent</artifactId>
        <version>2.2.6.RELEASE</version>
        <relativePath/> <!-- lookup parent from repository -->
    </parent>
    <groupId>top.javahai.learn.springcloud</groupId>
    <artifactId>config-client</artifactId>
    <version>0.0.1-SNAPSHOT</version>
    <name>config-client</name>
    <description>Demo project for Spring Boot</description>
    <properties>
        <java.version>1.8</java.version>
        <spring-cloud.version>Hoxton.SR6</spring-cloud.version>
    </properties>
    <dependencies>
        <dependency>
            <groupId>org.springframework.boot</groupId>
            <artifactId>spring-boot-starter-web</artifactId>
        </dependency>
        <dependency>
            <groupId>org.springframework.cloud</groupId>
            <artifactId>spring-cloud-starter-config</artifactId>
        </dependency>

        <dependency>
            <groupId>org.springframework.boot</groupId>
            <artifactId>spring-boot-starter-test</artifactId>
            <scope>test</scope>
        </dependency>
    </dependencies>
    <dependencyManagement>
        <dependencies>
            <dependency>
                <groupId>org.springframework.cloud</groupId>
                <artifactId>spring-cloud-dependencies</artifactId>
                <version>${spring-cloud.version}</version>
                <type>pom</type>
                <scope>import</scope>
            </dependency>
        </dependencies>
    </dependencyManagement>

    <build>
        <plugins>
            <plugin>
                <groupId>org.springframework.boot</groupId>
                <artifactId>spring-boot-maven-plugin</artifactId>
            </plugin>
        </plugins>
    </build>
</project>
项目创建成功后,在resources 目录下,添加 bootstrap.properties 配置, bootstrap.properties 配置文件的加载优先级高于 application.properties ,使用bootstrap.properties 配置优先获取外部化的配置。
添加内容用于获取配置文件的config-server位置如下:
server.port=8082
spring.application.name=client1
spring.cloud.config.profile=dev
spring.cloud.config.label=master
spring.cloud.config.uri=http://localhost:8081
配置项说明:
spring.application.name:对应配置文件规则的{application}部分spring.cloud.config.profile:对应配置文件规则的{profile}部分spring.cloud.config.label:对应配置文件规则的{label}部分spring.cloud.config.uri:配置中心config-server的地址
创建类HelloController,提供Hello接口用于测试
@RestController
public class HelloController {


    /**
     * 获取配置文件的env值
     */
    @Value("${env}")
    String value;

    @GetMapping("/hello")
    public String hello() {
        return value;
    }

}
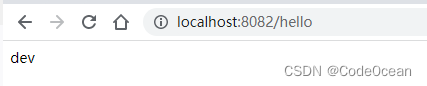
下面启动项目,浏览器访问http://localhost:8082/hello,可以看到config-client获取到了config-server的配置信息。
3.4 常用配置
3.4.1 占位符配置
我们可以使用占位符灵活控制查询目录。例如修改 config-server 配置文件:
spring.cloud.config.server.git.search-paths={application}
这里的 {application} 占位符代表了应用名,表示连接Config Server 的对应的Config Client对应的spring.application.name 属性的值。当Config Client客户端请求获取配置的时候,Config Server会根据客户端的spring.application.name 的值来填充 {application} 占位符以定位配置资源的存储位置,从而实现根据微服务应用的属性动态获取不同位置的配置,实现一个微服务应用对应一个目录的效果。

在 config-server 中,也可以用 {profile} 表示 client spring.cloud.config.profile,也可以用 {label} 表示 client 的spring.cloud.config.label
3.4.2 配置本地仓库
使用Git或者SVN仓库之后,文件都会在Config Server的本地文件系统中存储一份,这些文件默认会被存储于以<Git仓库名>为前缀的临时目录中,比如名为/tmp/<Git仓库名>-<随机数>的目录。
我们可以通过以下属性配置本地仓库固定的位置:
spring.cloud.config.server.git.basedir=
或者
spring.cloud.config.server.svn.basedir=
另外我们可以在 config-server 中,添加如下配置,表示指定配置文件的位置:
spring.cloud.config.server.native.search-locations=file://E:/properties/
通过上述的file://设置文件地址的方式,Config Server将以本地仓库的方式运行,可以方便我们在本地进行开发和调试工作。
3.4.3 配置本地文件系统
虽然在实际开发中,配置文件一般都是放在 Git 仓库中,但是config-server 也支持将配置文件放在classpath (src/main/resource)下。需要在 config-server 中添加如下配置:
spring.profiles.active=native
以上配置表示让 config-server 从 classpath 下查找配置文件,而不是去远程仓库中查找。
指定搜索配置文件的路径的属性:
spring.cloud.config.server.native.searchLocations=
3.4.4 属性覆盖
Config Server中有一个“属性覆盖”的特性,通过以下属性配置的参数不会被Config Client客户端修改。并且Spring Cloud客户端从Config Server中获取配置信息时,都会取得这些配置信息。例如配置name属性:
spring.cloud.config.server.overrides.name=123
通过“属性覆盖”的特性可以方便地为Spring Cloud应用配置一些共同属性或默认属性。
4. 安全管理
为了防止用户直接通过访问 config-server 看到配置文件内容,我们可以用 Spring Security 来保护 config-server的接口。首先在config-server中添加Spring Security 依赖:
        <dependency>
            <groupId>org.springframework.boot</groupId>
            <artifactId>spring-boot-starter-security</artifactId>
        </dependency>
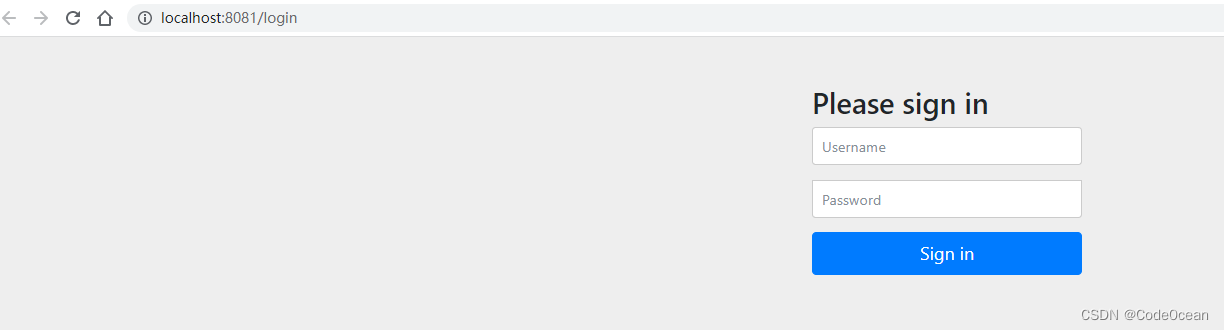
添加完依赖后,不需要进行任何其他改动就可以实现对配置中心的保护。下面访问config-server接口前需要先完成登录。
配置中心启动会生成打印出随机的密码,默认自动生成的密码不好记,所以我们可以在 config-server 配置用户名密码。在 config-server 服务的bootstrap.properties 配置文件中添加如下配置,:
spring.security.user.name=myadmin
spring.security.user.password=123
另外还需要在 config-client 服务的 bootstrap.properties 配置文件中添加如下配置。
spring.cloud.config.username=myadmin
spring.cloud.config.password=123
5. 配置文件加解密
5.1 常见加密方案
加密方案总体可分为两种类型:不可逆加密和可逆加密。不可逆加密,就是理论上无法根据加密后的密文推算出明文。一般用在密码加密上,常见的算法如MD5 消息摘要算法、SHA 安全散列算法。
可逆加密,看名字就知道可以根据加密后的密文推断出明文的加密方式,可逆加密一般又分为两种:
- 对称加密
- 非对称加密
对称加密指加密的密钥和解密的密钥是一样的。常见算法有DES、3DES、AES。非对称加密就是加密的密钥和解密的密钥不一样,加密的叫做公钥,可以告诉任何人,解密的叫做私钥,自己保存使用。常见的非对称加密算法有RSA。
5.2 对称加密配置
首先我们需要在配置中心的运行环境中安装不限长度的JCE(Unlimited Strength Java Cryptography Extension)版本。JRE中默认自带提供的JCE是限制长度的版本。
对应Java8版本的不限长度的JCE版本的下载地址https://www.oracle.com/cn/java/technologies/javase-jce8-downloads.html。
将下载的文件解压,解压出来的jar包拷贝到jdk安装目录下:%JDK_HOME%\jre\lib\security目录下覆盖原来文件。
然后在config-server的bootstrap.properties配置文件中,添加如下内容配置密钥:
encrypt.key=test-key
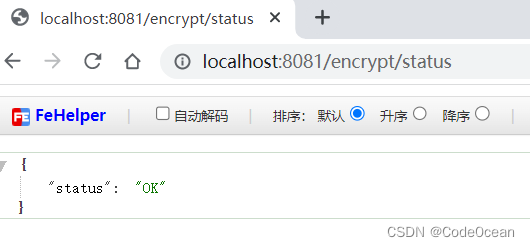
然后,启动 config-server ,访问如下地址,查看密钥配置是否成功:http://localhost:8081/encrypt/status
然后,访问:http://localhost:8081/encrypt ,该接口需要 POST 请求访问该地址,用于加密明文,使用PostMan进行测试。
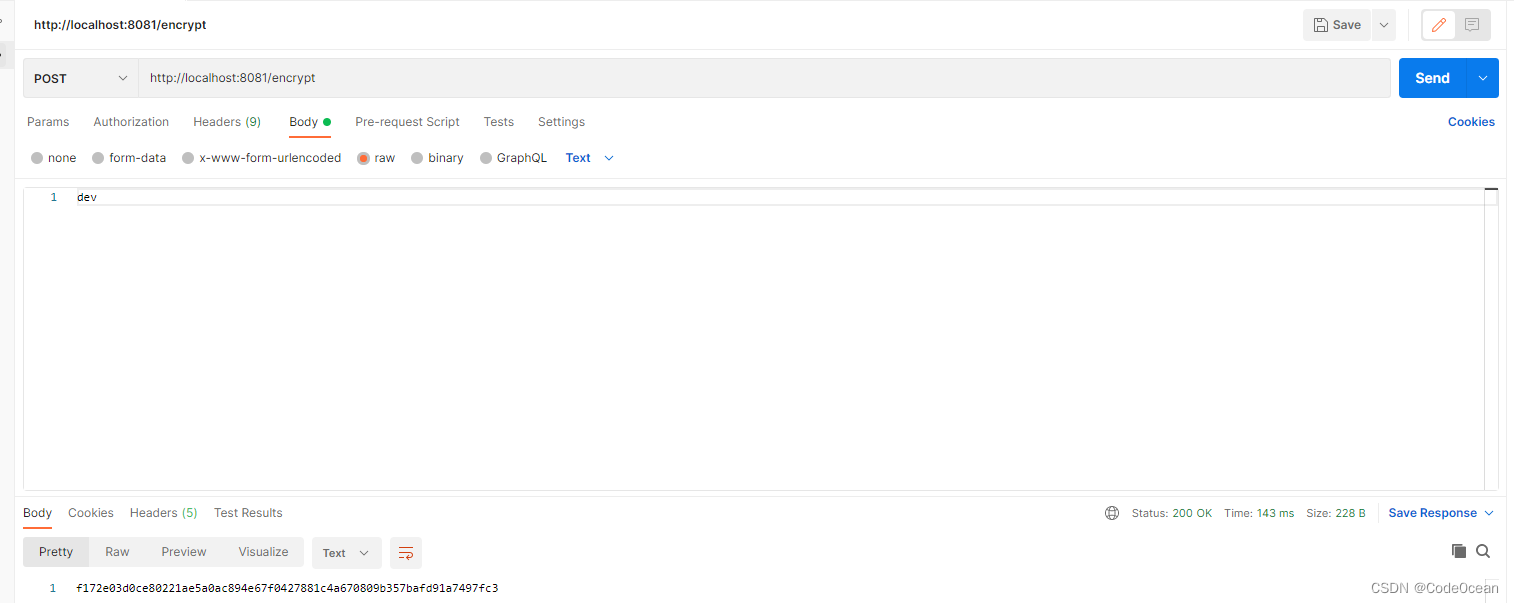 把加密后的明文存储到 Git 仓库中,存储时要加{cipher}前缀。{cipher}前缀是用来标注该内容是一个加密值。

配置中心提供的加密解密特有的端点,有如下几个:
- /encrypt/status:查看加密功能状态的端点
- /key:查看密钥的端点
- /encrypt:对请求的body内容进行加密的端点
- /decrypt:对请求的body内容进行解密的端点
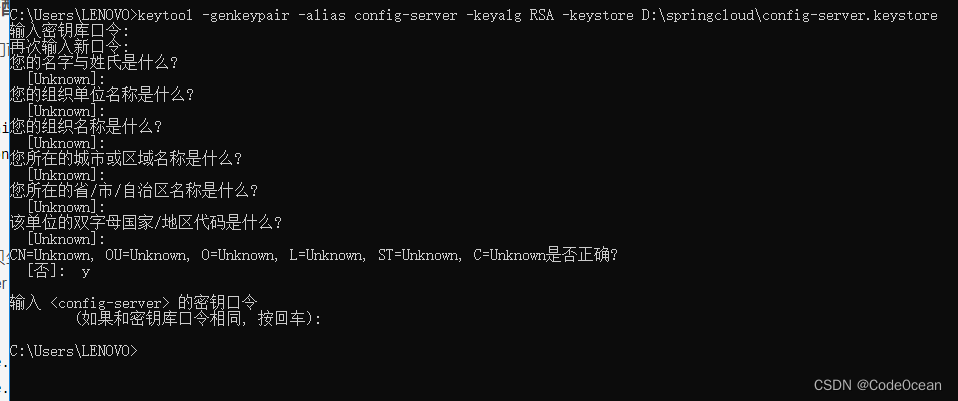
5.3 非对称加密配置
非对称加密的密钥生成和配置相比对称加密相对复杂一些,但是安全性比对称加密更高。非对称加密需要我们首先通过keytool工具来生成一个密钥对。
keytool是JDK中的一个密钥和证书管理工具,它使用户能够管理自己的公钥/私钥对及其相关证书,用于通过数字签名自我认证(用户向其他用户/服务认证自己)或者数据完整性认证服务。
在cmd命令行执行如下命令,生成 keystore:
keytool -genkeypair -alias config-server -keyalg RSA -keystore D:\springcloud\config-server.keystore
名令执行完成后,拷贝生成的 keystore 文件到 config-server 的 resources 目录下。然后在 config-server 的 bootstrap.properties 目录中,添加如下配置:
#encrypt.key=test-key
encrypt.key-store.location=config-server.keystore
encrypt.key-store.alias=config-server
encrypt.key-store.password=111111
encrypt.key-store.secret=111111
注意,在 pom.xml 的 build 节点中,添加如下配置,防止keystore文件被过滤掉。
<resources>
<resource>
<directory>src/main/resources</directory>
<includes>
<include>**/*.properties</include>
<include>**/*.keystore</include>
</includes>
</resource>
</resources>
重启 config-server服务 ,测试方法与对称加密一致。
6. 服务化
前面的配置都是直接在 config-client 中写死 config-server 的地址。下面实现首先将config-server 和 config-client注册到Eureka 注册中心上,首先启动 Eureka ,然后为了让 config-server 和 config-client 都能注册到 Eureka ,给这两个服务添加如下依赖。
        <dependency>
            <groupId>org.springframework.cloud</groupId>
            <artifactId>spring-cloud-starter-netflix-eureka-client</artifactId>
        </dependency>
然后在config-server 和 config-client的 application.properties 配置文件中配置注册信息。
eureka.client.service-url.defaultZone=http://localhost:1111/eureka
在config-server 和 config-client启动类上添加@EnableDiscoveryClient注解用于注册这两个服务到E ureka注册中心。
然后修改config-client的 bootstrap.properties配置文件
# 下面三行配置,分别对应 config-server 中的 {application}、{profile}以及{label}占位符
spring.application.name=client1
spring.cloud.config.profile=dev
spring.cloud.config.label=master
server.port=8082

#开启服务发现
spring.cloud.config.discovery.enabled=true
# 配置 config-server 服务名称
spring.cloud.config.discovery.service-id=config-server

spring.security.user.name=myadmin
spring.security.user.password=123
7. 请求失败快速响应与重试
config-client 在调用 config-server 时,可能发生请求失败的问题,这个时候我们可以配置一个请求重试的功能。
要给客户端config-client 添加重试功能,只需要pom.xml添加如下依赖即可:
        <dependency>
            <groupId>org.springframework.boot</groupId>
            <artifactId>spring-boot-starter-aop</artifactId>
        </dependency>

        <dependency>
            <groupId>org.springframework.retry</groupId>
            <artifactId>spring-retry</artifactId>
        </dependency>
然后修改配置文件,开启失败快速响应。开启失败快速响应后客户端会优先判断Config Server获取是否正常,并快速响应失败内容。
# 开启失败快速响应
spring.cloud.config.fail-fast=true
为了处理网络波动等间歇性问题导致的请求Config Server失败,我们可以通过如下属性配置请求重试来保证服务的可用性:
# 请求重试的初识间隔时间,单位为毫秒,默认为1000毫秒
spring.cloud.config.retry.initial-interval=1000
# 重试时间间隔乘数,默认为1.1,如初始间隔为1000毫秒,下一次间隔为1100毫秒
spring.cloud.config.retry.multiplier=1.1
# 最大重试次数,默认为6次
spring.cloud.config.retry.max-attempts=6
# 最大间隔时间,默认为2000毫秒
spring.cloud.config.retry.max-interval=2000
8. 动态刷新配置
当配置文件发生变化之后,config-server 可以及时感知到变化,但是 config-client 不会及时感知到变
化,默认情况下,config-client 只有重启才能加载到最新的配置文件。
首先给config-client添加如下依赖:
        <dependency>
            <groupId>org.springframework.boot</groupId>
            <artifactId>spring-boot-starter-actuator</artifactId>
        </dependency>
然后application.properties 配置文件中添加配置使refresh端点暴露出来:
management.endpoints.web.exposure.include=refresh
refresh端点用于实现客户端应用配置信息的重新获取与刷新。
最后再给config-client中使用了配置文件的地方加上 @RefreshScope 注解,这样当配置改变后,只
需要调用 refresh 端点,config-client 中的配置就可以自动刷新。
@RefreshScope
@RestController
public class HelloController {


    /**
     * 获取配置文件的env值
     */
    @Value("${env}")
    String value;

    @GetMapping("/hello")
    public String hello() {
        return value;
    }

}
重启config-client服务,只要配置文件发生变化,发送POST请求调用该接口:/actuator/refresh 。配置文件就会自动刷新。
通过以上方式实现的动态刷新,当配置文件有更改,需要对所有的微服务应用逐个手动调用/refresh请求来实现配置的实时更新,当微服务应用比较多的时候,该操作就比较麻烦并且容易出错了。我们可以通过Spring Cloud Bus来实现以消息总线的方式来进行配置变更的通知,并完成集群上的批量配置。
9. 整合Spring Cloud Bus
我们可以使用Spring Cloud Bus来构建微服务架构中的消息总线。消息总线是指在微服务架构中所有的微服务实例都连接上的消息主题。我们通常会使用轻量级的消息代理(消息中间件)来构建一个共用的消息主题,该主题中产生的消息会被所有实例监听和消费。
因为在总线上的实例都可以方便地广播一些需要让其他连接在该主题上的实例都知道的消息,所以我们可以在Spring Cloud Config中整合Spring Cloud Bus实现配置文件的实时更新。
9.1 广播配置文件更新
Spring Cloud Bus 通过轻量级的消息代理连接各个微服务,可以用来广播配置文件的更改,或者管理服
务监控。
首先给 config-server 和 config-client 分别加上 Spring Cloud Bus 依赖。
        <dependency>
            <groupId>org.springframework.cloud</groupId>
            <artifactId>spring-cloud-starter-bus-amqp</artifactId>
        </dependency>
然后在config-server 和 config-client服务的application.properties配置文件中配置RabbitMQ连接。
spring.rabbitmq.host=192.168.91.128
spring.rabbitmq.port=5672
spring.rabbitmq.username=guest
spring.rabbitmq.password=guest
在config-server 服务中添加actuator依赖
        <dependency>
            <groupId>org.springframework.boot</groupId>
            <artifactId>spring-boot-starter-actuator</artifactId>
        </dependency>
然后在config-server的配置文件中添加开启 bus-refresh 端点:
management.endpoints.web.exposure.include=bus-refresh
由于给config-server中的所有接口都添加了保护,所以刷新接口将无法直接访问,此时,可以通过修
改 Security 配置,对端点的权限做出修改:
@Configuration
public class SecurityConfig extends WebSecurityConfigurerAdapter {

    @Override
    protected void configure(HttpSecurity http) throws Exception {
        http.authorizeRequests()
                .anyRequest().authenticated()
                .and()
                .httpBasic()
                .and()
                .csrf().disable();
    }
}
在这段配置中,开启了 HttpBasic 登录,这样,在发送刷新请求时,就可以直接通过 HttpBasic 配置认
证信息了。最后分别启动 config-server 和 config-client,然后修改配置信息提交到 GitHub,刷新 config-client 接口,查看是否有变化。
然后,发送如下 POST 请求:http://localhost:8081/actuator/bus-refresh 。这个 POST 请求是针对 config-server 的,Config Server 会把这个刷新的指令传到 RabbitMQ ,然后RabbitMQ 再把指令传给各个 Config Client。
Git仓库中配置的修改到发起/bus-refresh的POST 请求可以通过 Git仓库的Web Hook来自动触发。所有连接到消息总线上的应用都会接收到更新请求。从而解决了配置文件更新后,需要逐个请求接口更新Config Client的配置文件的问题。
9.2 指定刷新范围
如果更新配置文件之后,不希望每一个微服务都去刷新配置文件,那么可以通过如下配置解决问题。
首先,给每一个 config-client 添加一个 instance-id:
eureka.instance.instance-id=${spring.application.name}:${server.port}
可以通过如下方式只刷新某一个微服务,instance-id对应微服务配置的instance-id。
http://localhost:8081/actuator/bus-refresh/{instance-id}
参考:
1.《Spring Cloud微服务实战》


 6204
6204


 被折叠的 条评论
为什么被折叠?
被折叠的 条评论
为什么被折叠?
 到【灌水乐园】发言


