


1、

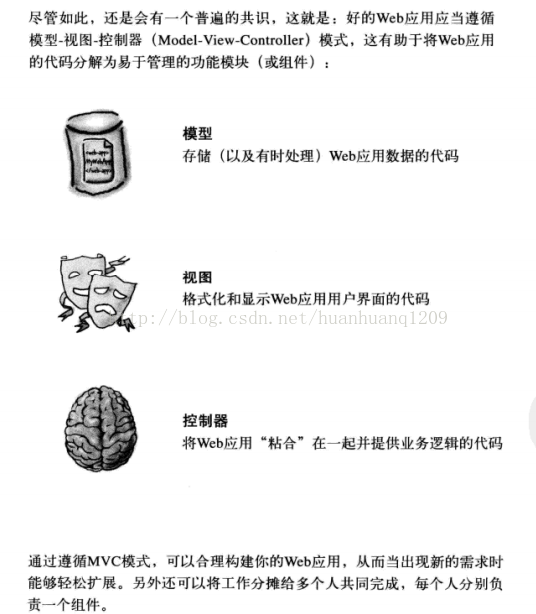
1、建立模型:
代码如下:
import pickle
import os
from chapter6 import  Athlete
from chapter6 import get_coach_data#from 模块 import 类/方法


def put_to_store(file_list):
    all_athletes={};
    for each_file in file_list:
        ath=get_coach_data(each_file);
        all_athletes[ath.name]=ath;
    try:
        with open('athlete.pickle','wb') as athf:
            pickle.dump(all_athletes,athf);#将对象obj保存到文件file中去
    except IOError as ioerr:
        print('File error(put_and_store):'+str(ioerr))
    return (all_athletes);


def get_from_store():
    all_athletes={};
    try:
        with open('athlete.pickle','rb') as athf:
            all_athletes=pickle.load(athf);
    except IOError as ioerr:
        print('File error (get_from_store):'+str(ioerr));
    return (all_athletes);


os.chdir("D:/pythontest/HeadFirstPython/chapter6/");
the_files=['sarah2.txt','james2.txt','mikey2.txt','julie2.txt'];
data=put_to_store(the_files);
print(data);
for each_athlete in data:
    print(data[each_athlete].name+' '+data[each_athlete].dob);


print("\n可以对比一下,put_to_store()和get_from_store()方法"   );
data_copy=get_from_store();
for each_athlete in data_copy:
    #注意,字符串必须跟字符串连接,不能是字符串+链表,必须将链表转换成字符串才可以
    print(data_copy[each_athlete].name+' '+data_copy[each_athlete].dob+' '+str(data_copy[each_athlete].times));
其中chapter6.py代码为:
import os

import sanitize1
os.chdir("D:/pythontest/HeadFirstPython/chapter6");
class Athlete:
    def __init__(self,a_name,a_dob=None,a_times=[]):
        self.name=a_name;
        self.dob=a_dob;
        self.times=a_times;
    def top3(self):
        return (sorted(set([sanitize1.sanitize(t) for t in self.times]))[0:3]);
    def add_time(self,time_value):
        self.times.append(time_value);
    def add_times(self,list_of_times):
        self.times.extend(list_of_times);

def get_coach_data(filename):
    try:
        with open(filename) as f:
            data=f.readline();
            templ=data.strip().split(',')

            return (Athlete(templ.pop(0),templ.pop(0),templ));

    except IOError as ioerr:
               print('File error:'+str(ioerr));
               return(None);
'''try:
    james=get_coach_data('james2.txt');
    julie=get_coach_data('julie2.txt');
    mikey=get_coach_data('mikey2.txt');
    sarah=get_coach_data('sarah2.txt');

    vera=Athlete('vera Vi');
    vera.add_time('1.31');
    print(vera.top3());
    vera.add_times(['2.22','1-21','2:22']);
    print(vera.top3());

    print(james.name+"'s fastest times are:"+str(james.top3()));
    print(julie.name+"'s fastest times are:"+str(julie.top3()));
    print(mikey.name+"'s fastest times are:"+str(mikey.top3()));
    print(sarah.name+"'s fastest times are:"+str(sarah.top3()));
except IOError as err:
    print("File error"+str(err));'''

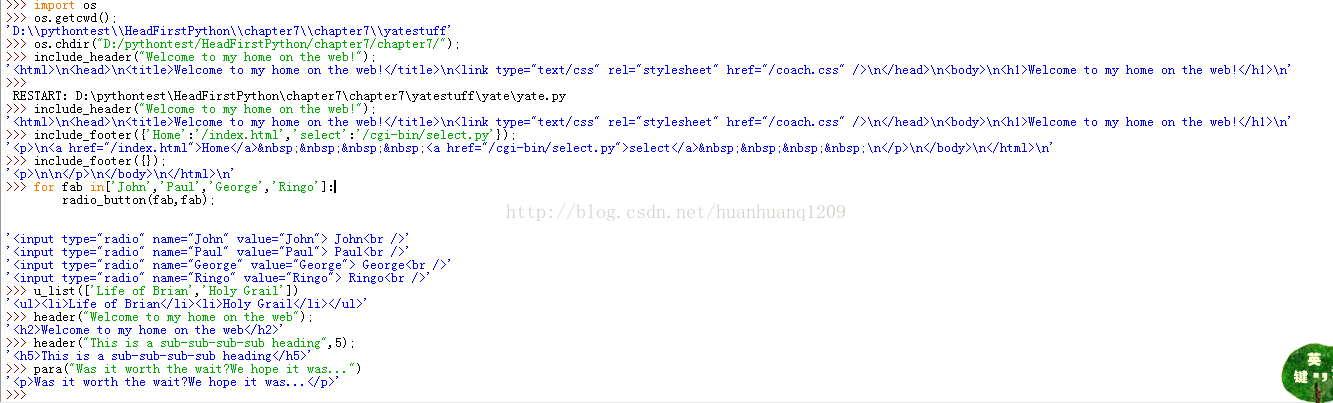
2、建立视图:
视图代码,会创建Web应用的用户界面。在web上,用户界面用web的标记技术HTML来创建。
代码如下:
import os
os.chdir("D:/pythontest/HeadFirstPython/chapter7/chapter7/yatestuff/");

from string import Template
'''从标准库的"string"模块导入"Template"类,他支持简单的字符串替换模板。'''


def start_response(resp="text/html"):#指示所传来的信息的MIME类型,一个很重要的一点那就是第一行代码:Content- type:text/html\r\n\r\n,这行被发送回浏览器,指明浏览器显示的文本类型。
    return('Content-type: ' + resp + '\n\n')
    '''这个函数需要一个(可选的)字符串作为参数,用它来创建一个CGI"content-type:"行,参数缺省值是”text/html"。'''

os.chdir("D:/pythontest/HeadFirstPython/chapter7/chapter7/");
def include_header(the_title):
    with open('templates/header.html') as headf:
        head_text = headf.read()
    header = Template(head_text)
    return(header.substitute(title=the_title))
    '''打开模板文件(HTML),读入文件,换入所提供的"标题"。这个函数需要一个字符串作为参数,用在HTML页面最前面的标题中。页面本身存储在一个单独的文件"templates/header.html"中,
       可以根据需要替换标题'''


def include_footer(the_links):
    with open('templates/footer.html') as footf:
        foot_text = footf.read()
    link_string = ''
    for key in the_links:
        link_string += '<a href="' + the_links[key] + '">' + key + '</a>    '
    footer = Template(foot_text)
    return(footer.substitute(links=link_string))
    '''打开模板文件(HTML),读入文件,换入"the links"中提供的HTML链接字典,将链接字典转换为一个字符串,然后再换入模板。
       HTML在字符串中加入空格的一种强制做法是  与“include_header"函数相似,这个函数使用一个字符串作为参数,
       来穿件一个HTML页面的尾部。页面本身存储在一个单独的文件“templates/footer.html"中,参数用于动态地创建一组HTML链接
       标记。从这些标记的使用来看,参数应当是一个字典。'''


def start_form(the_url, form_type="POST"):
    return('<form action="' + the_url + '" method="' + form_type + '">')
    '''这个函数返回表单最前面的HTML,允许调用者指定URL(表单数据将发送到这个UPL),还可以指定所要使用的方法。action是你form表单提交的地址,这个地址可以是请求后台的地址,比如请求Servlet, Struts 或者 Spring MVC 的,也可以是你跳转页面的地址,比如某个html、jsp等'''


def end_form(submit_msg="Submit"):
    return('<p></p><input type=submit value="' + submit_msg + '"></form>')
    '''这个函数返回表单末尾的HTML标记,同时还允许调用者定制表单"submit"(提交)按钮的文本。'''


def radio_button(rb_name, rb_value):
    return('<input type="radio" name="' + rb_name +
                             '" value="' + rb_value + '"> ' + rb_value + '<br />')
    '''给定一个单选钮名和值,创建一个HTML单选钮(通常包括在一个HTML表单中)。注意:两个参数都是必要的。'''


def u_list(items):
    u_string = '<ul>'
    for item in items:
        u_string += '<li>' + item + '</li>'
    u_string += '</ul>'
    return(u_string)
    '''一个简单的for循环就可以达到目的。给定一个项列表,这个函数会把该列表转换为一个HTML无序列表。一个简单的for循环
        就可以完成全部工作,每次迭代会向ul元素增加一个li元素。'''


def header(header_text, header_level=2):
    return('<h' + str(header_level) + '>' + header_text +
           '</h' + str(header_level) + '>')
    '''创建并返回一个HTML标题标记(H1、H2、H3等),默认为2级标题。“header_text"参数是必要的。'''


def para(para_text):
    return('<p>' + para_text + '</p>')
    '''用HTML段落标记包围一个文本段(一个字符串)。'''
3、控制器代码:
CGI(Common Gateway Interface)是一个Internet标准,允许Web服务器运行一个服务器端程序,称为CGI脚本。
基本原理:
CGI:通用网关接口(Common Gateway Interface)是一个Web服务器主机提供信息服务的标准接口。通过CGI接口,Web服务器就能够获取客户端提交的
信息,转交给服务器端的CGI程序进行处理,最后返回结果给客户端。组成CGI通信系统的是两部分:一部分是html页面,就是在用户端浏览器上显示的页
面。另一部分则是运行在服务器上的Cgi程序。
服务器和客户端之间的通信,是客户端的浏览器和服务器端的http服务器之间的HTTP通信,我们只需要知道浏览器请求执行服务器上哪个CGI程序就可以了,
其他不必深究细节,因为这些过程不需要程序员去操作。
服务器和CGI程序之间的通讯才是我们关注的。一般情况下,服务器和CGI程序之间是通过标准输入输出来进行数据传递的,而这个过程需要环境变量的
协作方可实现。
补充:
(1)<form action="www.baidu.com" method="post">
action 是链接,method 是方法。form是表单,里面的内容是要提交出去的。action可以理解成url,也就是当你内容填好以后点了提交按钮提交出去后转向的页面。类似论坛账号注册完以后,会转向论坛首页。method是方法,有get和post两种,各有所长。就是内容填好后提交需要一个方法,是获取你的内容还是传递你的内容。
(2)CGI擅长根据需要动态地生成HTML。CGI的输入来自web服务器,输出也会送到web服务器。
Web服务器生成动态内容,是由CGI脚本来实现的。所以,这个动态内容需要依托编写CGI脚本来实现。
Web服务器执行这些CGI脚本对Web请求做出响应。
Web服务器(支持CGI):就是为了提供HTML和运行CGI的。
所有Web应用都要在Web服务器上运行
(3)post请求:使用post方式时,数据放在data或者body中,不能放在url中,放在url中将被忽略。
get请求:使用get方式时,请求数据直接放在url中。
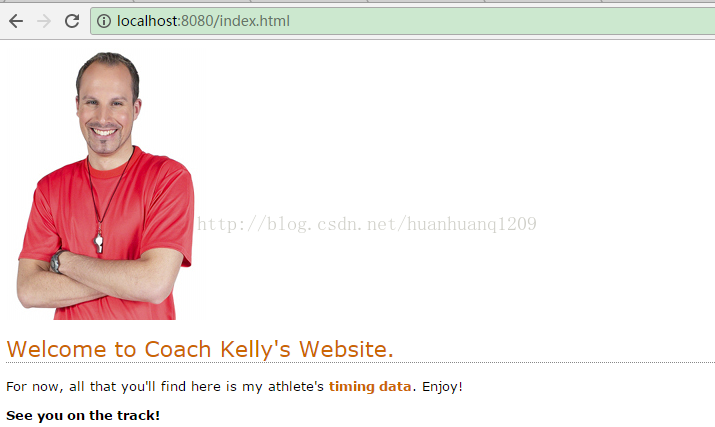
已有的网页:
index.html
<html>
<head>
<title>Welcome to Coach Kelly's Website</title>
<link type="text/css" rel="stylesheet" href="coach.css" />
</head>
<body>
<img src="images/coach-head.jpg">
<h1>Welcome to Coach Kelly's Website.</h1>
<p>
For now, all that you'll find here is my athlete's <a href="cgi-bin/generate_list.py">timing data</a>. Enjoy!
</p>
<p>
<!--加粗字体--->
<strong>See you on the track!</strong>
</p>
</body>
</html>
header.html:
<html>
<head>
<title>$title</title>
<link type="text/css" rel="stylesheet" href="/coach.css" />
</head>
<body>
<h1>$title</h1>
footer.html:
<p>
$links
</p>
</body>
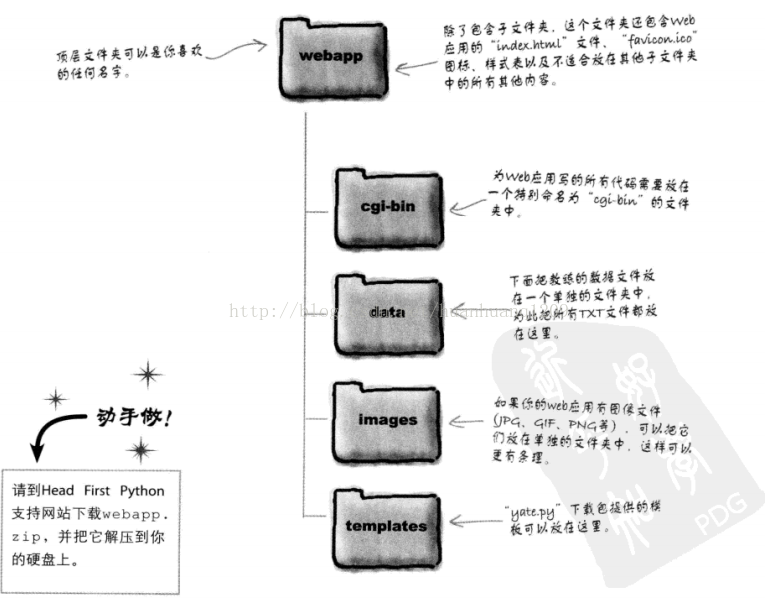
</html>以下的程序均放到cgi-bin文件夹下:
athletelist.py代码如下:
class AthleteList(list):

    def __init__(self, a_name, a_dob=None, a_times=[]):
        list.__init__([])
        self.name = a_name
        self.dob = a_dob
        self.extend(a_times)

    @staticmethod
    def sanitize(time_string):
        if '-' in time_string:
            splitter = '-'
        elif ':' in time_string:
            splitter = ':'
        else:
            return(time_string)
        (mins, secs) = time_string.split(splitter)
        return(mins + '.' + secs)

	'''top3()方法被重新指定为一个类属性,@property修饰符允许访问“top3()"返回的数据时把它看作是个类属性。'''

    @property
    def top3(self):
        return(sorted(set([self.sanitize(t) for t in self]))[0:3])

    @property
    def clean_data(self):
return(sorted(set([self.sanitize(t) for t in self])))athletemodel.py代码如下:
import pickle

from athletelist import AthleteList

def get_coach_data(filename):
    try:
        with open(filename) as f:
            data = f.readline()
        templ = data.strip().split(',')
        return(AthleteList(templ.pop(0), templ.pop(0), templ))
    except IOError as ioerr:
        print('File error (get_coach_data): ' + str(ioerr))
        return(None)

def put_to_store(files_list):
    all_athletes = {}
    for each_file in files_list:
        ath = get_coach_data(each_file)
        all_athletes[ath.name] = ath
    try:
        with open('athletes.pickle', 'wb') as athf:
            pickle.dump(all_athletes, athf)
    except IOError as ioerr:
        print('File error (put_and_store): ' + str(ioerr))
    return(all_athletes)

def get_from_store():
    all_athletes = {}
    try:
        with open('athletes.pickle', 'rb') as athf:
            all_athletes = pickle.load(athf)
    except IOError as ioerr:
        print('File error (get_from_store): ' + str(ioerr))
    return(all_athletes)
还有 yate.py文件中的代码;
Python提供了它自己的web服务器,这个web服务器包含在http.server库模块中。一个支持CGI的web服务器,名为simple_httpd.py
#导入Http服务器和CGI模块,用Python构建一个web服务器必须有这5行代码。
from http.server import HTTPServer, CGIHTTPRequestHandler
#指定一个端口
port = 8080
#创建一个Http服务器
httpd = HTTPServer(('', port), CGIHTTPRequestHandler)
#显示一个友好的消息,并启动服务器
print("Starting simple_httpd on port: " + str(httpd.server_port))
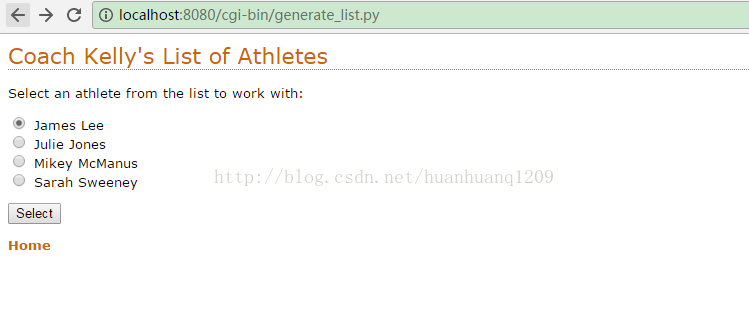
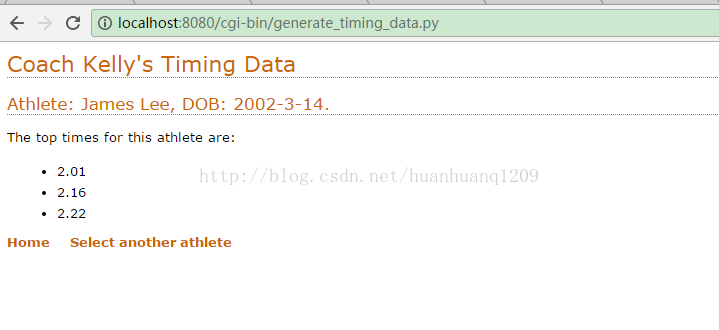
httpd.serve_forever()generate_list.py(即跳转的第二个页面,是由该CGI程序动态生成的结果)
#! /usr/local/bin/python3
'''导入你需要的模块,你已经见过“athletemodel"和”yate“。
   利用glob模块可以向操作系统查询一个文件名列表。'''
import glob

import athletemodel
import yate

data_files = glob.glob("data/*.txt")
athletes = athletemodel.put_to_store(data_files)#使用该方法由数据文件列表创建一个选手字典。

print(yate.start_response())#总是从一个content-type行开始。
print(yate.include_header("Coach Kelly's List of Athletes"))#网页题目;开始生成web页面,提供一个合适的标题。
'''form是表单,里面的内容是要提交出去的,action可以理解为URL,也就是当你内容填好以后点了提交按钮提交出去后转向的页面。
   即,开始生成表单,提供要链接的服务器端程序的名(要执行的CGI脚本的名称)。'''
print(yate.start_form("generate_timing_data.py"))
print(yate.para("Select an athlete from the list to work with:"))
#为各个选手分别生成一个单选按钮。
for each_athlete in athletes:
    print(yate.radio_button("which_athlete", athletes[each_athlete].name))
#生成表单的最后创建一个定制的“提交”按钮。
print(yate.end_form("Select"))
#在生成的HTML页面最下面增加一个链接,指向主页。
print(yate.include_footer({"Home": "/index.html"}))
#! /usr/local/bin/python3
#导入CGI库
import cgi
'''在CGI脚本最前面增加这两行代码,启用Python的CGI跟踪技术。'''
import cgitb
cgitb.enable()

import athletemodel
import yate
#还原所有运动员的文件pickle了的数据字典,从模型得到数据
athletes = athletemodel.get_from_store()


'''你在处理哪个选手的数据?'''
#获取所有表单数据并放到一个字典中。
form_data = cgi.FieldStorage()
#从表单数据访问一个指定的数据
athlete_name = form_data['which_athlete'].value

print(yate.start_response())
print(yate.include_header("Coach Kelly's Timing Data"))
print(yate.header("Athlete: " + athlete_name + ", DOB: " +
                      athletes[athlete_name].dob + "."))
print(yate.para("The top times for this athlete are:"))
'''由于使用了@property修饰符,在类用户看来top3()方法就像是一个属性。所以,不应该这样调用top3()方法:yate.u_list(athletes[athlete_name].top3());
	要把top3()方法看作是一个类属性,应当这样调用:'''
print(yate.u_list(athletes[athlete_name].top3)
print(yate.include_footer({"Home": "/index.html",
                           "Select another athlete": "generate_list.py"}))
4、测试驱动

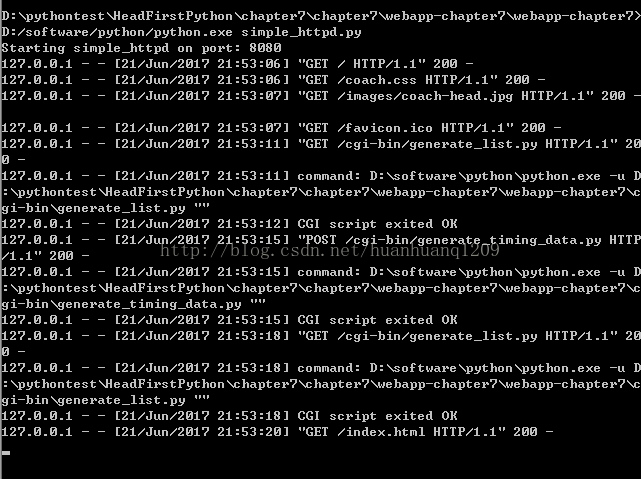
首先把cmd终端目录切换到服务器脚本所在的目录下,然后用python.exe启动服务器,命令中必须写python应用程序所在的绝对路径 再写要执行的服务器py文件。
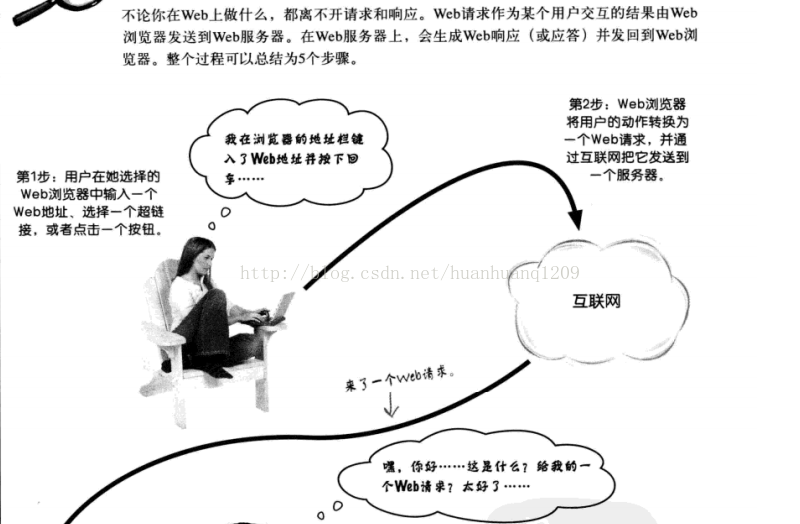
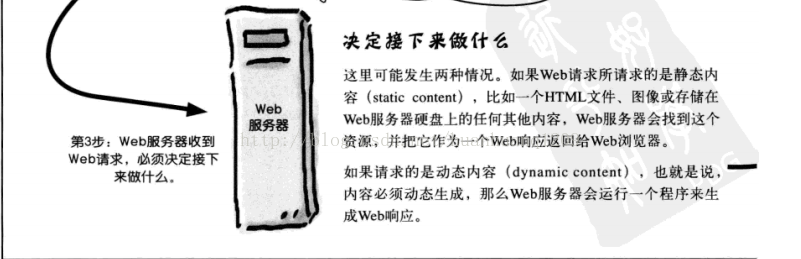
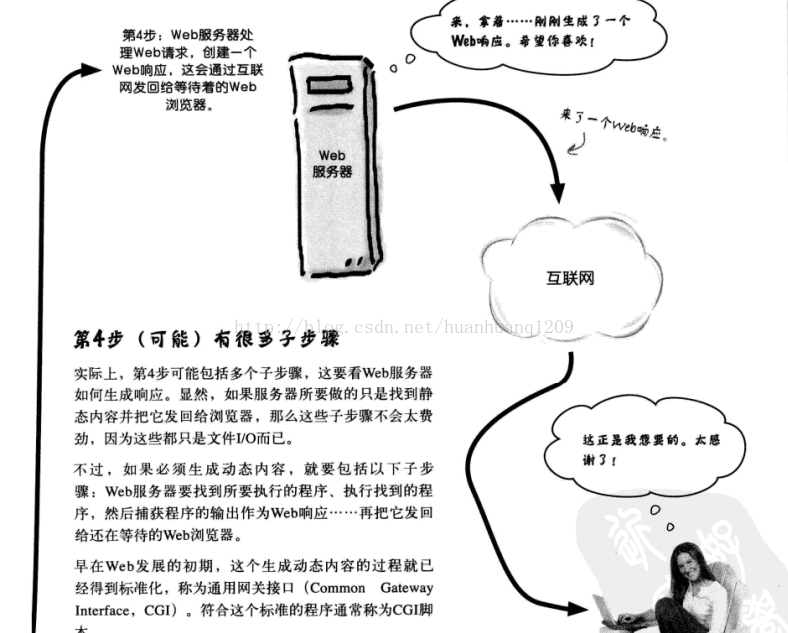
你的web服务器开始工作,它会把它处理的所有web请求记录下来(显示在屏幕上)。
如:
总结:
1、@property------------这是一个修饰符,可以使类方法表现得像是一个类属性;
2、web术语:
2.1、web应用-------在web上运行的一个程序;
2.2、web请求-------从web浏览器发送到web服务器;
2.3、web响应-------从web服务器发送到web浏览器,作为对web请求的响应。
2.4、CGI-------------通用网关接口(common gateway interface),允许web服务器运行一个服务器端程序。
3、模型--视图--控制器(mode-view-controller)模式允许你采用一种可维护的方式设计和构建一个web应用。
4、模型存储web应用的数据。
5、视图显示web应用的用户界面。
6、控制器将所有代码与编程逻辑“粘合”在一起。
7、标准库string模块包括一个名为Template的类,它支持简单的字符串的替换。
8、标准库http.server模块可以用来在Python中建立一个简单的web服务器。
8、标准CGI模块对编写CGI脚本提供了支持。
10、标准库glob模块非常适合处理文件名列表。
11、CGI代码中可以使用cgitb.enable()打开CGI跟踪。
12、可以使用cgi.FieldStorage()访问作为web请求一部分发送给Web服务器的数据,数据将作为一个Python字典。


 592
592


 被折叠的 条评论
为什么被折叠?
被折叠的 条评论
为什么被折叠?
 到【灌水乐园】发言


