


为了测试一个环境,需要在Azure上搭建高可用的LAMP架构。但要求MySQL的中间件Atlas采用主备的模式。在数据中心一般采用Keepalive+VIP的模式,通过浮动地址对外提供服务。
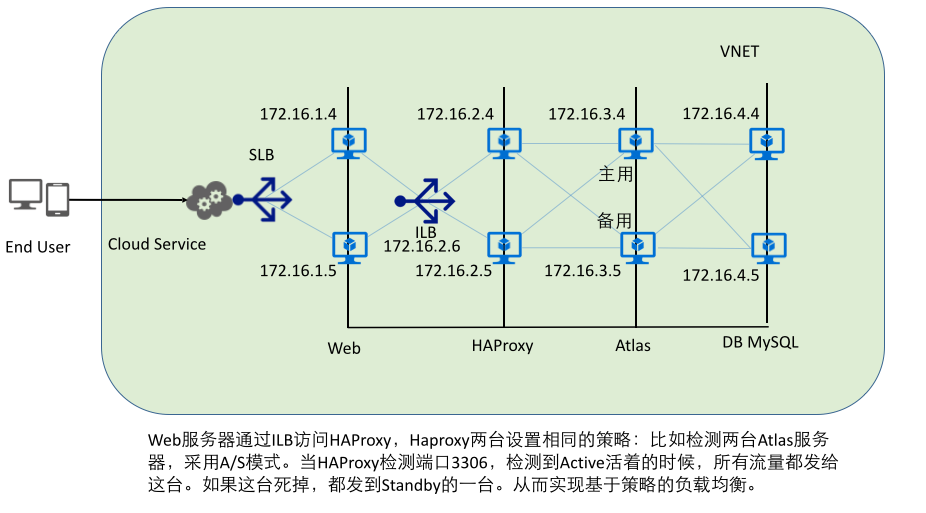
但在云环境中,不能支持浮动地址,也不支持A/S的负载均衡模式。于是考虑采用ILB+HAProxy的模式,由ILB模拟VIP地址,HAProxy负责A/S的负载均衡。
- 整体框架
采用全冗余的架构设计。每层都是双机。主机都是采用CentOS6.5的操作系统。
- MySQL的安装与配置
MySQL采用主主的配置方式。两台设备上都敲入下面的配置和命令:
yum install -y mysql-server
chekconfig mysqld on;service mysqld start
iptables -F
setenforce 0
service iptables save
更改root密码:
/usr/bin/mysqladmin -u root password “newpass”
使用root登陆
mysql -h127.0.0.1 -uroot -ppassword
创建数据库:
create database mytable;
创建用户,两台创建相同的用户:
GRANT ALL ON php.* to ‘user’@’%’ IDENTIFIED BY ‘password’;
FLUSH PRIVILEGES;
尝试创建表和插入数据,两台服务器插入不同的内容:
use mytable;
create table mytest(name varchar(20), phone char(14));
insert into mytest(name, phone) values(‘wang’, 11111111111);
select * from mytest;
配置主-主:
配置/etc/my.cnf文件:
| 主机一 | 主机二 |
|---|---|
| server-id = 1 | server-id = 2 |
| log_bin=mysqlbinlog | log_bin=mysqlbinlog |
| log_bin_index=mysqlbinlog-index | log_bin_index=mysqlbinlog-index |
| log_slave_updates=1 | log_slave_updates=1 |
| relay_log=relay-log | relay_log=relay-log |
| replicate_do_db=test | replicate_do_db=test |
| binlog-do-db = test | binlog-do-db = test |
| binlog-ignore-db=mysql | binlog-ignore-db=mysql |
| log-slave-updates | log-slave-updates |
| sync_binlog=1 | sync_binlog=1 |
| auto_increment_offset=1 | auto_increment_offset=2 |
| auto_increment_increment=2 | auto_increment_increment=2 |
| replicate-ignore-db= mysql | replicate-ignore-db= mysql |
配置完成后,重新启动mysql: service mysqld restart
在两台主机中观察:
show master status;
| File | Position | Binlog_Do_DB | Binlog_Ignore_DB |
|---|---|---|---|
| mysqlbinlog.000001 | 325 | test | mysql |
show slave status\G
此时Slave_IO_Running、Slave_SQL_Running状态是No的状态:
mysql> show slave status\G
***************** 1. row *****************
Slave_IO_State: Waiting for master to send event
Master_Host: 172.16.4.5
Master_User: slave
Master_Port: 3306
Connect_Retry: 60
Master_Log_File: mysqlbinlog.000001
Read_Master_Log_Pos: xxxx
Relay_Log_File: relay-log.0000xx
Relay_Log_Pos: 253
Relay_Master_Log_File: mysqlbinlog.000001
Slave_IO_Running: No
Slave_SQL_Running: No
Replicate_Do_DB: test
Replicate_Ignore_DB: mysql
Replicate_Do_Table:
Replicate_Ignore_Table:
Replicate_Wild_Do_Table:
Replicate_Wild_Ignore_Table:
Last_Errno: 0
Last_Error:
Skip_Counter: 0
Exec_Master_Log_Pos: xxxx
Relay_Log_Space: xxx
Until_Condition: None
Until_Log_File:
Until_Log_Pos: 0
Master_SSL_Allowed: No
Master_SSL_CA_File:
Master_SSL_CA_Path:
Master_SSL_Cert:
Master_SSL_Cipher:
Master_SSL_Key:
Seconds_Behind_Master: 0
Master_SSL_Verify_Server_Cert: No
Last_IO_Errno: 0
Last_IO_Error:
Last_SQL_Errno: 0
Last_SQL_Error:
1 row in set (0.00 sec)
在两台机器上创建复制用户:
GRANT REPLICATION SLAVE ON . TO ‘slave’@’%’ IDENTIFIED BY ‘password’;
执行下面的命令实现 主-主:
172.16.4.4上执行:
stop slave;
CHANGE MASTER TO MASTER_HOST=’172.16.4.5’, MASTER_USER=’slave’, MASTER_PASSWORD=”password, MASTER_LOG_FILE=’mysqlbinlog.000001’, MASTER_LOG_POS=325;
start slvae;
在172.16.4.5上执行:
stop slave;
CHANGE MASTER TO MASTER_HOST=’172.16.4.4’, MASTER_USER=’slave’, MASTER_PASSWORD=’password’, MASTER_LOG_FILE=’mysqlbinlog.000001’, MASTER_LOG_POS=325;
start slave;
此时show slave status\G中的Slave_IO_Running、Slave_SQL_Running状态是yes、yes状态。此时主-主就做成功了。
3 安装Atlas
两台安装配置相同:
从Github上下载Atlas:
https://github.com/Qihoo360/Atlas/releases
选择相应的版本,我的机器是CentOS6.5,所以我选择Atlas-2.2.1.el6.x86_64.rpm。
wget https://github.com/Qihoo360/Atlas/releases/download/2.2.1/Atlas-2.2.1.el6.x86_64.rpm
发现是存放在AWS的S3上。
安装:rpm -ivh Atlas-2.2.1.el6.x86_64.rpm
修改配置文件: /usr/local/mysql-proxy/conf/test.cnf
#带#号的为非必需的配置项目

#管理接口的用户名
admin-username = user

#管理接口的密码
admin-password = pwd

#Atlas后端连接的MySQL主库的IP和端口,可设置多项,用逗号分隔
proxy-backend-addresses = 172.16.4.4:3306

#Atlas后端连接的MySQL从库的IP和端口,@后面的数字代表权重,用来作负载均衡,若省略则默认为1,可设置多项,用逗号分隔
proxy-read-only-backend-addresses = 172.16.4.5:3306@1

#用户名与其对应的加密过的MySQL密码,密码使用PREFIX/bin目录下的加密程序encrypt加密,下行的user1和user2为示例,将其替换为你的MySQL的用户名和加密密码!
pwds = slave:euRQ8nFxoVUtoVZBPiOC6Q==

#设置Atlas的运行方式,设为true时为守护进程方式,设为false时为前台方式,一般开发调试时设为false,线上运行时设为true,true后面不能有空格。
daemon = true

#设置Atlas的运行方式,设为true时Atlas会启动两个进程,一个为monitor,一个为worker,monitor在worker意外退出后会自动将其重启,设为false时只有worker,没有monitor,一般开发调试时设为false,线上运行时设为true,true后面不能有空格。
keepalive = false

#工作线程数,对Atlas的性能有很大影响,可根据情况适当设置
event-threads = 1

#日志级别,分为message、warning、critical、error、debug五个级别
log-level = message

#日志存放的路径
log-path = /usr/local/mysql-proxy/log

#SQL日志的开关,可设置为OFF、ON、REALTIME,OFF代表不记录SQL日志,ON代表记录SQL日志,REALTIME代表记录SQL日志且实时写入磁盘,默认为OFF
#sql-log = OFF

#慢日志输出设置。当设置了该参数时,则日志只输出执行时间超过sql-log-slow(单位:ms)的日志记录。不设置该参数则输出全部日志。
#sql-log-slow = 10

#实例名称,用于同一台机器上多个Atlas实例间的区分
#instance = test

#Atlas监听的工作接口IP和端口
proxy-address = 0.0.0.0:3306

#Atlas监听的管理接口IP和端口
admin-address = 0.0.0.0:2345

#分表设置,此例中person为库名,mt为表名,id为分表字段,3为子表数量,可设置多项,以逗号分隔,若不分表则不需要设置该项
#tables = person.mt.id.3

#默认字符集,设置该项后客户端不再需要执行SET NAMES语句
#charset = utf8

#允许连接Atlas的客户端的IP,可以是精确IP,也可以是IP段,以逗号分隔,若不设置该项则允许所有IP连接,否则只允许列表中的IP连接
#client-ips = 127.0.0.1, 192.168.1

#Atlas前面挂接的LVS的物理网卡的IP(注意不是虚IP),若有LVS且设置了client-ips则此项必须设置,否则可以不设置
#lvs-ips = 192.168.1.1
需要注意的是,mysql的密码需要经过/usr/local/mysql-proxy/bin/encrypt 程序进行加密: ./encrypt password
制作启动程序:
vim /etc/init.d/atlas
#!/bin/sh
#
#atlas:    Atlas Daemon
#
# chkconfig:    - 90 25
# description:  Atlas Daemon
#
# Source function library.
start()
{
        echo -n $"Starting atlas: "
        /usr/local/mysql-proxy/bin/mysql-proxyd test start
        echo
}
stop()
{
        echo -n $"Shutting down atlas: "
        /usr/local/mysql-proxy/bin/mysql-proxyd test stop
        echo
}
ATLAS="/usr/local/mysql-proxy/bin/mysql-proxyd"
[ -f $ATLAS ] || exit 1
# See how we were called.
case "$1" in
        start)
                start
                ;;
        stop)
                stop
                ;;
        restart)
                stop
                sleep 3
                start
                ;;
        *)
                echo $"Usage: $0 {start|stop|restart}"
                exit 1
esac
exit 0
chmod a+x atlas
chkconfig atlas on; service atlas start
检查是否已经开始监听端口:
netstat -tunlp
看到3306端口已经在listen的状态,说明atlas已经开始工作了。
4 安装HAProxy
两台配置相同:
yum install haproxy -y
chkconfig haproxy on
修改haproxy的配置文件:vim /etc/haproxy/haproxy.cfg
#---------------------------------------------------------------------
# Example configuration for a possible web application.  See the
# full configuration options online.
#
#   http://haproxy.1wt.eu/download/1.4/doc/configuration.txt
#
#---------------------------------------------------------------------

#---------------------------------------------------------------------
# Global settings
#---------------------------------------------------------------------
global
    # to have these messages end up in /var/log/haproxy.log you will
    # need to:
    #
    # 1) configure syslog to accept network log events.  This is done
    #    by adding the '-r' option to the SYSLOGD_OPTIONS in
    #    /etc/sysconfig/syslog
    #
    # 2) configure local2 events to go to the /var/log/haproxy.log
    #   file. A line like the following can be added to
    #   /etc/sysconfig/syslog
    #
    #    local2.*                       /var/log/haproxy.log
    #
    log         127.0.0.1 local2

    chroot      /var/lib/haproxy
    pidfile     /var/run/haproxy.pid
    maxconn     4000
    user        haproxy
    group       haproxy
    daemon

    # turn on stats unix socket
    stats socket /var/lib/haproxy/stats

#---------------------------------------------------------------------
# common defaults that all the 'listen' and 'backend' sections will
# use if not designated in their block
#---------------------------------------------------------------------
defaults
    mode                    tcp
    log                     global
    option                  dontlognull
    option                  redispatch
    retries                 3
    timeout http-request    10s
    timeout queue           1m
    timeout connect         10s
    timeout client          1m
    timeout server          1m
    timeout http-keep-alive 10s
    timeout check           10s
    maxconn                 3000

#---------------------------------------------------------------------
# main frontend which proxys to the backends
#---------------------------------------------------------------------
frontend  main *:3306
    mode tcp
    default_backend nodes

#---------------------------------------------------------------------
# static backend for serving up images, stylesheets and such
#---------------------------------------------------------------------
#backend static
#    balance     roundrobin
#    server      static 127.0.0.1:4331 check

#---------------------------------------------------------------------
# round robin balancing between the various backends
#---------------------------------------------------------------------
backend nodes

    mode tcp
    balance roundrobin
    server  app1 172.16.4.4:3306 check
    server  app2 172.16.4.5:3306 backup
最后的backup表明这台服务器是备份状态。
还可以配置运行状态监控,我在这里没有配置,哪位有兴趣可以自己加上。
5 Azure的ILB
Azure的ILB只能采用PowerShell配置。具体的命令是:
Add-AzureInternalLoadBalancer -InternalLoadBalancerName MyHAILB -SubnetName Subnet-2 -ServiceName atlasha01
get-AzureVM -ServiceName atlasha01 -Name atlasha01 | Add-AzureEndpoint -Name mysql -LBSetName mysqlha -Protocol tcp -LocalPort 3306 -PublicPort 3306 -ProbePort 3306 -ProbeProtocol tcp -ProbeIntervalInSeconds 10 -InternalLoadBalancerName MyHAILB | Update-AzureVM
get-AzureVM -ServiceName atlasha01 -Name atlasha02 | Add-AzureEndpoint -Name mysql -LBSetName mysqlha -Protocol tcp -LocalPort 3306 -PublicPort 3306 -ProbePort 3306 -ProbeProtocol tcp -ProbeIntervalInSeconds 10 -InternalLoadBalancerName MyHAILB | Update-AzureVM
PS C:> Get-AzureInternalLoadBalancer -servicename atlasha01
InternalLoadBalancerName : MyHAILB
ServiceName : atlasha01
DeploymentName : atlasha01
SubnetName : Subnet-2
IPAddress : 172.16.2.6
OperationDescription : Get-AzureInternalLoadBalancer
OperationId : cd86e37a-776c-4fc8-8e31-7bad6ebc88b7
OperationStatus : Succeeded
已经把两台HAProxy的主机加入到ILB的负载均衡中。
此时ILB的虚拟浮动地址是172.16.2.6
6 安装前端的Web服务器
我安装的是phpBB3,具体的安装方法请参考我的另外一篇博客:http://blog.csdn.net/huizhia/article/details/47865795
需要注意的是,在安装phpBB3的安装过程中,需要输入MySQL提供服务的IP地址,此时需要填写ILB的地址:172.16.2.6
在一条主机上安装完成后,把网站内容复制到另外一台主机:
rsync -a /var/www/html/phpBB3 172.16.1.5:/var/www/html/phpBB3
当然要事先建好目录,另外要有root的权限和密码。
7 Azure的SLB
在配置Aure的主机时,Web的两台服务器要求配置到一个SLB中,这个在图形化界面里就可以操作了,我就不多描述了。配置好SLB后,需要配置SLB的工作模式,把它调整成source IP的hash模式。这样,可以保证同一客户端的请求总是访问同一台Web服务器。
这个工作需要通过PowerShell实现:
Set-AzureLoadBalanceEndpoint -LBSetName httpset -LoadBalancerDistribution sourceIP -ServiceName atlasweb
总结:
至此,所有的配置工作全部完成。
通过关闭MySQL服务器、Atlas服务器、HAProxy服务器、Web服务器中的任何一台,系统都能够正常工作。


 558
558

 被折叠的 条评论
为什么被折叠?
被折叠的 条评论
为什么被折叠?
 到【灌水乐园】发言


