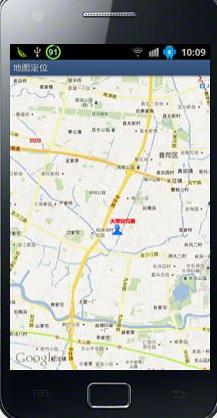
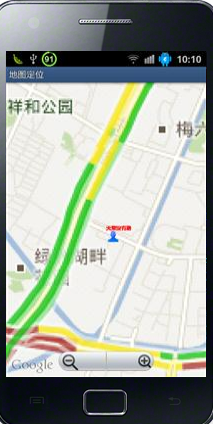
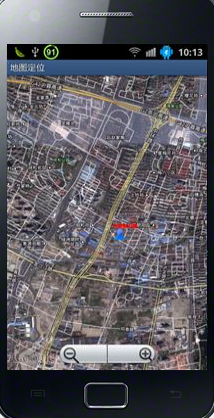
在android开发中地图和定位是很多软件不可或缺的内容,这些特色功能也给人们带来了很多方便。
首先介绍一下地图包中的主要类:
MapController : 主要控制地图移动,伸缩,以某个GPS坐标为中心,控制MapView中的view组件,管理Overlay,提供View的基本功能。使用多种地图模式(地图模式(某些城市可实时对交通状况进行更新),卫星模式,街景模式)来查看Google Map。常用方法:animateTo(GeoPoint point) setCenter(GeoPoint point) setZoom(int zoomLevel) 等。
Mapview : 是用来显示地图的view, 它派生自android.view.ViewGroup。当MapView获得焦点,可以控制地图的移动和缩放。地图可以以不同的形式来显示出来,如街景模式,卫星模式等,通过setSatellite(boolean) setTraffic(boolean), setStreetView(boolean) 方法。
Overlay : 是覆盖到MapView的最上层,可以扩展其ondraw接口,自定义在MapView中显示一些自己的东西。MapView通过MapView.getOverlays()对Overlay进行管理。
Projection :MapView中GPS坐标与设备坐标的转换(GeoPoint和Point)。
定位系统包中的主要类:
LocationManager:本类提供访问定位服务的功能,也提供获取最佳定位提供者的功能。另外,临近警报功能也可以借助该类来实现。
LocationProvider:该类是定位提供者的抽象类。定位提供者具备周期性报告设备地理位置的功能。
LocationListener:提供定位信息发生改变时的回调功能。必须事先在定位管理器中注册监听器对象。
Criteria:该类使得应用能够通过在LocationProvider中设置的属性来选择合适的定位提供者。
Geocoder:用于处理地理编码和反向地理编码的类。地理编码是指将地址或其他描述转变为经度和纬度,反向地理编码则是将经度和纬度转变为地址或描述语言,其中包含了两个构造函数,需要传入经度和纬度的坐标。getFromLocation方法可以得到一组关于地址的数组。
下面开始地图定位实例的开发,在开发地图前需要 获取Android地图 API密钥 网上有很多资料,这里就不再复述。
首先要在manifest.xml中设置全相应的权限和maps库:
|
1
2
3
4
5
6
7
8
9
10
11
12
13
14
15
16
17
18
19
|
<
application
android:icon
=
"@drawable/ic_launcher"
android:label
=
"@string/app_name"
>
<
activity
android:label
=
"@string/app_name"
android:name
=
".MyMapActivity"
>
<
intent-filter
>
<
action
android:name
=
"android.intent.action.MAIN"
/>
<
category
android:name
=
"android.intent.category.LAUNCHER"
/>
</
intent-filter
>
</
activity
>
<
span
style
=
"color:#FF6666;"
>
<
uses-library
android:name
=
"com.google.android.maps"
/></
span
>
</
application
>
<
span
style
=
"color:#FF6666;"
> <
uses-permission
android:name
=
"android.permission.INTERNET"
/>
<
uses-permission
android:name
=
"android.permission.ACCESS_FINE_LOCATION"
/>
<
uses-permission
android:name
=
"android.permission.ACCESS_COARSE_LOCATION"
/></
span
>
|
layout下的main.xml:
|
1
2
3
4
5
6
7
8
9
10
11
12
13
14
|
<?
xml
version
=
"1.0"
encoding
=
"utf-8"
?>
<
LinearLayout
xmlns:android
=
"http://schemas.android.com/apk/res/android"
android:layout_width
=
"fill_parent"
android:layout_height
=
"fill_parent"
android:orientation
=
"vertical"
>
<
com.google.android.maps.MapView
android:id
=
"@+id/mapview"
android:layout_width
=
"fill_parent"
android:layout_height
=
"fill_parent"
android:apiKey
=
"008uu0x2a7GWlK2LzCW872afBAPLhJ-U2R26Wgw"
/>
</
LinearLayout
>
|
|
1
2
3
4
5
6
7
8
9
10
11
12
13
14
15
16
17
18
19
20
21
22
23
24
25
26
27
28
29
30
31
32
33
34
35
36
37
38
39
40
41
42
43
44
45
46
47
48
49
50
51
52
53
54
55
56
57
58
59
60
61
62
63
64
65
66
67
68
69
70
71
72
73
74
75
76
77
78
79
80
81
82
83
84
85
86
87
88
89
90
91
92
93
94
95
96
97
98
99
100
101
102
103
104
105
106
107
108
109
110
111
112
113
114
115
116
117
118
119
120
121
122
123
124
125
126
127
128
129
130
131
132
133
134
135
136
137
138
139
140
141
142
143
144
145
146
147
148
149
150
151
152
153
154
155
156
157
158
159
160
161
162
163
164
165
166
167
168
169
170
171
172
173
174
175
176
177
178
179
180
181
182
183
184
185
186
187
|
public
class
MyMapActivity
extends
MapActivity {
/** Called when the activity is first created. */
private
MapController mapController;
private
MapView mapView;
private
MyOverLay myOverLay;
@Override
public
void
onCreate(Bundle savedInstanceState) {
super
.onCreate(savedInstanceState);
setContentView(R.layout.main);
LocationManager locationManager=(LocationManager) getSystemService(Context.LOCATION_SERVICE);
mapView=(MapView)
this
.findViewById(R.id.mapview);
//设置交通模式
mapView.setTraffic(
true
);
//设置卫星模式
mapView.setSatellite(
false
);
//设置街景模式
mapView.setStreetView(
false
);
//设置缩放控制
mapView.setBuiltInZoomControls(
true
);
mapView.setClickable(
true
);
mapView.setEnabled(
true
);
//得到MapController实例
mapController=mapView.getController();
mapController.setZoom(
15
);
myOverLay=
new
MyOverLay();
List<Overlay> overLays=mapView.getOverlays();
overLays.add(myOverLay);
Criteria criteria=
new
Criteria();
criteria.setAccuracy(Criteria.ACCURACY_FINE);
criteria.setAltitudeRequired(
false
);
criteria.setBearingRequired(
false
);
criteria.setCostAllowed(
false
);
criteria.setPowerRequirement(Criteria.POWER_LOW);
//取得效果最好的Criteria
String provider=locationManager.getBestProvider(criteria,
true
);
//得到Location
Location location=locationManager.getLastKnownLocation(provider);
updateWithLocation(location);
//注册一个周期性的更新,3秒一次
locationManager.requestLocationUpdates(provider,
3000
,
0
, locationListener);
}
@Override
public
boolean
onCreateOptionsMenu(Menu menu) {
// TODO Auto-generated method stub
menu.add(
0
,
1
,
1
,
"交通模式"
);
menu.add(
0
,
2
,
2
,
"卫星模式"
);
menu.add(
0
,
3
,
3
,
"街景模式"
);
return
super
.onCreateOptionsMenu(menu);
}
@Override
public
boolean
onOptionsItemSelected(MenuItem item) {
// TODO Auto-generated method stub
super
.onOptionsItemSelected(item);
switch
(item.getItemId()) {
case
1
:
//交通模式
mapView.setTraffic(
true
);
mapView.setSatellite(
false
);
mapView.setStreetView(
false
);
break
;
case
2
:
//卫星模式
mapView.setSatellite(
true
);
mapView.setStreetView(
false
);
mapView.setTraffic(
false
);
break
;
case
3
:
//街景模式
mapView.setStreetView(
true
);
mapView.setTraffic(
false
);
mapView.setSatellite(
false
);
break
;
default
:
mapView.setTraffic(
true
);
mapView.setSatellite(
false
);
mapView.setStreetView(
false
);
break
;
}
return
true
;
}
private
void
updateWithLocation(Location location){
if
(location!=
null
){
//为绘制类设置坐标
myOverLay.setLocation(location);
GeoPoint geoPoint=
new
GeoPoint((
int
)(location.getLatitude()*1E6), (
int
)(location.getLongitude()*1E6));
//定位到指定的坐标
mapController.animateTo(geoPoint);
mapController.setZoom(
15
);
}
}
private
final
LocationListener locationListener=
new
LocationListener() {
@Override
public
void
onStatusChanged(String provider,
int
status, Bundle extras) {
// TODO Auto-generated method stub
}
@Override
public
void
onProviderEnabled(String provider) {
// TODO Auto-generated method stub
}
@Override
public
void
onProviderDisabled(String provider) {
// TODO Auto-generated method stub
}
//当坐标改变时出发此函数
@Override
public
void
onLocationChanged(Location location) {
// TODO Auto-generated method stub
updateWithLocation(location);
}
};
class
MyOverLay
extends
Overlay{
private
Location location;
public
void
setLocation(Location location){
this
.location=location;
}
@Override
public
boolean
draw(Canvas canvas, MapView mapView,
boolean
shadow,
long
when) {
// TODO Auto-generated method stub
super
.draw(canvas, mapView, shadow);
Paint paint=
new
Paint();
Point myScreen=
new
Point();
//将经纬度换成实际屏幕的坐标。
GeoPoint geoPoint=
new
GeoPoint((
int
)(location.getLatitude()*1E6), (
int
)(location.getLongitude()*1E6));
mapView.getProjection().toPixels(geoPoint, myScreen);
paint.setStrokeWidth(
1
);
paint.setARGB(
255
,
255
,
0
,
0
);
paint.setStyle(Paint.Style.STROKE);
Bitmap bmp=BitmapFactory.decodeResource(getResources(), R.drawable.mypicture);
//把这张图片画到相应的位置。
canvas.drawBitmap(bmp, myScreen.x, myScreen.y,paint);
canvas.drawText(
"天堂没有路"
, myScreen.x, myScreen.y, paint);
return
true
;
}
}
@Override
protected
boolean
isRouteDisplayed() {
// TODO Auto-generated method stub
return
false
;
}
@Override
public
boolean
onKeyDown(
int
keyCode, KeyEvent event) {
// TODO Auto-generated method stub
if
(keyCode == KeyEvent.KEYCODE_BACK) {
AlertDialog.Builder builder =
new
AlertDialog.Builder(
this
);
builder.setMessage(
"你确定退出吗?"
)
.setCancelable(
false
)
.setPositiveButton(
"确定"
,
new
DialogInterface.OnClickListener() {
public
void
onClick(DialogInterface dialog,
int
id) {
MyMapActivity.
this
.finish();
android.os.Process
.killProcess(android.os.Process
.myPid());
android.os.Process.killProcess(android.os.Process.myTid());
android.os.Process.killProcess(android.os.Process.myUid());
}
})
.setNegativeButton(
"返回"
,
new
DialogInterface.OnClickListener() {
public
void
onClick(DialogInterface dialog,
int
id) {
dialog.cancel();
}
});
AlertDialog alert = builder.create();
alert.show();
return
true
;
}
return
super
.onKeyDown(keyCode, event);
}
}
|

可以放大缩小:

可是使用menu键,切换不同的模式:


 1万+
1万+


 被折叠的 条评论
为什么被折叠?


