


概述
Spring框架,可以解决对象创建以及对象之间依赖关系的一种框架。
    且可以和其他框架一起使用;Spring与Struts,  Spring与hibernate
    (起到整合(粘合)作用的一个框架)
Spring提供了一站式解决方案:
    1) Spring Core  spring的核心功能: IOC容器, 解决对象创建及依赖关系
    2) Spring Web  Spring对web模块的支持。
                - 可以与struts整合,让struts的action创建交给spring
                - spring mvc模式
    3) Spring DAO  Spring 对jdbc操作的支持  【JdbcTemplate模板工具类】
    4) Spring ORM  spring对orm的支持:
         既可以与hibernate整合,【session】
         也可以使用spring的对hibernate操作的封装
    5)Spring AOP  切面编程
    6)SpringEE   spring 对javaEE其他模块的支持
开发步骤
spring各个版本中:
在3.0以下的版本,源码有spring中相关的所有包【spring功能 + 依赖包】如2.5版本;
在3.0以上的版本,源码中只有spring的核心功能包【没有依赖包】(如果要用依赖包,需要单独下载!)
**1) 源码, jar文件:spring-framework-3.2.5.RELEASE
commons-logging-1.1.3.jar 日志
spring-beans-3.2.5.RELEASE.jar bean节点
spring-context-3.2.5.RELEASE.jar spring上下文节点
spring-core-3.2.5.RELEASE.jar spring核心功能
spring-expression-3.2.5.RELEASE.jar spring表达式相关
以上是必须引入的5个jar文件,在项目中可以用户库管理!
2) 核心配置文件: applicationContext.xml
Spring配置文件:applicationContext.xml / bean.xml
约束参考
spring-framework-3.2.5.RELEASE\docs\spring-framework-reference\htmlsingle\index.html
<beans xmlns="http://www.springframework.org/schema/beans"
    xmlns:xsi="http://www.w3.org/2001/XMLSchema-instance"
    xmlns:p="http://www.springframework.org/schema/p"
    xmlns:context="http://www.springframework.org/schema/context"
    xsi:schemaLocation="
        http://www.springframework.org/schema/beans
        http://www.springframework.org/schema/beans/spring-beans.xsd
        http://www.springframework.org/schema/context
        http://www.springframework.org/schema/context/spring-context.xsd">

</beans>
bean对象创建的细节
1) 对象创建: 单例/多例
scope=”singleton”, 默认值, 即 默认是单例 【service/dao/工具类】
scope=”prototype”, 多例; 【Action对象】
2) 什么时候创建?
scope=”prototype” 在用到对象的时候,才创建对象。
scope=”singleton” 在启动(容器初始化之前), 就已经创建了bean,且整个应用只有一个。
3)是否延迟创建
lazy-init=”false” 默认为false, 不延迟创建,即在启动时候就创建对象
lazy-init=”true” 延迟初始化, 在用到对象的时候才创建对象
(只对单例有效)
4) 创建对象之后,初始化/销毁
init-method=”init_user” 【对应对象的init_user方法,在对象创建之后执行 】
destroy-method=”destroy_user” 【在调用容器对象的destriy方法时候执行,(容器
spring对象的创建
实体类与接口:
接口:
public interface Person {
public void say();
public void eat();
}
实体类:
public class ChinesePerson implements Person {
public void say() {
System.out.println("中国人会说话");
}
public void run() {
System.out.println("中国人会武功");
}
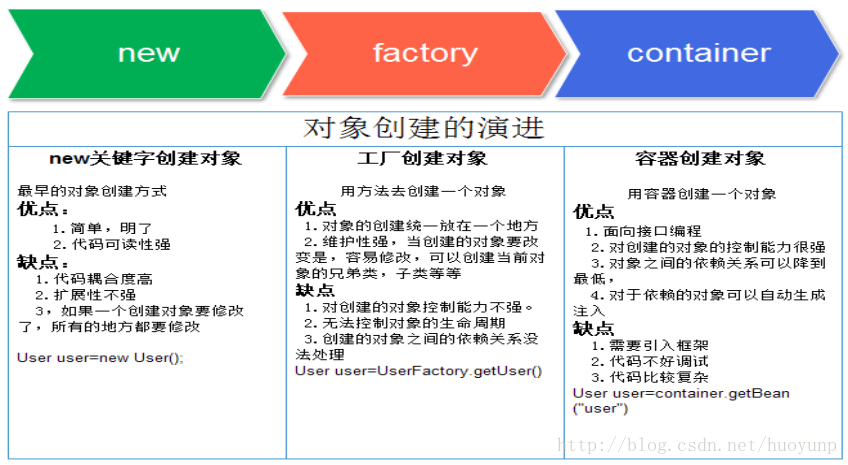
}1.普通new方法创建对象
public class New {
    public static void main(String[] args) {
    //如果new了很多个对象,如果类名改变,那么改起来很麻烦,换句话说就是代码耦合性太高
        IPerson c = new ChinesePerson();
    }
}
2 工厂创建对象 工厂类
public class Factory {
    public static Person getObject(){
        //相当于将new创建对象封装成一个方法,创建时调用方法即可,更改类名时更改方法,降低了耦合
        return new ChinesePerson();
    }
}
3.容器创建(spring)
Spring.xml:
    <?xml version="1.0" encoding="UTF-8"?>
<beans
    xmlns="http://www.springframework.org/schema/beans"
    xmlns:xsi="http://www.w3.org/2001/XMLSchema-instance"
    xmlns:p="http://www.springframework.org/schema/p"
    xsi:schemaLocation="http://www.springframework.org/schema/beans http://www.springframework.org/schema/beans/spring-beans-4.2.xsd">
    <!-- class指定要实例化的类的路径,id是变量名 -->
    <bean id="c" class="spring.ChinesePerson">
    </bean>
</beans>
Java:
public class Container {
/**
* 获取容器的方法
* FileSystemXmlApplicationContext 从文件系统寻找xml文件
* ClassPathXmlApplicationContext 从类路径下寻找(常用建议使用)
* GenericXmlApplicationContext 通用默认查找类路径
* WebApplicationContext web.xml中实例化
* 前缀:classpath(服务器路径优先) file(本地路径优先,带盘符)
* */
public static void main(String[] args) {
//获取容器对象,指定xml
ApplicationContext context = new ClassPathXmlApplicationContext("spring.xml");
//根据id取对象,如果没有id可以用类名.class或者类的群路径,但只适合有一个对象时,不推荐使用
ChinesePerson c =(ChinesePerson)context.getBean("c");
//遍历所有对象名,如果没有id会用“#数字(从0顺序开始)”命名
String [] str = context.getBeanDefinitionNames();
for (String string : str) {
System.out.println(string);
}
}
}注入
   A、B、C类代码:
package spring;
public class A {
    private String name;
    public String getName() {
        return name;
    }
    public void setName(String name) {
        this.name = name;
    }
}
package spring;
public class B {
    private A a;
    public A getA() {
        return a;
    }
    public void setA(A a) {
        this.a = a;
    }
}
package spring;
public class C {
    private String name;
    private B b;
    public C(String name, B b) {
        this.name = name;
        this.b = b;
    }
    public String getName() {
        return name;
    }
    public B getB() {
        return b;
    }
Spring.xml:
<bean id="a1" class="com.et.lession01.A">
<!-- 属性注入,name是属性名,value是要赋值的值(基本类型),被实例化的类不能有构造方法 -->
<property name="name" value="张三"></property>
</bean>
<bean id="b" class="com.et.lession01.B">
<!-- 属性注入,name是属性名,ref是引用的对象,被实例化的类不能有构造方法-->
<property name="A" ref="a1"></property>
</bean>
<!-- 构造器注入1 -->
<bean id="c1" class="com.et.lession01.C">
<!--索引赋值,index从参数的索引(从0开始),value要赋的值 ,ref是引用的对象-->
<constructor-arg index="0" value="李四"></constructor-arg>
<constructor-arg index="1" ref="b"></constructor-arg>
</bean>
<!-- 构造器注入2 -->
<bean id="c2" class="com.et.lession01.C">
<!--形参赋值,name是形参名,value要赋的值 ,ref是引用的对象(建议使用)-->
<constructor-arg name="name" value="王五"></constructor-arg>
<constructor-arg name="b" ref="b"></constructor-arg>
</bean>
<!-- 构造器注入3 -->
<bean id="c3" class="spring.C">
<!--形参赋值,type是类型的地址,value要赋的值 ,ref是引用的对象-->
<constructor-arg type="java.lang.String" value="赵六"></constructor-arg>
<constructor-arg type="com.et.lession01.B" ref="b"></constructor-arg>
</bean>Java代码:
A a = (A)context.getBean("a1");
System.out.println(a.getName());
B b = (B)context.getBean("b");
System.out.println(b.getA().getName());
C c1 = (C)context.getBean("c1");
System.out.println(c1.getB().getA().getName());
C c2 = (C)context.getBean("c2");
System.out.println(c2.getB().getA().getName());
C c3 = (C)context.getBean("c3");
System.out.println(c3.getB().getA().getName());自动装配(了解)
根据名称自动装配:autowire=”byName”
- 自动去IOC容器中找与属性名同名的引用的对象,并自动注入
spring.xml:
<!-- 自动装配 (根据类型byType),bytype对象属性 所在的类 在容器中只能有一个实例-->
  <bean id="b1" class="com.et.lession01_autowire.B" autowire="byType">
  </bean>
  <!-- 自动装配 byName根据当前对象属性的名称来查找对应的实例 多个单实例是相对的如不b中是个集合可以自动装配-->
  <bean id="b2" class="spring.B" autowire="byName">
  </bean>
Java代码:
B b1 = (B)context.getBean("b1");
System.out.println(b1.getA().getName());
B b2 = (B)context.getBean("b2");
System.out.println(b2.getA().getName());总结:
Spring提供的自动装配主要是为了简化配置; 但是不利于后期的维护。
(一般不推荐使用)
注解
注解方式可以简化spring的IOC容器的配置!
使用注解步骤:
1)先引入context名称空间
xmlns:context=”http://www.springframework.org/schema/context”
2)开启注解扫描
spring.xml

<context:component-scan base-package="com.et.lesson03.log">
</context:component-scan>
3)使用注解
通过注解的方式,把对象加入ioc容器。
创建对象以及处理对象依赖关系,相关的注解:
@Component 指定把一个对象加入IOC容器
@Repository 作用同@Component; 在持久层使用
@Service 作用同@Component; 在业务逻辑层使用
@Controller 作用同@Component; 在控制层使用
@Resource 属性注入
总结:
1) 使用注解,可以简化配置,且可以把对象加入IOC容器,及处理依赖关系(DI)
2) 注解可以和XML配置一起使用。


 3万+
3万+

 被折叠的 条评论
为什么被折叠?
被折叠的 条评论
为什么被折叠?
 到【灌水乐园】发言


