


Widget与Map之间的交互是最常见的一种交互,BaseWidget不仅定义了Map实例对象,而且封装了与Map进行交互的方法。BaseWidget良好封装使Widget与Map交互非常简单。
4.1 交互方式1:map实例
在BaseWidget中,有如下代码:
| /** * Current active map that the container shows. * The WidgetManager will set its value when a widget is initialized. */ private var _map:Map; [Bindable] /** * Set a map object reference. Used by WidgetManager to pass in the current * map. * @param value the map reference object. */ public function get map():Map{ return _map; } public function set map(value:Map):void{ _map = value; } |
通过注释可知,Widget在初始化的时候,WidgetManager会将当前的map实例注入Widget。所以,一旦Widget初始化完成,就有一个map实例可供使用。
下面我们实现一个HelloMapWidget,来说明在Widget如何使用map实例,代码如下:
| <?xml version="1.0" encoding="utf-8"?> <viewer:BaseWidget xmlns:fx="http://ns.adobe.com/mxml/2009" xmlns:s="library://ns.adobe.com/flex/spark" xmlns:mx="library://ns.adobe.com/flex/mx" xmlns:viewer="com.esri.viewer.*" layout="absolute" width="400" height="300" widgetConfigLoaded="init()"> <fx:Script> <![CDATA[ import com.esri.ags.geometry.MapPoint; import mx.controls.Label;
private var helloContent:String;
private function init():void{ if (configXML){ helloContent=String(configXML.hellocontent); } }
private function sayHiToMap():void{ var center:MapPoint=map.extent.center; var message:Label=new Label(); message.text=helloContent; map.infoWindowContent=message; map.infoWindow.show(center); } ]]> </fx:Script> <viewer:WidgetTemplate> <s:HGroup height="100%" width="100%" horizontalAlign="center" verticalAlign="middle"> <s:Button label="Say Hi to Map" click="sayHiToMap()"/> </s:HGroup> </viewer:WidgetTemplate> </viewer:BaseWidget> |
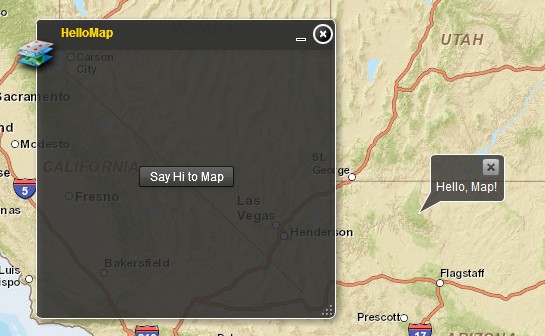
HelloMapWidget实现的功能是,单击“Say Hi to Map”按钮,在地图当前视图范围的中心点显示infoWindow,infoWindow显示的内容是配置文件中的字符。运行结果如下图所示:
有了map实例,在Widget就可以做任何与Map相关的事情,比如控制Map图层、获得Map的各种信息等等,具体可参考Flex Viewer中的NavigationWidget、MapSwitcherWidget等。
4.2 交互方式2:BaseWidget封装的方法
除了map实例,Widget可以通过BaseWidget中封装的方法与Map进行交互(实际上是与MapManager的交互),见如下代码:
| /** * Show information window (infoWindow) based on infoData from widget. */ public function showInfoWindow(infoData:Object):void{ ViewerContainer.dispatchEvent(newAppEvent(AppEvent.SHOW_INFOWINDOW, infoData)); } /** * Set map action from widget. */ public function setMapAction(action:String, status:String, symbol:Symbol, callback:Function):void{ var data:Object ={ tool: action, status: status, symbol: symbol, handler: callback}; ViewerContainer.dispatchEvent(new AppEvent(AppEvent.SET_MAP_ACTION, data)); } /** * Set map navigation mode, such a pan, zoomin, etc. * <p>The navigation methods supported are:</p> * <listing> * pan (Navigation.PAN) * zoomin (Navigation.ZOOM_IN) * zoomout (Navigation.ZOOM_OUT) * zoomfull (ViewerContainer.NAVIGATION_ZOOM_FULL) * zoomprevious (ViewerContainer.NAVIGATION_ZOOM_PREVIOUS) * zoomnext (ViewerContainer.NAVIGATION_ZOOM_NEXT) * </listing> */ public function setMapNavigation(navMethod:String, status:String):void{ var data:Object ={ tool: navMethod, status: status}; ViewerContainer.dispatchEvent(newAppEvent(AppEvent.SET_MAP_NAVIGATION, data)); } |
u showInfoWindow()
弹出窗口并显示信息。
u setMapAction()
设置画图操作。
u setMapNavigation()
设置导航操作。
由于是与MapManager交互,上述三个方法中只是派发了相应的事件,这些事件由MapManager监听、捕捉和响应,在MapManager中有如下代码说明对上述三个方法派发的事件进行了监听:
| ViewerContainer.addEventListener(AppEvent.SET_MAP_NAVIGATION, changeNavigationbyMenu); ViewerContainer.addEventListener(AppEvent.SET_MAP_ACTION, enableMapAction); ViewerContainer.addEventListener(AppEvent.SHOW_INFOWINDOW, widgetShowInfo); |
下面实现HelloMapManagerWidget,演示如何使用上述三个方法,代码如下:
| <?xml version="1.0" encoding="utf-8"?> <viewer:BaseWidget xmlns:fx="http://ns.adobe.com/mxml/2009" xmlns:s="library://ns.adobe.com/flex/spark" xmlns:mx="library://ns.adobe.com/flex/mx" xmlns:viewer="com.esri.viewer.*" widgetConfigLoaded="init()"> <fx:Script> <![CDATA[ import com.esri.ags.events.DrawEvent; import com.esri.ags.layers.GraphicsLayer; import com.esri.ags.tools.DrawTool; import com.esri.ags.tools.NavigationTool; import com.esri.viewer.ViewerContainer;
private var helloContent:String; private var graphicsLayer:GraphicsLayer;
private function init():void{ if (configXML){ helloContent=String(configXML.hellocontent); } graphicsLayer=new GraphicsLayer(); map.addLayer(graphicsLayer);① }
private function sayHiToMapManager():void{② var infoData:Object={content: helloContent, point: map.extent.center}; this.showInfoWindow(infoData); }
private function activateMapNavigation(tool:String):void{③ this.setMapNavigation(tool, null); }
private function draw(shape:String):void{④ this.setMapAction(shape, null, null, drawEnd); } private function drawEnd(event:DrawEvent):void{⑤ graphicsLayer.add(event.graphic); } ]]> </fx:Script> <viewer:WidgetTemplate width="680" height="200"> <s:VGroup width="100%" height="100%" verticalAlign="middle" horizontalAlign="center"> <s:HGroup width="100%"> <s:Button label="Say Hi to MapManager" click="sayHiToMapManager()"/> </s:HGroup> <s:HGroup width="100%">⑥ <s:Button label="Zoom In" click="activateMapNavigation(NavigationTool.ZOOM_IN)"/> <s:Button label="Zoom Out" click="activateMapNavigation(NavigationTool.ZOOM_OUT)"/> <s:Button label="Pan" click="activateMapNavigation(NavigationTool.PAN)"/> <s:Button label="Previous View" click="activateMapNavigation(ViewerContainer.NAVIGATION_ZOOM_PREVIOUS)"/> <s:Button label="Next View" click="activateMapNavigation(ViewerContainer.NAVIGATION_ZOOM_NEXT)"/> <s:Button label="Full Extent" click="activateMapNavigation(ViewerContainer.NAVIGATION_ZOOM_FULL)"/> </s:HGroup> <s:HGroup width="100%">⑦ <s:Button label="Point" click="draw(DrawTool.MAPPOINT)"/> <s:Button label="Polyline" click="draw(DrawTool.POLYLINE)"/> <s:Button label="Polygon" click="draw(DrawTool.POLYGON)"/> <s:Button label="Extent" click="draw(DrawTool.EXTENT)"/> <s:Button label="Circle" click="draw(DrawTool.CIRCLE)"/> <s:Button label="Freehand Polyline" click="draw(DrawTool.FREEHAND_POLYLINE)"/> <s:Button label="Freehand Polygon" click="draw(DrawTool.FREEHAND_POLYGON)"/> </s:HGroup> </s:VGroup> </viewer:WidgetTemplate> </viewer:BaseWidget> |
① map添加GraphicsLayer实例,用于显示画图结果;
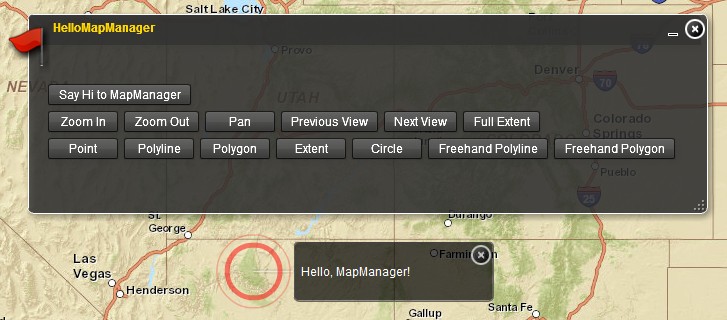
② 构造infoData对象,调用showInfoWindow()方法,单击“Say Hi to MapManager”按钮,将显示下图所示信息框(InfoPupup.mxml和defaults.css已作出相应调整,见源代码):
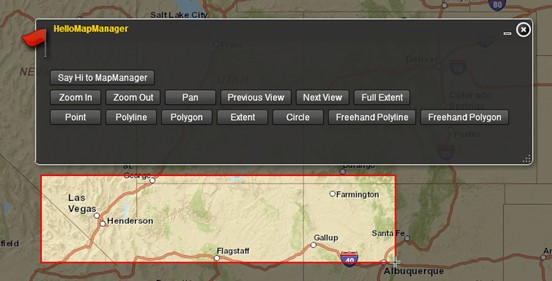
③ 调用setMapNavigation()方法,设置当前地图导航操作,Zoom In的效果如下图所示:
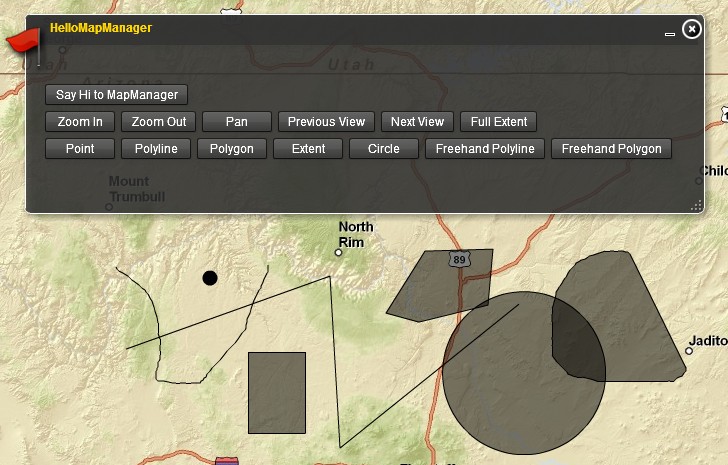
④ 调用setMapAction()方法,设置地图画图操作,如下图所示:
⑤ 响应画图事件的方法,在此方法中将画图事件中的graphic添加到graphicsLayer中;
⑥ 设置地图导航操作的按钮,click事件中调用activateMapNavigation()方法;
⑦ 设置画图操作的按钮,click事件中调用draw()方法。


 1785
1785

 被折叠的 条评论
为什么被折叠?
被折叠的 条评论
为什么被折叠?
 到【灌水乐园】发言


