


文章目录
mysql主从
主从简介
在现代企业中,数据显得尤为重要,而存储数据的数据库选择又五花八门,但无论是何种数据库,均存在着一种隐患。
想几个问题:
- 用一台数据库存放数据,若此数据库服务器宕机了导致数据丢失怎么办?
- 业务量大了,数据多了,访问的人多了,一台数据库无法保证服务质量了怎么办?
主从作用
- 实时灾备,用于故障切换
- 读写分离,提供查询服务
- 备份,避免影响业务
主从形式
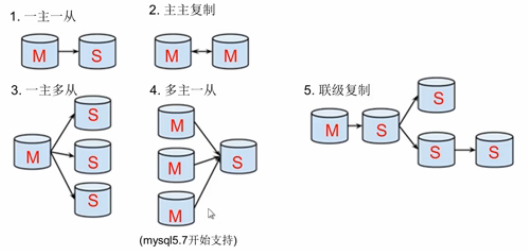
- 一主一从
- 主主复制
- 一主多从—扩展系统读取的性能,因为读是在从库读取的
- 多主一从—5.7开始支持
- 联级复制
主从复制原理
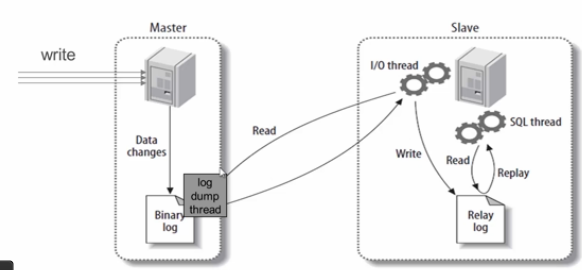
主从复制步骤:
- 主库将所有的写操作记录到binlog日志中并生成一个log dump线程,将binlog日志传给从库的I/O线程
- 从库生成两个线程,一个I/O线程,一个SQL线程
- I/O线程去请求主库的binlog,并将得到的binlog日志写到relay log(中继日志) 文件中
- SQL线程,会读取relay log文件中的日志,并解析成具体操作,来实现主从的操作一致,达到最终数据一致的目的
主从复制配置
主从复制配置步骤:
- 确保从数据库与主数据库里的数据一样
- 在主数据库里创建一个同步账号授权给从数据库使用
- 配置主数据库(修改配置文件)
- 配置从数据库(修改配置文件)
需求:
搭建两台MySQL服务器,一台作为主服务器,两台台作为从服务器,主服务器进行写操作,从服务器进行读操作
环境说明:
| 数据库角色 | IP | 应用与系统版本 | 有无数据 |
|---|---|---|---|
| 主数据库 | 192.168.96.129 | centos8/redhat8 mysql-5.7 | 无数据 |
| 从数据库 | 192.168.96.133 | centos8/redhat8 mysql-5.7 | 无数据 |
| 从数据库 | 192.168.96.134 | centos8/redhat8 mysql-5.7 | 无数据 |
1 mysql安装
分别在主从三台服务器上安装mysql-5.7版本,此处略过安装步骤,若有疑问请参考二进制格式安装MySQL
2 mysql主从配置
2.1先把三台服务器的防火墙关闭
#主
[root@localhost ~]# systemctl stop firewalld
[root@localhost ~]# systemctl status firewalld
● firewalld.service - firewalld - dynamic firewall daemon
   Loaded: loaded (/usr/lib/systemd/system/firewalld.service; disabled; v>
   Active: inactive (dead)
     Docs: man:firewalld(1)

May 11 22:30:55 localhost.localdomain systemd[1]: Starting firewalld - dy>
May 11 22:30:56 localhost.localdomain systemd[1]: Started firewalld - dyn>
May 11 22:30:57 localhost.localdomain firewalld[932]: WARNING: AllowZoneD>
May 11 23:10:02 localhost.localdomain systemd[1]: Stopping firewalld - dy>
May 11 23:10:03 localhost.localdomain systemd[1]: firewalld.service: Succ>
May 11 23:10:03 localhost.localdomain systemd[1]: Stopped firewalld - dyn>
[root@localhost ~]# systemctl disable firewalld
[root@localhost ~]# getenforce
Enforcing
[root@localhost ~]# setenforce 0
[root@localhost ~]# getenforce
Permissive
#从1
[root@localhost ~]# systemctl stop firewalld
[root@localhost ~]# systemctl stastus firewalld
Unknown operation stastus.
[root@localhost ~]# systemctl status firewalld
● firewalld.service - firewalld - dynamic firewall daemon
   Loaded: loaded (/usr/lib/systemd/system/firewalld.service; enabled; ve>
   Active: inactive (dead) since Tue 2021-05-11 23:11:38 CST; 21s ago
     Docs: man:firewalld(1)
  Process: 916 ExecStart=/usr/sbin/firewalld --nofork --nopid $FIREWALLD_>
 Main PID: 916 (code=exited, status=0/SUCCESS)

May 11 22:27:06 localhost.localdomain systemd[1]: Starting firewalld - dy>
May 11 22:27:07 localhost.localdomain systemd[1]: Started firewalld - dyn>
May 11 22:27:08 localhost.localdomain firewalld[916]: WARNING: AllowZoneD>
May 11 23:11:38 localhost.localdomain systemd[1]: Stopping firewalld - dy>
May 11 23:11:38 localhost.localdomain systemd[1]: firewalld.service: Succ>
May 11 23:11:38 localhost.localdomain systemd[1]: Stopped firewalld - dyn>
[root@localhost ~]# systemctl disable firewalld
Removed /etc/systemd/system/multi-user.target.wants/firewalld.service.
Removed /etc/systemd/system/dbus-org.fedoraproject.FirewallD1.service.
[root@localhost ~]# getenforce
Enforcing
[root@localhost ~]# setenforce 0
[root@localhost ~]# setenforce 0
[root@localhost ~]# getenforce
Permissive
#从2
[root@localhost ~]# systemctl stop firewalld
[root@localhost ~]# systemctl status firewalld
● firewalld.service - firewalld - dynamic firewall daemon
   Loaded: loaded (/usr/lib/systemd/system/firewalld.service; enabled; ve>
   Active: inactive (dead) since Tue 2021-05-11 23:13:21 CST; 6s ago
     Docs: man:firewalld(1)
  Process: 932 ExecStart=/usr/sbin/firewalld --nofork --nopid $FIREWALLD_>
 Main PID: 932 (code=exited, status=0/SUCCESS)

May 11 22:26:44 localhost.localdomain systemd[1]: Starting firewalld - dy>
May 11 22:26:44 localhost.localdomain systemd[1]: Started firewalld - dyn>
May 11 22:26:45 localhost.localdomain firewalld[932]: WARNING: AllowZoneD>
May 11 23:13:21 localhost.localdomain systemd[1]: Stopping firewalld - dy>
May 11 23:13:21 localhost.localdomain systemd[1]: firewalld.service: Succ>
May 11 23:13:21 localhost.localdomain systemd[1]: Stopped firewalld - dyn>
[root@localhost ~]# systemctl disable firewalld
Removed /etc/systemd/system/multi-user.target.wants/firewalld.service.
Removed /etc/systemd/system/dbus-org.fedoraproject.FirewallD1.service.
[root@localhost ~]# getenforce
Enforcing
[root@localhost ~]# setenforce 0
[root@localhost ~]# getenforce
Permissive
2.2 查看各个服务器中的mysq中数据是否一致
# 主
mysql> show databases;
+--------------------+
| Database           |
+--------------------+
| information_schema |
| mysql              |
| performance_schema |
| sys                |
+--------------------+
4 rows in set (0.00 sec)
# 从1
mysql> show databases;
+--------------------+
| Database           |
+--------------------+
| information_schema |
| mysql              |
| performance_schema |
| sys                |
+--------------------+
4 rows in set (0.01 sec)
# 从2
mysql> show databases;
+--------------------+
| Database           |
+--------------------+
| information_schema |
| mysql              |
| performance_schema |
| sys                |
+--------------------+
4 rows in set (0.01 sec)
如果数据库中的数据不一样,则需要全备主服务器中数据,然后恢复到从服务器中,备份时使用以下命令锁表,使其不能插入数据。
mysql> FLUSH TABLES WITH READ LOCK;
全量备份若有疑问请参考 全量备份
2.3在主数据库里创建一个同步账号授权给从数据库使用
mysql> CREATE USER 'bwxh'@'192.168.96.133' IDENTIFIED BY 'bwxh123';
Query OK, 0 rows affected (0.00 sec)
mysql> GRANT REPLICATION SLAVE ON *.* TO 'bwxh'@'192.168.96.133';
Query OK, 0 rows affected (0.00 sec)
mysql> CREATE USER 'bwxh'@'192.168.96.134' IDENTIFIED BY 'bwxh123';
Query OK, 0 rows affected (0.00 sec)
mysql> GRANT REPLICATION SLAVE ON *.* TO 'bwxh'@'192.168.96.134';
Query OK, 0 rows affected (0.00 sec)
2.4配置主数据库
[root@localhost ~]# vim /etc/my.cnf
//添加以下内容
[mysqld3306]
datadir = /opt/data/3306
port = 3306
socket = /tmp/mysql3306.sock
pid-file = /opt/data/3306/mysql_3306.pid
log-error=/var/log/3306.log
log-bin=mysqld-bin		//启用binlog日志
server-id=10			//数据库服务器唯一标识符,主库的server-id值必须比从库的小

//重启MySQL服务
[root@localhost ~]# service mysqld restart
Shutting down MySQL.. SUCCESS!
Starting MySQL.. SUCCESS!
//查看主库的状态
mysql> show master status;
+-------------------+----------+--------------+------------------+-------------------+
| File              | Position | Binlog_Do_DB | Binlog_Ignore_DB | Executed_Gtid_Set |
+-------------------+----------+--------------+------------------+-------------------+
| mysqld-bin.000001 |      154 |              |                  |                   |
+-------------------+----------+--------------+------------------+-------------------+
1 row in set (0.00 sec)
2.5 配置从数据库
从1
[root@localhost ~]# vim /etc/my.cnf
//添加以下内容
[mysqld]
basedir = /usr/local/mysql
datadir = /opt/data
socket = /tmp/mysql.sock
port = 3306
pid-file = /opt/data/mysql.pid
user = mysql
skip-name-resolve
server-id=20		//设置从库的唯一标识符,从库的server-id值必须大于主库的该值
relay-log=mysql-relay-bin	//启用中继日志relay-log

//重启从库的MySQL服务
[root@localhost ~]#  service mysqld restart
Shutting down MySQL.. SUCCESS!
Starting MySQL. SUCCESS!

//配置并启动主从复制
ysql> CHANGE MASTER TO
    -> MASTER_HOST='192.168.96.129',
    -> MASTER_USER='bwxh',
    -> MASTER_PASSWORD='bwxh123',
    -> MASTER_LOG_FILE='mysqld-bin.000001',
    -> MASTER_LOG_POS=154;
Query OK, 0 rows affected, 2 warnings (0.01 sec)

mysql> start slave;
Query OK, 0 rows affected (0.01 sec)

//查看从服务器状态
mysql> show slave status \G
*************************** 1. row ***************************
               Slave_IO_State: Waiting for master to send event
                  Master_Host: 192.168.96.129
                  Master_User: bwxh
                  Master_Port: 3306
                Connect_Retry: 60
              Master_Log_File: mysqld-bin.000001
          Read_Master_Log_Pos: 154
               Relay_Log_File: mysql-relay-bin.000002
                Relay_Log_Pos: 321
        Relay_Master_Log_File: mysqld-bin.000001
             Slave_IO_Running: Yes		//此次必须为yes
            Slave_SQL_Running: Yes		//此次必须为yes
              Replicate_Do_DB:
          Replicate_Ignore_DB:
           Replicate_Do_Table:
       Replicate_Ignore_Table:
      Replicate_Wild_Do_Table:
  Replicate_Wild_Ignore_Table:
                   Last_Errno: 0
                   Last_Error:
                 Skip_Counter: 0
          Exec_Master_Log_Pos: 154
              Relay_Log_Space: 528
              Until_Condition: None
               Until_Log_File:
                Until_Log_Pos: 0
           Master_SSL_Allowed: No
           Master_SSL_CA_File:
           Master_SSL_CA_Path:
              Master_SSL_Cert:
            Master_SSL_Cipher:
               Master_SSL_Key:
        Seconds_Behind_Master: 0
Master_SSL_Verify_Server_Cert: No
                Last_IO_Errno: 0
                Last_IO_Error:
               Last_SQL_Errno: 0
               Last_SQL_Error:
  Replicate_Ignore_Server_Ids:
             Master_Server_Id: 10
                  Master_UUID: 6b52bbf9-b198-11eb-9706-000c29a69e07
             Master_Info_File: /opt/data/master.info
                    SQL_Delay: 0
          SQL_Remaining_Delay: NULL
      Slave_SQL_Running_State: Slave has read all relay log; waiting for more updates
           Master_Retry_Count: 86400
                  Master_Bind:
      Last_IO_Error_Timestamp:
     Last_SQL_Error_Timestamp:
               Master_SSL_Crl:
           Master_SSL_Crlpath:
           Retrieved_Gtid_Set:
            Executed_Gtid_Set:
                Auto_Position: 0
         Replicate_Rewrite_DB:
                 Channel_Name:
           Master_TLS_Version:
1 row in set (0.00 sec)
从2
[root@localhost ~]# vim /etc/my.cnf
//添加以下内容
[mysqld]
basedir = /usr/local/mysql
datadir = /opt/data
socket = /tmp/mysql.sock
port = 3306
pid-file = /opt/data/mysql.pid
user = mysql
skip-name-resolve
server-id=20		//设置从库的唯一标识符,从库的server-id值必须大于主库的该值
relay-log=mysql-relay-bin	//启用中继日志relay-log

//重启从库的MySQL服务
[root@localhost ~]#  service mysqld restart
Shutting down MySQL.. SUCCESS!
Starting MySQL. SUCCESS!

//配置并启动主从复制
ysql> CHANGE MASTER TO
    -> MASTER_HOST='192.168.96.129',
    -> MASTER_USER='bwxh',
    -> MASTER_PASSWORD='bwxh123',
    -> MASTER_LOG_FILE='mysqld-bin.000001',
    -> MASTER_LOG_POS=154;
Query OK, 0 rows affected, 2 warnings (0.01 sec)

mysql> start slave;
Query OK, 0 rows affected (0.01 sec)

//查看从服务器状态
mysql> show slave status \G
*************************** 1. row ***************************
               Slave_IO_State: Waiting for master to send event
                  Master_Host: 192.168.96.129
                  Master_User: bwxh
                  Master_Port: 3306
                Connect_Retry: 60
              Master_Log_File: mysqld-bin.000001
          Read_Master_Log_Pos: 154
               Relay_Log_File: mysql-relay-bin.000002
                Relay_Log_Pos: 321
        Relay_Master_Log_File: mysqld-bin.000001
             Slave_IO_Running: Yes		//此次必须为yes
            Slave_SQL_Running: Yes		//此次必须为yes
              Replicate_Do_DB:
          Replicate_Ignore_DB:
           Replicate_Do_Table:
       Replicate_Ignore_Table:
      Replicate_Wild_Do_Table:
  Replicate_Wild_Ignore_Table:
                   Last_Errno: 0
                   Last_Error:
                 Skip_Counter: 0
          Exec_Master_Log_Pos: 154
              Relay_Log_Space: 528
              Until_Condition: None
               Until_Log_File:
                Until_Log_Pos: 0
           Master_SSL_Allowed: No
           Master_SSL_CA_File:
           Master_SSL_CA_Path:
              Master_SSL_Cert:
            Master_SSL_Cipher:
               Master_SSL_Key:
        Seconds_Behind_Master: 0
Master_SSL_Verify_Server_Cert: No
                Last_IO_Errno: 0
                Last_IO_Error:
               Last_SQL_Errno: 0
               Last_SQL_Error:
  Replicate_Ignore_Server_Ids:
             Master_Server_Id: 10
                  Master_UUID: 6b52bbf9-b198-11eb-9706-000c29a69e07
             Master_Info_File: /opt/data/master.info
                    SQL_Delay: 0
          SQL_Remaining_Delay: NULL
      Slave_SQL_Running_State: Slave has read all relay log; waiting for more updates
           Master_Retry_Count: 86400
                  Master_Bind:
      Last_IO_Error_Timestamp:
     Last_SQL_Error_Timestamp:
               Master_SSL_Crl:
           Master_SSL_Crlpath:
           Retrieved_Gtid_Set:
            Executed_Gtid_Set:
                Auto_Position: 0
         Replicate_Rewrite_DB:
                 Channel_Name:
           Master_TLS_Version:
1 row in set (0.00 sec)
2.6 测试验证
在主服务器的数据库中创建bwxh库,在bwxh库中创建表student并插入数据:
mysql> show databases;
+--------------------+
| Database           |
+--------------------+
| information_schema |
| mysql              |
| performance_schema |
| sys                |
+--------------------+
4 rows in set (0.00 sec)
mysql> create database hyh;
Query OK, 1 row affected (0.00 sec)

mysql> use hyh;
Database changed

mysql> insert student(name,age) values('tom',18),('jerry',23),('zhangshan',
,20);
Query OK, 3 rows affected (0.07 sec)
Records: 3  Duplicates: 0  Warnings: 0

mysql> select * from student;
+----+-----------+------+
| id | name      | age  |
+----+-----------+------+
|  1 | tom       |   18 |
|  2 | jerry     |   23 |
|  3 | zhangshan |   20 |
+----+-----------+------+
3 rows in set (0.00 sec)
在从数据库中查看数据是否同步:
//从1
mysql> select * from hyh.student;
+----+-----------+------+
| id | name      | age  |
+----+-----------+------+
|  1 | tom       |   18 |
|  2 | jerry     |   23 |
|  3 | zhangshan |   20 |
+----+-----------+------+
3 rows in set (0.01 sec)
//从2
mysql> select * from hyh.student;
+----+-----------+------+
| id | name      | age  |
+----+-----------+------+
|  1 | tom       |   18 |
|  2 | jerry     |   23 |
|  3 | zhangshan |   20 |
+----+-----------+------+
3 rows in set (0.00 sec)


 217
217


 被折叠的 条评论
为什么被折叠?
被折叠的 条评论
为什么被折叠?
 到【灌水乐园】发言


