


虚拟化基础与分类

x86 CPU特权级别设为四个Ring:Kernel Mode运行在Ring 0、User Mode运行在Ring 3;
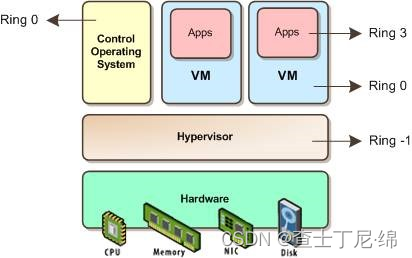
非硬件辅助虚拟化(一型)

Hypervisor运行在Ring 0;
Guest OS不做修改,以为自己运行在Ring 0上,实际运行在Ring 1上,通过使用虚拟CPU间接使用物理CPU;
Hypervisor对Guest OS的运行在Ring 0上的指令进行转译,变成真实CPU的指令;
直接安装在物理机上,称作bare metal hypervisor。例如:VMware ESXi、Microsoft Hyper-V、KVM。
硬件辅助全虚拟化(二型)
Intel VT and AMD-V创建一个新的Ring -1,Hypervisor运行在其上,
Guest OS无需修改,可以直接运行在Ring 0;
安装在物理机的操作系统上的软件,称作hosted hypervisor。例如:VMware Workstation、VirtualBox。
半虚拟化

Hypervisor使用Kernel Mode,运行在Ring 0;
Guest OS的Kernel需要修改,将运行在Ring 0上的指令转为调用Hypervisor;
Guest OS上的应用运行在Ring 3;
替换不能虚拟化的部分指令,通过超级调用hypercall直接和底层的虚拟化层hypervisor来通讯,hypervisor同时也提供了超级调用接口来满足其他关键内核操作,比如内存管理、中断和时间保持。例如:xen。
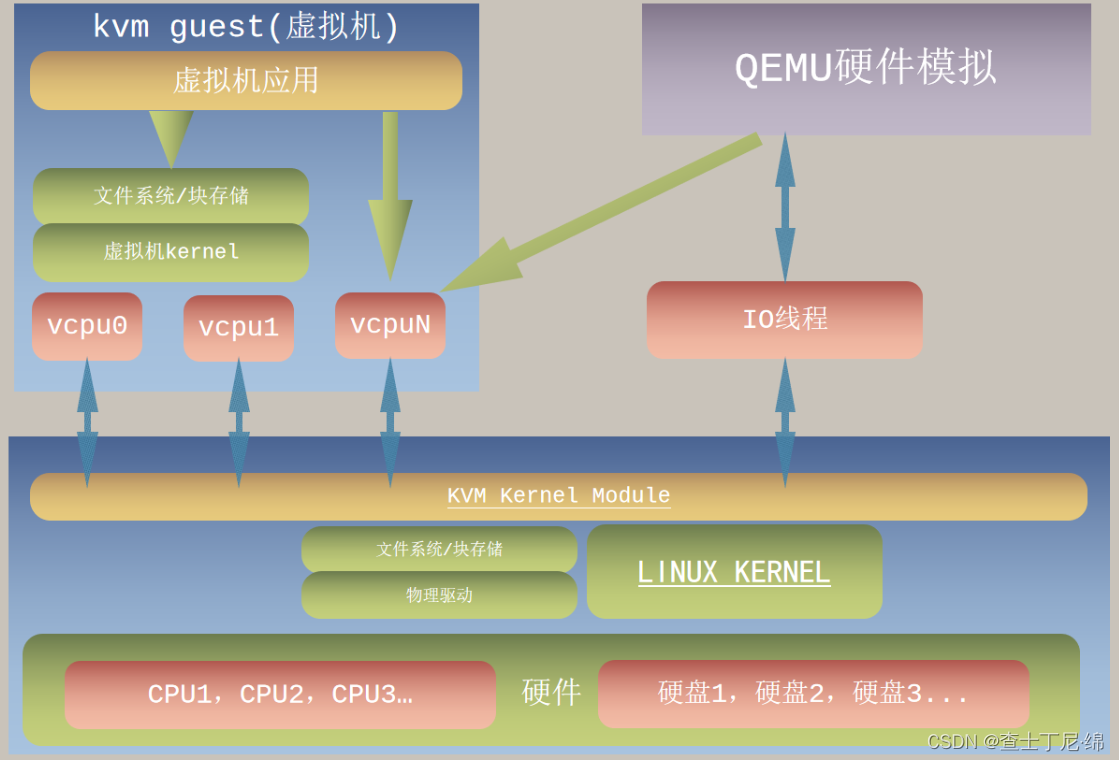
KVM介绍
一型虚拟化:非硬件辅助虚拟化,可对NUMA框架的cpu做定制的调优;
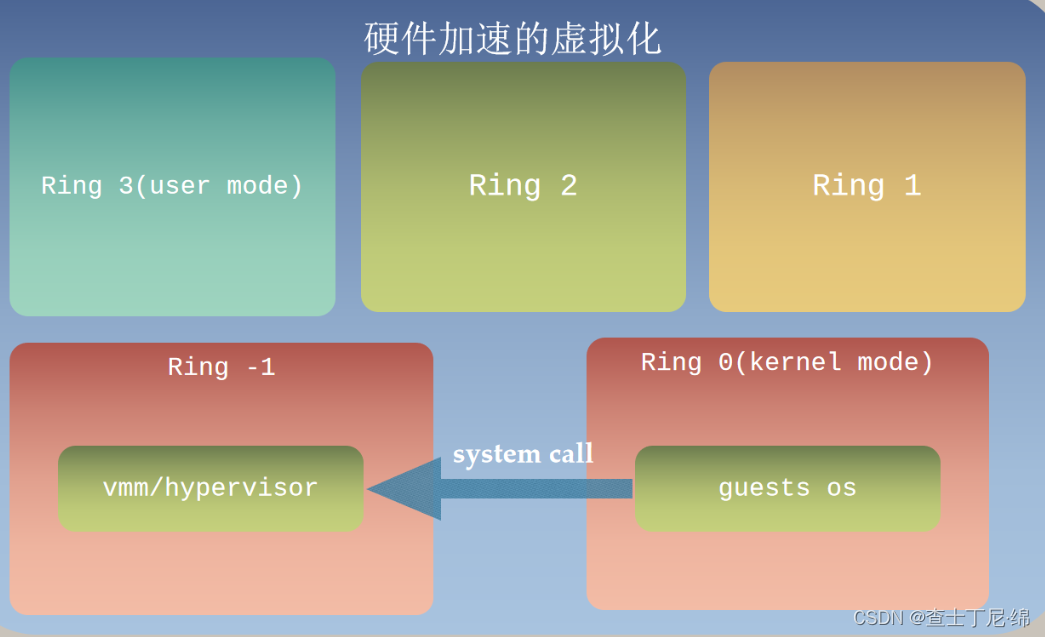
system call:应用程序原本运行在ring 3上。如果要做受控操作(访问磁盘、写文件),需执行系统调用函数。执行时,运行级别会发生ring 3到ring 0的切换,并跳转到系统调用对应的内核代码位置执行,完成设备访问后,再从ring 0切换回ring 3。此过程也称作用户态和内核态的切换。
qemu
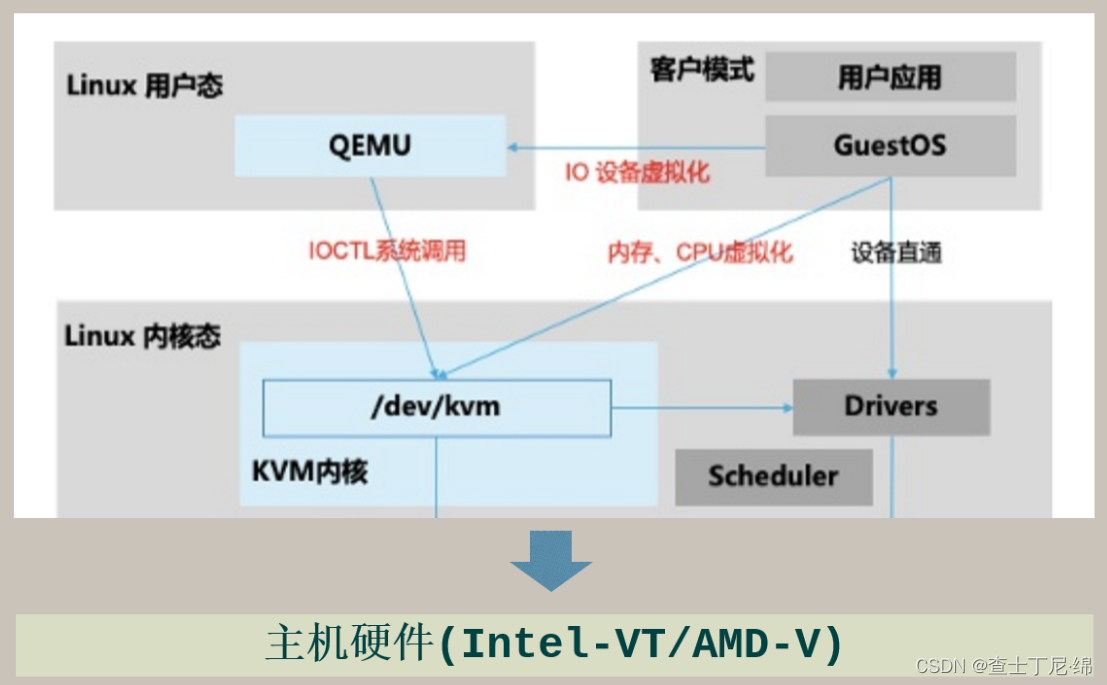
qumu-kvm:帮助kvm进行io模拟的Hypervisor;
/dev/kvm:被宿主机调用的接口,负责vcpu/vmem资源;(比如:qemu进程利用mmap系统调用映射一块内存给VM的描述符,其实也就是给VM创建内存的过程)
关键文件
配置文件: /etc/libvirt/libvirtd.conf
虚拟化守护进程日志文件:/var/log/libvirt/libvirtd.log
虚拟机配置文件:/etc/libvirt/qemu/instance-0000xxxx.xml
虚机日志文件:/var/log/libvirt/qemu/instance-0000xxxx.log
xml配置文件举例及解释
<domain type='kvm'>          ##描述hypervisor
  <name>centos7.0</name>        ##定义虚拟机整体信息
  <uuid>c2d264d3-5c61-4d2e-8678-b28673c1f64b</uuid>
  <memory unit='KiB'>1048576</memory>
  <currentMemory unit='KiB'>1048576</currentMemory>
  <vcpu placement='static'>1</vcpu>
  <os>                  ##系统信息
    <type arch='x86_64' machine='pc-i440fx-rhel7.0.0'>hvm</type>
    <boot dev='hd'/>      ##开机从哪里启动
  </os>
  <features>          ##硬件资源特性
    <acpi/>
    <apic/>
  </features>
  <cpu mode='custom' match='exact'>
    <model fallback='allow'>Haswell-noTSX</model>
  </cpu>
  <clock offset='utc'>
    <timer name='rtc' tickpolicy='catchup'/>
    <timer name='pit' tickpolicy='delay'/>
    <timer name='hpet' present='no'/>
  </clock>
  <on_poweroff>destroy</on_poweroff>      ##突发事件处理
  <on_reboot>restart</on_reboot>
    <suspend-to-mem enabled='no'/>
    <suspend-to-disk enabled='no'/>
  </pm>
  <devices>                ##外设资源
    <emulator>/usr/libexec/qemu-kvm</emulator>
    <disk type='file' device='disk'>    ##描述虚拟磁盘image
      <driver name='qemu' type='qcow2'/>
      <source file='/var/lib/libvirt/images/centos7.0.qcow2'/>
      <target dev='vda' bus='virtio'/>
      <address type='pci' domain='0x0000' bus='0x00' slot='0x07' function='0x0'/>
    </disk>
    <controller type='usb' index='0' model='ich9-ehci1'>
      <address type='pci' domain='0x0000' bus='0x00' slot='0x06' function='0x7'/>
    </controller>
    <controller type='usb' index='0' model='ich9-uhci1'>
      <master startport='0'/>
    </controller>
    <controller type='usb' index='0' model='ich9-uhci2'>
      <master startport='2'/>
      <address type='pci' domain='0x0000' bus='0x00' slot='0x06' function='0x1'/>
    </controller>
    <controller type='usb' index='0' model='ich9-uhci3'>
      <master startport='4'/>
      <address type='pci' domain='0x0000' bus='0x00' slot='0x06' function='0x2'/>
    <controller type='virtio-serial' index='0'>
      <address type='pci' domain='0x0000' bus='0x00' slot='0x05' function='0x0'/>
    </controller>
    <interface type='bridge'>    ##虚拟网络,基于网桥
      <mac address='52:54:00:6a:1e:54'/>
      <source bridge='br0'/>
      <model type='virtio'/>
      <address type='pci' domain='0x0000' bus='0x00' slot='0x03' function='0x0'/>
    </interface>
    <serial type='pty'>      ##串口信息可以不用更改
      <target port='0'/>
    </serial>
    <console type='pty'>
      <target type='serial' port='0'/>
    </console>
    <channel type='unix'>
      <target type='virtio' name='org.qemu.guest_agent.0'/>
      <address type='virtio-serial' controller='0' bus='0' port='1'/>
    </channel>
    <channel type='spicevmc'>
      <target type='virtio' name='com.redhat.spice.0'/>
      <address type='virtio-serial' controller='0' bus='0' port='2'/>
    </channel>
    <input type='tablet' bus='usb'/>
    <input type='mouse' bus='ps2'/>
    <input type='keyboard' bus='ps2'/>
    <graphics type='vnc' port='-1' autoport='yes' keymap='en-us'/>
    <sound model='ich6'>      ##从此往下的内容可以不用更改
      <address type='pci' domain='0x0000' bus='0x00' slot='0x04' function='0x0'/>
    </sound>
    <video>
      <model type='qxl' ram='65536' vram='65536' vgamem='16384' heads='1'/>
      <address type='pci' domain='0x0000' bus='0x00' slot='0x02' function='0x0'/>
    </video>
    <redirdev bus='usb' type='spicevmc'>
    </redirdev>
    <redirdev bus='usb' type='spicevmc'>
    </redirdev>
    <memballoon model='virtio'>
      <address type='pci' domain='0x0000' bus='0x00' slot='0x08' function='0x0'/>
    </memballoon>
  </devices>
</domain>
<domain type='kvm'>
#虚拟机整体信息
#系统信息
#硬件资源特性
#突发事件处理
#虚拟磁盘(单个或多个)
#虚拟光盘(可选)
#虚拟网络(单个或多个)
#vnc/spice配置
</domain>

# 修改虚机配置文件命令,关机重启即可生效
# 不建议直接使用vi编辑xml文件
virsh edit <domain>
常用命令
# 列出所有虚机
virsh list --all
# 虚机开关机、重启
virsh shutdown/start/reboot uuid
# 迁移回退
virsh domjobabort uuid
# 根据xml定义虚机
virsh define /var/lib/nova/instances/uuid/libvirt.xml
# 取消虚机定义
virsh undefine uuid
# 获取xml配置
virsh dumpxml uuid
# 虚机挂载、卸载盘
virsh attach-device/detach-device uuid add_disk.xml
# 获取qga信息
virsh qemu-agent-command uuid  '{"execute":"guest-info"}'
# 查询文件系统状态
virsh qemu-agent-command uuid '{"execute":"guest-fsfreeze-status"}'
# 查询虚机所有磁盘
virsh domblklist uuid
# kvm内核模块正常加载
lsmod | grep kvm
# libvirt服务
systemctl status/start/stop/restart libvirtd
# 查看kvm虚机进程
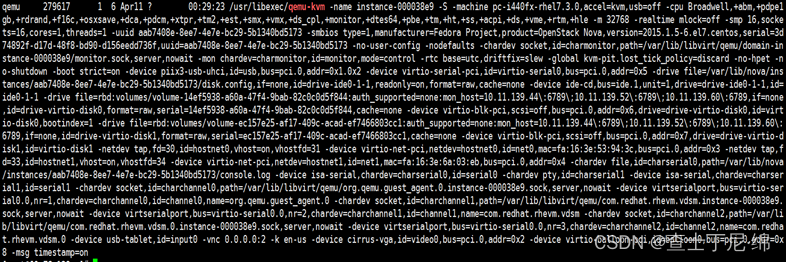
ps -efww | grep qemu-kvm


 492
492


 被折叠的 条评论
为什么被折叠?
被折叠的 条评论
为什么被折叠?
 到【灌水乐园】发言


