


You will learn
- How to create an HTTP service
- How to return system data using a (whitelisted) ABAP utility class
You can then access the ABAP system from the browser, for example to fetch a report. In this tutorial, you will simply fetch your user name and the date and time for simplicity.
Step 1: Create an HTTP service
-
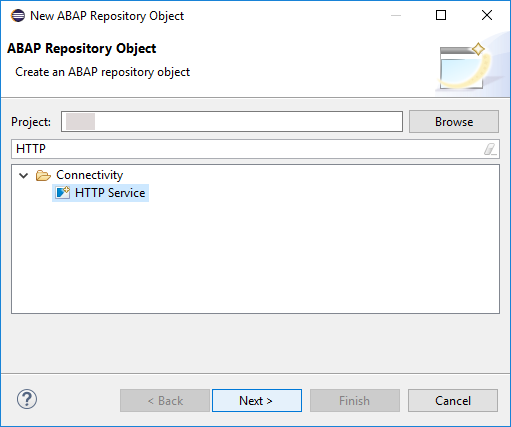
Select a package and choose New > Other Repository Object from the context menu:

-
Enter the filter text HTTP and choose Next:
-
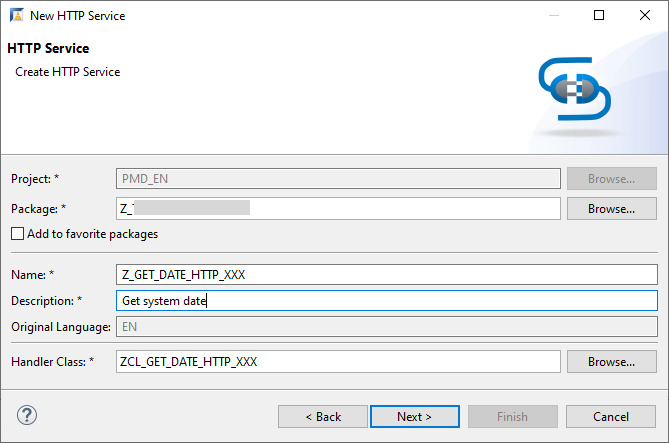
Enter a name and description for your service and choose Next:
-
Choose or create a transport request:

The new HTTP service is displayed on a new tab. The handler class and URL are generated automatically, in the form:https://<server:port>/sap/bc/http/sap/<service_name>?sap-client=100

Log on to answer question
Step 2: Implement the handler class
Now, you will implement the handler class, starting with a simple text output.
-
Open the handler class by clicking on it:

-
The structure of the class and the interfaces statement for
IF_HTTP_SERVICE_EXTENSIONare generated automatically. - Go to the class implementation section and insert the following statement in the method:
response->set_text('Hello again!').
Log on to answer question
Step 3: Save and activate
Save (Ctrl+S) and activate (Ctrl+F3) your class.
Log on to answer question
Step 4: Test the service
-
Test your service in the browser by clicking the URL link:

-
If necessary, log in again. The preview open automatically in a new tab and display something like this:

Log on to answer question
Step 5: Add system date to the method
Now you will add to the method by fetching the date from the back end first.
In the ABAP environment, you can only use whitelisted APIs. Therefore, you cannot use SY-DATUM. Instead, you call the appropriate method of the class CL_ABAP_CONTEXT_INFO.
You then cast this date variable to a string variable and output that as before.
Delete the statement response->set_text('Hello again!'). and add the following to your code:
ABAP
Copy
DATA(system_date) = CL_ABAP_CONTEXT_INFO=>get_system_date( ).
DATA: text type string.

text = system_date.
response->set_text( text ).
Log on to answer question
Step 6: Test the service again
- Save (
Ctrl+S) and activate (Ctrl+F3) your class. - Test your service by clicking the URL link again. This time, the preview should display something like this:

Log on to answer question
Step 7: Test yourself
Implement the method IF_HTTP_SERVICE_EXTENSION~HANDLE_REQUEST so that it returns the current user name (UNAME), not the system date.
Use the variables user_name and text and the method get_user_formatted_name.
×
Log on to answer question
Step 8: Copy code (optional)
Your code should look like this:
ABAP
Copy
class ZCL_JP_TEST_HTTP definition
  public
  create public .

public section.

  interfaces IF_HTTP_SERVICE_EXTENSION .
protected section.
private section.
ENDCLASS.

CLASS ZCL_JP_TEST_HTTP IMPLEMENTATION.

  method IF_HTTP_SERVICE_EXTENSION~HANDLE_REQUEST.
      DATA(system_date) = CL_ABAP_CONTEXT_INFO=>get_system_date( ).
      DATA: text type string.

      text = system_date.
      response->set_text( text ).
  endmethod.
ENDCLASS.


 452
452


 被折叠的 条评论
为什么被折叠?
被折叠的 条评论
为什么被折叠?
 到【灌水乐园】发言


