


WPF中DataTemplate和ControlTemplate的一直感觉无法区分明白,后面看了两遍书,第二遍时才感觉有一点点明白这两个之间的区别。
这里先介绍下我对DataTemplate的理解:
一、先说定义
DataTemplate,顾名思义是数据模板,从字面上理解是数据的表现形式,书上也都这么解释,并以此作为和ControlTemplate区分的标准。但是个人感觉这种解释太过于抽象,其实数据的表现形式和控件的外在表现(ControlTemplate)很不容易区分。比如对于ListBoxItem中嵌入CheckBox,通过DataTemplate和ControlTemplate都可以实现,这时候DataTemplate和ControlTemplate至少在用户看来是无法区分的。
要区分DataTemplate和ControlTemplate,我觉得应该还是从使用的角度入手。
二、DataTenpate最常用的地方。
1、ContentControl的ContentTemplate属性。
凡是继承自ContentControl的控件都带有ContentTemplate属性(常见的控件包括各类Button、ScrollViewer等),而此类控件都有一个ContentTemplate属性,可以用我们自定义的DataTenpate对其进行赋值。以下例子是定义一个包含CheckBox和TextBlock的DataTenpate,将其赋值给Button
、Label、ScrollViewer三个继承自ContentControl的控件。
以上代码,将一个GridView对象赋值给ListView对象的View属性,并在GridView对象的GridViewColumn属性中,将CellTemplate绑定静态资源datatemplate1,运行效果如下:
这里先介绍下我对DataTemplate的理解:
一、先说定义
DataTemplate,顾名思义是数据模板,从字面上理解是数据的表现形式,书上也都这么解释,并以此作为和ControlTemplate区分的标准。但是个人感觉这种解释太过于抽象,其实数据的表现形式和控件的外在表现(ControlTemplate)很不容易区分。比如对于ListBoxItem中嵌入CheckBox,通过DataTemplate和ControlTemplate都可以实现,这时候DataTemplate和ControlTemplate至少在用户看来是无法区分的。
要区分DataTemplate和ControlTemplate,我觉得应该还是从使用的角度入手。
二、DataTenpate最常用的地方。
1、ContentControl的ContentTemplate属性。
凡是继承自ContentControl的控件都带有ContentTemplate属性(常见的控件包括各类Button、ScrollViewer等),而此类控件都有一个ContentTemplate属性,可以用我们自定义的DataTenpate对其进行赋值。以下例子是定义一个包含CheckBox和TextBlock的DataTenpate,将其赋值给Button
、Label、ScrollViewer三个继承自ContentControl的控件。
XAML代码如下:
<Window x:Class="_11_4.MainWindow"
xmlns="http://schemas.microsoft.com/winfx/2006/xaml/presentation"
xmlns:x="http://schemas.microsoft.com/winfx/2006/xaml"
Title="MainWindow" Height="350" Width="525">
<Window.Resources>
<DataTemplate x:Key="datatemplate1">
<StackPanel Orientation="Horizontal">
<CheckBox/>
<TextBlock Text=" Hello World"/>
</StackPanel>
</DataTemplate>
</Window.Resources>
<Grid>
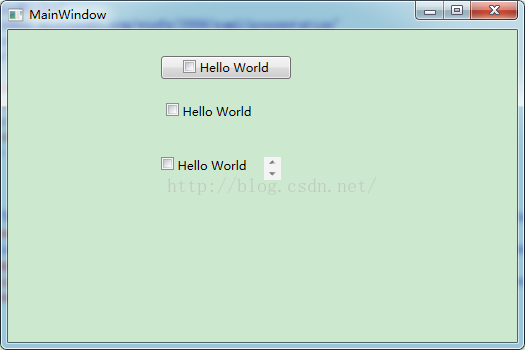
<Button Content="Button" Height="23" HorizontalAlignment="Left" Margin="153,26,0,0" Name="button1" VerticalAlignment="Top" Width="130"
ContentTemplate="{StaticResource datatemplate1}"/>
<Label Content="Label" Height="28" HorizontalAlignment="Left" Margin="153,68,0,0" Name="label1" VerticalAlignment="Top" Width="130"
ContentTemplate="{StaticResource datatemplate1}"/>
<ScrollViewer Height="23" HorizontalAlignment="Left" Margin="153,127,0,0" Name="scrollViewer1" VerticalAlignment="Top" Width="120"
ContentTemplate="{StaticResource datatemplate1}"/>
</Grid>
</Window>运行效果如下:
2、ItemsControl的ItemTemplate属性
包括ListView、TreeView、ListBox在内,很多继承自ItemsControl的Collection<T>型控件都包含ItemTemplate属性,我们可以直接通过给ItemTemplate赋值的方式控制其item数据的显示。
<Window x:Class="_11_4.MainWindow"
xmlns="http://schemas.microsoft.com/winfx/2006/xaml/presentation"
xmlns:x="http://schemas.microsoft.com/winfx/2006/xaml"
Title="MainWindow" Height="350" Width="525">
<Window.Resources>
<DataTemplate x:Key="datatemplate1">
<StackPanel Orientation="Horizontal">
<CheckBox/>
<TextBlock Text=" Hello World"/>
</StackPanel>
</DataTemplate>
</Window.Resources>
<Grid>
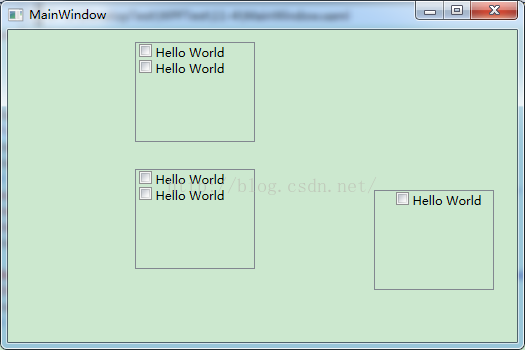
<ListView Height="100" HorizontalAlignment="Left" Margin="127,12,0,0" Name="listView1" VerticalAlignment="Top" Width="120"
>
<ListView.ItemTemplate>
<DataTemplate>
<StackPanel Orientation="Horizontal">
<CheckBox/>
<TextBlock Text=" Hello World"/>
</StackPanel>
</DataTemplate>
</ListView.ItemTemplate>
<ListItem/>
<ListItem/>
</ListView>
<ListBox Height="100" HorizontalAlignment="Left" Margin="127,139,0,0" Name="listBox1" VerticalAlignment="Top" Width="120"
ItemTemplate="{StaticResource datatemplate1}">
<ListItem/>
<ListItem/>
</ListBox>
<TreeView Height="100" HorizontalAlignment="Left" Margin="366,160,0,0" Name="listView2" VerticalAlignment="Top" Width="120"
ItemTemplate="{StaticResource datatemplate1}">
<ListItem/>
</TreeView>
</Grid>
</Window>
3、GridViewColumn的CellTemplate属性。
<Window x:Class="_11_4.MainWindow"
xmlns="http://schemas.microsoft.com/winfx/2006/xaml/presentation"
xmlns:x="http://schemas.microsoft.com/winfx/2006/xaml"
Title="MainWindow" Height="350" Width="525">
<Window.Resources>
<DataTemplate x:Key="datatemplate1">
<StackPanel Orientation="Horizontal">
<CheckBox/>
<TextBlock Text=" Hello World"/>
</StackPanel>
</DataTemplate>
</Window.Resources>
<Grid>
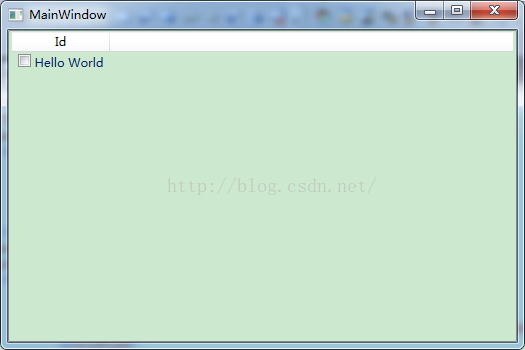
<ListView>
<ListView.View>
<GridView>
<GridViewColumn Header="Id" CellTemplate="{StaticResource datatemplate1}"/>
</GridView>
</ListView.View>
<ListItem/>
</ListView>
</Grid>
</Window>以上代码,将一个GridView对象赋值给ListView对象的View属性,并在GridView对象的GridViewColumn属性中,将CellTemplate绑定静态资源datatemplate1,运行效果如下:
4、DataGridTemplateColumn的CellTemplate属性。
该种应用同上面的类似,只不过是在DataGrid控件上的使用:
<Window x:Class="_11_4.MainWindow"
        xmlns="http://schemas.microsoft.com/winfx/2006/xaml/presentation"
        xmlns:x="http://schemas.microsoft.com/winfx/2006/xaml"
        Title="MainWindow" Height="350" Width="525">
    <Grid>
        <DataGrid Name="datagrid">
            <DataGrid.Columns>
                <DataGridTemplateColumn Header="ID">
                    <DataGridTemplateColumn.CellTemplate>
                        <DataTemplate>
                            <StackPanel Orientation="Horizontal">
                                <CheckBox/>
                                <TextBlock Text=" Hello World"/>
                            </StackPanel>
                        </DataTemplate>
                    </DataGridTemplateColumn.CellTemplate>
                </DataGridTemplateColumn>
            </DataGrid.Columns>
        </DataGrid>
    </Grid>
</Window>


 4741
4741

 被折叠的 条评论
为什么被折叠?
被折叠的 条评论
为什么被折叠?
 到【灌水乐园】发言


