


文章目录结构
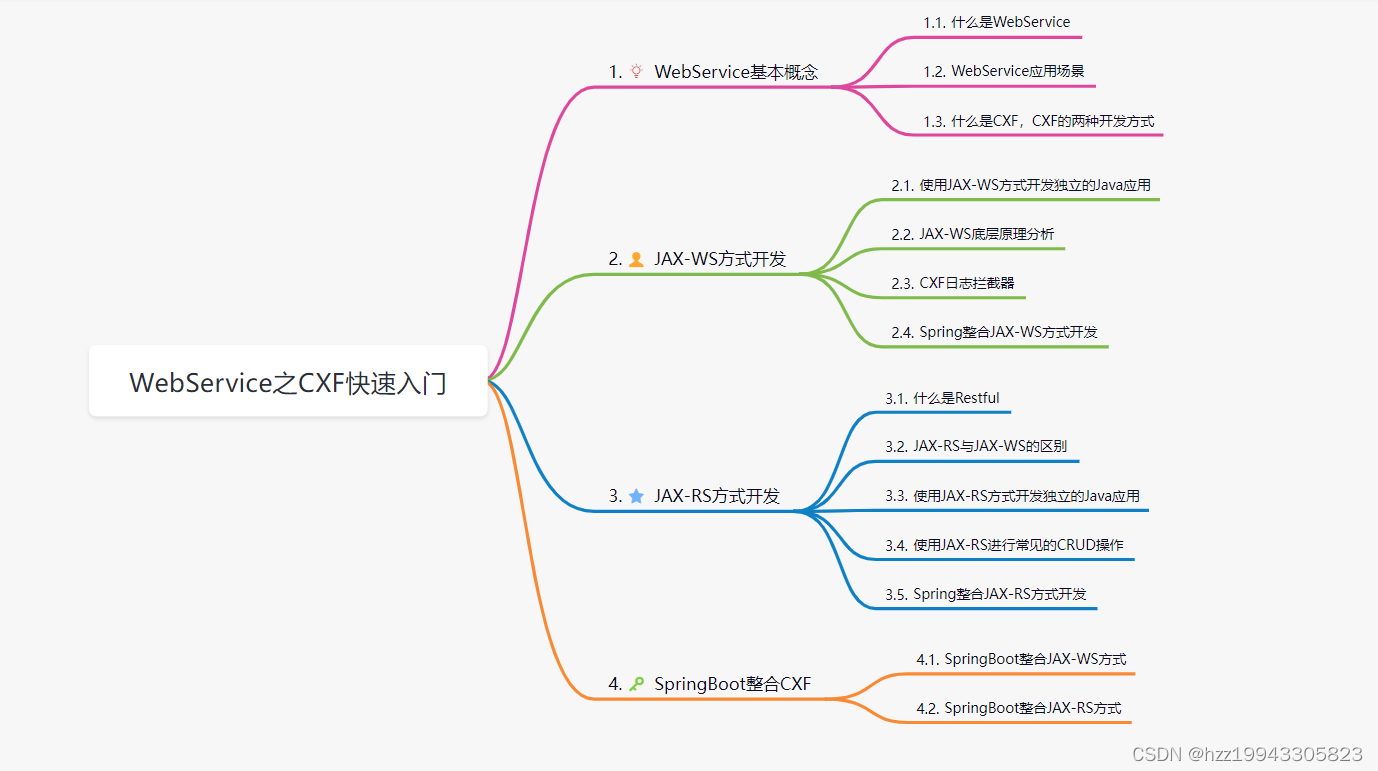
1、WebService基本概念
1.1什么是WebService
Web Service是一个平台独立的,低耦合的,自包含的、基于可编程的web的应用程序,可使用开放的XML(标准通用标记语言下的一个子集)标准来描述、发布、发现、协调和配置这些应用程序,用于开发分布式的交互操作的应用程序。
1)WebService是一个Web应用程序
2)WebService的应用基于客户端、服务端
3)WebService是基于http协议的应用
4)WebService是一个跨编程语言,跨操作系统的远程调用技术
1.2WebServie应用场景
WebService用于异构系统整合
异构系统:使用不同编程语言开发的系统。
1.3什么是CXF?CXF两种开发方式?
开源的 Services 框架
CXF,Apache CXF = Celtix + XFire,开始叫 Apache CeltiXfire,后来更名为 Apache CXF,继承了 Celtix 和 XFire 两大开源项目的精华,提供了对 JAX-WS 全面的支持,并且提供了多种 Binding 、DataBinding、Transport 以及各种 Format 的支持,并且可以根据实际项目的需要,采用代码优先(Code First)或者 WSDL 优先(WSDL First)来轻松地实现 Web Services 的发布和使用。Apache CXF已经是一个正式的Apache顶级项目。
CXF分为JAX-WS和JAX-RS两种开发方式。
1)JAX-WS:基于xml协议的WebService技术

2)JAX-RS:基于restful风格的开发方式

2、JAX-WS 开发方式
2.1使用JAX-WS方式开发独立的Java应用
1)开发服务端
a、建立maven项目,导入jax-ws的依赖
        <!--cxf对jaxws的支持-->
        <dependency>
            <groupId>org.apache.cxf</groupId>
            <artifactId>cxf-rt-frontend-jaxws</artifactId>
            <version>3.0.1</version>
        </dependency>
        <!--内置jetty web服务器-->
        <dependency>
            <groupId>org.apache.cxf</groupId>
            <artifactId>cxf-rt-transports-http-jetty</artifactId>
            <version>3.0.1</version>
        </dependency>
        <!--依赖日志-->
        <dependency>
            <groupId>org.slf4j</groupId>
            <artifactId>slf4j-log4j12</artifactId>
            <version>1.6.6</version>
        </dependency>
b、包结构
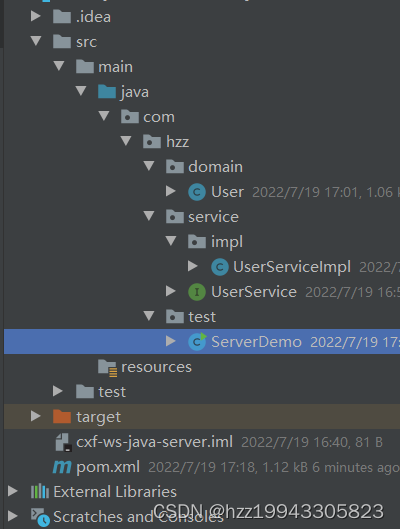
c、UserService接口
package com.hzz.service;

import com.hzz.domain.User;

import javax.jws.WebService;
import java.util.List;

/**
 * @Author: curry
 * @Date: Created in 16:51 2022/7/19
 * @Modified By:
 * @description:   @WebService注解把该类标注为WebService接口,可能被远程调用
 *                 注意:该注解需要在jdk1.6以上才能使用
 */
@WebService
public interface UserService {

    public void saveUser(User user);

    public void updateUser(User user);

    public void deleteUser(Integer id);

    public List<User> findAllUser();

    public User findById(Integer id);
}
d、UserServiceImpl类
package com.hzz.service.impl;

import com.hzz.domain.User;
import com.hzz.service.UserService;

import java.util.ArrayList;
import java.util.List;

/**
 * @Author: curry
 * @Date: Created in 16:58 2022/7/19
 * @Modified By:
 * @description:
 */
public class UserServiceImpl implements UserService {


    @Override
    public void saveUser(User user) {
        System.out.println("新增用户"+user);
    }

    @Override
    public void updateUser(User user) {
        System.out.println("修改用户"+user);
    }

    @Override
    public void deleteUser(Integer id) {
        System.out.println("删除用户"+id);
    }

    @Override
    public List<User> findAllUser() {

        List<User> userList = new ArrayList<>();
        userList.add(new User(1,"张三","男"));
        userList.add(new User(2,"洛溪","女"));
        userList.add(new User(3,"牡丹","妖"));

        return userList;
    }

    @Override
    public User findById(Integer id) {
        return new User(1,"卢瑟","男");
    }
}
ServerDemo类
package com.hzz.test;

import com.hzz.service.UserService;
import com.hzz.service.impl.UserServiceImpl;
import org.apache.cxf.jaxws.JaxWsServerFactoryBean;

/**
 * @Author: curry
 * @Date: Created in 17:04 2022/7/19
 * @Modified By:
 * @description: 发布WebService接口
 */
public class ServerDemo {

    public static void main(String[] args) {
        //1.创建工厂对象
        JaxWsServerFactoryBean factoryBean = new JaxWsServerFactoryBean();

        //2.设置参数
        //2.1设置访问地址
        factoryBean.setAddress("http://localhost:8888/userService");
        //2.2设置接口类型
        factoryBean.setServiceClass(UserService.class);
        //2.3设置实现类对象
        factoryBean.setServiceBean(new UserServiceImpl());

        //3.发布接口(阻塞方法)
        factoryBean.create();

        System.out.println("WebService发布成功");

    }
}
运行ServerDemo类中的main方法不要关闭
2)开发客户端
复制拷贝服务端代码,删除UserServiceImpl实现类和ServerDemo类,新建ClientDemo类
a、客户端目录结构

b、ClientDemo类
package com.hzz.test;

import com.hzz.domain.User;
import com.hzz.service.UserService;
import org.apache.cxf.jaxws.JaxWsProxyFactoryBean;

/**
 * @Author: curry
 * @Date: Created in 17:15 2022/7/19
 * @Modified By:
 * @description:
 */
public class ClientDemo {

    public static void main(String[] args) {
        //1.创建工厂对象
        JaxWsProxyFactoryBean factory = new JaxWsProxyFactoryBean();


        //设置参数
        //2.1设置访问路径
        factory.setAddress("http://localhost:8888/userService");

        //2.2设置接口类型
        factory.setServiceClass(UserService.class);

        //3.创建接口的代理对象
        UserService userService =(UserService) factory.create();

        //4.调用
        userService.saveUser(new User(1,"小明","男"));


    }
}
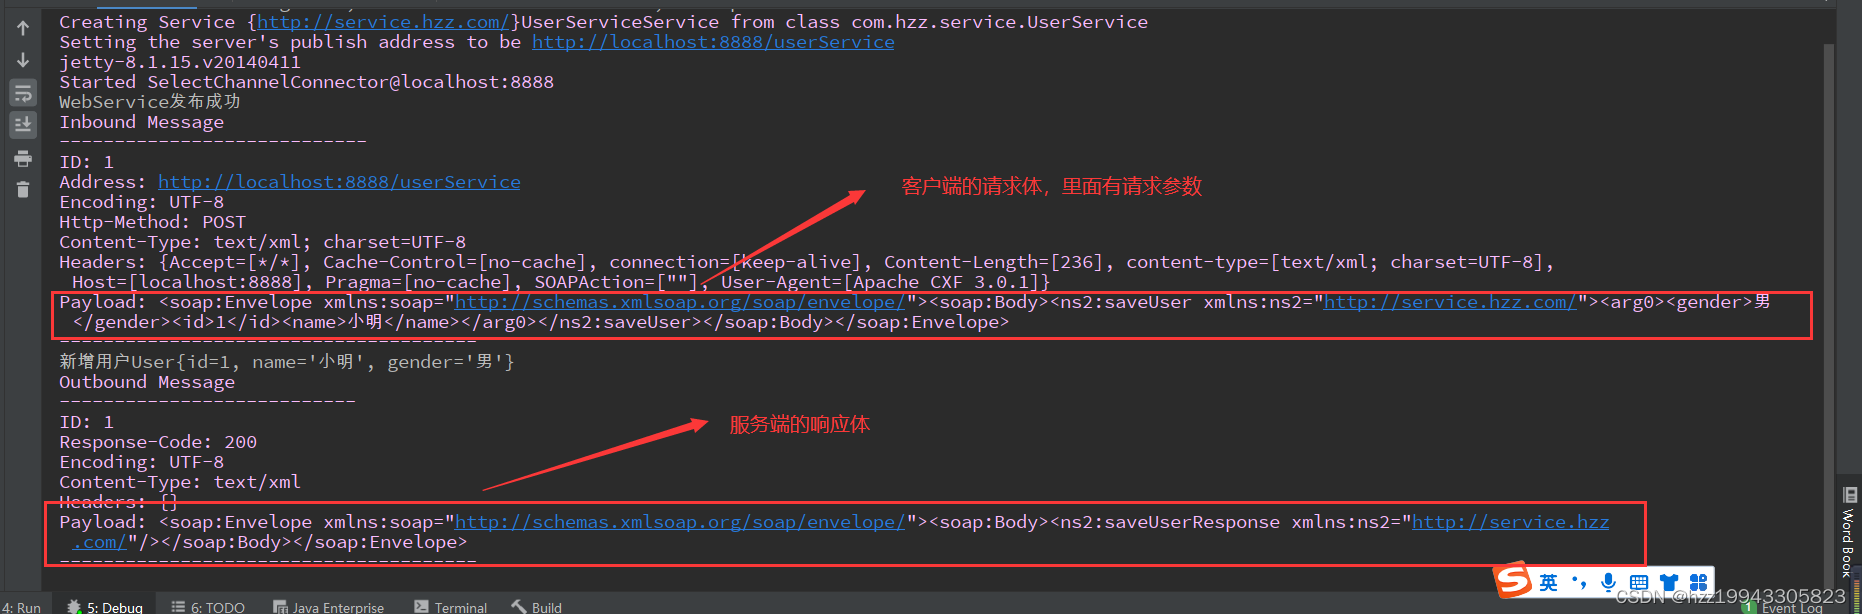
启动ClientDemo类中main方法,ServerDemo控制台如下说明,通过WebServer远程调用成功

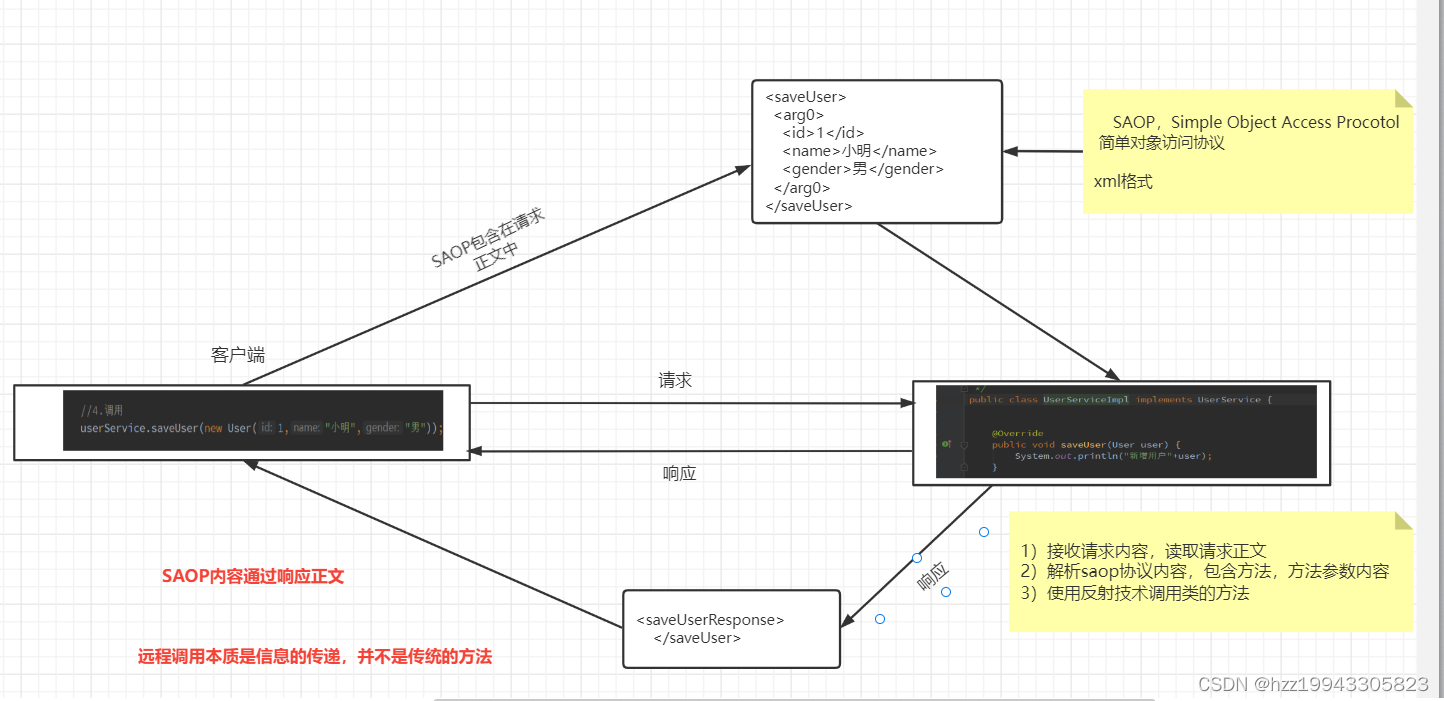
2.2JAX-WS远程调用底层原理分析
2.3CXF日志拦截器

可以在服务端定义输入拦截器拦截客户端发送的请求,定义输出拦截器拦截客户端的响应;在客户端定义输出拦截器拦截客户端发送的请求,定义输入拦截器拦截服务端的响应
a、在服务端的ServerDemo加入以下代码
b、在服务端添加log4j.properties配置文件,内容如下
### direct log messages to stdout ###
log4j.appender.stdout=org.apache.log4j.ConsoleAppender
log4j.appender.stdout.Target=System.err
log4j.appender.stdout.layout=org.apache.log4j.PatternLayout


### direct messages to file mylog.log ###
log4j.appender.file=org.apache.log4j.FileAppender
log4j.appender.file.File=d:/mylog.log
log4j.appender.file.layout=org.apache.log4j.PatternLayout


log4j.rootLogger=info, stdout
c、先运行服务端中ServerDemo的main方法,在运行客户端ClientDemo的main方法,结果如下
2.4 Spring整合JAX-WS方式开发
1)开发服务端
a、复制上面JAX-WS方式开发的Java应用,删除ServerDemo类,修改项目为web项目,添加依赖。
<dependencies>

        <!-- https://mvnrepository.com/artifact/org.springframework/spring-web -->
        <dependency>
            <groupId>org.springframework</groupId>
            <artifactId>spring-web</artifactId>
            <version>5.3.14</version>
        </dependency>


        <!--cxf对jaxws的支持-->
        <dependency>
            <groupId>org.apache.cxf</groupId>
            <artifactId>cxf-rt-frontend-jaxws</artifactId>
            <version>3.0.1</version>
        </dependency>

        <!-- https://mvnrepository.com/artifact/org.apache.cxf/cxf-rt-transports-http -->
        <dependency>
            <groupId>org.apache.cxf</groupId>
            <artifactId>cxf-rt-transports-http</artifactId>
            <version>3.0.1</version>
        </dependency>


        <!--spring框架-->
        <dependency>
            <groupId>org.springframework</groupId>
            <artifactId>spring-context</artifactId>
            <version>4.2.0.RELEASE</version>
        </dependency>
        <dependency>
            <groupId>org.springframework</groupId>
            <artifactId>spring-context-support</artifactId>
            <version>4.2.0.RELEASE</version>
        </dependency>
        <dependency>
            <groupId>org.springframework</groupId>
            <artifactId>spring-test</artifactId>
            <version>4.2.0.RELEASE</version>
        </dependency>

        <!--junit测试框架-->
        <dependency>
            <groupId>junit</groupId>
            <artifactId>junit</artifactId>
            <version>4.11</version>
            <scope>test </scope>
        </dependency>
    </dependencies>
b、在applicationContext.xml中发布接口,代码如下
<?xml version="1.0" encoding="UTF-8" ?>
<beans xmlns="http://www.springframework.org/schema/beans"
    xmlns:xsi="http://www.w3.org/2001/XMLSchema-instance"
       xmlns:jaxws="http://cxf.apache.org/jaxws"
       xsi:schemaLocation="http://www.springframework.org/schema/beans
        http://www.springframework.org/schema/beans/spring-beans.xsd
        http://cxf.apache.org/jaxws
        http://cxf.apache.org/schemas/jaxws.xsd">

    <!--发布接口-->
    <jaxws:server address="/userService" serviceClass="com.hzz.service.UserService">
        <jaxws:serviceBean>
            <bean class="com.hzz.service.impl.UserServiceImpl"/>
        </jaxws:serviceBean>
        <jaxws:inInterceptors>
            <bean class="org.apache.cxf.interceptor.LoggingInInterceptor"/>
        </jaxws:inInterceptors>
        <jaxws:outInterceptors>
            <bean class="org.apache.cxf.interceptor.LoggingOutInterceptor"/>
        </jaxws:outInterceptors>
    </jaxws:server>

</beans>
运行Spring整合CXF服务端代码。
2)开发客户端
a、复制上面Spring整合CXF工程代码,删除userServiceImpl实现类,修改applicationContext代码
修改后的applicationContext代码如下
<?xml version="1.0" encoding="UTF-8" ?>
<beans xmlns="http://www.springframework.org/schema/beans"
    xmlns:xsi="http://www.w3.org/2001/XMLSchema-instance"
       xmlns:jaxws="http://cxf.apache.org/jaxws"
       xsi:schemaLocation="http://www.springframework.org/schema/beans
        http://www.springframework.org/schema/beans/spring-beans.xsd
        http://cxf.apache.org/jaxws
        http://cxf.apache.org/schemas/jaxws.xsd">

    <!--创建服务接口代理对象-->
    <jaxws:client id="userService"
            address="http://localhost:8080/cxf_ws_spring_server_war_exploded/userService" serviceClass="com.hzz.service.UserService"/>


</beans>
b、新建ClientDemo类,如下
package com.hzz.test;
import com.hzz.domain.User;
import com.hzz.service.UserService;
import org.springframework.context.ApplicationContext;
import org.springframework.context.support.ClassPathXmlApplicationContext;
/**
* @Author: curry
* @Date: Created in 11:43 2022/7/20
* @Modified By:
* @description:
*/
public class ClientDemo {
public static void main(String[] args) {
//1.加载applicationContext.xml
ApplicationContext ac = new ClassPathXmlApplicationContext("applicationContext.xml");
//2.获取Spring容器的接口代理对象
UserService userService =(UserService) ac.getBean("userService");
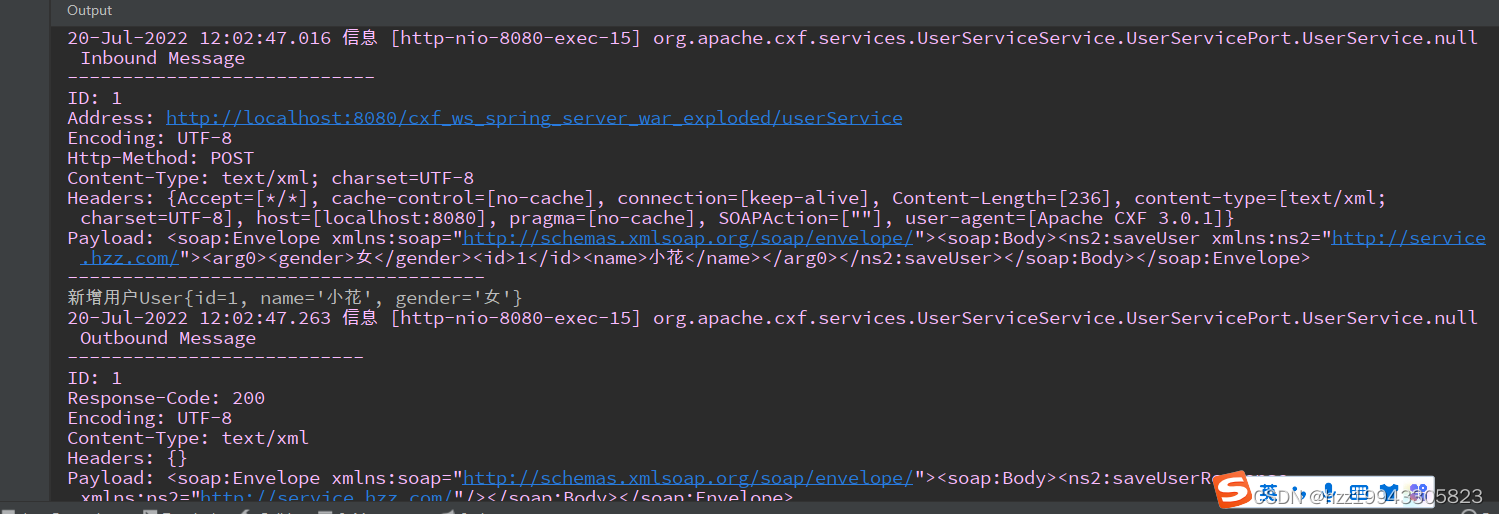
userService.saveUser(new User(1,"小花","女"));
}
}
c、运行ClientDemo类,服务端的控制台如下,说明远程调用成功
3、JAX-RS开发方式
3.1 什么是Restful风格


1)传统风格
增加:http://localhost:8080/crm/saveCustomer.action
删除:http://localhost:8080/crm/deleteCustomer.action
修改:http://localhost:8080/crm/updateCustomer.action
查询所有客户:http://localhost:8080/crm/findAllCustomer.action
查询一个客户:http://localhost:8080/crm/findCustomerById.action
以上是传统风格,没有统一的url
2)restful风格
增加:http://localhost:8080/crm/customer PUT
删除:http://localhost:8080/crm/customer DELETE
修改:http://localhost:8080/crm/customer UPDATE
查询所有客户:http://localhost:8080/crm/custome GET
查询一个客户:http://localhost:8080/crm/custome/id GET
以上restful风格是非常统一!
3.2 JAX-RS与JAX-WS的区别
1)rs基于restful风格的,ws基于soap的xml协议
2)rs比ws传输的数据更少,效率更高
3)ws值传递xml数据,rs既可以传递xml,也可以传递json
3.3 使用JAX-RS方式开发独立的Java应用
1)服务端
a、创建maven工程,复制前面服务端代码domain和service包,添加依赖如下
 <dependencies>
        <!--cxf对jaxrs的支持-->
        <dependency>
            <groupId>org.apache.cxf</groupId>
            <artifactId>cxf-rt-frontend-jaxrs</artifactId>
            <version>3.0.1</version>
        </dependency>
        <!--内置jetty web服务器-->
        <dependency>
            <groupId>org.apache.cxf</groupId>
            <artifactId>cxf-rt-transports-http-jetty</artifactId>
            <version>3.0.1</version>
        </dependency>
        <!--依赖日志-->
        <dependency>
            <groupId>org.slf4j</groupId>
            <artifactId>slf4j-log4j12</artifactId>
            <version>1.6.6</version>
        </dependency>
    </dependencies>
b、创建ServerDemo类如下
package com.hzz.test;
import com.hzz.service.impl.UserServiceImpl;
import org.apache.cxf.interceptor.LoggingInInterceptor;
import org.apache.cxf.interceptor.LoggingOutInterceptor;
import org.apache.cxf.jaxrs.JAXRSServerFactoryBean;
/**
* @Author: curry
* @Date: Created in 17:04 2022/7/19
* @Modified By:
* @description: 发布restful风格的WebService接口
*/
public class ServerDemo {
public static void main(String[] args) {
//1.创建工厂对象
JAXRSServerFactoryBean factoryBean = new JAXRSServerFactoryBean();
//2.设置参数
//2.1设置访问地址
factoryBean.setAddress("http://localhost:8888/userService");
//2.2设置实现类对象
factoryBean.setServiceBean(new UserServiceImpl());
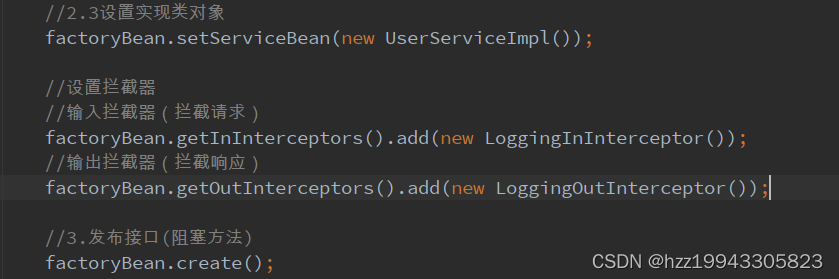
//设置拦截器
//输入拦截器(拦截请求)
factoryBean.getInInterceptors().add(new LoggingInInterceptor());
//输出拦截器(拦截响应)
factoryBean.getOutInterceptors().add(new LoggingOutInterceptor());
//3.发布接口(阻塞方法)
factoryBean.create();
System.out.println("WebService发布成功");
}
}运行ServerDemo中的main方法
2)客户端
a、创建maven工程,服饰服务端的实体类,导入依赖如下
<dependencies>
        <!--CXF WebClient工具类所在的包-->
        <dependency>
            <groupId>org.apache.cxf</groupId>
            <artifactId>cxf-rt-rs-client</artifactId>
            <version>3.0.1</version>
        </dependency>

        <dependency>
            <groupId>junit</groupId>
            <artifactId>junit</artifactId>
            <version>4.11</version>
        </dependency>
    </dependencies>
b、创建ClientDemo类如下
package com.hzz.test;

import com.hzz.domain.User;
import org.apache.cxf.jaxrs.client.WebClient;
import org.junit.Test;

/**
 * @Author: curry
 * @Date: Created in 14:33 2022/7/20
 * @Modified By:
 * @description:
 */
public class ClientDemo {


    @Test
    public void testSaveUser(){
        //1.发送POST请求
        WebClient.create("http://localhost:8888/userService")
        .post(new User(1,"小张","男"));

    }
}
c、运行ClientDemo类中的测试方法,服务端控制台如下则曾明成功通信

3.4 使用JAX-RS进行常见的CRUD操作
由于JAX-RS是基于restful风格进行通信,使用JAX-RS进行CRUD操作要对应接口方法中的请求方式(POST、PUT、DELETE、GET);
package com.hzz.test;

import com.hzz.domain.User;
import org.apache.cxf.jaxrs.client.WebClient;
import org.junit.Test;

import java.util.List;

/**
 * @Author: curry
 * @Date: Created in 14:33 2022/7/20
 * @Modified By:
 * @description:
 */
public class ClientDemo {

    /**
     * 增加
     */
    @Test
    public void testSaveUser(){
        //1.发送POST请求
        WebClient.create("http://localhost:8888/userService")
        .post(new User(1,"小张","男"));

    }

    /**
     * 删除
     */
    @Test
    public void testDeleteUser(){
        //1.发送DELETE请求
        WebClient.create("http://localhost:8888/userService/10")
                .delete();

    }

    /**
     * 修改
     */
    @Test
    public void testUpdateUser(){
        //1.发送PUT请求
        WebClient.create("http://localhost:8888/userService")
                .put(new User(1,"小张","男"));

    }

    /**
     * 查询所有用户
     */
    @Test
    public void testFindAllUser(){
        //1.发送GET 请求
        List<User> userList =(List<User>) WebClient.create("http://localhost:8888/userService")
                .getCollection(User.class);

        for (User user : userList) {
            System.out.println(user);
        }

    }

    /**
     *  查询一个用户
     */
    @Test
    public void testFindUserById(){
        //1.发送GET请求
       User user =  WebClient.create("http://localhost:8888/userService/2")
                .get(User.class);

        System.out.println(user);

    }
}
3.5 JAX-RS服务端和客户端之间传递json数据
a、由于服务端和客户端之间传递的shijson数据,所以要有json数据的转换,在服务端和客户端中导入转换json的依赖。依赖如下
<!--装换json-->
        <dependency>
            <groupId>org.apache.cxf</groupId>
            <artifactId>cxf-rt-rs-extension-providers</artifactId>
            <version>3.0.1</version>
        </dependency>
        <dependency>
            <groupId>org.codehaus.jettison</groupId>
            <artifactId>jettison</artifactId>
            <version>1.3.7</version>
        </dependency>
b、在服务端的接口方法上加上@Produces(MediaType.APPLICATION_JSON) 注解,同时在客户端的发送请求的方法中加上.accept(MediaType.APPLICATION_JSON)。代码截图如下

4、SpringBoot整合CXF
4.1 SpringBoot整合JAX-WS方式
1)服务端
服务端目录结构如下:
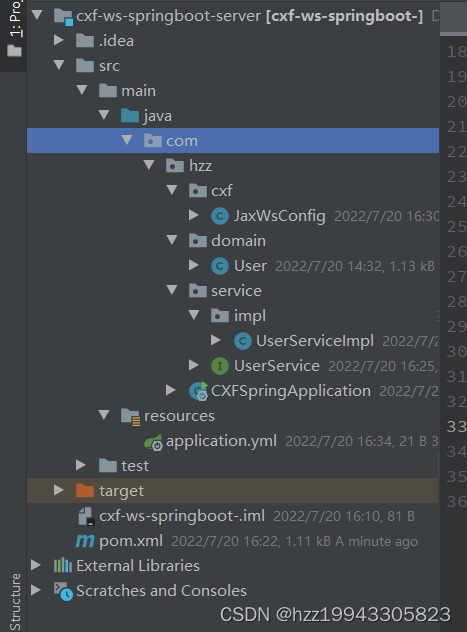
a、创建maven工程,导入依赖,依赖如下。复制前面工程的domain,service包
<!--SpringBoot父工程-->
    <parent>
        <groupId>org.springframework.boot</groupId>
        <artifactId>spring-boot-starter-parent</artifactId>
        <version>1.5.4.RELEASE</version>
    </parent>

    <dependencies>
        <!--web支持,SpringMVC,Servlet等-->
        <dependency>
            <groupId>org.springframework.boot</groupId>
            <artifactId>spring-boot-starter-web</artifactId>
        </dependency>

        <!-- CXF-WS -->
        <dependency>
            <groupId>org.apache.cxf</groupId>
            <artifactId>cxf-spring-boot-starter-jaxws</artifactId>
            <version>3.1.11</version>
        </dependency>
    </dependencies>
b、UserService接口
package com.hzz.service;

import com.hzz.domain.User;


import javax.jws.WebService;
import java.util.List;

/**
 * @Author: curry
 * @Date: Created in 16:51 2022/7/19
 * @Modified By:
 * @description:
 */

@WebService
public interface UserService {


    public void saveUser(User user);


    public void updateUser(User user);


    public void deleteUser( Integer id);


    public List<User> findAllUser();


    public User findById( Integer id);
}
c、userServiceImpl实现类
package com.hzz.service.impl;

import com.hzz.domain.User;
import com.hzz.service.UserService;
import org.springframework.stereotype.Service;

import java.util.ArrayList;
import java.util.List;

/**
 * @Author: curry
 * @Date: Created in 16:58 2022/7/19
 * @Modified By:
 * @description:
 */
@Service
public class UserServiceImpl implements UserService {


    @Override
    public void saveUser(User user) {
        System.out.println("新增用户"+user);
    }

    @Override
    public void updateUser(User user) {
        System.out.println("修改用户"+user);
    }

    @Override
    public void deleteUser(Integer id) {
        System.out.println("删除用户"+id);
    }

    @Override
    public List<User> findAllUser() {

        List<User> userList = new ArrayList<>();
        userList.add(new User(1,"张三","男"));
        userList.add(new User(2,"洛溪","女"));
        userList.add(new User(3,"牡丹","妖"));

        return userList;
    }

    @Override
    public User findById(Integer id) {
        return new User(1,"卢瑟","男");
    }
}
d、编写JaxWsConfig配置类
package com.hzz.cxf;

import com.hzz.service.UserService;
import org.apache.cxf.Bus;
import org.apache.cxf.jaxws.EndpointImpl;
import org.springframework.beans.factory.annotation.Autowired;
import org.springframework.context.annotation.Bean;
import org.springframework.context.annotation.Configuration;

import javax.annotation.Resource;
import javax.xml.ws.Endpoint;

/**
 * @Author: curry
 * @Date: Created in 16:26 2022/7/20
 * @Modified By:
 * @description:
 */
@Configuration
public class JaxWsConfig {

    @Resource
    private Bus bus;

    @Autowired
    private UserService userService;

    @Bean
    public Endpoint createEndpoint(){
        Endpoint endpoint = new EndpointImpl(bus,userService);
        endpoint.publish("/userService");
        return endpoint;
    }

}
启动该项目
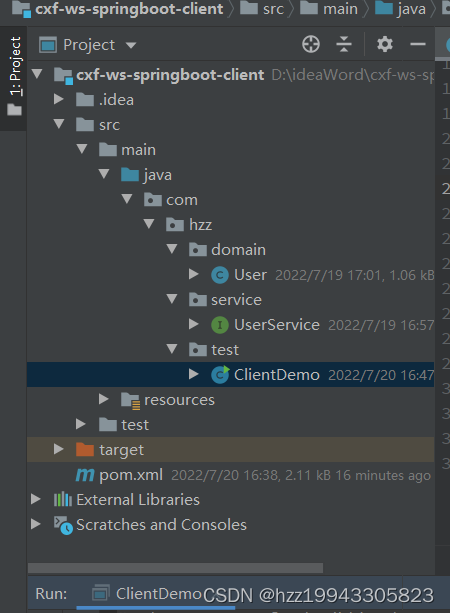
2)客户端
客户端是一个普通的maven工程,目录结构如下:
a、依赖
<dependencies>

        <!-- https://mvnrepository.com/artifact/org.springframework/spring-web -->
        <dependency>
            <groupId>org.springframework</groupId>
            <artifactId>spring-web</artifactId>
            <version>5.3.14</version>
        </dependency>


        <!--cxf对jaxws的支持-->
        <dependency>
            <groupId>org.apache.cxf</groupId>
            <artifactId>cxf-rt-frontend-jaxws</artifactId>
            <version>3.0.1</version>
        </dependency>

        <!-- https://mvnrepository.com/artifact/org.apache.cxf/cxf-rt-transports-http -->
        <dependency>
            <groupId>org.apache.cxf</groupId>
            <artifactId>cxf-rt-transports-http</artifactId>
            <version>3.0.1</version>
        </dependency>


        <!--spring框架-->
        <dependency>
            <groupId>org.springframework</groupId>
            <artifactId>spring-context</artifactId>
            <version>4.2.0.RELEASE</version>
        </dependency>
        <dependency>
            <groupId>org.springframework</groupId>
            <artifactId>spring-context-support</artifactId>
            <version>4.2.0.RELEASE</version>
        </dependency>
        <dependency>
            <groupId>org.springframework</groupId>
            <artifactId>spring-test</artifactId>
            <version>4.2.0.RELEASE</version>
        </dependency>

        <!--junit测试框架-->
        <dependency>
            <groupId>junit</groupId>
            <artifactId>junit</artifactId>
            <version>4.11</version>
            <scope>test </scope>
        </dependency>
    </dependencies>
b、ClientDemo类如下
注意:SpringBoot整合JaxWs工程url路径默认在端口后面加services 所以设置访问路径为
factory.setAddress("http://localhost:8088/services/userService");
package com.hzz.test;

import com.hzz.domain.User;
import com.hzz.service.UserService;
import org.apache.cxf.jaxws.JaxWsProxyFactoryBean;
import org.springframework.context.ApplicationContext;
import org.springframework.context.support.ClassPathXmlApplicationContext;

/**
 * @Author: curry
 * @Date: Created in 11:43 2022/7/20
 * @Modified By:
 * @description:
 */
public class ClientDemo {
    public static void main(String[] args) {
        //1.创建工厂
        JaxWsProxyFactoryBean factory=new JaxWsProxyFactoryBean();

        //2.设置参数
        //2.1设置访问路径
        factory.setAddress("http://localhost:8088/services/userService");

        //2.2设置接口
        factory.setServiceClass(UserService.class);

        //3.创建接口的代理对象
        UserService userService = (UserService)factory.create();

        userService.saveUser(new User(1,"王二","男"));
    }
}
c、启动客户端,服务端的控制台运行结果如下

4.2 SpringBoot整合JAX-RS方式
目录结构

a、服务端是一个SpringBoot工程,依赖如下
<!--SpringBoot父工程-->
    <parent>
        <groupId>org.springframework.boot</groupId>
        <artifactId>spring-boot-starter-parent</artifactId>
        <version>1.5.4.RELEASE</version>
    </parent>

    <dependencies>
        <!--web支持,SpringMVC,Servlet等-->
        <dependency>
            <groupId>org.springframework.boot</groupId>
            <artifactId>spring-boot-starter-web</artifactId>
        </dependency>

        <!-- CXF-RS -->
        <dependency>
            <groupId>org.apache.cxf</groupId>
            <artifactId>cxf-spring-boot-starter-jaxrs</artifactId>
            <version>3.1.11</version>
        </dependency>

        <!--装换json-->
        <dependency>
            <groupId>org.apache.cxf</groupId>
            <artifactId>cxf-rt-rs-extension-providers</artifactId>
            <version>3.1.11</version>
        </dependency>
        <dependency>
            <groupId>org.codehaus.jettison</groupId>
            <artifactId>jettison</artifactId>
            <version>1.3.7</version>
        </dependency>
    </dependencies>
b、应为JAX-RS基于restful风格,所以接口要遵守restful风格,userService接口如下
package com.hzz.service;

import com.hzz.domain.User;

import javax.ws.rs.*;
import javax.ws.rs.core.MediaType;
import java.util.List;

/**
 * @Author: curry
 * @Date: Created in 16:51 2022/7/19
 * @Modified By:
 * @description:  restful风格
 */

public interface UserService {

    @POST
    public void saveUser(User user);

    @PUT
    public void updateUser(User user);

    @DELETE
    @Path("/{id}")
    public void deleteUser(@PathParam("id") Integer id);

    @GET
    public List<User> findAllUser();

    @GET
    @Path("/{id}")
    @Produces(MediaType.APPLICATION_JSON)
    public User findById(@PathParam("id") Integer id);
}
c、userServiceImpl实现类如下
package com.hzz.service.impl;

import com.hzz.domain.User;
import com.hzz.service.UserService;
import org.springframework.stereotype.Service;

import java.util.ArrayList;
import java.util.List;

/**
 * @Author: curry
 * @Date: Created in 16:58 2022/7/19
 * @Modified By:
 * @description:
 */
@Service
public class UserServiceImpl implements UserService {


    @Override
    public void saveUser(User user) {
        System.out.println("新增用户"+user);
    }

    @Override
    public void updateUser(User user) {
        System.out.println("修改用户"+user);
    }

    @Override
    public void deleteUser(Integer id) {
        System.out.println("删除用户"+id);
    }

    @Override
    public List<User> findAllUser() {

        List<User> userList = new ArrayList<>();
        userList.add(new User(1,"张三","男"));
        userList.add(new User(2,"洛溪","女"));
        userList.add(new User(3,"牡丹","妖"));

        return userList;
    }

    @Override
    public User findById(Integer id) {
        return new User(1,"卢瑟","男");
    }
}
d、编写JaxWsConfig配置类
package com.hzz.cxf;

import com.hzz.service.UserService;
import org.apache.cxf.Bus;
import org.apache.cxf.endpoint.Server;
import org.apache.cxf.jaxrs.JAXRSServerFactoryBean;
import org.springframework.beans.factory.annotation.Autowired;
import org.springframework.context.annotation.Bean;
import org.springframework.context.annotation.Configuration;

/**
 * @Author: curry
 * @Date: Created in 17:13 2022/7/20
 * @Modified By:
 * @description:
 */
@Configuration
public class JaxRsConfig {

    @Autowired
    private Bus bus;

    @Autowired
    private UserService userService;

    @Bean
    public Server createServer(){

        JAXRSServerFactoryBean endpoint = new JAXRSServerFactoryBean();

        //设置参数
        //设置访问地址
        endpoint.setAddress("/userService");
        //设置Bus
        endpoint.setBus(bus);
        //设置实体类对象
        endpoint.setServiceBean(userService);

        return endpoint.create();
    }
}
运行服务端代码
2)客户端
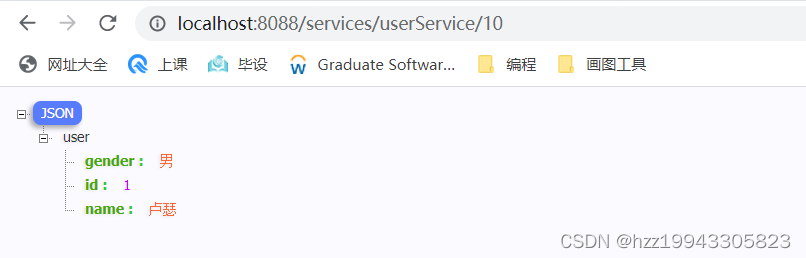
客户端这里省略,直接在浏览器输入http://localhost:8088/services/userService/10 模仿客户端
得到运行结果如下图所示,标识成功调用服务端


 1万+
1万+


 被折叠的 条评论
为什么被折叠?
被折叠的 条评论
为什么被折叠?
 到【灌水乐园】发言


