


一、struts2中的拦截器(框架功能核心)
1、过滤器VS拦截器
过滤器VS拦截器功能是一回事。过滤器是Servlet规范中的技术,可以对请求和响应进行过滤。
拦截器是Struts2框架中的技术,实现AOP(面向切面)的编程思想,是可插拔的, 可以对访问某个 Action 方法之前或之后实施拦截。
拦截器栈(Interceptor Stack): 将拦截器按一定的顺序联结成一条链. 在访问被拦截的方法时, Struts2拦截器链中的拦截器就会按其之前定义的顺序被依次调用
Struts2执行原理 - 底层分析

2、自定义拦截器
struts2定义了一个拦截器接口Interceptor接口。
Interceptor接口里面有三个抽象方法

- init: 该方法将在拦截器被创建后立即被调用, 它在拦截器的生命周期内只被调用一次. 可以在该方法中对相关资源进行必要的初始化
- interecept: 每拦截一个动作请求, 该方法就会被调用一次.
- destroy: 该方法将在拦截器被销毁之前被调用, 它在拦截器的生命周期内也只被调用一次.
Struts 会依次调用程序员为某个 Action 而注册的每一个拦截器的 interecept 方法.每次调用 interecept 方法时, Struts 会传递一个 ActionInvocation 接口的实例.
ActionInvocation: 代表一个给定动作的执行状态, 拦截器可以从该类的对象里获得与该动作相关联的 Action 对象和 Result 对象. 在完成拦截器自己的任务之后, 拦截器将调用 ActionInvocation 对象的 invoke 方法前进到 Action 处理流程的下一个环节.
还可以调用 ActionInvocation 对象的 addPreResultListener 方法给 ActionInvocation 对象 “挂” 上一个或多个 PreResultListener 监听器. 该监听器对象可以在动作执行完毕之后, 开始执行动作结果之前做些事情
自定义拦截器步骤:
a、编写一个类,实现com.opensymphony.xwork2.interceptor.Interceptor接口,或者继承
com.opensymphony.xwork2.interceptor.AbstractInterceptor类。(适配器模式),一般都选择继承AbstractInterceptor(拦截器会驻留内存)。因为AbstractInterceptor 类实现了 Interceptor 接口. 并为 init, destroy 提供了一个空白的实现
编写两个拦截器InterceptorDemo1 ,和InterceptorDemo2
package com.itheima.interceptor;

import com.opensymphony.xwork2.ActionInvocation;
import com.opensymphony.xwork2.interceptor.AbstractInterceptor;

public class InterceptorDemo1 extends AbstractInterceptor {
    //动作的每次访问都会调用该方法
    public String intercept(ActionInvocation invocation) throws Exception {
        System.out.println("拦截前Demo1");
        String rtvalue = invocation.invoke();//放行,这里为什么返回string?
因为最终的结果返回的Action的Result,而action的结果是string类型
        System.out.println("拦截后Demo1");
        return rtvalue;
    }

}
package com.itheima.interceptor;
import com.opensymphony.xwork2.ActionInvocation;
import com.opensymphony.xwork2.interceptor.AbstractInterceptor;
import com.opensymphony.xwork2.interceptor.PreResultListener;
public class InterceptorDemo2 extends AbstractInterceptor {
//动作的每次访问都会调用该方法
public String intercept(ActionInvocation invocation) throws Exception {
// invocation.addPreResultListener(new PreResultListener() {
//
// public void beforeResult(ActionInvocation invocation, String resultCode) {
// System.out.println("结果显示前");
// }
// });
System.out.println("拦截前Demo2");
String rtvalue = invocation.invoke();//放行
System.out.println("拦截后Demo2");
return rtvalue;
}
}
b、需要在struts.xml中进行定义,定义拦截器,先定义在使用。
<package name="p1" extends="struts-default">
    <!-- 定义拦截器:只对当前包有效 -->
    <interceptors>
        <interceptor name="interceprotDemo1" class="com.itheima.interceptor.InterceptorDemo1"></interceptor>
        <interceptor name="interceprotDemo2" class="com.itheima.interceptor.InterceptorDemo2"></interceptor>
    </interceptors>

</package>
c、在动作配置中就可以使用了
<action name="action1" class="com.itheima.action.Demo1Action" method="execute">
        <!-- 使用定义的拦截器。如过没有指定任何的拦截器,默认使用default-stack栈中的所有拦截器;
            一旦指定了任何一个拦截器,默认的就无效了
         -->
         <interceptor-ref name="interceprotDemo1"></interceptor-ref>
         <interceptor-ref name="interceprotDemo2"></interceptor-ref>
         <result>/success.jsp</result>
</action>
实现动作类Demo1Action
package com.itheima.action;

import com.opensymphony.xwork2.ActionSupport;

public class Demo1Action extends ActionSupport {

    @Override
    public String execute() throws Exception {
        System.out.println("execute执行了");
        return SUCCESS;
    }

}
运行结果
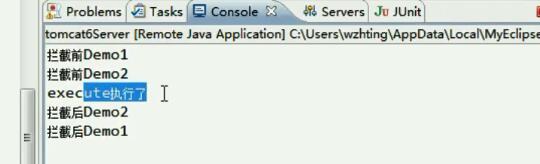
因为struts2中如文件上传,数据验证,封装请求参数到action等功能都是由系统默认的defaultStack中的拦截器实现的,所以我们定义的拦截器需要引用系统默认的defaultStack,这样应用才可以使用struts2框架提供的众多功能。
如过没有指定任何的拦截器,默认使用default-stack栈中的所有拦截器;一旦指定了任何一个拦截器,默认的就无效了除了要使用自定义的拦截器之外,还要使用defaultStack,可以这么办
方法一:(自己使用),只需在action中配置自定义的和defaultStack默认的就可以了。

方法二:(大家都用的时候),如果希望包下的所有action都使用自定义的拦截器, 要使用拦截器栈 interceptor-stack,定义一个interceptor-stack,然后在action中可以通过<default-interceptor-ref name=“mydefaultStack”/>把拦截器定义为默认拦截器,mydefaultStack名字可以自己取。
<interceptors>
<interceptor name="interceprotDemo1" class="com.itheima.interceptor.InterceptorDemo1"></interceptor>
<interceptor name="interceprotDemo2" class="com.itheima.interceptor.InterceptorDemo2"></interceptor>
<interceptor-stack name="mydefaultStack">
<interceptor-ref name="defaultStack"></interceptor-ref>
<interceptor-ref name="interceprotDemo1"></interceptor-ref>
<interceptor-ref name="interceprotDemo2"></interceptor-ref>
</interceptor-stack>
</interceptors>
<action name="action3" class="com.itheima.action.LoginAction" method="login">
<interceptor-ref name="mydefaultStack"></interceptor-ref>
<result>/success.jsp</result>
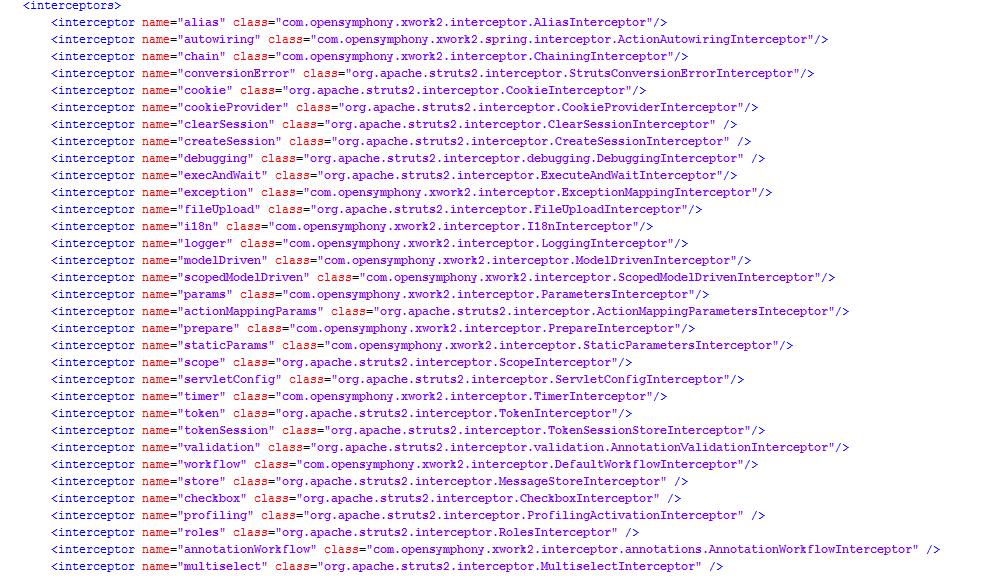
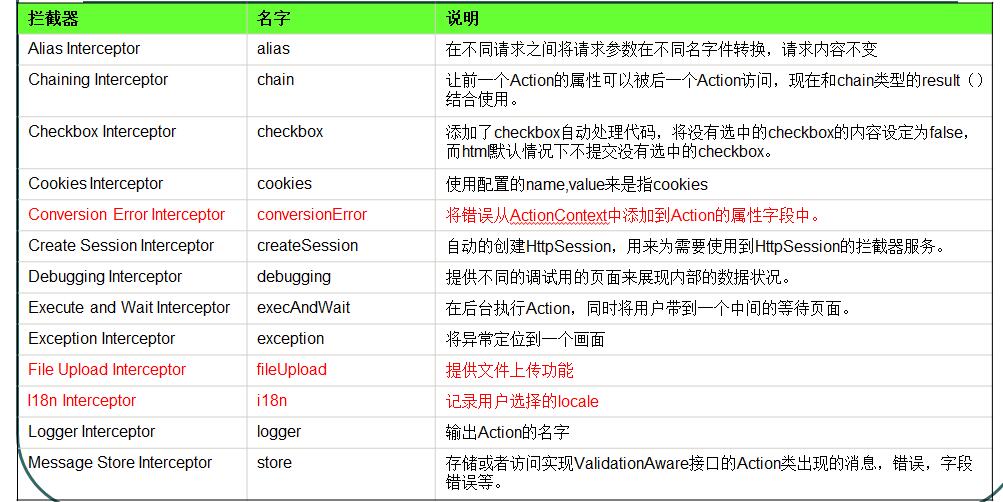
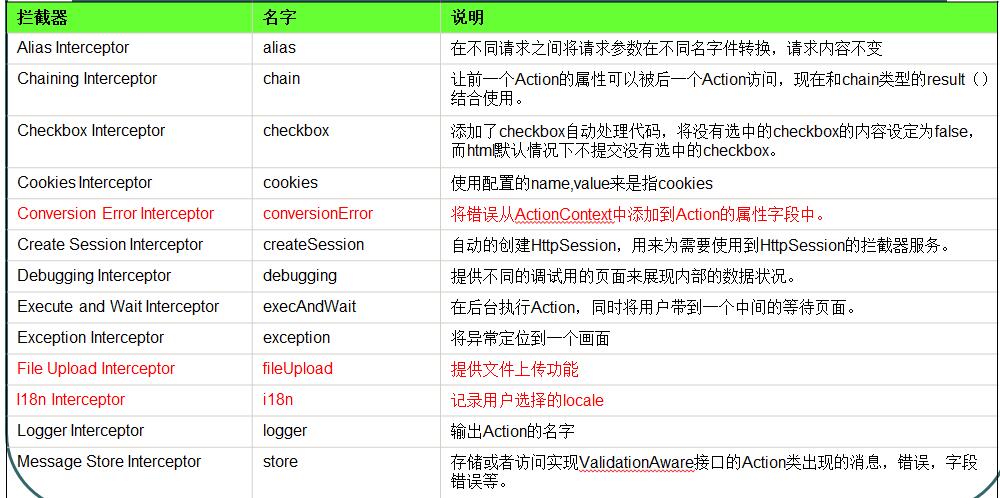
</action>3、Struts2 自带的拦截器
案例1:检查用户是否登录
1、 编写页面login.jsp
  <body>
    <form action="${pageContext.request.contextPath}/login.action" method="post">
        <input type="text" name="username"/><br/>
        <input type="text" name="password"/><br/>
        <input type="submit" value="登录"/>
    </form>
  </body>
2、编写登录校验的拦截器LoginCheckInterceptor 类
package com.itheima.interceptor;

import javax.servlet.http.HttpSession;

import org.apache.struts2.ServletActionContext;

import com.opensymphony.xwork2.ActionInvocation;
import com.opensymphony.xwork2.interceptor.AbstractInterceptor;

public class LoginCheckInterceptor extends AbstractInterceptor {

    public String intercept(ActionInvocation invocation) throws Exception {
        HttpSession session = ServletActionContext.getRequest().getSession();//通过ServletActionContext对象获得session对象
        Object user = session.getAttribute("user");
        if(user==null){
            //没有登录
            return "login";//返回到某个逻辑视图
        }
        return invocation.invoke();//放行
    }

}
3、编写配置文件struts.xml
<package name="p2" extends="struts-default">
        <interceptors>
            <interceptor name="loginCheckInterceptor" class="com.itheima.interceptor.LoginCheckInterceptor"></interceptor>
            <interceptor-stack name="mydefaultStack">
                <interceptor-ref name="defaultStack"></interceptor-ref>
                <interceptor-ref name="loginCheckInterceptor"></interceptor-ref>
            </interceptor-stack>
        </interceptors>
        <action name="login" class="com.itheima.action.CustomerAction" method="login">
            <result>/login.jsp</result>
        </action>
    </package>
4、编写动作类CustomerAction
package com.itheima.action;

import org.apache.struts2.ServletActionContext;

import com.opensymphony.xwork2.ActionSupport;

public class CustomerAction extends ActionSupport {
    public String login(){
        System.out.println("登录");
        ServletActionContext.getRequest().getSession().setAttribute("user", "ppp");
        return SUCCESS;
    }
}
案例2:监测动作方法的执行效率
编写时间监测过滤器TimerInterceptor
package com.itheima.interceptor;

import com.opensymphony.xwork2.ActionInvocation;
import com.opensymphony.xwork2.interceptor.AbstractInterceptor;

public class TimerInterceptor extends AbstractInterceptor {

    public String intercept(ActionInvocation invocation) throws Exception {
        long time = System.nanoTime();
        String rtvalue = invocation.invoke();
        System.out.println(rtvalue+"执行耗时:"+(System.nanoTime()-time)+"纳秒");
        return rtvalue;
    }

}
编写配置文件
<package name="p2" extends="struts-default">
        <interceptors>
            <interceptor name="loginCheckInterceptor" class="com.itheima.interceptor.LoginCheckInterceptor"></interceptor>
            <interceptor name="timerInterceptor" class="com.itheima.interceptor.TimerInterceptor"></interceptor>
            <interceptor-stack name="mydefaultStack">
                <interceptor-ref name="defaultStack"></interceptor-ref>
                <interceptor-ref name="loginCheckInterceptor"></interceptor-ref>
                <interceptor-ref name="timerInterceptor"></interceptor-ref>
            </interceptor-stack>
        </interceptors>
            <result name="login">/login.jsp</result>
        </action>
    </package>
从上面可以看出,在一个action 中可以配置多个过滤器。
4、自定义拦截器:能够指定拦截的方法或不拦截的方法
能够指定拦截的方法或不拦截的方法,编写过滤器时,可以实现类MethodFilterInterceptor,里面有两个字段,通过注入参数就可以指定那些不拦截,两个参数只要用一个即可,当拦截较少是,可以用includeMethods ,当拦截较多是,可以用排除的方法excludeMethods 。
excludeMethods = Collections.emptySet();//排除那些
includeMethods = Collections.emptySet();//包括那些案例:再续登录校验的例子。
1、编写过滤器LoginCheckInterceptor
package com.itheima.interceptor;

import javax.servlet.http.HttpSession;

import org.apache.struts2.ServletActionContext;

import com.opensymphony.xwork2.ActionInvocation;
import com.opensymphony.xwork2.interceptor.AbstractInterceptor;
import com.opensymphony.xwork2.interceptor.MethodFilterInterceptor;

public class LoginCheckInterceptor extends MethodFilterInterceptor {
    protected String doIntercept(ActionInvocation invocation) throws Exception {
        HttpSession session = ServletActionContext.getRequest().getSession();
        Object user = session.getAttribute("user");
        if(user==null){
            //没有登录
            return "login";//返回到某个逻辑视图
        }
        return invocation.invoke();//放行
    }

}
2、编写配置文件

3、编写动作类CustomerAction
package com.itheima.action;

import org.apache.struts2.ServletActionContext;

import com.opensymphony.xwork2.ActionSupport;

public class CustomerAction extends ActionSupport {
    public String add(){
        System.out.println("调用add的service方法");
        return SUCCESS;
    }
    public String edit(){
        System.out.println("调用edit的service方法");
        return SUCCESS;
    }
    public String login(){
        System.out.println("登录");
        ServletActionContext.getRequest().getSession().setAttribute("user", "ppp");
        return SUCCESS;
    }
}
4、编写页面
addCustomer.jsp
 <body>
    添加客户
  </body>
editCustomer.jsp
  <body>
   修改客户
  </body>
login.jsp
  <body>
    <form action="${pageContext.request.contextPath}/login.action" method="post">
        <input type="text" name="username"/><br/>
        <input type="text" name="password"/><br/>
        <input type="submit" value="登录"/>
    </form>
  </body>
success.jsp
  <body>
    oyeah
  </body>
二、文件上传与下载
Struts2开发的三板斧,页面jsp—配置文件struts2.xml—-还有动作类Action
文件上传前提:
form表单的method必须是post
form表单的enctype必须是multipart/form-data
提供type=”file”的上传输入域
Struts 对文件上传的支持的一些规则
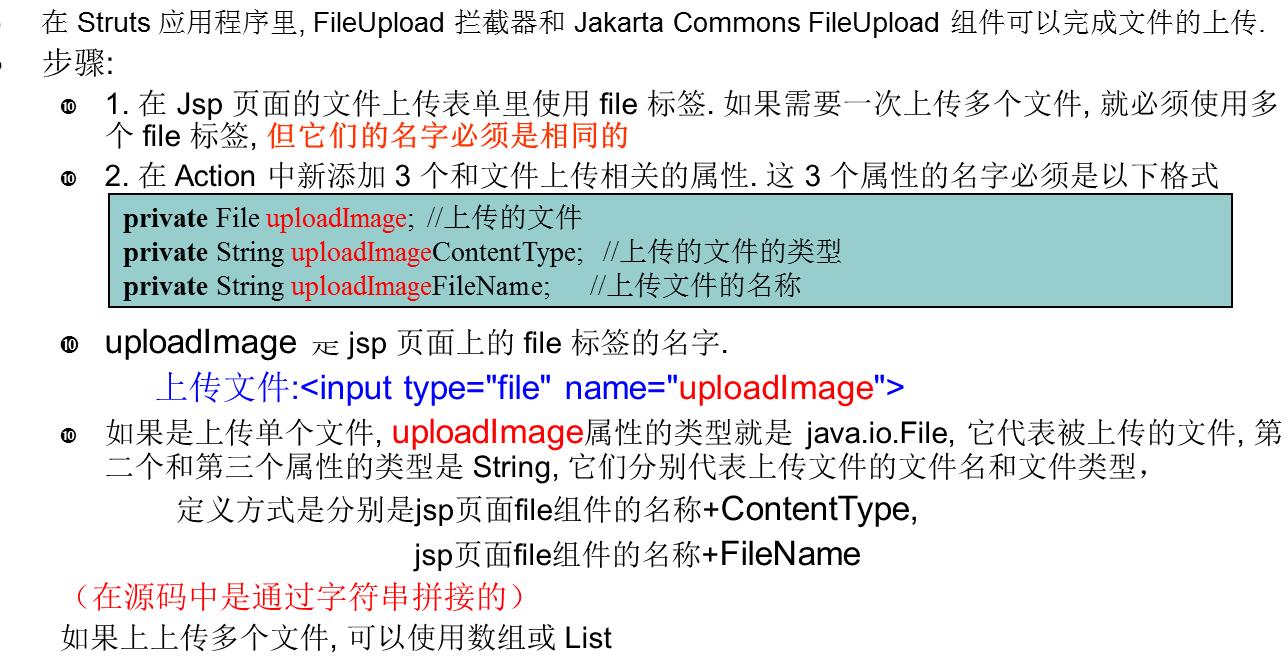
1、单文件上传
开发步骤:
1、在WEB-INF/lib下加入commons-fileupload-1.2.1.jar、commons-io-1.3.2.jar。这两个文件可以从http://commons.apache.org/下载
2、第二步:编写upfile.jsp ,把form表的enctype设置为:“multipart/form-data“,如下:
<%@ page language="java" import="java.util.*" pageEncoding="UTF-8"%>
<%@ taglib uri="/struts-tags" prefix="s"%>
<body>
    <s:actionerror/>
    <hr/>
    <s:fielderror></s:fielderror>
    <form action="${pageContext.request.contextPath}/upload1.action" method="post" enctype="multipart/form-data"><!-- 以MIME的方式传递
-->
        用户名:<input type="text" name="username"/><br/>
        靓照:<input type="file" name="photo"/><br/>
        <input type="submit" value="上传"/>
    </form>
  </body>
编写错误页面error.jsp
 <body>
    服务器忙,一会再试。
  </body>
success.jsp
  <body>
    上传成功
  </body>
3、编写UploadAction1 类:在Action类中添加属性,属性对应于表单中文件字段的名称:
package com.itheima.actions;

import java.io.File;
import java.io.IOException;

import org.apache.commons.io.FileUtils;
import org.apache.struts2.ServletActionContext;

import com.opensymphony.xwork2.ActionSupport;
//文件上传:fileUpload拦截器完成的
public class UploadAction1 extends ActionSupport {

    private String username;
    private File photo;//和表单的上传字段名保持一致。类型是File类型的
    private String photoFileName;//上传的文件名
    private String photoContentType;//上传文件的MIME类型

    //省略getter和setter方法
    public String upload(){
        System.out.println(photoFileName+":"+photoContentType);
        //普通字段:
        System.out.println(username);
        //上传字段:上传到某个文件夹。存到应用的images目录下
        String realPath = ServletActionContext.getServletContext().getRealPath("/images");
        File directory = new File(realPath);
        if(!directory.exists()){
            directory.mkdirs();
        }
        try {
            FileUtils.copyFile(photo, new File(directory, photoFileName));
            return SUCCESS;
        } catch (IOException e) {
            e.printStackTrace();
            return ERROR;
        }

    }
}
在struts.xml文件中增加如下配置
<action name="upload1" class="com.itheima.actions.UploadAction1" method="upload">
    <interceptor-ref name="defaultStack">
        <param name="fileUpload.allowedTypes">image/jpeg,image/png</param>
        <param name="fileUpload.allowedExtensionsSet">jpg,jpeg,png</param>
    </interceptor-ref>
    <result>/success.jsp</result>
    <result name="error">/error.jsp</result>
    <result name="input">/index.jsp</result>
</action>
原理分析:
a 、FileUpload 拦截器负责处理文件的上传操作, 它是默认的 defaultStack 拦截器栈的一员. 拦截器有 3 个属性可以设置.
- maximumSize: 上传文件的最大长度(以字节为单位), 默认值为 2 MB
- allowedTypes: 允许上传文件的类型, 各类型之间以逗号分隔
- allowedExtensions: 允许上传文件扩展名, 各扩展名之间以逗号分隔
可以在 struts.xml 文件中覆盖这 3 个属性

b、超出大小或非法文件的上传,会报错(转向一个input的视图)
通过:
<s:actionError/> <s:feildError/>显示错误消息的提示
c、错误消息提示改为中文版:借助国际化的消息资源文件
如果是通过配置全局默认参数引起的错误,最好用全局的消息资源文件。
struts2默认的提示资源文件:struts2-core-**.jar 的org.apache.struts2的struts-message.properties文件中。比着key值覆盖对应的value即可。
配置如下:
struts.messages.error.uploading=Error uploading: {0}
struts.messages.error.file.too.large=File too large: {0} "{1}" "{2}" {3}
struts.messages.error.content.type.not.allowed=Content-Type not allowed: {0} "{1}" "{2}" {3}
struts.messages.error.file.extension.not.allowed=File extension not allowed: {0} "{1}" "{2}" {3}{0}:<input type=“file” name=“uploadImage”>中name属性的值
{1}:上传文件的真实名称
{2}:上传文件保存到临时目录的名称
{3}:上传文件的类型(对struts.messages.error.file.too.large是上传文件的大小)
源码:

修改显示错误的资源文件的信息
第一步:创建新的资源文件 例如fileuploadmessage.properties,放置在src下
           在该资源文件中增加如下信息
struts.messages.error.uploading=上传错误: {0}
struts.messages.error.file.too.large=上传文件太大: {0} "{1}" "{2}" {3}
struts.messages.error.content.type.not.allowed=上传文件的类型不允许: {0} "{1}" "{2}" {3}
struts.messages.error.file.extension.not.allowed=上传文件的后缀名不允许: {0} "{1}" "{2}" {3}

 第二步:在struts.xml文件加载该资源文件

       <!-- 配置上传文件的出错信息的资源文件 -->
       <constant name="struts.custom.i18n.resources" value=“cn….xxx.fileuploadmessage“/>
2、多文件上传
上传多个文件, 可以使用数组或 List,其他和单文件上传类似。
package com.itheima.actions;

import java.io.File;
import java.io.IOException;

import org.apache.commons.io.FileUtils;
import org.apache.struts2.ServletActionContext;

import com.opensymphony.xwork2.ActionSupport;
//文件上传:fileUpload拦截器完成的
public class UploadAction2 extends ActionSupport {

    private String username;
    private File[] photo;//和表单的上传字段名保持一致。类型是File类型的 .数组或List
    private String[] photoFileName;//上传的文件名
    private String[] photoContentType;//上传文件的MIME类型

    public String upload(){
        //上传字段:上传到某个文件夹。存到应用的images目录下
        String realPath = ServletActionContext.getServletContext().getRealPath("/images");
        File directory = new File(realPath);
        if(!directory.exists()){
            directory.mkdirs();
        }
        try {
            for(int i=0;i<photo.length;i++){
                FileUtils.copyFile(photo[i], new File(directory, photoFileName[i]));
            }
            return SUCCESS;
        } catch (IOException e) {
            e.printStackTrace();
            return ERROR;
        }

    }
}
3、文件下载
原理:struts2提供了stream结果类型,该结果类型就是专门用于支持文件下载功能的
指定stream结果类型 需要指定一个 inputName参数,该参数指定一个输入流,提供被下载文件的入口
编码步骤:
1、动作类DownloadAction :
package com.itheima.actions;

import java.io.File;
import java.io.FileInputStream;
import java.io.FileNotFoundException;
import java.io.InputStream;
import java.net.URLEncoder;

import org.apache.commons.io.FilenameUtils;
import org.apache.struts2.ServletActionContext;

import com.opensymphony.xwork2.ActionSupport;

public class DownloadAction extends ActionSupport {
    private InputStream image;//用in有问题的
    private String filename;//文件名
    private long filesize;
    public InputStream getImage() {
        return image;
    }

    public void setImage(InputStream image) {
        this.image = image;
    }

    public String getFilename() {
        return filename;
    }

    public long getFilesize() {
        return filesize;
    }

    public String download() throws Exception{
        //给image字节流赋值
        String fileRealPath = ServletActionContext.getServletContext().getRealPath("/WEB-INF/classes/霉女.jpg");
        filename = FilenameUtils.getName(fileRealPath);
        //方式一:中文文件要进行URL编码
//      filename = URLEncoder.encode(filename, "UTF-8");
        filesize = new File(fileRealPath).length();
        System.out.println(filename);
        image = new FileInputStream(fileRealPath);
        return SUCCESS;
    }
}
struts.xml配置文件:主要是对stream类型的结果进行配置
<struts>
    <constant name="struts.devMode" value="true" />
    <constant name="struts.ognl.allowStaticMethodAccess" value="true" />
        <action name="download" class="com.itheima.actions.DownloadAction" method="download">
            <result type="stream">

                <param name="inputName">image</param><!--动作类中InputStream的字段名,需要在Action中提供getTargetFile方法,返回inputStream-->
                <param name="contentType">application/octet-stream</param><!--告诉浏览器响应头,文件的MIME格式,调用Action中的getContentType方法-->
                <!-- 在struts.xml中使用OGNL表达式获取动作类中属性的值。 调用动作类中的 getFilename()-->
                <!-- 中文文件名编码:方式二.使用OGNL表达式,调用URLEncode的静态方法 -->
                <!-- 默认OGNL调用静态方法是不行的,需要开启一个常量开关.struts.ognl.allowStaticMethodAccess=true -->
                <param name="contentDisposition">attachment;filename=${@java.net.URLEncoder@encode(filename,'UTF-8')}</param><!-- 告诉浏览器的下载方式-->
                <param name="contentLength">${filesize}</param>
            </result>
        </action>
    </package>
</struts>
拦截器和文件上传就写到这里了,好累!


 862
862

 被折叠的 条评论
为什么被折叠?
被折叠的 条评论
为什么被折叠?
 到【灌水乐园】发言


