


OWASP Firmware Security Testing Methodology
Whether network connected or standalone, firmware is the center of controlling any embedded device. As such, it is crucial to understand how firmware can be manipulated to perform unauthorized functions and potentially cripple the supporting ecosystem’s security. To get started with performing security testing and reverse engineering of firmware, use the following methodology as guidance when embarking on an upcoming assessment. The methodology is composed of nine stages tailored to enable security researchers, software developers, consultants, hobbyists, and Information Security professionals with conducting firmware security assessments.
Stage | Description |
1. Information gathering and reconnaissance | Acquire all relative technical and documentation details pertaining to the target device’s firmware |
2. Obtaining firmware | Attain firmware using one or more of the proposed methods listed |
3. Analyzing firmware | Examine the target firmware’s characteristics |
4. Extracting the filesystem | Carve filesystem contents from the target firmware |
5. Analyzing filesystem contents | Statically analyze extracted filesystem configuration files and binaries for vulnerabilities |
6. Emulating firmware | Emulate firmware files and components |
7. Dynamic analysis | Perform dynamic security testing against firmware and application interfaces |
8. Runtime analysis | Analyze compiled binaries during device runtime |
9. Binary Exploitation | Exploit identified vulnerabilities discovered in previous stages to attain root and/or code execution |
The following sections will further detail each stage with supporting examples where applicable. Consider visiting the OWASP Internet of Things Project page and GitHub repository for the latest methodology updates and forthcoming project releases.
A preconfigured Ubuntu virtual machine (EmbedOS) with firmware testing tools used throughout this document can be downloaded via the following link. Details regarding EmbedOS’ tools can be found on GitHub within the following repository https://github.com/scriptingxss/EmbedOS.
During this stage, collect as much information about the target as possible to understand its overall composition underlying technology. Attempt to gather the following:
-
Supported CPU architecture(s)
-
Operating system platform
-
Bootloader configurations
-
Hardware schematics
-
Datasheets
-
Lines-of-code (LoC) estimates
-
Source code repository location
-
Third-party components
-
Open source licenses (e.g. GPL)
-
Changelogs
-
FCC IDs
-
Design and data flow diagrams
-
Threat models
-
Previous penetration testing reports
-
Bug tracking tickets (e.g. Jira and bug bounty platforms such as BugCrowd or HackerOne)
The above listed information should be gathered prior to security testing fieldwork via a questionnaire or intake form. Ensure to leverage internal product line development teams to acquire accurate and up to date data. Understand applied security controls as well as roadmap items, known security issues, and most concerning risks. If needed, schedule follow up deep dives on particular features in question. Assessments are most successful within a collaborative environment.
Where possible, acquire data using open source intelligence (OSINT) tools and techniques. If open source software is used, download the repository and perform both manual as well as automated static analysis against the code base. Sometimes, open source software projects already use free static analysis tools provided by vendors that provide scan results such as Coverity Scan and Semmle’s LGTM. For example, the screenshots below shows snippets of Das U-Boot’s Coverity Scan results.
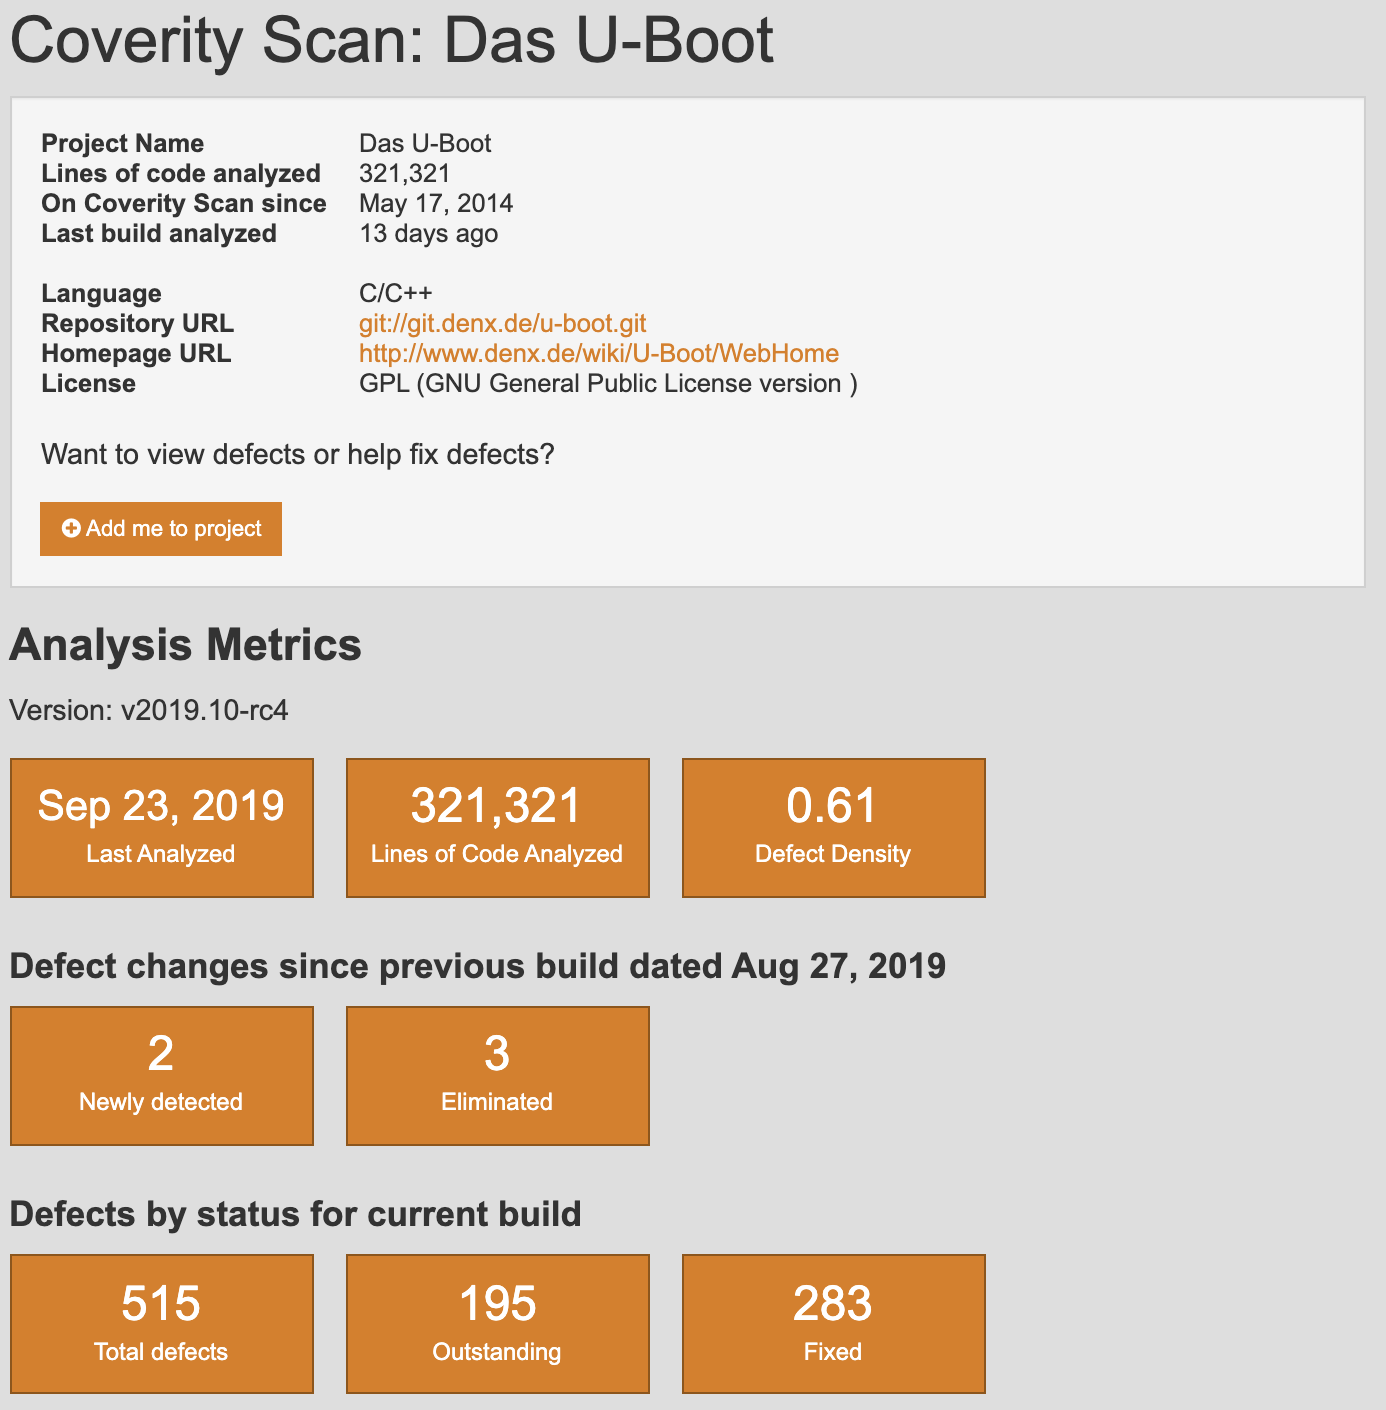
Figure : U-Boot Coverity Scan
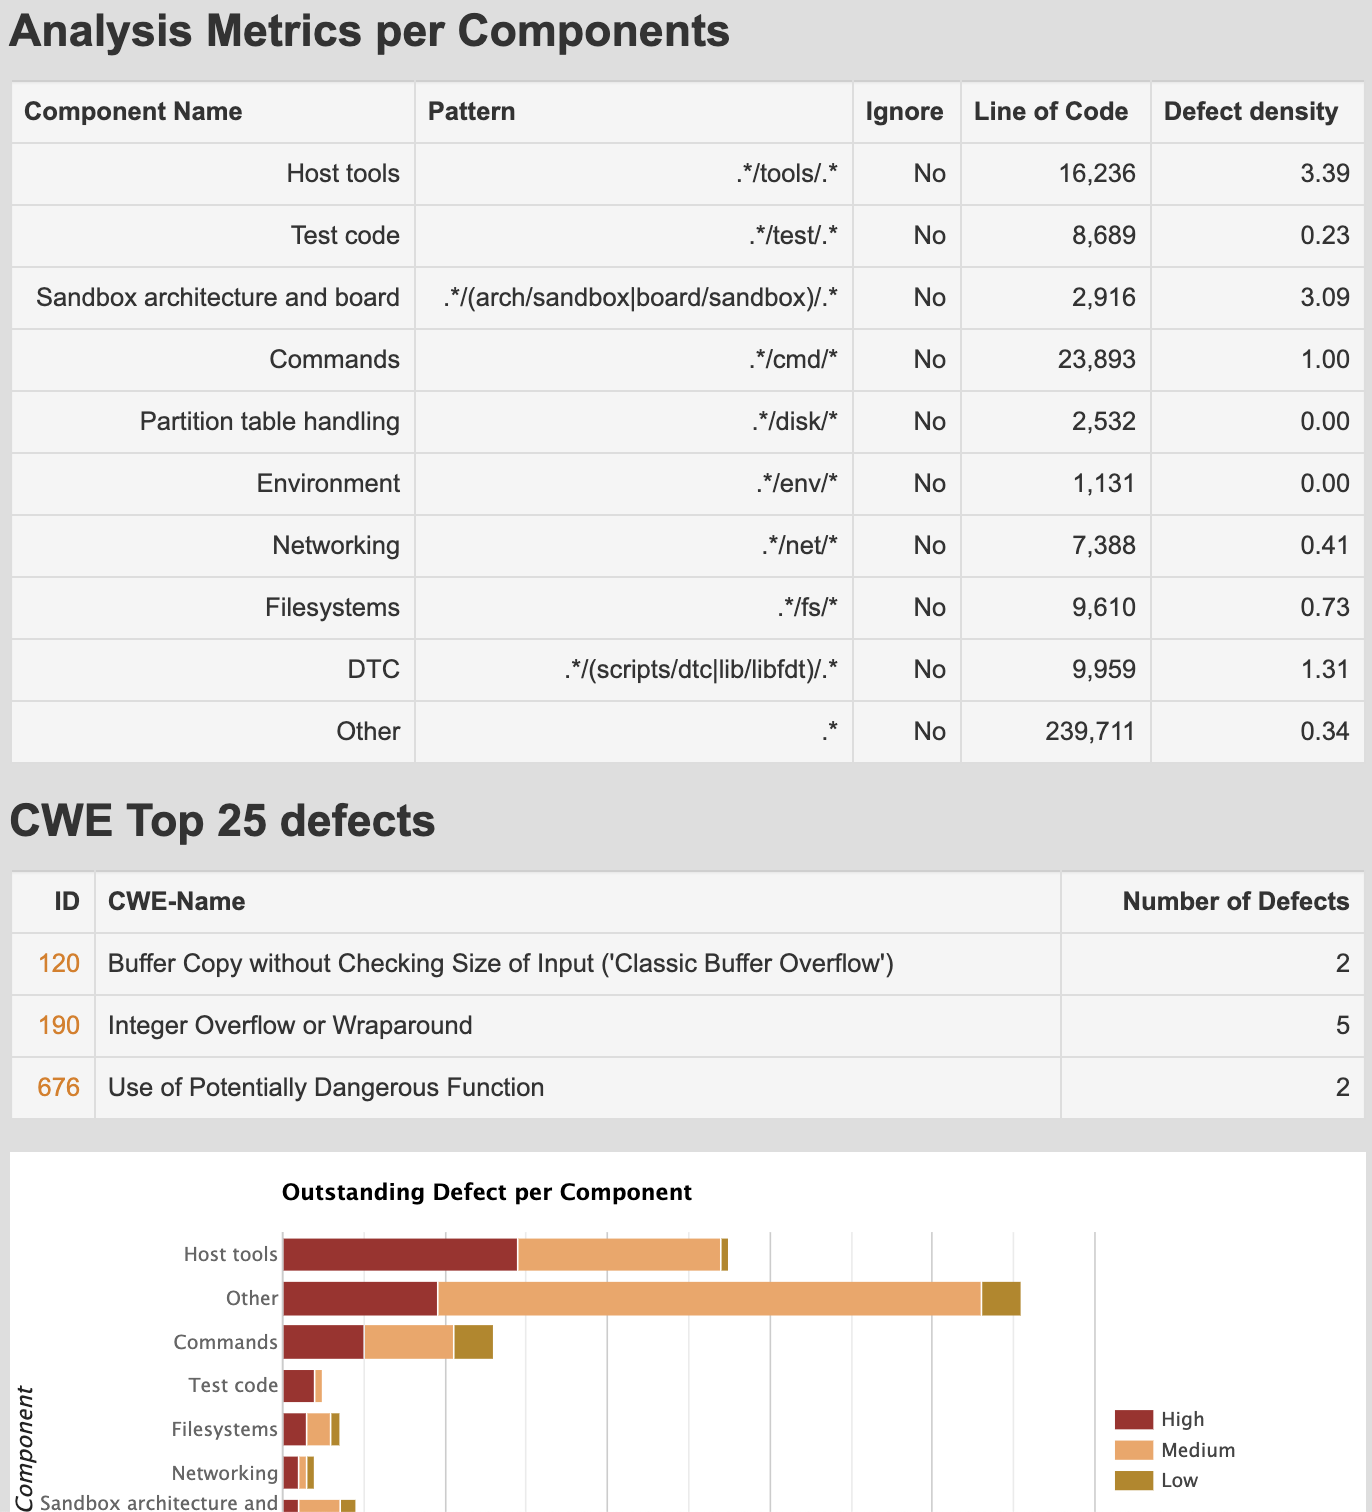
Figure : U-Boot Coverity Scan Analysis
Below are screenshots of Dropbear results from LGTM’s analysis.
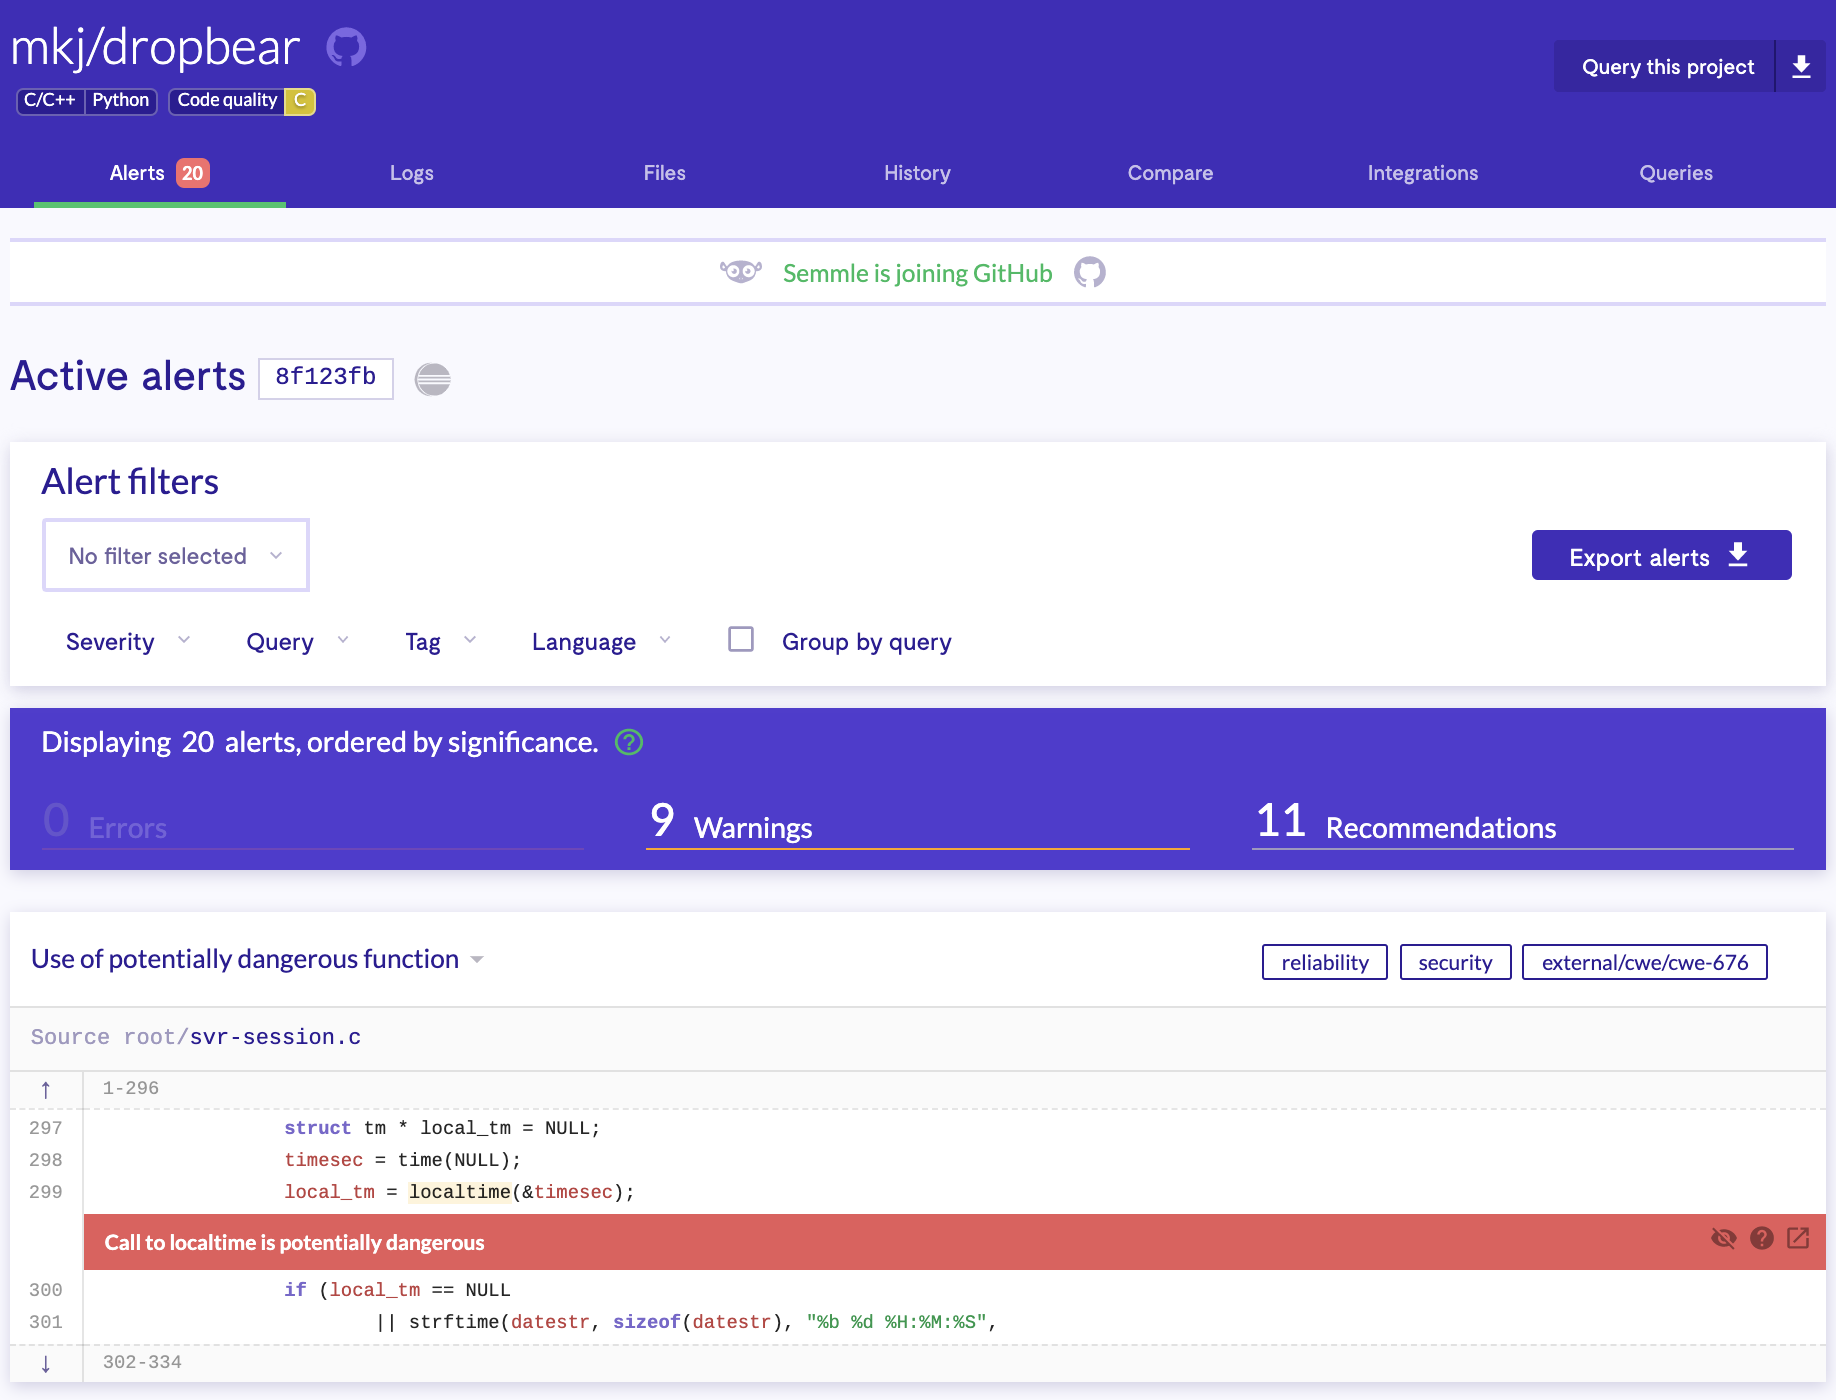
Figure : LGTM Dropbear Alerts

Figure : LGTM Dropbear Results
With the information at hand, a light threat model exercise should be performed mapping attack surfaces and impact areas that show the most value in the event of compromise.
To begin reviewing firmware contents, the firmware image file must be acquired. Attempt to obtain firmware contents using one or more of the following methods:
-
Directly from the development team, manufacturer/vendor or client
-
Build from scratch using walkthroughs provided by the manufacturer
-
From the vendor’s support site
-
Google dork queries targeted towards binary file extensions and file sharing platforms such as Dropbox, Box, and Google drive
-
It’s common to come across firmware images through customers who upload contents to forums, blogs, or comment on sites where they contacted the manufacturer to troubleshoot an issue and were given firmware via a zip or flash drive sent.
-
-
Man-in-the-middle (MITM) device communication during updates
-
Download builds from exposed cloud provider storage locations such as Amazon Web Services (AWS) S3 buckets
-
Extract directly from hardware via UART, JTAG, PICit, etc.
-
Sniff serial communication within hardware components for update server requests
-
Via a hardcoded endpoint within the mobile or thick applications
-
Dumping firmware from the bootloader (e.g. U-boot) to flash storage or over the network via tftp
-
Removing the flash chip (e.g. SPI) or MCU from the board for offline analysis and data extraction (LAST RESORT).
-
You will need a supported chip programmer for flash storage and/or the MCU.
-
Note: Ensure to follow local laws and regulations when downloading data from exposed cloud provider storage services.
Each of the listed methods vary in difficulty and should not be considered an exhaustive list. Select the appropriate method according to the project objectives and rules of engagement. If possible, request both a debug build and release build of firmware to maximize testing coverage use cases in the event debug code or functionality is compiled within a release.
Once the firmware image is obtained, explore aspects of the file to identify its characteristics. Use the following steps to analyze firmware file types, potential root filesystem metadata, and gain additional understanding of the platform it’s compiled for.
Leverage utilities such as:
      file <bin>


      strings


      strings -n5 <bin>


      strings -n16 <bin>#longer than 16


      strings -tx <bin> #print offsets in hex


      binwalk <bin>


      hexdump -C -n 512 <bin> > hexdump.out


      hexdump -C <bin> | head # might find signatures in header


      fdisk -lu <bin> #lists a drives partition and filesystems if multiple
If none of the above methods provide any useful data, the following is possible:
-
Binary may be BareMetal
-
Binary may be for a real time operating system (RTOS) platform with a custom filesystem
-
Binary may be encrypted
If the binary may be encrypted, check the entropy using binwalk with the following command:
$ binwalk -E <bin>
Low entropy = Not likely to be encrypted
High entropy = Its likely encrypted (or compressed in some way).
Alternate tools are also available using Binvis online and the standalone application.
This stage involves looking inside firmware and parsing relative filesystem data to start identifying as many potential security issues as possible. Use the following steps to extract firmware contents for review of uncompiled code and device configurations used in following stages. Both automated and manual extractions methods are shown below.
-
Use the following tools and methods to extract filesystem contents:
$ binwalk -ev <bin>
Files will be extracts to " _binaryname/filesystemtype/“
Filesystem types: squashfs, ubifs, romfs, rootfs, jffs2, yaffs2, cramfs, initramfs
2a. Sometimes, binwalk will not have the magic byte of the filesystem in its signatures. In these cases, use binwalk to find the offset of the filesystem and carve the compressed filesystem from the binary and manually extract the filesystem according to its type using the steps below.
$ binwalk DIR850L_REVB.bin
DECIMAL HEXADECIMAL DESCRIPTION
----------------------------------------------------------------------------- —
0 0x0 DLOB firmware header, boot partition: “””“dev=/dev/mtdblock/1"”""
10380 0x288C LZMA compressed data, properties: 0x5D, dictionary size: 8388608 bytes, uncompressed size: 5213748 bytes
1704052 0x1A0074 PackImg section delimiter tag, little endian size: 32256 bytes; big endian size: 8257536 bytes
1704084 0x1A0094 Squashfs filesystem, little endian, version 4.0, compression:lzma, size: 8256900 bytes, 2688 inodes, blocksize: 131072 bytes, created: 2016-07-12 02:28:41
2b. Run the following dd command carving the Squashfs filesystem.
$ dd if=DIR850L_REVB.bin bs=1 skip=1704084 of=dir.squashfs
8257536+0 records in
8257536+0 records out
8257536 bytes (8.3 MB, 7.9 MiB) copied, 12.5777 s, 657 kB/s
Alternatively, the following command could also be run.
$ dd if=DIR850L_REVB.bin bs=1 skip=
(
(
0
x
1
A
0094
)
)
o
f
=
d
i
r
.
s
q
u
a
s
h
f
s
<
/
c
o
d
e
>
<
/
s
p
a
n
>
<
/
s
p
a
n
>
<
/
s
p
a
n
>
<
/
p
>
<
p
c
l
a
s
s
=
"
b
l
o
c
k
P
a
r
a
g
r
a
p
h
−
544
a
408
c
"
d
a
t
a
−
k
e
y
=
"
7
d
360
c
81862
c
41
a
b
92
d
4490
b
98
a
5704
e
"
>
<
s
p
a
n
c
l
a
s
s
=
"
t
e
x
t
−
4505230
f
−
−
T
e
x
t
H
400
−
3033861
f
−
−
t
e
x
t
C
o
n
t
e
n
t
F
a
m
i
l
y
−
49
a
318
e
1
"
>
<
s
p
a
n
d
a
t
a
−
k
e
y
=
"
5
d
b
32
a
6
e
b
e
53409
f
9
c
5
a
2473
d
c
6
d
595
e
"
>
<
s
p
a
n
d
a
t
a
−
o
f
f
s
e
t
−
k
e
y
=
"
5
d
b
32
a
6
e
b
e
53409
f
9
c
5
a
2473
d
c
6
d
595
e
:
0
"
>
2
c
.
F
o
r
s
q
u
a
s
h
f
s
(
u
s
e
d
i
n
t
h
e
e
x
a
m
p
l
e
a
b
o
v
e
)
<
/
s
p
a
n
>
<
/
s
p
a
n
>
<
/
s
p
a
n
>
<
/
p
>
<
p
c
l
a
s
s
=
"
b
l
o
c
k
P
a
r
a
g
r
a
p
h
−
544
a
408
c
"
d
a
t
a
−
k
e
y
=
"
95
d
63
b
00
d
9
d
44310
a
763
b
a
b
09419
c
a
3
c
"
>
<
s
p
a
n
c
l
a
s
s
=
"
t
e
x
t
−
4505230
f
−
−
T
e
x
t
H
400
−
3033861
f
−
−
t
e
x
t
C
o
n
t
e
n
t
F
a
m
i
l
y
−
49
a
318
e
1
"
>
<
s
p
a
n
d
a
t
a
−
k
e
y
=
"
f
41384
a
e
2
d
8142
d
79
f
7
e
19
b
f
d
4
a
c
8128
"
>
<
s
p
a
n
d
a
t
a
−
o
f
f
s
e
t
−
k
e
y
=
"
f
41384
a
e
2
d
8142
d
79
f
7
e
19
b
f
d
4
a
c
8128
:
0
"
>
<
c
o
d
e
s
p
e
l
l
c
h
e
c
k
=
"
f
a
l
s
e
"
c
l
a
s
s
=
"
c
o
d
e
−
81
e
98
f
88
"
d
a
t
a
−
s
l
a
t
e
−
l
e
a
f
=
"
t
r
u
e
"
>
((0x1A0094)) of=dir.squashfs</code></span></span></span></p><p class="blockParagraph-544a408c" data-key="7d360c81862c41ab92d4490b98a5704e"><span class="text-4505230f--TextH400-3033861f--textContentFamily-49a318e1"><span data-key="5db32a6ebe53409f9c5a2473dc6d595e"><span data-offset-key="5db32a6ebe53409f9c5a2473dc6d595e:0">2c. For squashfs (used in the example above)</span></span></span></p><p class="blockParagraph-544a408c" data-key="95d63b00d9d44310a763bab09419ca3c"><span class="text-4505230f--TextH400-3033861f--textContentFamily-49a318e1"><span data-key="f41384ae2d8142d79f7e19bfd4ac8128"><span data-offset-key="f41384ae2d8142d79f7e19bfd4ac8128:0"><code spellcheck="false" class="code-81e98f88" data-slate-leaf="true">
((0x1A0094))of=dir.squashfs</code></span></span></span></p><pclass="blockParagraph−544a408c"data−key="7d360c81862c41ab92d4490b98a5704e"><spanclass="text−4505230f−−TextH400−3033861f−−textContentFamily−49a318e1"><spandata−key="5db32a6ebe53409f9c5a2473dc6d595e"><spandata−offset−key="5db32a6ebe53409f9c5a2473dc6d595e:0">2c.Forsquashfs(usedintheexampleabove)</span></span></span></p><pclass="blockParagraph−544a408c"data−key="95d63b00d9d44310a763bab09419ca3c"><spanclass="text−4505230f−−TextH400−3033861f−−textContentFamily−49a318e1"><spandata−key="f41384ae2d8142d79f7e19bfd4ac8128"><spandata−offset−key="f41384ae2d8142d79f7e19bfd4ac8128:0"><codespellcheck="false"class="code−81e98f88"data−slate−leaf="true"> unsquashfs dir.squashfs
Files will be in “squashfs-root” directory afterwards.
2d. CPIO archive files
$ cpio -ivd --no-absolute-filenames -F <bin>
2f. For jffs2 filesystems
$ jefferson rootfsfile.jffs2
2d. For ubifs filesystems with NAND flash
$ ubireader_extract_images -u UBI -s <start_offset> <bin>
$ ubidump.py <bin>
During this stage, clues are gathered for dynamic and runtime analysis stages. Investigate if the target firmware contains the following (non-exhaustive):
-
Legacy insecure network daemons such as telnetd (sometimes manufactures rename binaries to disguise )
-
Hardcoded credentials (usernames, passwords, API keys, SSH keys, and backdoor variants )
-
Hardcoded API endpoints and backend server details
-
Update server functionality that could be used as an entry point
-
Review uncompiled code and start up scripts for remote code execution
-
Extract compiled binaries to be used for offline analysis with a disassembler for future steps
Statically analyze filesystem contents and uncompiled code manually or leveraging automation tools such as firmwalker that parse the following:
-
etc/shadow and etc/passwd
-
list out the etc/ssl directory
-
search for SSL related files such as .pem, .crt, etc.
-
search for configuration files
-
look for script files
-
search for other .bin files
-
look for keywords such as admin, password, remote, AWS keys, etc.
-
search for common web servers used on IoT devices
-
search for common binaries such as ssh, tftp, dropbear, etc.
-
search for banned c functions
-
search for common command injection vulnerable functions
-
search for URLs, email addresses and IP addresses
-
and more…
The following subsections introduce open source automated firmware analysis tools.
Execute firmwalker within it’s directory in ~/tools/firmwalker and point firmwalker to the absolute path of the extracted filesystem’s root directory. Firmwalker uses information in the "/data/” directory for parsing rules. A custom fork modified by Aaron Guzman with additional checks can be found on GitHub at https://github.com/scriptingxss/firmwalker. The following examples show the usage of firmwalker used on OWASP’s IoTGoat. Additional vulnerable firmware projects are listed in the Vulnerable firmware section at the end of the document.
$ ./firmwalker.sh /home/embedos/firmware/ _IoTGoat-rpi-2.img.extracted/squashfs-root/
See the firmwalker output below.
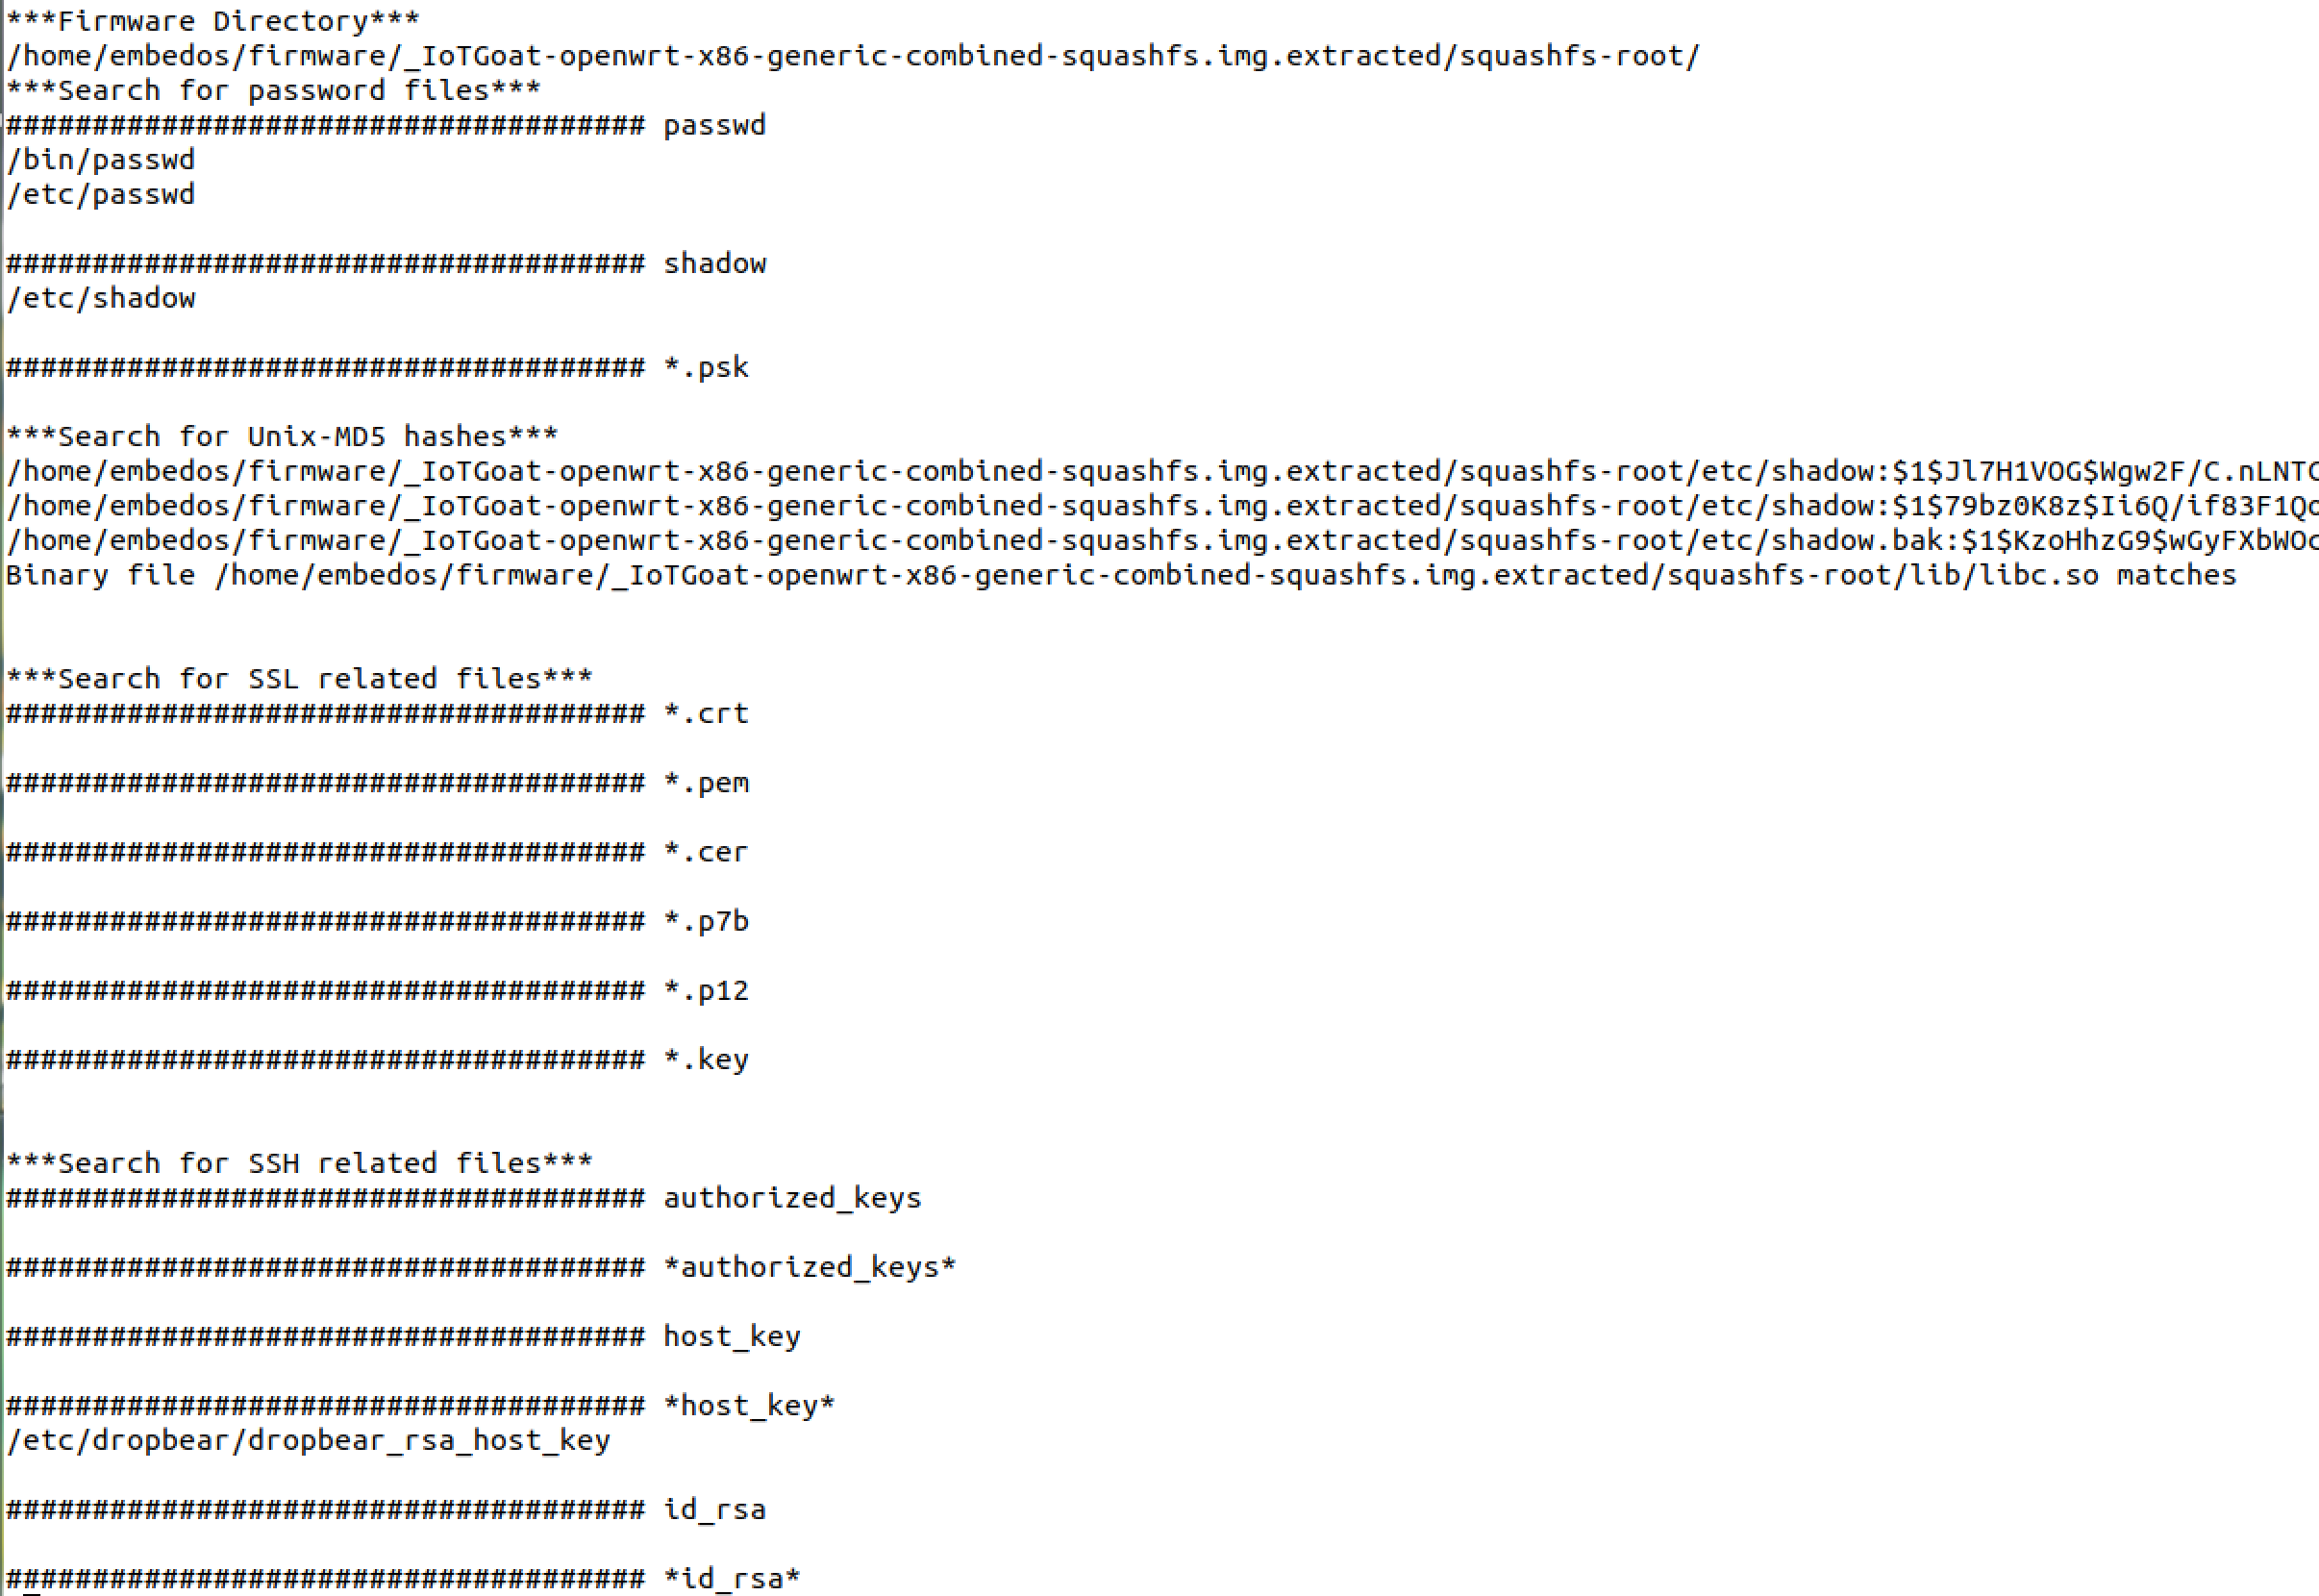
Two files will be generated, firmwalker.txt and firmwalkerappsec.txt. These output files should be manually reviewed.
Fortunately, multiple open source automated firmware analysis tools are available. FACT features include the following:
-
Identification of software components such as operating system, CPU architecture, and third-party components along with their associated version information
-
Extraction of firmware filesystem (s ) from images
-
Detection of certificates and private keys
-
Detection of weak implementations mapping to Common Weakness Enumeration (CWE)
-
Feed & signature-based detection of vulnerabilities
-
Basic static behavioral analysis
-
Comparison (diff) of firmware versions and files
-
User mode emulation of filesystem binaries using QEMU
-
Detection of binary mitigations such as NX, DEP, ASLR, stack canaries, RELRO, and FORTIFY_SOURCE
-
REST API
-
and more…
Below are instructions for using firmware analysis comparison toolkit within the companion preconfigured virtual machine.
Tip: It is recommended to run FACT with a computer that has 16 Cores 64GB RAM although the tool can run with a minimum of 4 cores and 8GB of RAM at a much slower pace. Scan output results vary on the allocated resources given to the virtual machine. The more resources, the faster FACT will complete scan submissions.
      $ cd ~/tools/FACT_core/


      $ sudo ./start_all_installed_fact_components
Navigate to http://127.0.0.1:5000 in browser
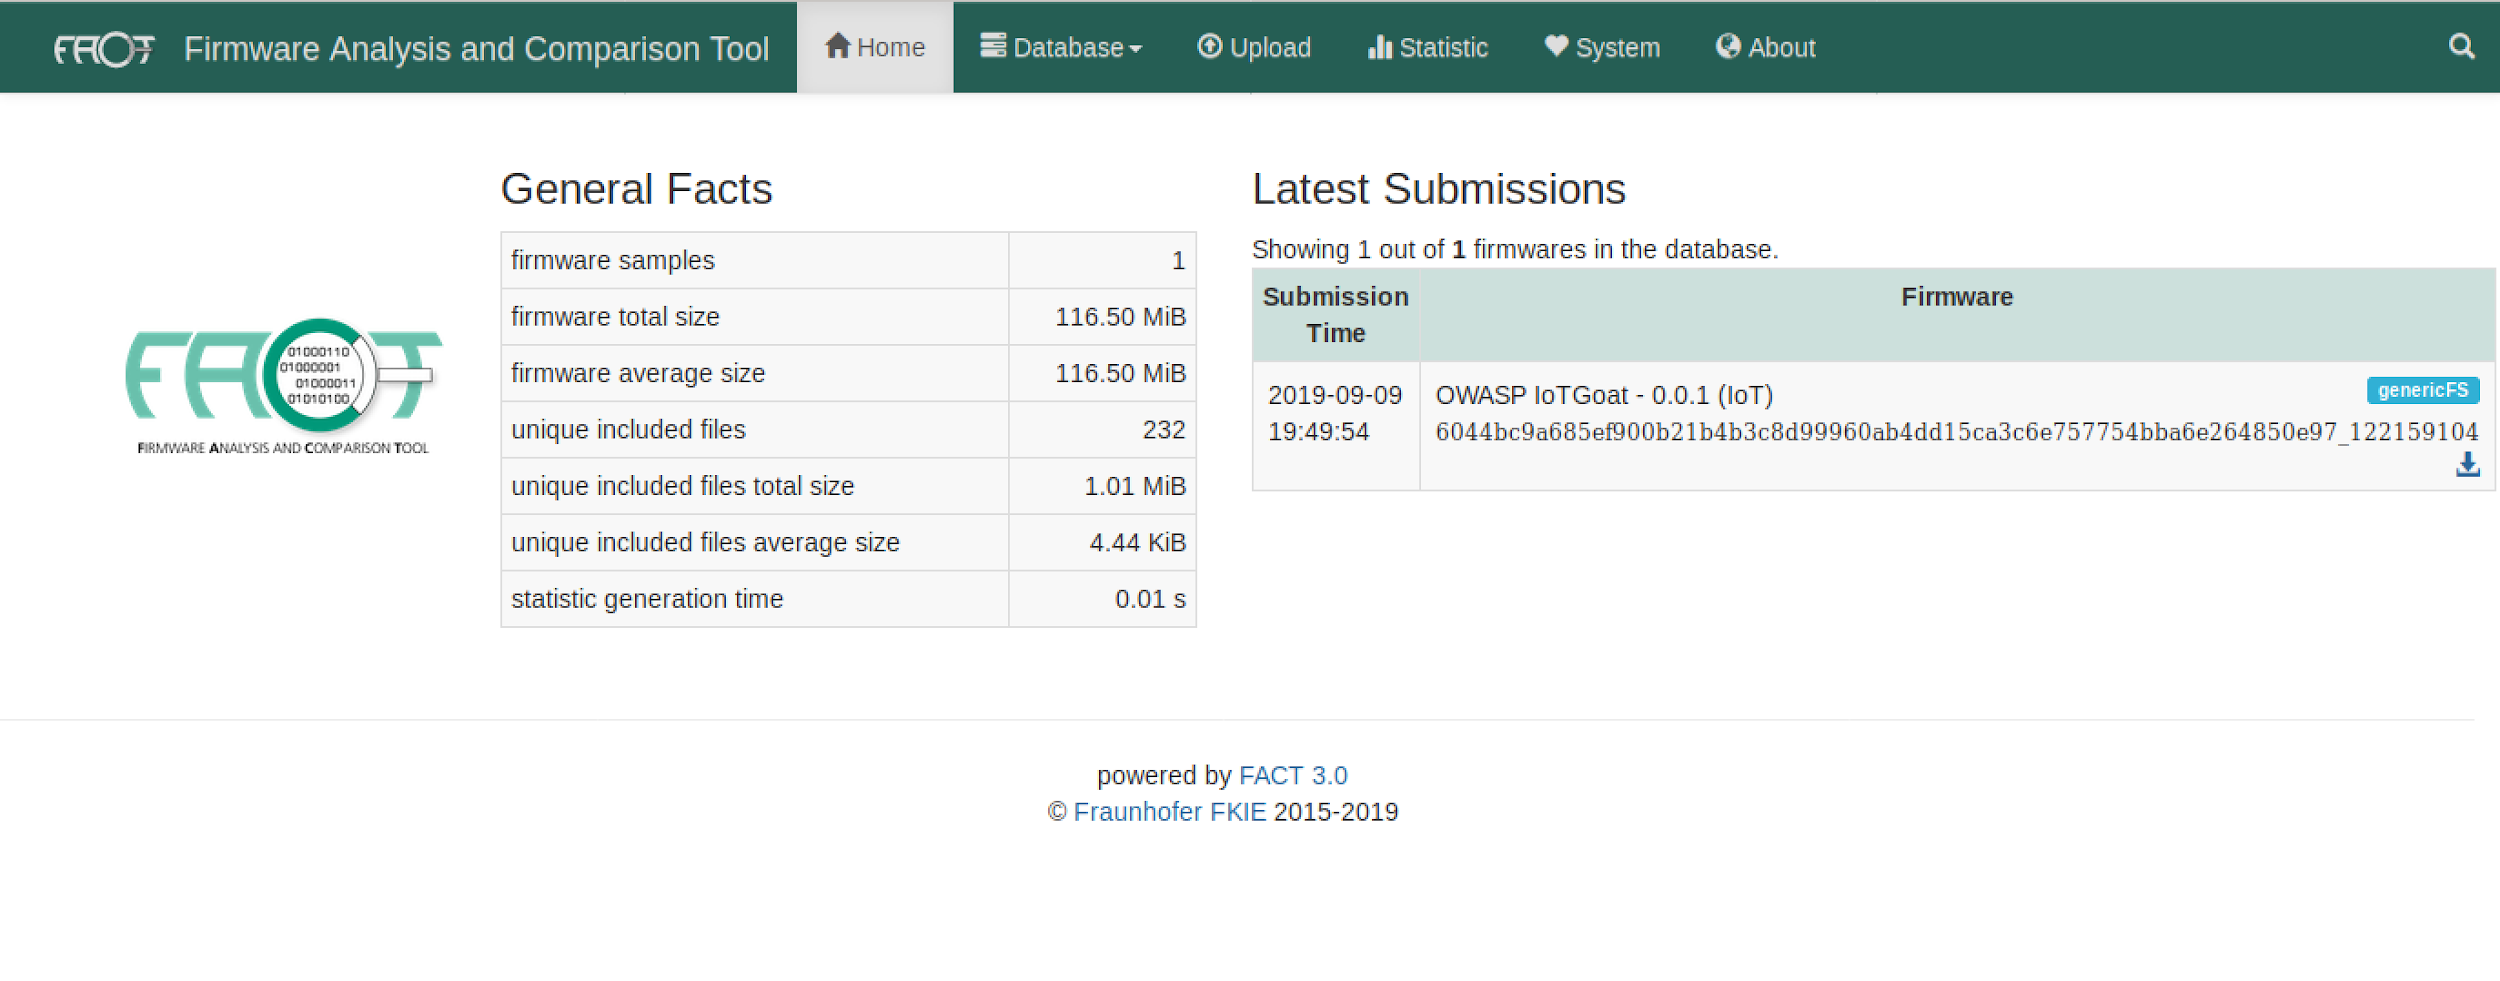
Figure : FACT Dashboard
Upload firmware components to FACT for analysis. In the screenshot below, the compressed complete firmware with its root filesystem will be uploaded and analyzed.
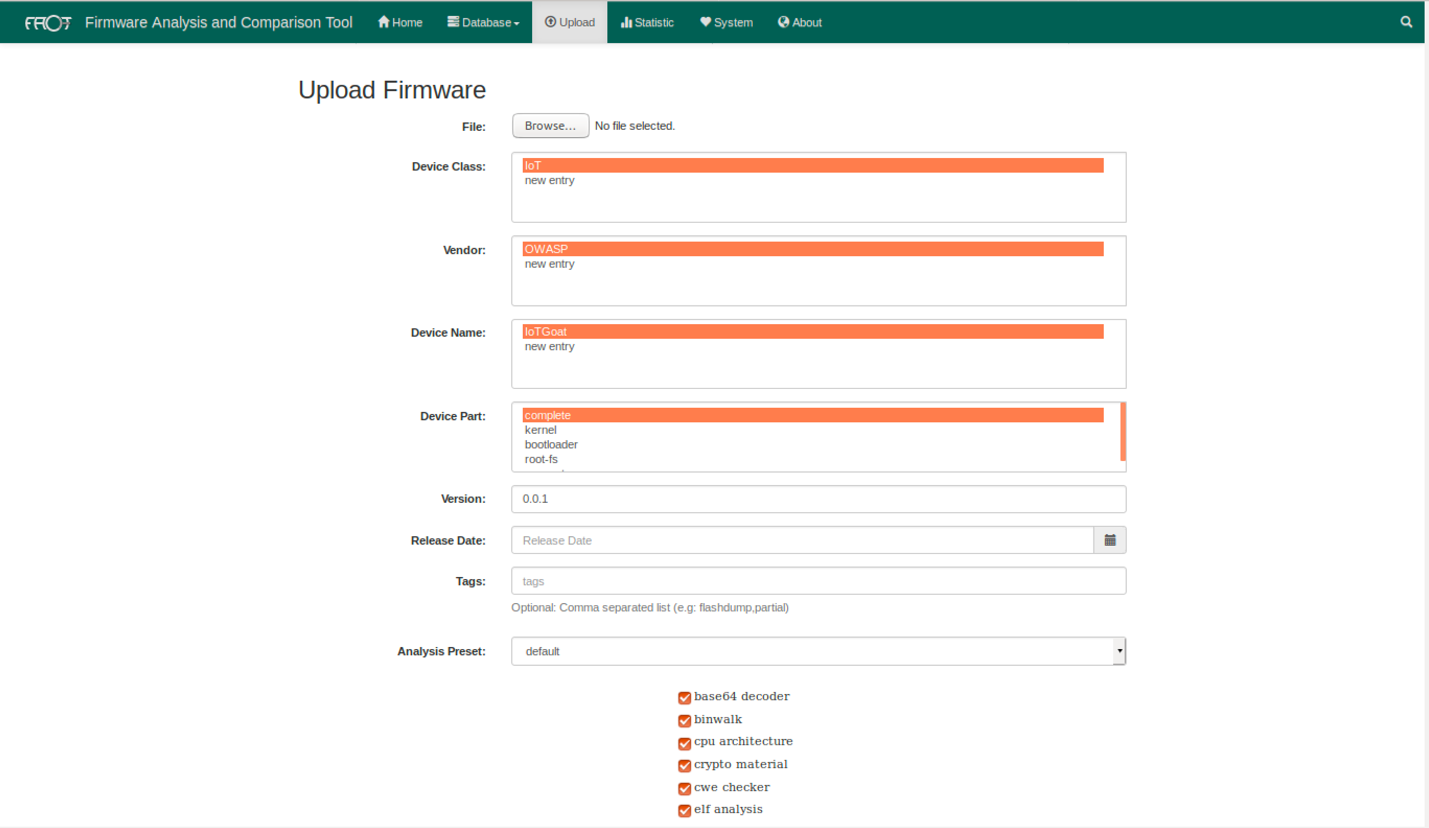
Figure : FACT Upload
Depending on the hardware resources given to FACT, the analysis results will appear with its scan results upon a given time. This process can take hours if minimal resources are allocated.

Figure : FACT IoTGoat

Figure : FACT IoTGoat Exploit Mitigation Results
Disassemble suspect target binaries with data gathered from FACT using IDA Pro, Ghidra, Hopper, Capstone, or Binary Ninja. Analyze binaries for potential remote code execution system calls, strings, function lists, memory corruption vulnerabilities, and identify Xrefs to system() or alike function calls. Note potential vulnerabilities to use for upcoming steps.
The following screenshot shows the “shellback” binary disassembled using Ghidra.
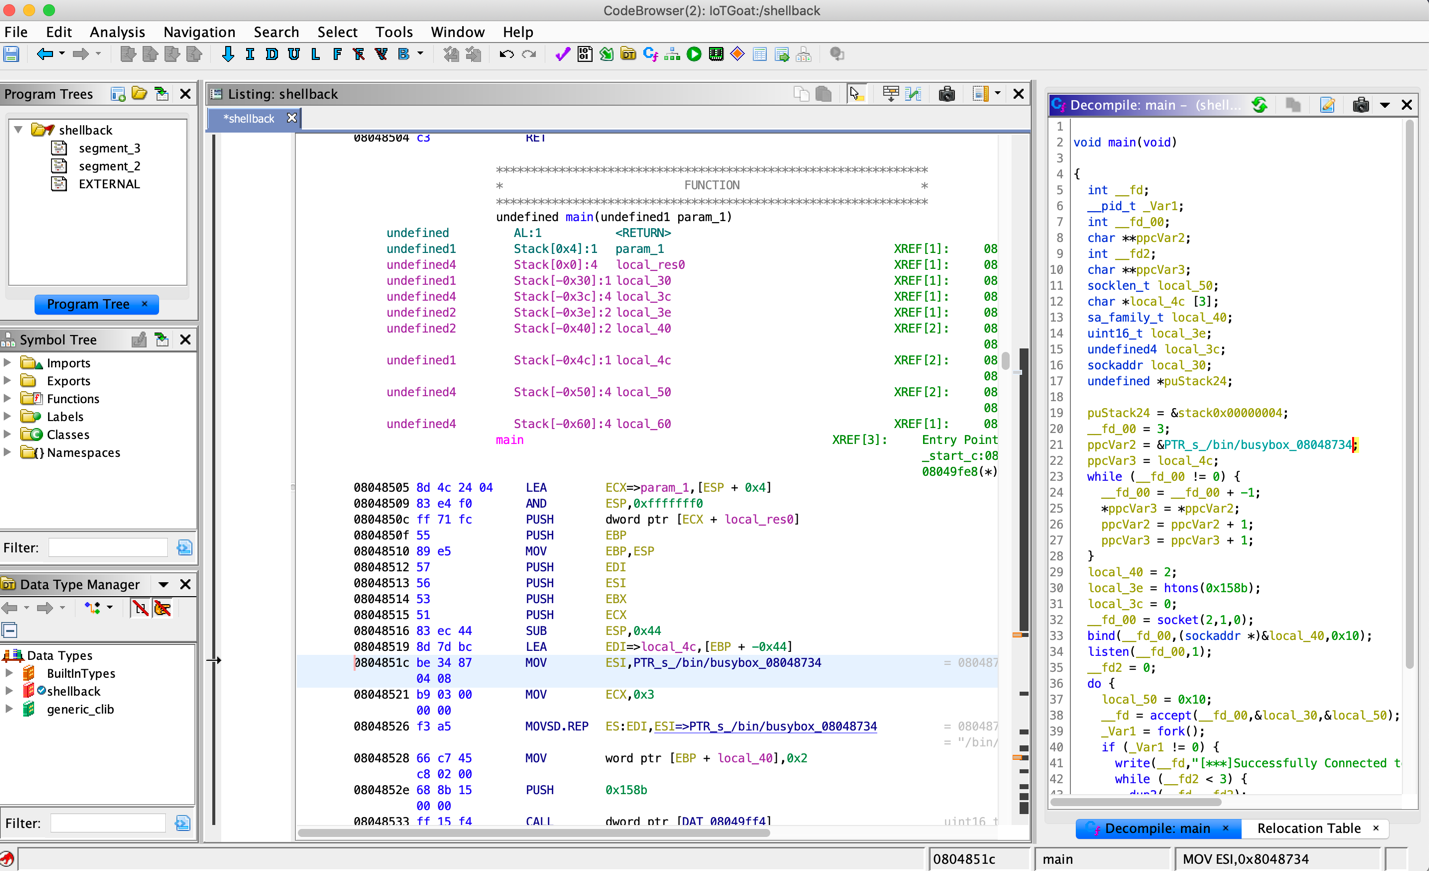
Figure : Shellback Ghidra Analysis
Common binary analysis consist of reviewing the following:
-
Stack canaries enabled or disabled
-
$ readelf -aW bin/| grep stack_chk_fail -
$ mips-buildroot-linux-uclibc-objdump -d bin/binary | grep stack_chk_fail
-
-
Position-independent executable (PIE) enabled or disabled
-
PIE disabled
-
$ readelf -h <bin> | grep -q 'Type:[[:space:]]EXEC’
-
-
PIE enabled
-
$ readelf -h <bin> | grep 'Type:[[:space:]]DYN’
-
-
DSO
-
$ readelf -d <bin> | grep -q 'DEBUG’
-
-
Symbols
-
$ readelf --syms <bin> -
$ nm <bin>
-
-
-
Recognizable strings
-
-elspecifies little-endian characters 16-bits wide (e.g. UTF-16). -
Use
-ebfor big endian -
Prints any ASCII strings longer than 16 to stdout
-
The
-tflag will return the offset of the string within the file. -
-txwill return it in hex format, T-to in octal and-tdin decimal. -
Useful for cross-referencing with a hex editor, or want to know where in the file your string is.
-
strings -n5 <bin> -
strings -el <bin> -
strings -n16 <bin> -
strings -tx <bin>
-
-
Non-executable (NX) enabled or disabled
-
$ readelf -lW bin/<bin>| grep STACK
-
GNU_STACK 0x000000 0x00000000 0x00000000 0x00000 0x00000 RWE 0x4
The ‘E’ indicates that the stack is executable.
$ execstack bin/
X bin/ash
X bin/busybox
-
Relocations read-only (RELRO) configuration
-
Full RELRO:
-
$ readelf -d binary | grep BIND_NOW
-
-
Partial RELRO:
-
$ readelf -d binary | grep GNU_RELRO
-
-
A script that automates checking many of the above binary properties is checksec.sh. Below, are two examples of using the script.
      > ./checksec --file=/home/embedos/firmware/_IoTGoat-x86-generic-combined-squashfs.img.extracted/squashfs-root/bin/busybox


      RELRO           STACK CANARY      NX            PIE             RPATH      RUNPATH    Symbols        FORTIFY    Fortified    Fortifiable  FILE


      Partial RELRO   No canary found   NX enabled    No PIE          No RPATH   No RUNPATH   No Symbols      No    0        0    /home/embedos/firmware/_IoTGoat-x86-generic-combined-squashfs.img.extracted/squashfs-root/bin/busybox
      > ./checksec --file=/home/embedos/firmware/_IoTGoat-x86-generic-combined-squashfs.img.extracted/squashfs-root/usr/bin/shellback


      RELRO           STACK CANARY      NX            PIE             RPATH      RUNPATH    Symbols        FORTIFY    Fortified    Fortifiable  FILE


      Partial RELRO   No canary found   NX enabled    No PIE          No RPATH   No RUNPATH   No Symbols      No    0        0    /home/embedos/firmware/_IoTGoat-x86-generic-combined-squashfs.img.extracted/squashfs-root/usr/bin/shellback

Figure : Checksec.sh
For Microsoft binaries (EXE & DLL), use PESecurity to check for ASLR, DEP, SafeSEH, StrongNaming, Authenticode, Control Flow Guard, and HighEntropyVA.
Using details and clues identified in previous steps, firmware as well as it’s encapsulated binaries must be emulated to verify potential vulnerabilities. To accomplish emulating firmware, there are a few approaches listed below.
-
Partial emulation (user space) - Emulation of standalone binaries derived from a firmware’s extracted filesystem such as
/usr/bin/shellback -
Full system emulation - Emulation of the full firmware and start up configurations leveraging fake NVRAM.
-
Emulation using a real device or virtual machine - At times, partial or full emulation may not work due to a hardware or architecture dependencies. If the architecture and endianness match a device owned such as a raspberry pie, the root filesystem or specific binary can be transferred to the device for further testing. This method also applies to pre built virtual machines using the same architecture and endianness as the target.
To begin partially emulating binaries, the CPU architecture and endianness must be known for selecting the appropriate QEMU emulation binary in the following steps.
      $ binwalk -Y <bin>


      $ readelf -h <bin>
el - little endian
eb - big endian
Binwalk can be used identify endianness for packaged firmware binaries (not from binaries within extracted firmware) using the command below.
$ binwalk -Y UPG_ipc8120p-w7-M20-hi3516c-20160328_165229.ov
DECIMAL HEXADECIMAL DESCRIPTION
--------------------------------------------------------------------------------
3480 0xD98 ARM executable code, 32-bit, little endian, at least 1154 valid instructions
After the CPU architecture and endianness have been identified, locate the appropriate QEMU binary to perform partial emulation (Not for emulating the full firmware, but binaries with the extracted firmware.)
Typically, in:
/usr/local/qemu-arch or /usr/bin/qemu-arch
Copy the applicable QEMU binary into the extracted root filesystem. The second command shows copying the static arm QEMU binary to the extracted root filesystem within a ZSH shell showing the absolute path.
> cp /usr/local/qemu-arch /extractedrootFS/
/home/embedos/firmware/_DIR850L_REVB_FW207WWb05_h1ke_beta1.decrypted.extracted/squashfs-root
> cp /usr/bin/qemu-arm-static .
Execute the ARM binary (or appropriate arch) to emulate using QEMU and chroot with the following command:
$ sudo chroot . ./qemu-arch <binarytoemulate>
The following example shows Busybox emulated within a typical x64 architecture an attacker machine is likely using.
      > sudo chroot . ./qemu-arm-static bin/busybox ls


      [sudo] password for embedos:


      bin               etc               overlay           rom               sys               var


      dev               lib               proc              root              tmp               www


      dnsmasq_setup.sh  mnt               qemu-arm-static   sbin              usr
Below, is an example of emulating a service that listens on port 5515.
> sudo chroot . ./qemu-arm-static usr/bin/shellback
Also, the same service can be emulated with qiling framework.
> ./qltool run --console False -f ~/_IoTGoat-x86.img.extracted/squashfs-root/usr/bin/shellback --rootfs ~/_IoTGoat-x86.img.extracted/squashfs-root
In another terminal, check if the service is listening locally and try to connect to it with netcat.
      > sudo lsof -i :5515


      COMMAND     PID USER   FD   TYPE DEVICE SIZE/OFF NODE NAME


      qemu-arm- 13264 root    3u  IPv4 662221      0t0  TCP :5515 (LISTEN)


      > nc -nv 127.0.0.1 5515


      Connection to 127.0.0.1 5515 port [tcp/] succeeded!


      [*]Successfully Connected to IoTGoat’s Backdoor[***]
Sometimes, requests are dispatched to the CGI binary by the HTTP server. By simply emulating the CGI binary, it’s possible to analyze the process procedure or verify the vulnerability without setting up a HTTP server. The following example issues a GET request to a MIPS CGI binary.
~/DIR850L/squashfs-root/htdocs/web$ ls -l captcha.cgi
lrwxrwxrwx 1 root root 14 Oct 17 2017 captcha.cgi -> /htdocs/cgibin
# fix the broken symbolic link
~/DIR850L/squashfs-root/htdocs/web$ rm captcha.cgi && ln -s …/cgibin captcha.cgi
~/DIR850L/squashfs-root$ sudo chroot . ./qemu-mips-static -E REQUEST_METHOD=“GET” -E REQUEST_URI="/captcha.cgi" -E REMOTE_ADDR=“192.168.1.1” -E CONTENT_TYPE=“text/html” /htdocs/web/captcha.cgi
HTTP/1.1 200 OK
Content-Type: text/xml
<?xml version=“1.0” encoding=“utf-8”?><captcha>
<result>FAIL</result><message>NO SESSION</message>
</captcha>
With the target binary emulated, interact with its interpreter or listening service. Fuzz its application and network interfaces as noted in the next phase.
When possible, use automation tools such as firmadyne, firmware analysis toolkit, or ARM-X Firmware Emulation Framework to perform full emulation of firmware. These tools are essentially wrappers for QEMU and other environmental functions such as nvram.
Using firmware analysis toolkit, simply execute the following command:
sudo python3 ./fat.py IoTGoat-rpi-2.img --qemu 2.5.0
__
/ | | |
| | __ _ | |
| _| / _| | __|</span></span></div><div class="codeLine-a3169fbc" data-key="2b527838063543f58012a4ec6e582f31"><span data-key="fdc05a4dc5ce477c9cc3064648116f28"><span data-offset-key="fdc05a4dc5ce477c9cc3064648116f28:0"> | | | (_| | | |_</span></span></div><div class="codeLine-a3169fbc" data-key="2bfa36721b4f48bf9c0acde6ce5ad81f"><span data-key="382c4d54d7e7457fa5cc796360445ec8"><span data-offset-key="382c4d54d7e7457fa5cc796360445ec8:0"> |_| \__,_| \__|</span></span></div><div class="codeLine-a3169fbc" data-key="c5989008a7bd42beae7016d86da8c42f"><span data-key="cecf8285eade46b8ba347698fb0c3235"><span data-offset-key="cecf8285eade46b8ba347698fb0c3235:0"><span data-slate-zero-width="n"></span></span></span></div><div class="codeLine-a3169fbc" data-key="3629fbfae6534d9ca2a3e4d673429a36"><span data-key="c1582d8818594c79b71bb0c927f628ec"><span data-offset-key="c1582d8818594c79b71bb0c927f628ec:0"> Welcome to the Firmware Analysis Toolkit - v0.3</span></span></div><div class="codeLine-a3169fbc" data-key="69f238203189402393e6872bfb8a0bb4"><span data-key="0b42b6a487764bdebbc721b19f9371ea"><span data-offset-key="0b42b6a487764bdebbc721b19f9371ea:0"> Offensive IoT Exploitation Training http://bit.do/offensiveiotexploitation</span></span></div><div class="codeLine-a3169fbc" data-key="e0d8f8b7f3164ca6b733995ed8b9cfac"><span data-key="862c9d1661dc4e50bf6870957224a194"><span data-offset-key="862c9d1661dc4e50bf6870957224a194:0"> By Attify - https://attify.com | @attifyme</span></span></div><div class="codeLine-a3169fbc" data-key="97aa1c4dccfb465ebbc81500b45b4de1"><span data-key="75ffc60991db4dd4b76e80180ed13c52"><span data-offset-key="75ffc60991db4dd4b76e80180ed13c52:0"><span data-slate-zero-width="n"></span></span></span></div><div class="codeLine-a3169fbc" data-key="db12e6b9db894342abed9cc9de4460af"><span data-key="b1b80d0d386d442bb8d5c7c8b070fbbe"><span data-offset-key="b1b80d0d386d442bb8d5c7c8b070fbbe:0">[+] Firmware: IoTGoat-rpi-2.img</span></span></div><div class="codeLine-a3169fbc" data-key="1212a8a5e1824cf4bfda0941b311150f"><span data-key="08cc81fb6d804b71960fa8d7d2ce399a"><span data-offset-key="08cc81fb6d804b71960fa8d7d2ce399a:0">[+] Extracting the firmware...</span></span></div><div class="codeLine-a3169fbc" data-key="88bbb8e58fa342dbb6a47c7bb9bfc05f"><span data-key="c2e03ee6da414cf7b4fa92dc83ccdd8a"><span data-offset-key="c2e03ee6da414cf7b4fa92dc83ccdd8a:0">[+] Image ID: 1</span></span></div><div class="codeLine-a3169fbc" data-key="59190a8c8a8b40c9b78a4ba95e570833"><span data-key="af22ab08d1994e42bdab178481d5e1e2"><span data-offset-key="af22ab08d1994e42bdab178481d5e1e2:0">[+] Identifying architecture...</span></span></div><div class="codeLine-a3169fbc" data-key="7ce67754dd0f4680b3091d3722688fe1"><span data-key="1c2de6a282a44f38bc238f1aa040ab1c"><span data-offset-key="1c2de6a282a44f38bc238f1aa040ab1c:0">[+] Architecture: armel</span></span></div><div class="codeLine-a3169fbc" data-key="24f7da779a3a4f4093b9fe1917649805"><span data-key="9b2c056ecde74ded9905fb96e4072360"><span data-offset-key="9b2c056ecde74ded9905fb96e4072360:0">[+] Building QEMU disk image...</span></span></div><div class="codeLine-a3169fbc" data-key="2fb92472bce641e7b07425bbf47c1193"><span data-key="0bb9a30c7d594580b748404fcc4e10ce"><span data-offset-key="0bb9a30c7d594580b748404fcc4e10ce:0">[+] Setting up the network connection, please standby...</span></span></div><div class="codeLine-a3169fbc" data-key="b233be19754e4def8518bbb4b7e48389"><span data-key="e577591983c54ab8b5649a3f446d8e26"><span data-offset-key="e577591983c54ab8b5649a3f446d8e26:0">[+] Network interfaces: [('eth0', '192.168.1.1')]</span></span></div><div class="codeLine-a3169fbc" data-key="7a8695c113934089a9675374425cf224"><span data-key="03d253da083d429f89fb248ee9d239f2"><span data-offset-key="03d253da083d429f89fb248ee9d239f2:0">[...]</span></span></div><div class="codeLine-a3169fbc" data-key="76286edf52474333afc4d86e1c470af6"><span data-key="bbb1b0fc5ed240d9a57c9d9a93db0977"><span data-offset-key="bbb1b0fc5ed240d9a57c9d9a93db0977:0">Adding route to 192.168.1.1...</span></span></div><div class="codeLine-a3169fbc" data-key="0468107deaad4b17ae71b1d1aa3faca3"><span data-key="73ab5e8487e44848a79bc3c72c4b6b22"><span data-offset-key="73ab5e8487e44848a79bc3c72c4b6b22:0">Starting firmware emulation... use Ctrl-a + x to exit</span></span></div><div class="codeLine-a3169fbc" data-key="1bb3d27023824b14bc835d081633ba49"><span data-key="6c2ac76add434a86bdbe4b05f33e4d07"><span data-offset-key="6c2ac76add434a86bdbe4b05f33e4d07:0">[ 0.000000] Booting Linux on physical CPU 0x0</span></span></div><div class="codeLine-a3169fbc" data-key="7b573ba515d444c99b238dcb34924861"><span data-key="0c28af3ff3f042429fc00a2a81bf3ab6"><span data-offset-key="0c28af3ff3f042429fc00a2a81bf3ab6:0">[ 0.000000] Linux version 4.1.17+ (vagrant@vagrant-ubuntu-trusty-64) (gcc version 5.3.0 (GCC) ) #1 Thu Feb 18 01:05:21 UTC 2016</span></span></div><div class="codeLine-a3169fbc" data-key="0dce8a42c38849e0b71391ddb7e64e78"><span data-key="fb25e8f36f434f958843a4af0bf60a0a"><span data-offset-key="fb25e8f36f434f958843a4af0bf60a0a:0">[ 0.000000] CPU: ARMv7 Processor [412fc0f1] revision 1 (ARMv7), cr=10c5387d</span></span></div><div class="codeLine-a3169fbc" data-key="ac8a0e7170424075b18456bd308aa38f"><span data-key="c32e6e0894fc463fa1b37c0bbcdc91e7"><span data-offset-key="c32e6e0894fc463fa1b37c0bbcdc91e7:0">[ 0.000000] CPU: PIPT / VIPT nonaliasing data cache, PIPT instruction cache</span></span></div><div class="codeLine-a3169fbc" data-key="f9cb9c01a3e244138ba33e5913f6b360"><span data-key="2ce27f7702744b51bcabd9478791c1a3"><span data-offset-key="2ce27f7702744b51bcabd9478791c1a3:0"><span data-slate-zero-width="n"></span></span></span></div><div class="codeLine-a3169fbc" data-key="23bbc1801d124c2594baeed31e571f72"><span data-key="ebd6f59d6fd64a86a2c0399c489d74d7"><span data-offset-key="ebd6f59d6fd64a86a2c0399c489d74d7:0">BusyBox v1.28.4 () built-in shell (ash)</span></span></div><div class="codeLine-a3169fbc" data-key="d935787d4ebd493ca7761569ddc99cb0"><span data-key="cbdcd5b7637f4747b80a214e01077bbc"><span data-offset-key="cbdcd5b7637f4747b80a214e01077bbc:0"><span data-slate-zero-width="n"></span></span></span></div><div class="codeLine-a3169fbc" data-key="a258f5ce8c6b438fbf924c538670d661"><span data-key="bc3c2caa569a429dbc51eb7c766760aa"><span data-offset-key="bc3c2caa569a429dbc51eb7c766760aa:0"> .--,\\\__ </span></span></div><div class="codeLine-a3169fbc" data-key="6451f8ba39c7469fa4b7c2ebaccc1f5b"><span data-key="1c43150f28264d5b820ed40e885abf3a"><span data-offset-key="1c43150f28264d5b820ed40e885abf3a:0"> ██████╗ ██╗ ██╗ █████╗ ███████╗██████╗-. a-.__ </span></span></div><div class="codeLine-a3169fbc" data-key="5a28767565734e1a837abff4385eb0bf"><span data-key="63dcd25179d245c6aa3d71eece8fc212"><span data-offset-key="63dcd25179d245c6aa3d71eece8fc212:0">██╔═══██╗██║ ██║██╔══██╗██╔════╝██╔══██╗ | ') </span></span></div><div class="codeLine-a3169fbc" data-key="b53030de95274e7897a33f8712380ddf"><span data-key="6a697c668c6a49d291a6b53e5b0f557d"><span data-offset-key="6a697c668c6a49d291a6b53e5b0f557d:0">██║ ██║██║ █╗ ██║███████║███████╗██████╔╝ / \ _.-'-,;
██║ ██║██║███╗██║██╔══██║╚════██║██╔═══╝ / | { /
╚██████╔╝╚███╔███╔╝██║ ██║███████║██║ / | { /
╚═════╝ ╚══╝╚══╝ ╚═╝ ╚═╝╚══════╝╚═╝ …-"``~"-’ ; )
╦┌─┐╔╦╗╔═╗┌─┐┌─┐┌┬┐ ;’ </span></span></div><div class="codeLine-a3169fbc" data-key="56e37af4768d41458f1846edd8a02ae8"><span data-key="20213e348f4d4f9d82030e822ad42ce0"><span data-offset-key="20213e348f4d4f9d82030e822ad42ce0:0"> ║│ │ ║ ║ ╦│ │├─┤ │ ;'
╩└─┘ ╩ ╚═╝└─┘┴ ┴ ┴ ;’ `
------------------------------------------------------------ ;’
GitHub: https://github.com/OWASP/IoTGoat
------------------------------------------------------------
root@IoTGoat:/#
Note: Modifications to these tools may be required if the firmware contains an uncommon compression, filesystem, or unsupported architecture.
In this stage, perform dynamic testing while a device is running in its normal or emulated environment. Objectives in this stage may vary depending on the project and level of access given. Typically, this involves tampering of bootloader configurations, web and API testing, fuzzing (network and application services), as well as active scanning using various toolsets to acquire elevated access (root) and/or code execution.
Tools that may be helpful are (non-exhaustive):
-
Burp Suite
-
OWASP ZAP
-
Commix
-
Fuzzers such as - American fuzzy loop (AFL)
-
Nmap
-
NCrack
-
Metasploit
Reference industry standard web methodologies such as OWASP’s Testing Guide and Application Security Verification Standard (ASVS).
Specific areas to review within an embedded device’s web application are the following:
-
Diagnostic or troubleshooting pages for potential command injection vulnerabilities
-
Authentication and authorization schemes are validated against the same framework across ecosystem applications as well as the firmware operating system platform
-
Test whether default usernames and passwords are used
-
Perform directory traversal and content discovery on web pages to identify debug or testing functionality
-
Asses SOAP/XML and API communication for input validation and sanitization vulnerabilities such as XSS and XXE
-
Fuzz application parameters and observe exceptions and stack traces
-
Tailor targeted payloads against embedded web application services for common C/C++ vulnerabilities such as memory corruption vulnerabilities, format string flaws, and integer overflows.
-
Depending on the product and its application interfaces, test cases will differ.
When modifying device start up and bootloaders such as U-boot, attempt the following:
-
Attempt to access the bootloaders interpreter shell by pressing “0”, space or other identified “magic codes” during boot.
-
Modify configurations to execute a shell command such as adding ‘
init=/bin/sh’ at the end of boot arguments-
#printenv -
#setenv bootargs=console=ttyS0,115200 mem=63M root=/dev/mtdblock3 -
mtdparts=sflash:<partitiionInfo> rootfstype=<fstype> hasEeprom=0 5srst=0 int=/bin/sh -
#saveenv -
#boot
-
-
Setup a tftp server to load images over the network locally from your workstation. Ensure the device has network access.
-
#setenv ipaddr 192.168.2.2 #local IP of the device -
#setenv serverip 192.168.2.1 #tftp server IP -
#saveenv -
#reset -
#ping 192.168.2.1 #check if network access is available -
#tftp KaTeX parse error: Expected 'EOF', got '#' at position 26: … uImage-3.6.35 #̲loadaddr takes …$$$$$$$$$$KaTeX parse error: Expected 'EOF', got '&' at position 595: … and control (C&̲amp;C) framewor…$$$$$$$$$$$$$$ If possible, identify a vulnerability within startup scripts to obtain persistent access to a device across reboots. Such vulnerabilities arise when startup scripts reference, symbolically link, or depend on code located in untrusted mounted locations such as SD cards, and flash volumes used for storage data outside of root filesystems.
Runtime analysis involves attaching to a running process or binary while a device is running in its normal or emulated environment. Basic runtime analysis steps are provided below:
-
sudo chroot . ./qemu-arch -L <optionalLibPath> -g <gdb_port> <binary> -
Attach gdb-multiarch or use IDA to emulate the binary
-
Set breakpoints for functions identified during step 4 such as memcpy, strncpy, strcmp, etc.
-
Execute large payload strings to identify overflows or process crashes using a fuzzer
-
Move to step 8 if a vulnerability is identified
Tools that may be helpful are (non-exhaustive):
-
gdb-multiarch
-
Peda
-
Frida
-
ptrace
-
strace
-
IDA Pro
-
Ghidra
-
Binary Ninja
-
<span data-key="cd648
-
-


 1971
1971

 被折叠的 条评论
为什么被折叠?
被折叠的 条评论
为什么被折叠?
 到【灌水乐园】发言


