


后记:有网上的朋友说PG到了3.X之后文件夹的规划有了变化,需要配置的地方也发生了变化,因为之前也为PG3.5版本装过一次BarcodeScanner插件,所以现将这些补充到最后面,希望能够帮到大家。
由于一直在使用phoneGap来开发安卓应用,而对于原生Java小白的我最近这几天一直陷入了如何使用phonegap的BarcodeScanner插件这件事情上,可以说查遍了百度和Google,虽然只是一个小小的二维码的功能,但是这里面还是让我学到了许多开发安卓应用的内容,一起共勉吧。
首先,告诉大家的是
1、我使用的phonegap版本是2.9.0,当然对于phonegap版本的东西我也不太了解,不过可以保证的是phonegap2.0.0之后的按照我这种办法来实现二维码是没有问题的。
2、phonegap的插件都是放在github上托管的,大家可以Google一下或者到http://www.github.com搜索下载
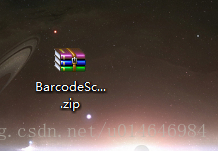
下载插件之后是这样名字的压缩包
解压之后会看到
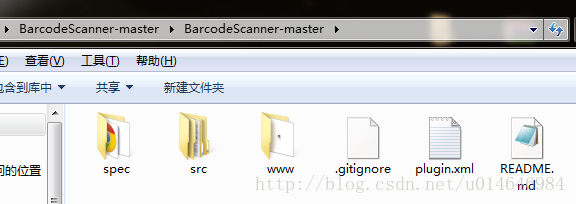
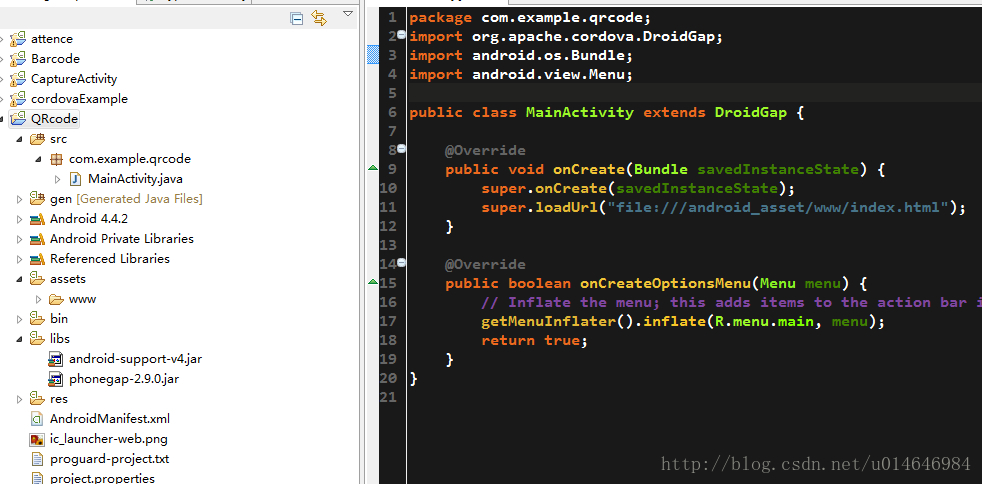
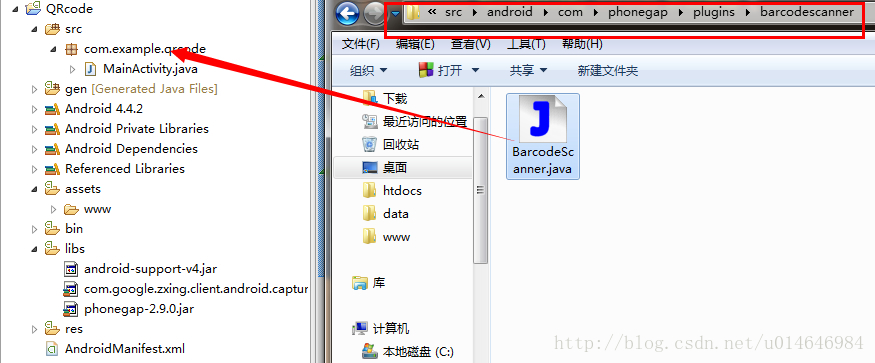
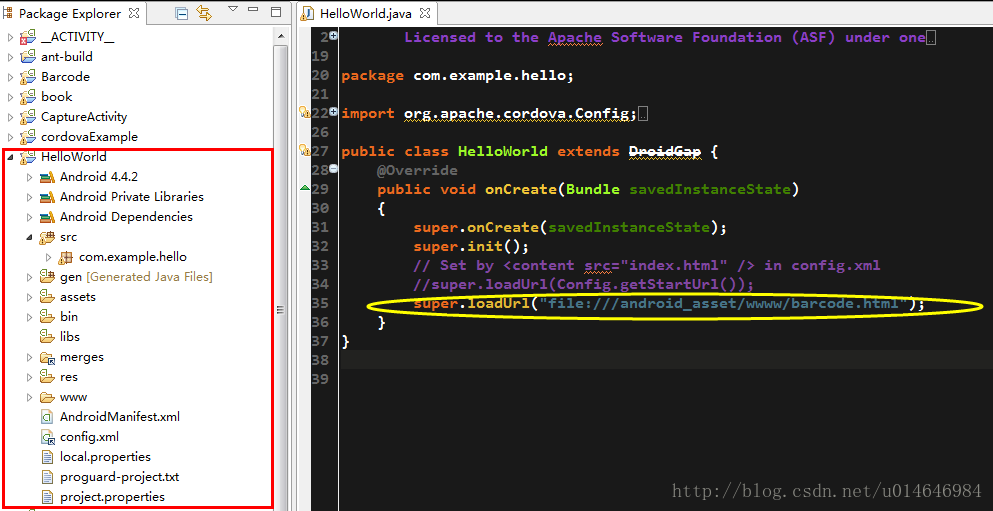
这里面最最重要的东西在 src 文件夹中
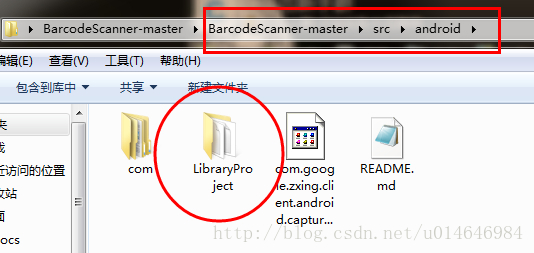
图片中划红线的文件可以说是有很多学问在里面了,我们在开发任何项目的时候都会将一些公用的文件封装好,然后就可以在任何地方使用,而这种思想在开发Android应用的时候同样适用,只不过在Android这里这种思想有一个名字叫做 Android Library,也就是图片这个LibraryProject就是已经给我们提供好的一个实现二维码的Android Library,但是这样的文件夹我们又不能直接拿来用,我们需要在ADT当中将这个LibraryProject引入到我们的一个公共二维码项目中去,具体的安装方法,查看 http://www.yelanxiaoyu.com/app/android%E5%BC%80%E5%8F%91/%E5%A6%82%E4%BD%95%E6%B7%BB%E5%8A%A0android-library.html
好了,当你已经将这个LibraryProject加入到项目中去后,结果会是这个样子的
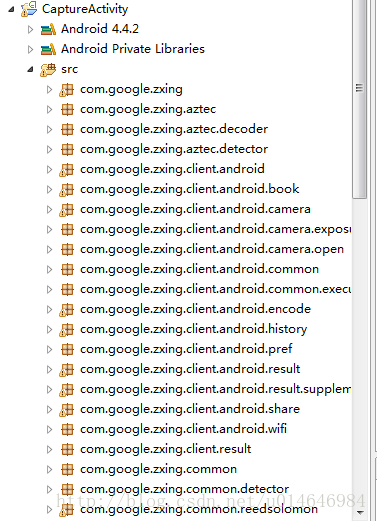
还是重申一遍,这个叫做CaptureActivity的项目作为一个实现二维码功能的公共项目存在,我可以在Project1中使用这个CaptureActivity,也可以在Project2中使用这个CaptureActivity,也就是它作为一个公共项目存在,在其他项目中可以随时使用它。
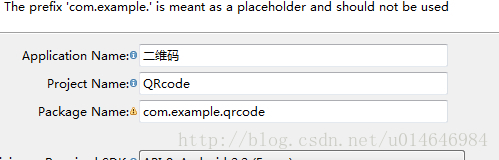
接下来就开始看我们如何来实现二维码功能了,首先新建一个项目,比如叫做QRcode
将安卓项目配置成phonegap项目,引入phonegap-x.x.x.jar xml文件夹 phonegap-x.x.x.js,具体的操作步骤可以查看我的另一篇文章,当然这里说的有点多余。
配置完成之后是这个样子的
START#############################################
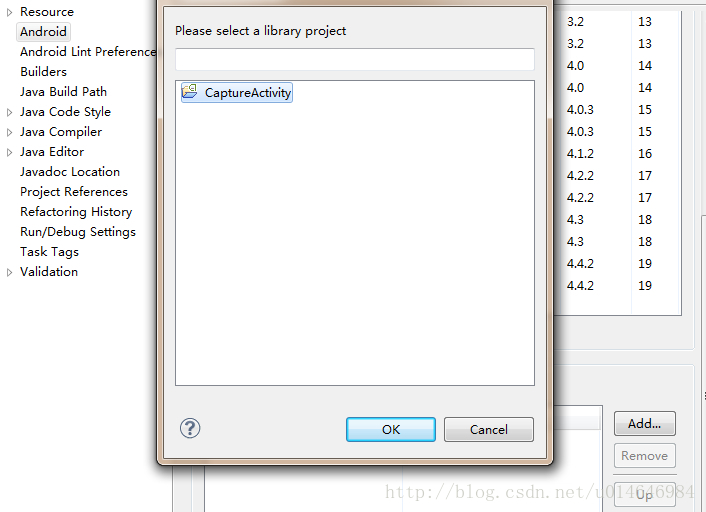
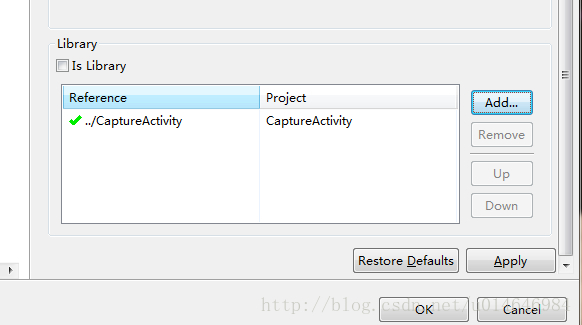
然后将CaptureActivity引入,右键QRcode项目,看到properties,点击左侧Android,右侧下面有个add,会看到之前已经引入的CaptureActivity,(isLibrary一定不要点),点击OK。
将下载下来的文件夹中的这些内容移动到项目目录中去,看下图
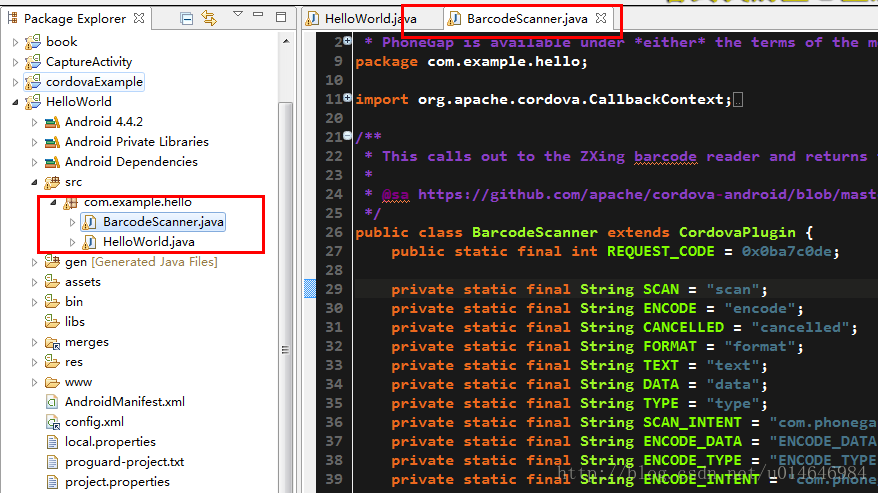
这个BarcodeScanner.java会报错,
报错1:

将这行代码改为 package com.example.qrcode; 即可,也就是
报错2:
解决办法很简单,按住Ctrl+shift + o 就可以将需要的包导进来了,这下就不会有错误了。
也差不多接近尾声了,需要配置一个非常重要的东西,叫做 AndroidManifest.xml,在它的<application>标签中添加如下代码
- <!-- ZXing activities -->
- <activity android:name="com.google.zxing.client.android.CaptureActivity"
- android:screenOrientation="landscape"
- android:clearTaskOnLaunch="true"
- android:configChanges="orientation|keyboardHidden"
- android:theme="@android:style/Theme.NoTitleBar.Fullscreen"
- android:windowSoftInputMode="stateAlwaysHidden"
- android:exported="false">
- <intent-filter>
- <action android:name="com.phonegap.plugins.barcodescanner.SCAN"/>
- <category android:name="android.intent.category.DEFAULT"/>
- </intent-filter>
- </activity>
- <activity android:name="com.google.zxing.client.android.encode.EncodeActivity" android:label="@string/share_name">
- <intent-filter>
- <action android:name="com.phonegap.plugins.barcodescanner.ENCODE"/>
- <category android:name="android.intent.category.DEFAULT"/>
- </intent-filter>
- </activity>
- <activity android:name="com.google.zxing.client.android.HelpActivity" android:label="@string/share_name">
- <intent-filter>
- <action android:name="android.intent.action.VIEW"/>
- <category android:name="android.intent.category.DEFAULT"/>
- </intent-filter>
- </activity>
这里的配置也就是使用外部CaptureActivity那个公共项目的关键,当然还需要在Manifest中写入权限,将
- <uses-permission android:name="android.permission.CAMERA" />
- <uses-permission android:name="android.permission.VIBRATE" />
- <uses-permission android:name="android.permission.ACCESS_COARSE_LOCATION" />
- <uses-permission android:name="android.permission.ACCESS_FINE_LOCATION" />
- <uses-permission android:name="android.permission.ACCESS_LOCATION_EXTRA_COMMANDS" />
- <uses-permission android:name="android.permission.INTERNET" />
- <uses-permission android:name="android.permission.RECEIVE_SMS" />
- <uses-permission android:name="android.permission.RECORD_AUDIO" />
- <uses-permission android:name="android.permission.RECORD_VIDEO"/>
- <uses-permission android:name="android.permission.MODIFY_AUDIO_SETTINGS" />
- <uses-permission android:name="android.permission.READ_CONTACTS" />
- <uses-permission android:name="android.permission.WRITE_CONTACTS" />
- <uses-permission android:name="android.permission.WRITE_EXTERNAL_STORAGE" />
- <uses-permission android:name="android.permission.ACCESS_NETWORK_STATE" />
- <uses-permission android:name="android.permission.GET_ACCOUNTS" />
- <uses-permission android:name="android.permission.BROADCAST_STICKY" />
- <uses-feature android:name="android.hardware.camera" />
- <uses-feature android:name="android.hardware.camera.autofocus" />
加入到</application>之后
END###############################################
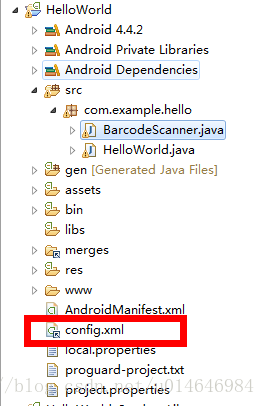
配置res/xml/config.xml文件,在<plugins>标签中添加
- <plugin name="BarcodeScanner" value="com.example.qrcode.BarcodeScanner"/>
其中com.example.qrcode也就是
 ,之后的BarcodeScanner也就是那个引入的Java文件。
START#############################################
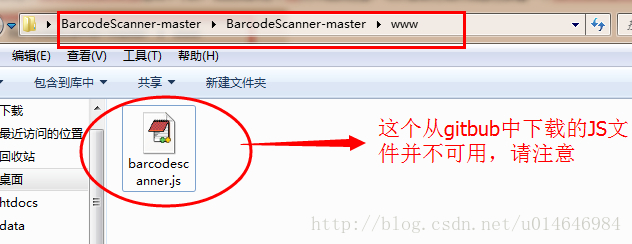
具体的配置过程就完成了,接下来需要通过JS来使用了,在assets文件中有个www文件夹(没有的创建一下),将phone-x.x.x.js和 下载下来的文件夹中的barcodescanner.js引入到www文件夹中,实际上下载下来的这个barcodescanner.js是用不了的,我把我的这个JS文件贴到这里,可以复制之后然后自己新建一个barcodescanner.js
barcodescanner.js
- /**
- * cordova is available under *either* the terms of the modified BSD license *or* the
- * MIT License (2008). See http://opensource.org/licenses/alphabetical for full text.
- *
- * Copyright (c) Matt Kane 2010
- * Copyright (c) 2011, IBM Corporation
- */
- cordova.define("cordova/plugins/barcodescanner",
- function(require, exports, module) {
- var exec = require("cordova/exec");
- var BarcodeScanner = function() {};
- //-------------------------------------------------------------------
- BarcodeScanner.prototype.scan = function(successCallback, errorCallback) {
- if (errorCallback == null) { errorCallback = function() {}}
- if (typeof errorCallback != "function") {
- console.log("BarcodeScanner.scan failure: failure parameter not a function");
- return
- }
- if (typeof successCallback != "function") {
- console.log("BarcodeScanner.scan failure: success callback parameter must be a function");
- return
- }
- exec(successCallback, errorCallback, 'BarcodeScanner', 'scan', []);
- };
- //-------------------------------------------------------------------
- BarcodeScanner.prototype.encode = function(type, data, successCallback, errorCallback, options) {
- if (errorCallback == null) { errorCallback = function() {}}
- if (typeof errorCallback != "function") {
- console.log("BarcodeScanner.scan failure: failure parameter not a function");
- return
- }
- if (typeof successCallback != "function") {
- console.log("BarcodeScanner.scan failure: success callback parameter must be a function");
- return
- }
- exec(successCallback, errorCallback, 'BarcodeScanner', 'encode', [{"type": type, "data": data, "options": options}]);
- };
- var barcodeScanner = new BarcodeScanner();
- module.exports = barcodeScanner;
- });
- cordova.define("cordova/plugin/BarcodeConstants",
- function(require, exports, module) {
- module.exports = {
- Encode:{
- TEXT_TYPE: "TEXT_TYPE",
- EMAIL_TYPE: "EMAIL_TYPE",
- PHONE_TYPE: "PHONE_TYPE",
- SMS_TYPE: "SMS_TYPE",
- }
- };
- });
- //-------------------------------------------------------------------
- var BarcodeScanner = cordova.require('cordova/plugin/BarcodeConstants');
- if(!window.plugins) {
- window.plugins = {};
- }
- if (!window.plugins.barcodeScanner) {
- window.plugins.barcodeScanner = cordova.require("cordova/plugins/barcodescanner");
- }
需要的配置和文件都已经准备好了,接下来需要建立一个index.html文件来使用扫描二维码了,很兴奋噢!!
index.html
- <html>
- <head>
- <script src="phonegap-2.9.0.js" type="text/javascript"></script>
- <script src="barcodescanner.js" type="text/javascript"></script>
- <script type="text/javascript">
- var scanCode = function() {
- window.plugins.barcodeScanner.scan(
- function(result) {
- alert("Scanned Code: " + result.text
- + ". Format: " + result.format
- + ". Cancelled: " + result.cancelled);
- }, function(error) {
- alert("Scan failed: " + error);
- });
- }
- var encodeText = function() {
- window.plugins.barcodeScanner.encode(
- BarcodeScanner.Encode.TEXT_TYPE,
- "http://www.mobiledevelopersolutions.com",
- function(success) {
- alert("Encode success: " + success);
- }, function(fail) {
- alert("Encoding failed: " + fail);
- });
- }
- var encodeEmail = function() {
- window.plugins.barcodeScanner.encode(
- BarcodeScanner.Encode.EMAIL_TYPE,
- "a.name@gmail.com", function(success) {
- alert("Encode success: " + success);
- }, function(fail) {
- alert("Encoding failed: " + fail);
- });
- }
- var encodePhone = function() {
- window.plugins.barcodeScanner.encode(
- BarcodeScanner.Encode.PHONE_TYPE,
- "555-227-5283", function(success) {
- alert("Encode success: " + success);
- }, function(fail) {
- alert("Encoding failed: " + fail);
- });
- }
- var encodeSMS = function() {
- window.plugins.barcodeScanner.encode(
- BarcodeScanner.Encode.SMS_TYPE,
- "An important message for someone.", function(success) {
- alert("Encode success: " + success);
- }, function(fail) {
- alert("Encoding failed: " + fail);
- });
- }
- </script>
- </head>
- <body>
- hello 二维码!
- <input type="button" onclick="scanCode()" value="扫描"/>
- <input type="button" onclick="encodeText()" value="转换文本"/>
- <input type="button" onclick="encodeEmail()" value="转换邮箱地址"/>
- </body>
- </html>
END###############################################
解决BarcodeScanner显示二维码时横屏问题
答:深度Google了一会儿,也试了很多方法,看到有很多人说现在BarcodeScanner现不支持竖屏,而且官方源码中也是有说明
- // We're landscape-only, and have apparently seen issues with display thinking it's portrait
- // when waking from sleep. If it's not landscape, assume it's mistaken and reverse them:
不过我也找到了一个办法可以实现竖屏,但是这样的办法只是实现了取景框以及二维码扫描框下方的文字显示为竖屏,但是摄像头中显示的图像是歪的 ,有需要的可以看看,在项目的Manifest.xml中做一下修改,将
- <activity android:name="com.google.zxing.client.android.CaptureActivity"
- android:screenOrientation="landscape"
- android:clearTaskOnLaunch="true"
- android:configChanges="orientation|keyboardHidden"
- android:theme="@android:style/Theme.NoTitleBar.Fullscreen"
- android:windowSoftInputMode="stateAlwaysHidden"
- android:exported="false">
- <intent-filter>
- <action android:name="com.phonegap.plugins.barcodescanner.SCAN"/>
- <category android:name="android.intent.category.DEFAULT"/>
- </intent-filter>
- </activity>
- <activity android:name="com.google.zxing.client.android.encode.EncodeActivity" android:label="@string/share_name">
- <intent-filter>
- <action android:name="com.phonegap.plugins.barcodescanner.ENCODE"/>
- <category android:name="android.intent.category.DEFAULT"/>
- </intent-filter>
- </activity>
- <activity android:name="com.google.zxing.client.android.HelpActivity" android:label="@string/share_name">
- <intent-filter>
- <action android:name="android.intent.action.VIEW"/>
- <category android:name="android.intent.category.DEFAULT"/>
- </intent-filter>
- </activity>
修改成
- <activity android:name="com.google.zxing.client.android.CaptureActivity"
- android:screenOrientation="<span style="font-family:Helvetica, arial, freesans, clean, sans-serif;color:#ff0000;"><span style="font-size: 14px; line-height: 26.44444465637207px;">portrait</span></span>"
- android:clearTaskOnLaunch="true"
- android:configChanges="orientation|keyboardHidden"
- android:theme="@android:style/Theme.NoTitleBar.Fullscreen"
- android:windowSoftInputMode="stateAlwaysHidden"
- android:exported="false">
- <intent-filter>
- <action android:name="com.phonegap.plugins.barcodescanner.SCAN"/>
- <category android:name="android.intent.category.DEFAULT"/>
- </intent-filter>
- </activity>
- <activity android:name="com.google.zxing.client.android.encode.EncodeActivity" android:label="@string/share_name">
- <intent-filter>
- <action android:name="com.phonegap.plugins.barcodescanner.ENCODE"/>
- <category android:name="android.intent.category.DEFAULT"/>
- </intent-filter>
- </activity>
- <activity android:name="com.google.zxing.client.android.HelpActivity" android:label="@string/share_name">
- <intent-filter>
- <action android:name="android.intent.action.VIEW"/>
- <category android:name="android.intent.category.DEFAULT"/>
- </intent-filter>
- </activity>
PG3.5之后的版本如何配置?
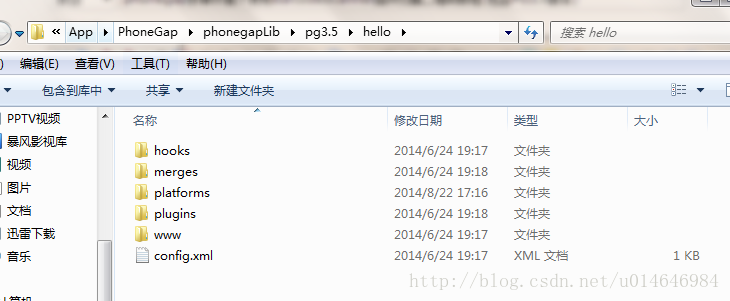
因为从2.9.0以后,phonegap官网就已经不提供库的下载了,所以大家都是通过nodejs来配置,但是本人从没有接触过这种配置方法,前一段时间偶然得到了一个PG3.5的通过nodejs获取的文件夹,例如
会发现文件结构已经完全不同了,当然我对于这个也只是个小白,对于3.X版本没有过多的了解,进入主题,还是实现BarcodeScanner插件。
①将通过nodejs建立好的项目引入到ADT中,这个接触过phonegap3.X同学们应该了解,首先将已存在项目引入
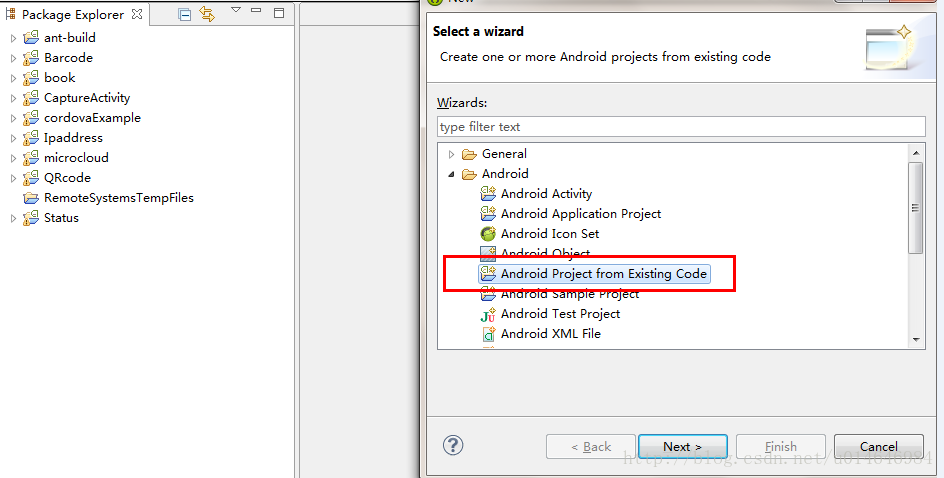
选择hello文件夹(也就是通过nodejs生成后的文件夹)
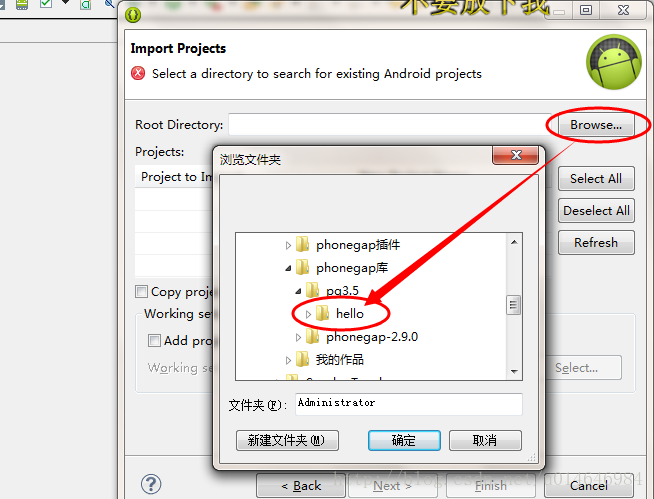
引入后的效果就是这样,将src包中的.java主文件配置成phonegap模式就好
Note:右侧黄框中的代码部分中是wwww文件夹,所以要在assets文件夹中新建一个wwww文件夹,当然不是一定要4个'W',3个'W'也是可以的。
②请参考上面的紫色 '#' 的部分,因为只是版本的变更问题,有些东西有变化,但是有些东西还是没有变化的
请参考
START####这里的内容END#####
部分
配置完成之后是这个样子
③如果到了这里,说明你已经配置完成了Manifest,接下来就是配置config.xml,细心的你会发现其实config.xml之前不是在这个位置的,原来是在res/xml文件夹下的,所以这里就是一个变化
打开config.xml,长的其实和以前也不一样了,主要是新版本的phonegap希望能够让开发者可以自己有效定制自己需要的功能。
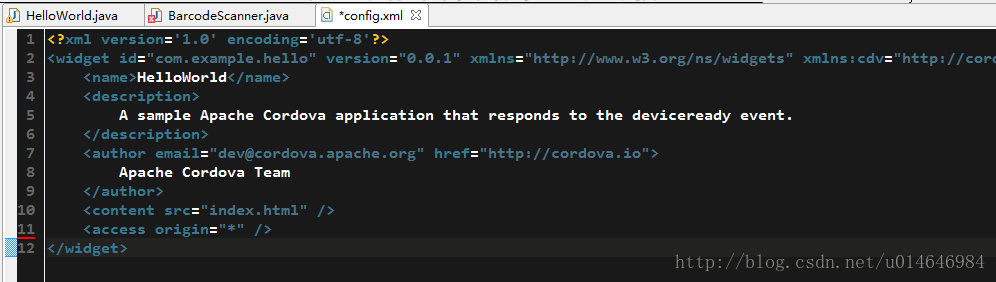
然后对它做一下小小的修改
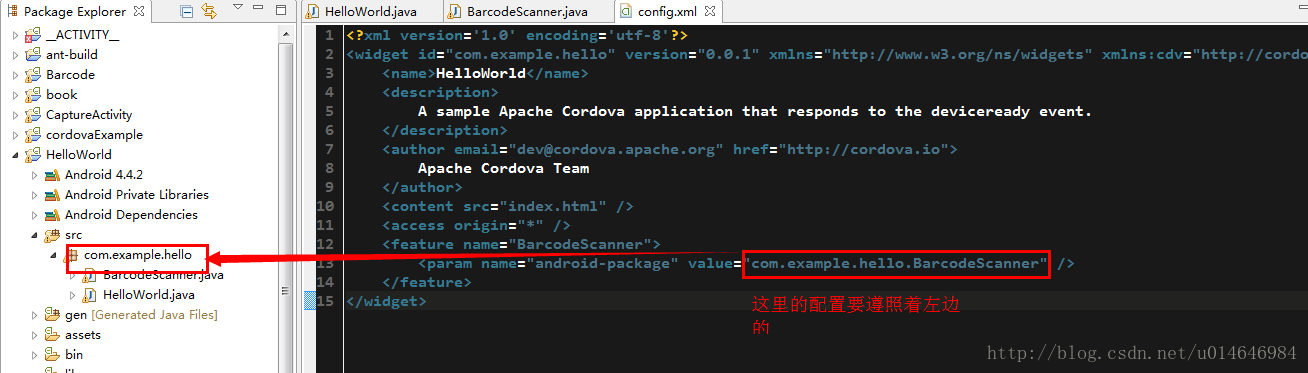
④基本的配置已经完成了,所以接下来将要添加HTML等等的内容了,这里还是从上面Copy
从上面的
STRAT#### 这里的内容噢 END####
⑤RUN
中间来完成接下来的配置,然后RUN,如果不出问题的话,会执行成功的。
Note:非常抱歉的说,这次配置其实并没有通过手机来测试,如果您有问题可以留言。
如果您还是有问题,可以留言噢。。
转载请注明出处:http://blog.csdn.net/u014646984/article/details/25655725


 3845
3845

 被折叠的 条评论
为什么被折叠?
被折叠的 条评论
为什么被折叠?
 到【灌水乐园】发言


