


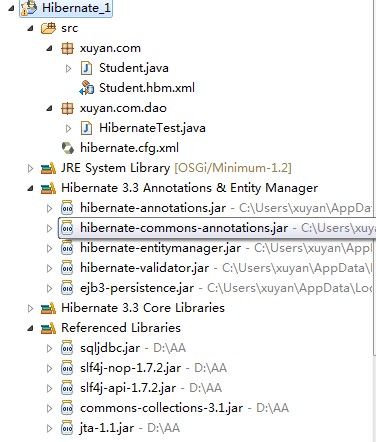
首先新建一个工程 导入相关jar包:
新建一个 Student .java
package xuyan.com;

public class Student {
       public int getID() {
		return ID;
	}
	public void setID(int iD) {
		ID = iD;
	}
	public String getName() {
		return name;
	}
	public void setName(String name) {
		this.name = name;
	}
	private int ID;
       private String name;
}
修改 hibernate.cfg.xml 文件:
<?xml version='1.0' encoding='UTF-8'?>
<!DOCTYPE hibernate-configuration PUBLIC
          "-//Hibernate/Hibernate Configuration DTD 3.0//EN"
          "http://hibernate.sourceforge.net/hibernate-configuration-3.0.dtd">

<!-- Generated by MyEclipse Hibernate Tools.                   -->
<hibernate-configuration>

<session-factory name="SqlServer">


	<property name="hibernate.connection.driver_class">
		com.microsoft.sqlserver.jdbc.SQLServerDriver
	</property>


	<property name="hibernate.connection.url">
		jdbc:sqlserver://localhost:1433;DatabaseName=hibernate
	</property>
	<property name="hibernate.connection.username">sa</property>
	<property name="hibernate.connection.password">1234</property>

	<property name="hibernate.dialect">
		org.hibernate.dialect.SQLServerDialect
	</property>
	<property name="hibernate.show_sql">true</property>
	<property name="hibernate.hbm2ddl.auto">update</property>
	<property name="current_session_context_class">thread</property>

	<mapping resource="xuyan/com/Student.hbm.xml" />


</session-factory>

</hibernate-configuration>
====================================================================
新建一个 Student.hbm.xml 和student.java 放在同一个包内:
<?xml version="1.0" encoding="UTF-8"?>

<!DOCTYPE hibernate-mapping PUBLIC
	"-//Hibernate/Hibernate Mapping DTD 3.0//EN"
	"http://www.hibernate.org/dtd/hibernate-mapping-3.0.dtd">


<hibernate-mapping >
	<class name="xuyan.com.Student" table="student">

		<id name="ID" column="ID" type="int">
		<generator class="native"/>
		</id>

		<property name="name" column="name" type="string"></property>

	</class>

</hibernate-mapping>
注意:
1、
<class name="xuyan.com.Student" table="student">2、 table="student" 中 student 为你的数据库表名。
3、 <generator class="native"/> native 表示 为ID自增长类型 (hibernate 会根据你的数据库类型 自动指定)
4、 <property name="name" column="name" type="string"></property> 中
type="string" string 必须为小写
最后写执行方法: HibernateTest.java
package xuyan.com.dao;

import org.hibernate.Session;
import org.hibernate.SessionFactory;
import org.hibernate.Transaction;
import org.hibernate.cfg.Configuration;

import xuyan.com.Student;

public class HibernateTest {

	/**
	 * @param args
	 */
	public static void main(String[] args) {


		SessionFactory sessionFactory=new Configuration().configure().buildSessionFactory();
		Session  session=sessionFactory.getCurrentSession();
		Transaction tx=session.beginTransaction();

		try {
			   Student  student=new Student();
			   //student.setID(1);
			   student.setName("sky99");
			   session.save(student);
			   tx.commit();

		} catch (Exception e) {
			tx.rollback();
			e.printStackTrace();
		}
	}

}
更多编程信息 请访问 www.ibcve.com 爱编程唯一网 !!
用注解的方式 实现hibernate
1、在Student.java 上加注解
package xuyan.com;

import javax.persistence.Entity;
import javax.persistence.GeneratedValue;
import javax.persistence.Id;

@Entity
public class Student {

	@Id
	@GeneratedValue
    public int getID() {
		return ID;
	}
	public void setID(int iD) {
		ID = iD;
	}
	public String getName() {
		return name;
	}
	public void setName(String name) {
		this.name = name;
	}
	private int ID;
       private String name;
}
2、在 hibernate.cfg.xml 中
把 <mapping resource="xuyan/com/Student.hbm.xml" />
改为 <mapping class="xuyan.com.Student" />
3、 将 SessionFactory sessionFactory=new Configuration().configure().buildSessionFactory();
改为 SessionFactory sessionFactory=new AnnotationConfiguration().configure().buildSessionFactory();


 642
642

 被折叠的 条评论
为什么被折叠?
被折叠的 条评论
为什么被折叠?
 到【灌水乐园】发言


