


Linux System Environment
标注:本章节教程以Nginx以源码编译安装环境讲解,默认Nginx安装路径/application/nginx
[root@nginx01 ~]# cat /etc/redhat-release #==》系统版本
CentOS Linux release 7.5.1804 (Core)
[root@nginx01 ~]# uname –r #==》内核版本
3.10.0-862.el7.x86_64
[root@nginx01 ~]# uname -m #==》系统架构
x86_64
[root@nginx01 ~]# echo $LANG #==》系统字符集
en_US.UTF-8
[root@nginx01 ~]# /application/nginx/sbin/nginx –v #==》Nginx版本
nginx version: nginx/1.16.1
NGINX HTTP 常用功能模块
提示:装时已经添加了以下功能模块,可通过 nginx -V 查看编译的参数.
1、ngx_http_core_module #包括一些核心的http参数配置,对应Nginx的配置为HTTP区块部分
2、ngx_http_access_module #访问控制模块,用来控制网站用户对Nginx的访问
3、ngx_http_gzip_module #压缩模块,对Nginx返回的数据压缩,属于性能优化模块
4、ngx_http_fastcgi_module #FastCGI模块,和 动态应用相关的模块,例如PHP
5、ngx_http_proxy_module #Proxy代理模块
6、ngx_http_upstream_module #负载均衡模块,可以实现网站的负载均衡功能及节点的健康检查
7、ngx_http_rewrite_module #URL地址重写模块
8、ngx_http_limit_conn_module #限制用户并发连接数及请求数模块
9、ngx_http_limit_req_module #根据定义的key限制Nginx请求过程的速率
10、ngx_http_log_module #访问日志模块,以指定的格式记录Nginx客户访问日志等信息
11、ngx_http_auth_basic_module #Web认证模块,设置Web用户通过账号、密码访问Nginx
12、ngx_http_ssl_module #ssl模块,用于加密的http连接,如https
13、ngx_http_stub_status_module #记录Nginx基本访问状态信息等模块
NGINX目录结构简介
[root@nginx01 nginx]# tree
├── client_body_temp #==》客户端临时存放文件目录
├── conf #==》Nginx所有配置文件目录,重要
│ ├── fastcgi.conf #==》fastgci相关参数的配置文件(动态应用)
│ ├── fastcgi.conf.default #==》fastgci.conf原始文件
│ ├── fastcgi_params #==》fastgci参数文件
│ ├── fastcgi_params.default #==》fastcgi_params原始文件
│ ├── koi-utf
│ ├── koi-win
│ ├── mime.types #==》媒体类型
│ ├── mime.types.default
│ ├── nginx.conf #==》Nginx默认主配置文件(静态应用),重要
│ ├── nginx.conf.default #==》nginx.conf原始文件
│ ├── scgi_params #==》scgi相关参数文件,一般用不到
│ ├── scgi_params.default
│ ├── uwsgi_params #==》uwsgi相关参数文件,一般用不到
│ ├── uwsgi_params.default
│ └── win-utf
├── fastcgi_temp #==》fastcgi临时数据目录
├── html #==》编译安装时Nginx默认站点目录,重要
│ ├── 50x.html #==》错误页面人性化替代显示
│ └── index.html #==》默认首页文件,可自定义
├── logs #==》Nginx默认存放日志路径,重要
│ ├── access.log #==》Nginx访问日志
│ ├── error.log #==》Nginx错误日志
│ └── nginx.pid #==》Nginx的pid文件,Nginx进程启动后,会把所有进程的ID号
写到此文件,如果Nginx停止,pid文件就会消失
├── proxy_temp #==》临时目录
├── sbin #==》存放Nginx命令的目录,重要
│ └── nginx #==》nginx启动命令
├── scgi_temp #==》临时目录
└── uwsgi_temp #==》临时目录
NGINX配置文件
[root@nginx01 ~]# cat /app/nginx/conf/nginx.conf #==》Nginx主配置文件
user nginx; #==》Nginx默认访问用户
worker_processes auto; #==》worker进程数量,与CPU核
数相同,设置auto自动调配
events { #==》events区块开始
worker_connections 1024; #==》每个worker进程支持的最大
连接数
} #==》events区块结束
http { #==》HTTP区块开始
include mime.types; #==》Nginx支持的媒体类型库文件
default_type application/octet-stream; #==》默认的媒体类型
sendfile on; #==》开启高效的传输模式
keepalive_timeout 65; #==》设置连接超时时间
include /application/nginx/conf/conf.d/*.conf; #==》指定Nginx子配置文件(server区块)
} #==》HTTP区块结束
[root@nginx01 ~]# cat /app/nginx/conf/conf.d/web.conf #==》Nginx子配置文件
server { #==》第一个server区块
开始,表示第一个虚拟主机站点
listen 80; #==》提供服务的端口,默
认80端口
server_name localhost; #==》提供服务的域名主机
名
location / { #==》第一个 location区块
开始,访问index.html首页
root html; #==》站点根目录
index index.html index.htm; #==》默认首页文件,多个
用空格分开
} #==》第一个location区块
结束
} #==》第一个server区块结
束
一、ngx_http_autoindex_module
1、模块功能
可以使用nginx作为简易的文件下载服务器
2、模块使用格式及参数说明
#==》模块开关
Syntax: autoindex on | off;
Default: autoindex off;
Context: http, server, location
Syntax: autoindex_exact_size on | off;
Default: autoindex_exact_size on;
Context: http, server, location
#==》默认为 on, 显示出文件的确切大小,单位是 bytes。
#==》修改为 off,显示出文件的大概大小,单位是 kB 或者 MB 或者 GB。
#==》指定你需要显示哪些文件格式以确切的大小显示
Syntax: autoindex_localtime on | off;
Default: autoindex_localtime off;
Context: http, server, location
#==》默认为 off,显示的文件时间为 GMT 时间。
#==》修改为 on, 显示的文件时间为文件的服务器时间。
二、ngx_http_stub_status_module
1、模块功能
显示Nginx服务运行的基本信息
2.模块使用格式及参数说明
Syntax: stub_status;
Default: —
Context: server, location
Active connections #==》当前活动的连接数
accepts #==》当前的总连接数 TCP
handled #==》成功的连接数 TCP
requests #==》总的 http 请求数
Reading #==》请求
Writing #==》响应
Waiting #==》待的请求数,开启了 keepalive
#==》注意, 一次 TCP 的连接,可以发起多次 http 的请求, 如下参数可配置进行验证
keepalive_timeout 0; #==》类似于关闭长连接
keepalive_timeout 65; #==》 65s 没有活动则断开连接
3.配置案例
[root@nginx01 ~]#vim /app/nginx/conf/conf.d/web.conf
server {
listen 80;
server_name status.test.com;
stub_status on;
access_log off;
}
[root@nginx01 ~]# /app/nginx/sbin/nginx -t
[root@nginx01 ~]# /app/nginx/sbin/nginx -s reload
4.测试
[root@nginx01 ~]# curl status.test.com
Active connections: 1
server accepts handled requests
39 39 79
Reading: 0 Writing: 1 Waiting: 0
三、ngx_http_access_module
1、模块功能
限制IP访问Nginx服务
2、模块使用格式及参数说明
#==》设置允许访问Nginx服务的IP地址
Syntax: allow address | CIDR | unix: | all;
Default: —
Context: http, server, location, limit_except
#==》设置禁止访问Nginx服务的IP地址
Syntax: deny address | CIDR | unix: | all;
Default: —
Context: http, server, location, limit_except
3、配置案例
#==》方案一
[root@nginx01 ~]# vim /application/nginx/conf/conf.d/www.conf
server {
listen 80;
server_name localhost;
location / {
root html;
index index.html index.htm;
allow 10.0.0.1;
deny all;
}
}
#==》方案二
[root@nginx01 ~]# vim /application/nginx/conf/conf.d/www.conf
server {
listen 80;
server_name localhost;
location / {
root html;
index index.html index.htm;
deny 10.0.0.1;
allow all;
}
}
[root@nginx01 ~]# /app/nginx/sbin/nginx -t
[root@nginx01 ~]# /app/nginx/sbin/nginx -s reload
4、测试
[root@nginx02 nginx]# curl 10.0.0.80
403 Forbidden
四、ngx_http_auth_basic_module
1、模块功能
基于用户认证访问Nginx服务
#==》用户验证提示信息
Syntax: auth_basic string | off;
Default: auth_basic off;
Context: http, server, location, limit_except
#==》用户验证的密码文件
Syntax: auth_basic_user_file file;
Default: —
Context: http, server, location, limit_except
3、配置案例
#==》安装httpd软件包
[root@nginx01 ~]# yum -y install httpd-tools
#==》使用httpd软件自带的命令对认证用户的密码进行加密处理
[root@nginx01 ~]# htpasswd -b -c /application/nginx/http_passwd test test123
Adding password for user test
[root@nginx01 ~]# cat /application/nginx/http_passwd
test: a p r 1 apr1 apr1ZKfLjVXa$u2iRf7vR9Q2qDA.OnmowM1
[root@nginx01 ~]# vim /app/nginx/conf/conf.d/web.conf
server {
listen 80;
server_name localhost;
location / {
auth_basic “input username and password!”;
auth_basic_user_file /app/nginx/http_passwd;
root html;
index index.html index.htm;
}
}
[root@nginx01 ~]# /app/nginx/sbin/nginx -t
[root@nginx01 ~]# /app/nginx/sbin/nginx -s reload
4、测试
#==》返回404错误状态码*
[root@nginx02 ~]# curl -I 10.0.0.80
HTTP/1.1 401 Unauthorized
Server: nginx/1.16.1
Date: Wed, 21 Aug 2019 03:44:21 GMT
Content-Type: text/html
Content-Length: 179
Connection: keep-alive
WWW-Authenticate: Basic realm=“input username and password!”
#==》返回200正常状态码
[root@nginx02 ~]# curl -I -u test:test123 10.0.0.80
HTTP/1.1 200 OK
Server: nginx/1.16.1
Date: Wed, 21 Aug 2019 03:44:16 GMT
Content-Type: text/html
Content-Length: 612
Last-Modified: Tue, 20 Aug 2019 02:25:49 GMT
Connection: keep-alive
ETag: “5d5b5a2d-264”
Accept-Ranges: bytes
五、ngx_http_limit_conn_module
1、模块功能
针对恶意攻击Nginx服务的连接频率进行限制
2、模块使用格式及参数说明
#==》定义客户端连接数
Syntax: limit_conn zone number;
Default: —
Context: http, server, location
#==》设置请求错误网页提示的状态码,默认是提示503
Syntax: limit_conn_status code;
Default: limit_conn_status 503;
Context: http, server, location
This directive appeared in version 1.3.15.
#==》标签段定义连接限制
Syntax: limit_conn_zone key zone=name:size;
Default: —
Context: http
3、配置案例
#==》在 http区块定义客户端变量及容器大小为1M
[root@nginx01 ~]# vim /app/nginx/conf/nginx.conf
http {
limit_conn_zone $binary_remote_addr zone=addr:1m;
}
#==》访问日志记录及客户连接数和连接限速100k/s
[root@nginx01 ~]# vim /app/nginx/conf/conf.d/wen.conf
server {
listen 80;
server_name localhost;
#==》同一时刻每个IP只能发起1个连接请求
limit_conn addr 1;
#==》限速100KB/s
limit_rate 100k;
access_log /app/nginx/logs/access.log main;
location / {
root html;
index index.html index.htm;
}
}
[root@nginx01 ~]# /app/nginx/sbin/nginx -t
[root@nginx01 ~]# /app/nginx/sbin/nginx -s reload
4、测试
[root@nginx01 ~]# yum -y install httpd-tools
[root@lamp ~]# ab -n 100 -n 2 10.0.0.80/
[root@nginx01 ~]# tail -F /application/nginx/logs/access.log
六、ngx_http_limit_req_module(推荐使用)
1、模块功能
针对恶意攻击Nginx服务的请求频率进行限制
2、模块使用格式及参数说明
#==》限定再次接收数据包的数量
Syntax: limit_req zone=name [burst=number] [nodelay | delay=number];
Default: —
Context: http, server, location
#==》设置请求错误网页提示的状态码,默认是提示503
Syntax: limit_req_status code;
Default: limit_req_status 503;
Context: http, server, location
This directive appeared in version 1.3.15.
#==》标签段定义请求限制
Syntax: limit_req_zone key zone=name:size rate=rate [sync];
Default: —
Context: http
3、配置案例
#==》在 http区块定义客户端变量及容器大小为10M,客户端每请求处理速度不超过每秒1个数据包(包
含1个)
[root@nginx01 ~]# vim /application/nginx/conf/nginx.conf
http {
limit_req_zone $binary_remote_addr zone=addr:10m rate=1r/s;
}
#》引用http定义的客户端变量,客户端每秒接收3个数据包,后续接收请求提示503错误,
#》至到下一步再重新接每秒收3个数据包(3个数据包外加http定义的客户端变量1个数据包,一共4个
数据包)
[root@nginx01 ~]# vim /application/nginx/conf/conf.d/www.conf
server {
listen 80;
server_name localhost;
limit_req zone=addr burst=3 nodelay;
access_log /app/nginx/logs/access.log main;
location / {
root html;
index index.html index.htm;
}
}
[root@nginx01 ~]# /app/nginx/sbin/nginx -t
[root@nginx01 ~]# /app/nginx/sbin/nginx -s reload
4、测试
[root@nginx02 ~]# ab -n 6 -c 1 10.0.0.80/
[root@nginx01 ~]# tail -F /application/nginx/logs/access.log
10.0.0.81 - - [21/Aug/2019:15:58:56 +0800] “GET / HTTP/1.0” 200 612 “-” “ApacheBench/2.3” “-”
10.0.0.81 - - [21/Aug/2019:15:58:56 +0800] “GET / HTTP/1.0” 200 612 “-” “ApacheBench/2.3” “-”
10.0.0.81 - - [21/Aug/2019:15:58:56 +0800] “GET / HTTP/1.0” 200 612 “-” “ApacheBench/2.3” “-”
10.0.0.81 - - [21/Aug/2019:15:58:56 +0800] “GET / HTTP/1.0” 200 612 “-” “ApacheBench/2.3” “-”
10.0.0.81 - - [21/Aug/2019:15:58:56 +0800] “GET / HTTP/1.0” 503 197 “-” “ApacheBench/2.3” “-”
10.0.0.81 - - [21/Aug/2019:15:58:56 +0800] “GET / HTTP/1.0” 503 197 “-” “ApacheBench/2.3” “-”
[root@nginx02 ~]# ab -n 2000 -c 1 10.0.0.80/
[root@nginx01 ~]# grep “200” /application/nginx/logs/access.log
10.0.0.81 - - [21/Aug/2019:16:02:40 +0800] “GET / HTTP/1.0” 200 612 “-” “ApacheBench/2.3” “-”
10.0.0.81 - - [21/Aug/2019:16:02:40 +0800] “GET / HTTP/1.0” 200 612 “-” “ApacheBench/2.3” “-”
10.0.0.81 - - [21/Aug/2019:16:02:40 +0800] “GET / HTTP/1.0” 200 612 “-” “ApacheBench/2.3” “-”
10.0.0.81 - - [21/Aug/2019:16:02:40 +0800] “GET / HTTP/1.0” 200 612 “-” “ApacheBench/2.3” “-”
10.0.0.81 - - [21/Aug/2019:16:02:41 +0800] “GET / HTTP/1.0” 200 612 “-” “ApacheBench/2.3” “-”
提示:为什么限制请求的效果更好
我们先来回顾一下 http 协议的连接与请求,首先 HTTP 是建立在 TCP 基础之上, 在完成 HTTP 请
求需要先建立TCP 三次握手(称为 TCP 连接) ,在连接的基础上在完成 HTTP 的请求。
所以多个 HTTP 请求可以建立在一次 TCP 连接之上, 那么我们对请求的精度限制,当然比对一个连
接的限制会更加的有效,因为同一时刻只允许一个 TCP 连接进入, 但是同一时刻多个 HTTP 请求可以通
过一个 TCP 连接进入。所以针对 HTTP 的请求限制才是比较优的解决方案。
七、ngx_http_core_module(location)
1、模块功能
此模块功能过多,本小节只讲解location功能,location是区块事件,匹配正则可以多样化指定访
问站点目录资源
2、模块使用格式及参数说明
Syntax: location [ = | ~ | ~* | ^~ ] uri { … }
location @name { … }
Default: —
Context: server, location
匹配符 匹配规则 优先级
= 精确匹配 1
^~ 以某个字符串开头 2
~ 区分大小写的正则匹配 3
~* 不区分大小写的正则匹配 4
!~ 区分大小写不匹配的正则 5
!~* 不区分大小不匹配的正则 6
/ 通用匹配,任何请求都会匹配到 7
3、配置案例
[root@nginx01 ~]# vim /app/nginx/conf/conf.d/web.conf
server {
listen 80;
server_name localhost;
root /application/nginx/html;
location / {
return 200 “location / \n”;
}
location = / {
return 200 “location = \n”;
}
location /documents/ {
    return 200 "location /documents/ \n";
}
location ^~ /images/ {
    return 200 "location ^~ /images/ \n";

}
location ~* \.(gif|jpg|jpeg)$ {
    return 200 "location ~* \.(gif|jpg|jpeg) \n";
}
access_log off;
}
[root@nginx01 ~]# /app/nginx/sbin/nginx -t
[root@nginx01 ~]# /app/nginx/sbin/nginx -s reload
4、测试
#==》精确匹配根目录
[root@nginx01 ~]# curl 10.0.0.80
location =
#==》不符合精确匹配,只能使用通用匹配
[root@nginx01 ~]# curl 10.0.0.80/index.html
location /
#==》通用匹配字符串缺少一个字符都不匹配,但可以加多字符串
[root@nginx01 ~]# curl 10.0.0.80/documents
location /documents/
[root@nginx01 ~]# curl 10.0.0.80/documents123
location /documents/
[root@nginx01 ~]# curl 10.0.0.80/document
location /
#==》~匹配高于通用匹配
[root@nginx01 ~]# curl 10.0.0.80/documents/oldboy.jpeg
location ~ .(gif|jpg|jpeg)
#==》文件的匹配高于目录的匹配(没有优先级之分),目录匹配按顺序匹配(没有优先级之分)
[root@nginx01 ~]# curl 10.0.0.80/documents/images/
location /documents/
[root@nginx01 ~]# curl 10.0.0.80/images/documents/
location ^~ /images/
[root@nginx01 ~]# curl 10.0.0.80/documents/images/oldboy.gif
location ~* .(gif|jpg|jpeg)
八、ngx_http_gzip_module
1、模块功能
(1)、ngx_gzip压缩模块提供了对文件内容压缩的功能,允许nginx服务器将输出内容在发送到客
户之前根据具体的策略进行压缩,以节约网站带宽,同时提升用户的访问体验,ngx_gzip压缩模块默认
已安装。
(2)、ngx_gzip压缩模块有一个缺点,压缩文件时会消耗CPU资源,所以,解决此问题可以在压缩
时选择小文件进行压缩,例如只压缩小文件,例如JS/CSS/HTML等,大文件不压缩,例如图片/视
频/FLASH等。
2、模块使用格式及参数说明
#==》开启或关闭gzip压缩功能
Syntax: gzip on | off;
Default: gzip off;
Context: http, server, location, if in location
#==》设置允许压缩的页面最小字节数,建议设置成1K
Syntax: gzip_min_length length;
Default: gzip_min_length 20;
Context: http, server, location
#==》设置缓冲区大小,32 4K表示32个单位的4K的内存作为压缩结果流缓存
Syntax: gzip_buffers number size;
Default: gzip_buffers 32 4k|16 8k;
Context: http, server, location
#==》压缩版本(默认1.1),默认即可
Syntax: gzip_http_version 1.0 | 1.1;
Default: gzip_http_version 1.1;
Context: http, server, location
#==》压缩比率等级,用来指定GZIP压缩比,1压缩比最小点,处理速度最快;9压缩比最大,传输速度快
,但处理最慢,比较消耗CPU资源
Syntax: gzip_comp_level level;
Default: gzip_comp_level 1;
Context: http, server, location
#==》用来指定压缩的类型,类型设置方法查看/aplication/nginx/conf/mime.types文件内容
**Syntax:**gzip_types mime-type …;
Default: gzip_types text/html;
Context: http, server, location
#==》vary header支持,该选项可以让前端的缓存服务器缓存经过GZIP压缩的页面,例如用Squid缓存过
的Nginx压缩的数据
**Syntax:**gzip_vary on | off;
**Default:**gzip_vary off;
Context: http, server, location
3、配置案例
[root@nginx01 ~]# vim /app/nginx/conf/conf.d/web.conf
server {
listen 80;
server_name localhost;
location / {
root html;
index index.html index.htm;
gzip on;
gzip_min_length 1k;
gzip_buffers 4 32K;
gzip_http_version 1.1;
gzip_comp_level 3;
gzip_types text/css application/javascript;
gzip_vary on;
}
}
[root@nginx01 ~]# /app/nginx/sbin/nginx -t
[root@nginx01 ~]# /app/nginx/sbin/nginx -s reload
4、测试
使用chrome**浏览器访问显示测试结果
输入测试的网站地址 http://10.0.0.8 — 按F12键 — Network
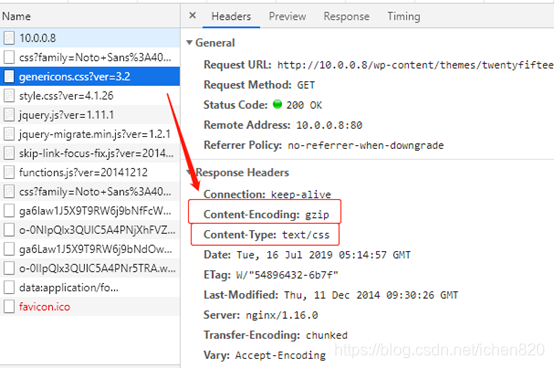
genenicons.css?ver=3.2 >>Content-Encoding:gzip
>>Content-Type:text/css
九、ngx_http_headers_module(expires)
1、模块功能
(1)、expires功能在访问量比较大的网站中,利用客户端缓存网站上不经常变动的图片或网页等
,缓解服务器压力,节省网站带宽,提升用户体验。
(2)、expires功能缺点如果设置缓存时间过长,网站更新了数据,客户端口可能依然使用缓存的旧数
据,无法及时更新。解决办法:(1)、缩短缓存时间;(2)、资源文件更新时进行改名。
2、模块使用格式及参数说明
作者:
Syntax: expires [modified] time;
expires epoch | max | off;
Default: expires off;
Context: http, server, location, if in location
3、配置案例
[root@nginx01 ~]# vim /app/nginx/conf/conf.d/web.conf
Server{
location ~ .*.(gif|jpg|jpeg|png|bmp|swf)$ {
root html;
expires 3650d;
}
            location ~ .*\.(js|css)?$ {
                      root html;
                      expires 30d;
             }
}
[root@nginx01 ~]# /app/nginx/sbin/nginx -t
[root@nginx01 ~]# /app/nginx/sbin/nginx -s reload
4、测试
使用chrome浏览器访问显示测试结果
输入测试的网站地址 http://10.0.0.8 — 按F12键 — Network
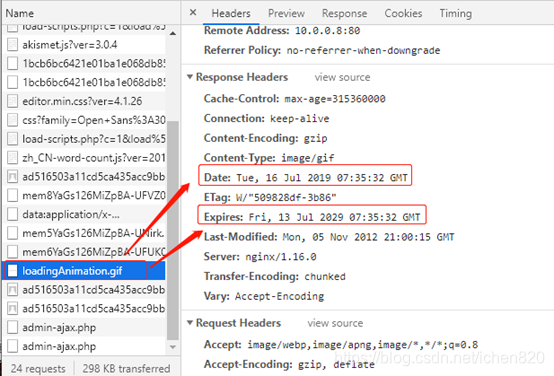
loadingAnimation.gif >>Date:Tue,16 jul 2019 10:35:32 GMT
>>Expires:Fri,13 jul 2029 10:35:32 GMT
十、ngx_http_log_module
1、模块功能
记录Nginx服务用户访问日志/错误日志
2、模块使用格式及参数说明
Syntax: access_log path [format [buffer=size] [gzip[=level]] [flush=time] [if=condition]];
access_log off;
Default: access_log logs/access.log combined;
Context: http, server, location, if in location, limit_except
#==》日志记录格式,日志名称main(可以自定义名称)
log_format main '$remote_addr - r e m o t e u s e r [ remote_user [ remoteuser[time_local] “$request” ’
'$status b o d y b y t e s s e n t " body_bytes_sent " bodybytessent"http_referer" ’
‘“ h t t p u s e r a g e n t " " http_user_agent" " httpuseragent""http_x_forwarded_for”’;
#==》日志格式参数对应访问日志记录的信息
[root@nginx01 conf]# head -1 /var/log/www.testwebsite_access.log
10.0.0.1 - - [24/Jun/2019:19:14:04 +0800] “GET / HTTP/1.1” 200 19 “-” "Mozilla/5.0 (Windows
NT 10.0; WOW64; Trident/7.0; rv:11.0) like Gecko" “-”
参数说明:
$remote_addr #==》客户端IP地址
$remote_user #==》对应第二个杠-代表远程用户,没有远程用户
[$time_local] #==》对应[24/Jun/2019:19:14:04 +0800]代表Nginx服务器本地时间
“$request” #==》对应"GET / HTTP/1.1"
$status #==》对应200状态码 ",200表示访问正常
$body_bytes_sent #==》对应19字节,即响应body的大小
“$http_referer” #==》对应"-",由于直接打开域名浏览器,所以,referer没有值
“$http_user_agent” #==》对应"Mozilla/5.0 (Windows NT 10.0; WOW64; Trident/7.0; rv:11.0)
like Gecko"
“$http_x_forwarded_for” #==》对应"-",因为Web服务没有使用代理,因此此处为"-"
3、配置案例
[root@nginx01 ~]# vim /app/nginx/conf/nginx.conf
http {
log_format main '$remote_addr - r e m o t e u s e r [ remote_user [ remoteuser[time_local] “$request” ’
'$status b o d y b y t e s s e n t " body_bytes_sent " bodybytessent"http_referer" ’
‘“ h t t p u s e r a g e n t " " http_user_agent" " httpuseragent""http_x_forwarded_for”’;
}
[root@nginx01 ~]# vim /app/nginx/conf/conf.d/web.conf
server {
             listen 80;

             server_name www.testwebsite.com;

             location / {

                         root html/www;

                         index index.html index.htm;

             }
             access_log /var/log/www.testwebsite_access.log main;
}
#==》记录不需要的access访问日志
server {
location ~ .*.(js|jpg|JPG|JPEG|jpeg|css|bmp|gif|GIF)$ {
access_log off;
}
}
[root@nginx01 ~]# /app/nginx/sbin/nginx -t
[root@nginx01 ~]# /app/nginx/sbin/nginx -s reload
4、测试
[root@nginx01 ~]# ls -l /application/nginx/logs/
total 8216
-rw-r–r-- 1 root root 189381 Aug 22 08:40 access.log
-rw-r–r-- 1 root root 8212625 Aug 22 08:56 error.log
-rw-r–r-- 1 root root 6 Aug 21 11:09 nginx.pid
[root@nginx01 ~]# tail -1 /application/nginx/logs/access.log
10.0.0.1 - - [22/Aug/2019:08:40:24 +0800] “GET /favicon.ico HTTP/1.1” 404 153 “-”
“Mozilla/5.0 (Windows NT 10.0; WOW64; Trident/7.0; rv:11.0) like Gecko”
5、补充案例(Nginx日志切割脚本)
[root@nginx01 scripts]# mkdir -s /server/scripts/ #==》创建脚本目录
[root@nginx01 scripts]# cd /server/scripts/
[root@nginx01 scripts]# vim cut_nginx_log.sh #==》编写shell脚本
#!/bin/bash
DateFormat=$(date +%Y%m%d –d -1day)
NginxLogDir="/var/log/"
NginxCommDir="/app/nginx/sbin/nginx"
NginxLogFile=“www.testwebsite_access”
[ -d $NginxLogDir ] && cd $NginxLogDir || exit 1
[ -f ${NginxLogFile}.log ] || exit 1
/bin/mv ${NginxLogFile}.log KaTeX parse error: Expected group after '_' at position 15: {NginxLogFile}_̲{DateFormat}.log
$NginxCommDir -s reload
[root@nginx01 scripts]# crontab –e #==》设置定时任务
###cut Nginx access log ,author:xiaoming, create date:20190624
00 00 * * * /bin/sh /server/scripts/cut_nginx_log.sh >/dev/null 2>&1
[root@nginx01 scripts]# crontab –l #==》查看定时任务
###cut Nginx access log ,author:xiaoming, create date:20190624
00 00 * * * /bin/sh /server/scripts/cut_nginx_log.sh >/dev/null 2>&1
6、访问日志的权限设置
提示:不需要在日志目录上分配所属者nginx或读写权限,因为nginx服务的master process主进程是
root用户
chown –R root.root /app/logs
chmod –R 700 /app/logs
十一、ngx_http_referer_module
1、模块功能
(1)、referer模块用于阻止指定网站URL的值无效的请求访问站点,此功能可用于Web资源防盗链
,阻止某些不法的网站未通过许可就非法调用网站资源,达到节省网站流量并且减轻服务器被频繁访问
的压力。
(2)、防盗链功能需要根据公司实际情况进行设置,以免造成不必要损失。
2、模块使用格式及参数说明
yntax: valid_referers none | blocked | server_names | string …;
Default: —
Context: server, location
3、配置案例
[root@nginx01 ~]# vim /application/nginx/conf/conf.d/www.conf
Server {
#==****》防盗链location标签建议放在server标签里最前面,否则会无效果
location ~* .*.(jpg|gif|png|swf|flv|mp4|jpeg)$ {
valid_referers none blocked *.testwebsite.com
testwebsite.com;
if ($invalid_referer) {
rewrite ^/ http://www.testwebsite.com/error.jpg;
}
}
[root@nginx01 ~]# /app/nginx/sbin/nginx -t
[root@nginx01 ~]# /app/nginx/sbin/nginx -s reload


 被折叠的 条评论
为什么被折叠?
被折叠的 条评论
为什么被折叠?
 到【灌水乐园】发言


