


VUE路由案例(商品列表)—vue练习必选项目(附原码)
文章目录
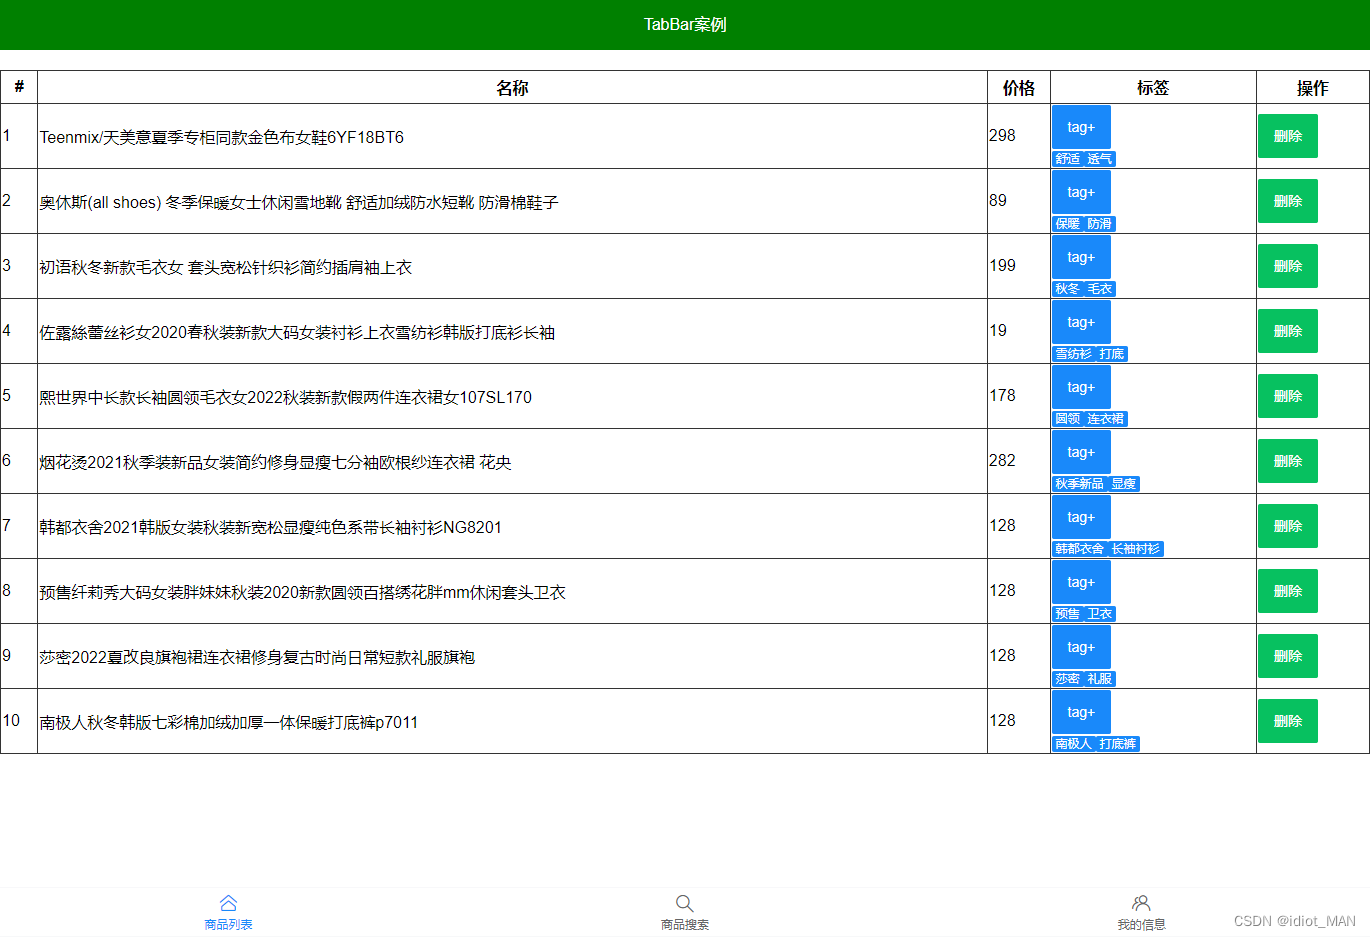
练习VUE基础知识点,练习了组件封装,父子组件之间得通信,组件插槽和组件路由,是一个很不错得练习项目
路由配置
二级路由
组件
- Layout.vue —总的框架
- List.vue ----商品列表
- Search.vue -----商品搜索
- My.vue-----我的信息
配置路由
const routes = [
  {
    path: '/',
    redirect: '/list',
    component: () => import('../views/Layout'),
    children: [
      {
        path: 'list',
        component: () => import('../views/List'),
      },
      {
        path: 'search',
        component: () => import('../views/Search'),
      },
      {
        path: 'my',
        component: () => import('../views/My'),
      },
    ],
  },
  {
    path: '*',
    component: () => import('../views/NotFound'),
  },
]
底部封装
- 创建MyTabBar.vue组件
<template>
  <van-tabbar v-model="active" route>
    <van-tabbar-item icon="home-o" to="/list">商品列表</van-tabbar-item>
    <van-tabbar-item icon="search" to="/search">商品搜索</van-tabbar-item>
    <van-tabbar-item icon="friends-o" to="/my">我的信息</van-tabbar-item>
  </van-tabbar>
</template>

<script>
export default {
  data() {
    return {
      active: 0,
    }
  },
}
</script>
顶部封装
-
创建MyHead.vue组件
<template>
  <div class="head">TabBar案例</div>
</template>

<script>
export default {}
</script>

<style scoped>
.head {
  height: 50px;
  line-height: 50px;
  background-color: blue;
  text-align: center;
  color: white;
}
</style>
商品列表
- 封装MyTable.vue ===标签和样式
- axios 在MyGoodList.vue请求数据回来
- 请求地址https://www.escook.cn/api/goods
- 传入MyTable.vue 中循环数据显示
axios 在MyGoodList.vue请求数据回来
-
下载axios
yarn add axios -
MyGoodList.vue
<template> <div> <my-table :list="list"></my-table> </div> </template> <script> import axios from 'axios' import MyTable from './MyTable.vue' export default { components: { MyTable, }, data() { return { list: [], } }, created() { // axios({ // url: 'https://www.escook.cn/api/goods', // }).then((res) => { // let { // data: { data: result }, // } = res // console.log(result) // }) this.getDate() }, methods: { async getDate() { let { data: { data: result }, } = await axios({ url: 'https://www.escook.cn/api/goods' }) console.log(result) this.list = result }, }, } </script> -
MyTable.vue
<template>
  <table class="table">
    <thead>
      <tr>
        <th>#</th>
        <th>名称</th>
        <th>价格</th>
        <th>标签</th>
        <th>操作</th>
      </tr>
    </thead>
    <tbody>
      <tr v-for="(item, index) in list">
        <td>{{ item.id }}</td>
        <td>{{ item.goods_name }}</td>
        <td>{{ item.goods_price }}</td>
        <td>{{ item.tags }}</td>
        <td>
          <van-button type="primary">删除</van-button>
        </td>
      </tr>
    </tbody>
  </table>
</template>

<script>
export default {
  props: {
    list: Array,
  },
}
</script>

<style scoped>
.table {
  width: 100%;
  margin: 20px auto;
  border: 1px solid #333;
  border-collapse: collapse;
}
td,
th {
  border: 1px solid #333;
  height: 30px;
}
</style>
商品表格–插槽
使用插槽技术,和作用域插槽技术,给MyTable.vue组件,自定义列标题,自定义表格内容
需求:允许用户自定义表个头和表格单元格内容
- 把MyTable.vue里准备slot
- 使用MyTable组件时传入具体标签
步骤:
- 提高组件==复用性和灵活性 ==,把表格列标题thead部分预留slot ,设置name属性
- 使用MyTable.vue时,传入列标题标签
- 表格内容td部分也可以让组件使用者自定义,也给tbody预留slot 和name属性
- 使用插槽需要用到插槽内的item对象上的数据,作用域插槽
MyTable.vue
<template>
  <table class="table">
    <thead>
      <tr>
        <!-- <th>#</th>
        <th>名称</th>
        <th>价格</th>
        <th>标签</th>
        <th>操作</th> -->
        <slot name="header"></slot>
      </tr>
    </thead>
    <tbody>
      <tr v-for="(item, index) in list">
        <!-- <td>{{ item.id }}</td>
        <td>{{ item.goods_name }}</td>
        <td>{{ item.goods_price }}</td>
        <td>{{ item.tags }}</td>
        <td>
          <van-button type="primary">删除</van-button>
        </td> -->
        <slot name="body" :row="item" :index="index"></slot>
      </tr>
    </tbody>
  </table>
</template>

<script>
export default {
  props: {
    list: Array,
  },
}
</script>
MyGoodList.vue
<template>
  <div>
    <my-table :list="list">
      <template #header>
        <th>#</th>
        <th>名称</th>
        <th>价格</th>
        <th>标签</th>
        <th>操作</th>
      </template>
      <template #body="{ row, index }">
        <td>{{ row.id }}</td>
        <td>{{ row.goods_name }}</td>
        <td>{{ row.goods_price }}</td>
        <td>{{ row.tags }}</td>
        <td>
          <van-button type="primary">删除</van-button>
        </td>
      </template>
    </my-table>
  </div>
</template>
商品表格tags
<td>
          <van-tag v-for="(str, ind) in row.tags" :key="ind" type="primary">{{
            str
          }}</van-tag>
        </td>
商品表格–删除功能
点击删除按钮删除数据
分析:
- 删除按钮绑定点击事件
- 作用域插槽绑定id出来
- 传给删除方法,删除MyGoodList.vue里数组的数据
MyGoodList.vue—注册点击事件
 <van-button type="primary" @click="removeBtn(row.id)"
            >删除</van-button>
MyGoodList.vue 根据id删除
methods:{
    removeBtn(id) {
      // 1 根据id查找下标
      let index = this.list.findIndex((obj) => obj.id === id)
      // 2 实现删除
      this.list.splice(index, 1)
    },
}
商品表格—添加tab
需求:点击tab按钮,出现输入框自动获取焦点,失去焦点关闭输入框,会出新增tag,esc清空内容
- 点击tab,按钮消失,输入框出现
- 输入框自动获焦
- 失去焦点,输入框消失,按钮出现
- 检测输入框回车,无数据拦截
- 输入框取消,清空数据
- 检测输入框回车,有数据添加
点击tab,按钮消失,输入框出现
  <div class="top">
            <van-field
              v-model="value"
              v-if="row.inputVisible"
              placeholder="请输入tab内容"
            />
            <van-button v-else @click="row.inputVisible = true" type="info"
              >tag+</van-button
            >
 </div>
输入框自动获焦
<van-field
              v-model="value"
              v-if="row.inputVisible"
              placeholder="请输入tab内容"
              :autofocus="true"
            />
失去焦点,输入框消失,按钮出现
 <van-field
              v-model="value"
              v-if="row.inputVisible"
              placeholder="请输入tab内容"
              :autofocus="true"
              @blur="row.inputVisible = false"
            />
输入框回车新增tag
1:监听input的回车事件
<van-field
              v-model="row.inputValue"
              v-if="row.inputVisible"
              placeholder="请输入tab内容"
              :autofocus="true"
              @blur="row.inputVisible = false"
              @keydown.enter="enterFn(row)"
            />
2.事件处理函数
 // 新增tag
    enterFn(row) {
      // console.log(row, 0)
      // 非空判断
      if (row.inputValue.trim().length === 0) {
        return alert('请输入数据')
      }

      // 添加
      row.tags.push(row.inputValue)
      row.inputValue = ''
    },
input框 esc清空内容
@keydown.esc="row.inputValue = ''"
附带项目原码:
https://download.csdn.net/download/idiot_MAN/86726354


 1612
1612


 被折叠的 条评论
为什么被折叠?
被折叠的 条评论
为什么被折叠?
 到【灌水乐园】发言


