


Matplotlib优势:Matlab的语法、python语言、latex的画图质量(还可以使用内嵌的latex引擎绘制的数学公式)
参考博客:
Python图表绘制:matplotlib绘图库入门
Matplotlib官方文档
Matplotlib.pyplot 说明文档
本节课接着上一节课,来可视化决策树,用Matplotlib注解绘制树形图
1 Matplotlib 注解
Matplotlib提供了一个注解工具:annotations,可以在数据图形上添加文本工具。
Matplotlib实际上是一套面向对象的绘图库,它所绘制的图表中的每个绘图元素,例如线条Line2D、文字Text、刻度等在内存中都有一个对象与之对应。
import matplotlib.pyplot as plt # 载入 pyplot API
decisionNode = dict(boxstyle="sawtooth", fc="0.8") # 注(a)
leafNode = dict(boxstyle="round4", "fc=0.8")
arrow_args = dict(arrowstyle="<-") # 箭头样式
def plotNode(Nodename, centerPt, parentPt, nodeType): # centerPt节点中心坐标 parentPt 起点坐标
creatPlot.ax1.annotate(Nodename, xy=parentPt, xycoords='axes fraction', xttest=centerPt, textcoords='axes fraction', va="center", ha="center", bbox=nodeType, arrowprops=arrow_args) # 注(b)
def creatplot():
fig = plt.figure(1, facecolor='white') # 创建一个新图形
fig.clf() # 清空绘图区
creatplot.ax1 = plt.subplot(111,frameon=False) # subplot(323)和subplot(3,2,3)是相同的
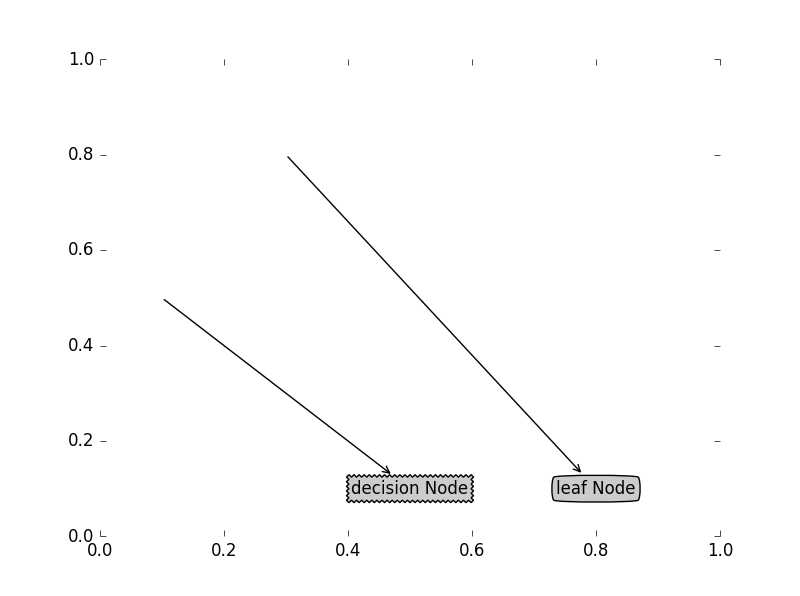
plotNode('decision Node', (0.5,0.1), (0.1,0.5), decisionNode)
plotNode('leaf Node', (0.8,0.1), (0.3,0.8), leafNode)
plt.show()
注
(a) 创建字典。 boxstyle=”sawtooth” 表示 注解框的边缘是波浪线,fc=”0.8” 是颜色深度
(b)annotate 说明文档
(c) 结果:
2 构造注解树
上面我们一直知道如何绘制树节点,接下来学习如何放置所有的树节点。首先我们要知道:1 有多少个叶节点,以便确定x轴的长度 2 树有多少层,以便确定y轴的高度。
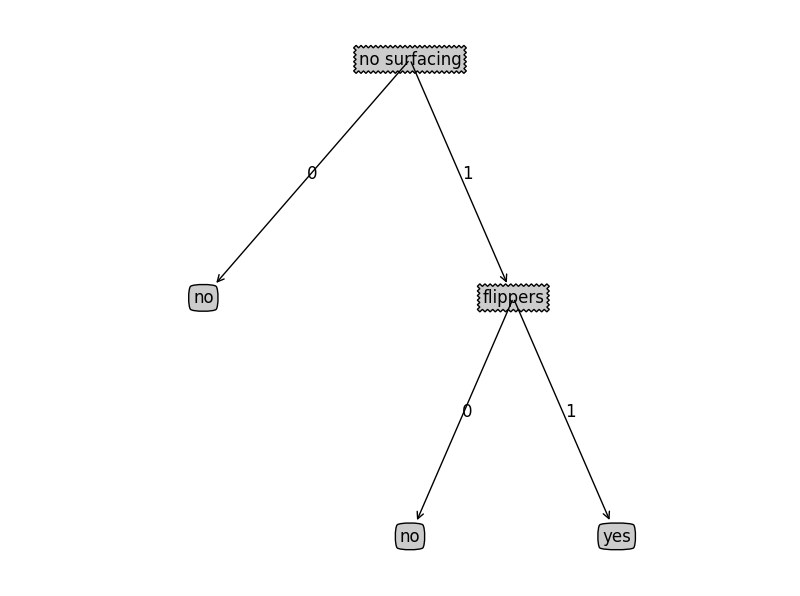
输入比如为 {‘no surfacing’: {0: ‘no’, 1: {‘flippers’: {0: ‘no’, 1: ‘yes’}}}}
def getNumleafs(mytree): # 获得叶节点数目,输入为我们前面得到的树(字典)
    Numleafs = 0 # 初始化
    firstStr = list(mytree.keys())[0] # 注(a) 获得第一个key值(根节点) 'no surfacing'
    secondDict = mytree[firstStr]  # 获得value值 {0: 'no', 1: {'flippers': {0: 'no', 1: 'yes'}}}
    for key in secondDict.keys(): #  键值:0 和 1
        if type(secondDict[key]).__name__=='dict': # 判断如果里面的一个value是否还是dict
            Numleafs += getNumleafs(secondDict[key]) # 递归调用
        else:
            Numleafs += 1
    return Numleafs

def getTreeDepth(mytree):
    maxDepth = 0
    thisDepth = 0
    firstStr = list(mytree.keys())[0]
    secondDict = mytree[firstStr]
    for key in secondDict.keys(): #  键值:0 和 1
        if type(secondDict[key]).__name__=='dict': # 判断如果里面的一个value是否还是dict
            thisDepth += getTreeDepth(secondDict[key]) # 递归调用
        else:
            Numleafs = 1
        if thisDepth > maxDepth:
            maxDepth = thisDepth
    return maxDepth
注
(a)python 3X 中: mytree.keys() 返回 :dict_keys([’ ‘])是类似于列表但又不是列表的东东,它是个字典的key值的一个视图(view),所以改写为本句方法.
3 plotTree 函数
def plotMidText(cntrPt, parentPt, txtString):   #  在两个节点之间的线上写上字
    xMid = (parentPt[0]-cntrPt[0])/2.0 + cntrPt[0]
    yMid = (parentPt[1]-cntrPt[1])/2.0 + cntrPt[1]
    creatPlot.ax1.text(xMid, yMid, txtString)  # text() 的使用
def plotTree(myTree, parentPt, nodeName):  # 画树
    numleafs = getNumleafs(myTree)
    depth = getTreeDepth(myTree)
    firstStr = list(myTree.keys())[0]
    cntrPt = (plotTree.xOff+(0.5/plotTree.totalw+float(numleafs)/2.0/plotTree.totalw), plotTree.yOff)
    plotMidText(cntrPt, parentPt, nodeName)
    plotNode(firstStr, cntrPt, parentPt, decisionNode)
    secondDict = myTree[firstStr]
    plotTree.yOff = plotTree.yOff - 1.0/plotTree.totalD # 减少y的值,将树的总深度平分,每次减少移动一点(向下,因为树是自顶向下画的)
    for key in secondDict.keys():
        if type(secondDict[key]).__name__=='dict':
            plotTree(secondDict[key], cntrPt, str(key))
        else:
            plotTree.xOff = plotTree.xOff + 1.0/plotTree.totalw
            plotNode(secondDict[key], (plotTree.xOff, plotTree.yOff), cntrPt, leafNode)
            plotMidText((plotTree.xOff, plotTree.yOff), cntrPt, str(key))
    plotTree.yOff = plotTree.yOff + 1.0/plotTree.totalD

def creatPlot(inTree):  # 使用的主函数
    fig = plt.figure(1, facecolor='white')
    fig.clf()  # 清空绘图区
    axprops = dict(xticks=[], yticks=[]) # 创建字典 存储=====有疑问???=====
    creatPlot.ax1 = plt.subplot(111, frameon=False, **axprops) #  ===参数的意义?===
    plotTree.totalw = float(getNumleafs(inTree))
    plotTree.totalD = float(getTreeDepth(inTree))  # 创建两个全局变量存储树的宽度和深度
    plotTree.xOff = -0.5/plotTree.totalw # 追踪已经绘制的节点位置 初始值为 将总宽度平分 在取第一个的一半
    plotTree.yOff = 1.0
    plotTree(inTree, (0.5,1.0), '')  # 调用函数,并指出根节点源坐标
    plt.show()
上面的代码可以生成:
总结:
本代码中有一些疑问:
plotTree.xOff 和 plotTree.yOff 是怎么自动变化的??


 692
692


 被折叠的 条评论
为什么被折叠?
被折叠的 条评论
为什么被折叠?
 到【灌水乐园】发言


