


Java的简单数字时钟
这里是最简单的实现方法,大概思路就是在一个JComponent上每隔一段时间进行一次重绘,为了保证重绘Timer的执行时间和终了时间,重写JComponent的addNotify方法和removeNotify方法,最后在DigitalClockUI中重写paint方法来绘制界面,并且重写 getPreferredSize使绘制的内容自适应界面的大小.
先看看效果:


<!--[if gte vml 1]> <![endif]-->
<!--[if gte vml 1]> <![endif]-->
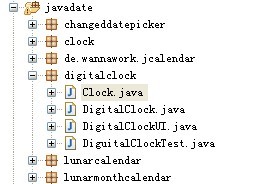
基本的工程目录如下:
<!--[if gte vml 1]> <![endif]-->
首先是最基本的界面: Clock,在这个工程里,这个类作用很小,定义不定义其实都无所谓,这儿定义它主要是为了统一,为以后实现其它时钟提供方便
这儿把它定义成抽象的
/**
* This bean to define basic properties and behaviors of a clock, concrete
* instances will be implemented by <code>DigitalClock</code> and others.
*/
publicabstractclass Clock extends JComponent {
为它提供几个属性:
/**
* The calendar instance for this clock.
*/
private Calendar calendar;
/**
* Background image of the clock.
*/
private Image bgImage;
/**
* Font rendering context - assumes no default transform, anti-aliasing
* active and fractional metrics allowed.
*/
publicstaticfinal FontRenderContext frc = new FontRenderContext(null, true, true);
其中FontRenderContext提供了文本显示和绘制的信息容器.
在构造函数中把calendar初始化:
calendar = Calendar.getInstance();
接着看DigitalClock类,这个类继承Clock类,主要是提供时钟计时Timer启动和终止的,另外提供了数字时钟的页面分隔符信息,以及UI设置和取得.
首先是定义的属性:
/**
* divide time.
*/
private String padding1 = "";
private String padding2 = "";
分别代表时分秒之间的分隔和秒与毫秒之间的分隔.
接着是构造函数,提供基本的和带参数的两种:
/**
* Default construct: Uses default format and appearance.
*/
public DigitalClock() {
super();
setFont(new Font("Arial", Font.BOLD, 20));
setOpaque(true);
padding1 = ":";
padding2 = ".";
setUI(DigitalClockUI.createUI(this));
}
/**
* Constructor: Initializes a digital-type clock by using given *parameters.
*/
public DigitalClock(String padding1, String padding2, Font font,
Color fg, Color bg, Locale locale) {
通过setUI(DigitalClockUI.createUI(this));把新的自定义UI赋给JComponent.
最后通过addNotify和removeNotify方法复写启动和终止计时Timer
/**
* Invoked when panel is added to a container.
*/
@Override
publicvoid addNotify() {
super.addNotify();
getUI().start();
}
/**
* Invoked when panel is removed from a container.
*/
@Override
publicvoid removeNotify() {
getUI().stop();
super.removeNotify();
}
最后就是DigitalClockUI类了,它主要提供页面的绘制,计时Timer的管理和时间的计算以及界面大小的调整功能.
首先是继承关系:
publicclass DigitalClockUI extends PanelUI implements ActionListener {
它通过继承PanelUI(其实就是ComponentUI)实现时钟界面UI管理,实现ActionListener接口则是为了Swing的Timer.
在构造函数中,把Timer启动
// stopwatch
timer = new Timer(10, this);
仿照其他Component组件提供UI代理,使界面可以设置UI:
// Create an instance of the UI delegate for this component
publicstatic ComponentUI createUI(DigitalClock component) {
returnnew DigitalClockUI(component);
}
然后定义类使用的属性:
// Attributed string containing current time
protected AttributedString timeString = null;
// Text layout of attributed string
protected TextLayout textLayout = null;
// Attributed string containing current timezone.
protected AttributedString timezoneString = null;
// Text layout of attributed timezone.
protected TextLayout textTimezoneLayout = null;
分别定义了绘制时间和时区的字符串属性格式和布局.
当组件加入到容器中呈现时,Timer启动,actionPerformed将会被调用.
@Override
publicvoid actionPerformed(ActionEvent event) {
在这个方法里,取得当前时间:
// Create a new attributed string with the new time
Date current = new Date();
Calendar cal = panel.getCalendar();
cal.setTime(current);
通过SimpleDateFormat类把时间格式化:
// Hour24 mode
df = new SimpleDateFormat("HH" + panel.getPadding1() + "mm"
+ panel.getPadding1() + "ss", panel.getLocale());
// Draw AM/PM
int tmpLen2 = 0;
// mode
df.applyPattern("a");
// timezone
df.applyPattern("Z");
StringBuffer sb = new StringBuffer("GMT");
sb.append(df.format(current));
sb.insert(6, ":");
df.applyPattern("zzzz");
然后将格式化好的时间字符串通过AttributedString设置显示格式:
timeString = new AttributedString(str);
// Render main time area
timeString.addAttribute(TextAttribute.FONT, font, 0, 6 + 2 * panel
.getPadding1().length());
timeString.addAttribute(TextAttribute.FOREGROUND,panel.getForeground());
// Do blinking if reach alarm point
timeString.addAttribute(TextAttribute.FOREGROUND,
panel.getForeground(), 0, 6 + 2 * panel.getPadding1().length());
// Render padding1, do blinking
timeString.addAttribute(TextAttribute.FOREGROUND, blink == 0 ? panel
.getForeground() : panel.getBackground(), 2, 2 + panel
.getPadding1().length());
timeString.addAttribute(TextAttribute.FOREGROUND, blink == 0 ? panel
.getForeground() : panel.getBackground(), 2 + panel
.getPadding1().length() + 2, 4 + 2 * panel.getPadding1()
.length());
然后设置TextLayout
// Create a new text layout and signal the panel that it needs
// repainting
textLayout = null;
textLayout = new TextLayout(timeString.getIterator(), Clock.frc);
最后根据字符串大小设置组件大小,刷新
// To keep the clock size fit for
// actual size in time.
panel.setSize(getPreferredSize(panel));
panel.repaint();
current = null;
df = null;
最后一个方法是复写getPreferredSize使组件可以自适应大小
// Return the preferred size for the component
@Override
public Dimension getPreferredSize(JComponent c) {
首先得出两个字符串大小:
Dimension size1 = textLayout.getBounds().getBounds().getSize();
Dimension size2 = textTimezoneLayout == null ? null : textTimezoneLayout.getBounds().getBounds().getSize();
然后宽度取2者大的,再额外增加一点Border
int max = width1;
if (width2 > max)
max = width2;
size.width = max + MARGIN + 2;
高度选取2者之和加上两者间的间隙:
int height1 = (int) (textLayout.getAscent() + textLayout.getDescent() + textLayout.getLeading());
int height2 = (int) (textTimezoneLayout == null ? 0 : textTimezoneLayout.getAscent()+ textTimezoneLayout.getDescent() + textTimezoneLayout.getLeading());
size.height = (height1 + MARGIN) + (height2 + MARGIN);
到此为止,最简单的数字时钟就完成了.
通过
private DigitalClock getDigitalClock() {
if (digitalClock == null) {
// To create a digital-type clock with dark
// red foreground and black background.
digitalClock = new DigitalClock(":", "'", new Font("Comic Sans MS",Font.BOLD, 20), Color.GREEN.darker(), Color.BLACK
.brighter(), Locale.ENGLISH);
}
returndigitalClock;
}
取得数字时钟组件,然后就和一般Java组件一样使用了.


 1561
1561

 被折叠的 条评论
为什么被折叠?
被折叠的 条评论
为什么被折叠?
 到【灌水乐园】发言


