操作系统:Centos 7.0
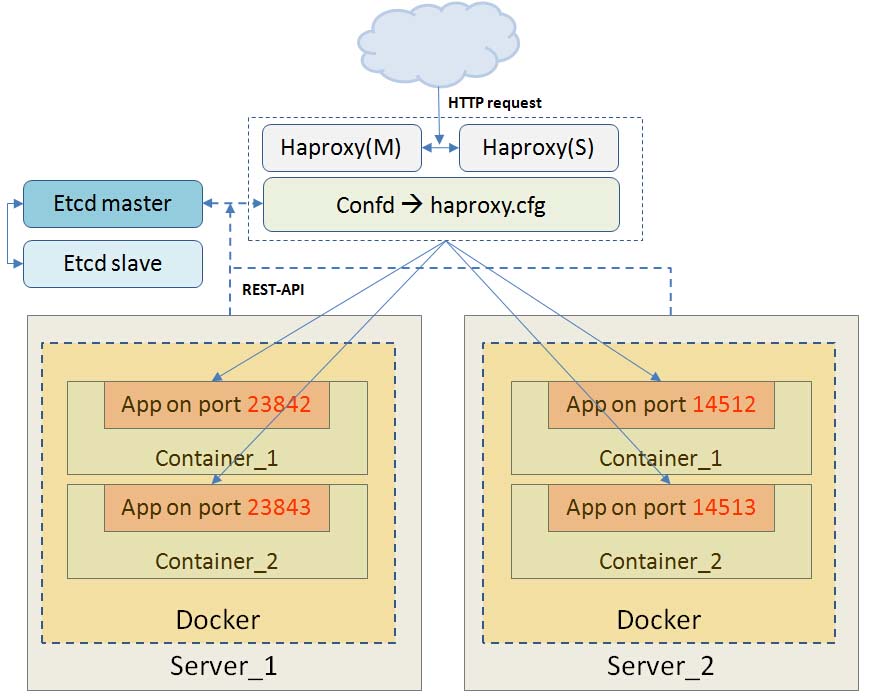
先扔出一张图来解释这四个组件之间的关系

下面细说
1.Haproxy
Haproxy不用多说,负载均衡软件,安装Haproxy
yum -y install haproxy
版本是haproxy-1.5.4-3.el6.x86_64.rpm
2.etcd
etcd,是一个高可用的 Key/Value 的内存数据库,提供 发布/订阅 模式的操作,每当有新的后端节点加入的时候,我们都会用脚本操作到etcd上去发布新节点信息,而已经订阅该消息的confd客户端就会收到新节点的发布信息,它会修改配置文件且分发去覆盖本机的Haproxy的配置,并且重启Haproxy,以达到给Haproxy新增后端分发节点的目的,安装etcd
wget https://github.com/coreos/etcd/releases/download/v3.0.3/etcd-v3.0.3-linux-amd64.tar.gz
tar xvf etcd-v3.0.3-linux-amd64.tar.gz
[root@201 data]# cd etcd-v3.0.3-linux-amd64/
[root@201 etcd-v3.0.3-linux-amd64]# cp etcd* /bin/
[root@201 etcd-v3.0.3-linux-amd64]# etcd -version
etcd Version: 3.0.3
Git SHA: 24a90ba
Go Version: go1.6.2
Go OS/Arch: linux/amd64
启动etcd
[root@201 data]
查看其监听的端口
[root@201 data]
tcp 0 0 127.0.0.1:2379 0.0.0.0:* LISTEN 4750/etcd
tcp 0 0 127.0.0.1:2380 0.0.0.0:* LISTEN 4750/etcd
设置测试key value
[root@201 data]
{"action":"set","node":{"key":"/key1","value":"Hello world","modifiedIndex":5,"createdIndex":5}}
查询测试key
[root@201 data]
{"action":"get","node":{"key":"/key1","value":"Hello world","modifiedIndex":5,"createdIndex":5}}
删除key
curl -XDELETE http://192.168.1.204:2379/v2/keys/app/servers
另外还可以用etcdctl命令来操作,创建一个新的目录和键分别使用 etcdctl mkdir 和 etcdctl mk 命令。
[root@201 data]
[root@201 data]
/demo: is a directory
[root@201 data]
[root@201 data]
Hello Etcd
- 1
- 2
- 3
- 4
- 5
- 6
- 7
- 8
- 9
- 10
- 11
- 12
- 13
- 14
- 15
- 16
- 17
- 18
- 19
- 20
- 21
- 22
- 23
- 24
- 25
3.confd
上面说过了,confd是分发新的配置到Haproxy中,安装confd
wget https://github.com/kelseyhightower/confd/releases/download/v0.11.0/confd-0.11.0-linux-amd64
[root@201 data]
[root@201 data]
[root@201 data]
confd 0.11.0
confd要与haproxy安装在同一台主机上,以便能生成给Haproxy用的配置。创建confd的默认配置存放路径,confd会根据该文件找到要修改的haproxy文件路径
[root@201 data]# mkdir -p /etc/confd/templates
vim /etc/confd/conf.d/haproxy.toml
[template]
#模板文件,基于它进行修改
src = "haproxy.cfg.tmpl"
#haproxy的默认配置路径
dest = "/etc/haproxy/haproxy.cfg"
#keys是在etcd上订阅消息的前缀
keys = [
  "/app/servers",
]
#更新配置后重启haproxy
reload_cmd = "/etc/init.d/haproxy reload"
创建haproxy.cfg的模板文件,以便confd能根据模板生成配置,语法格式是基于Go语言的语法
vim /etc/confd/templates/haproxy.cfg.tmpl
global
        log 127.0.0.1 local3
        maxconn 5000
        uid 99
        gid 99
        daemon

defaults
        log 127.0.0.1 local3
        mode http
        option dontlognull
        retries 3
        option redispatch
        maxconn 2000
        timeout connect 5000
        timeout client  50000
        timeout server  50000

frontend myhttp
        mode http
        bind 192.168.1.204:80
        use_backend myserver
backend myserver
        mode http
        balance roundrobin
        #confd的语法会替换下面的变量
        {{range gets "/app/servers/*"}}
        server {{base .Key}} {{.Value}} weight 10
        {{end}}
- 1
- 2
- 3
- 4
- 5
- 6
- 7
- 8
- 9
- 10
- 11
- 12
- 13
- 14
- 15
- 16
- 17
- 18
- 19
- 20
- 21
- 22
- 23
- 24
- 25
- 26
- 27
- 28
- 29
启动confd
confd -interval 10 -node '192.168.1.204:2379' -confdir /etc/confd > /var/log/confd.log &
这样当我们手动修改haproxy.cfg.tmpl文件以后,每隔不到10s左右的时间,confd都会发现模板文件已经更新,会重新生成配置发布,看到更新时候的日志如下
2016-07-23T21:45:39+08:00 204.localdomain confd[3317]: INFO /etc/haproxy/haproxy.cfg has md5sum 4b3b5d42ffd945117fe74d5d234ae49b should be e81aa47326241d0d1530c9d4b13e1e39
2016-07-23T21:45:39+08:00 204.localdomain confd[3317]: INFO Target config /etc/haproxy/haproxy.cfg out of sync
2016-07-23T21:45:39+08:00 204.localdomain confd[3317]: INFO Target config /etc/haproxy/haproxy.cfg has been updated
4.docker启动脚本
我们启动docker要写一个脚本,先启动docker,得到容器id。然后更新信息到etcd上,进而出发confd发布新的配置给Haproxy,这样在Haproxy配置文件中将我们新启动的容器ip地址添加到后端列表,以达到注册新节点的目的。记住启动和停止docker都要用这个脚本,不要直接使用docker命令,因为脚本还要处理etcd的信息。
docker.sh
--dns 172.17.42.1
#!/bin/bash
if [ -z $1 ]; then
echo "Usage: c start <image name>:<version>"
echo " c stop <container name>"
exit 1
fi
if [ -z $ETCD_HOST ]; then
ETCD_HOST="192.168.1.204:2379"
fi
if [ -z $ETCD_PREFIX ]; then
ETCD_PREFIX="app/servers"
fi
if [ -z $CPORT ]; then
CPORT="80"
fi
if [ -z $FORREST_IP ]; then
FORREST_IP=`ifconfig eth1| grep "inet addr" | head -1 | cut -d : -f2 | awk '{print $1}'`
fi
function launch_container {
echo "Launching $1 on $FORREST_IP and mapped port $CPORT to ..."
CONTAINER_ID=`docker run -d -P $1 python app.py`
PORT=`docker inspect $CONTAINER_ID|grep "\"Ports\"" -A 50|grep "\"$CPORT/tcp\"" -A 3| grep HostPort|cut -d '"' -f4|head -1`
NAME=`docker inspect $CONTAINER_ID | grep Name | cut -d '"' -f4 | sed "s/\///g"|sed -n 1p`
echo "Announcing to $ETCD_HOST..."
args="http://$ETCD_HOST/v2/keys/$ETCD_PREFIX/$NAME -d value=$FORREST_IP:$PORT"
curl -XPUT $args
echo "$1 running on Port $PORT with name $NAME"
}
function stop_container {
echo "Stopping $1..."
CONTAINER_ID=`docker ps -a| grep $1 | awk '{print $1}'`
echo "Found container $CONTAINER_ID"
docker stop $CONTAINER_ID
echo http://$ETCD_HOST/v2/keys/$ETCD_PREFIX/$1
curl -XDELETE http://$ETCD_HOST/v2/keys/$ETCD_PREFIX/$1 &> /dev/null
echo "Stopped."
}
if [ $1 = "start" ]; then
launch_container $2
else
stop_container $2
fi
- 1
- 2
- 3
- 4
- 5
- 6
- 7
- 8
- 9
- 10
- 11
- 12
- 13
- 14
- 15
- 16
- 17
- 18
- 19
- 20
- 21
- 22
- 23
- 24
- 25
- 26
- 27
- 28
- 29
- 30
- 31
- 32
- 33
- 34
- 35
- 36
- 37
- 38
- 39
- 40
- 41
- 42
- 43
- 44
- 45
- 46
- 47
- 48
- 49
- 50
- 51
- 52
- 53
- 54
- 55
- 56
- 57
- 58
- 59
- 60
- 61
- 62
- 63
一开始绑定eth0,发现一直失败,原来网卡绑定错了,后来改成eth1了。
5.测试
启动两个后端镜像试试
启动第一个服务
[root@204 data]
Launching tutum/lamp on 192.168.1.204 and mapped port 80 to ...
Announcing to 192.168.1.204:2379...
{"action":"set","node":{"key":"/app/servers/boring_goldstine","value":"192.168.1.204:32769","modifiedIndex":4,"createdIndex":4}}
tutum/lamp running on Port 32769 with name boring_goldstine
启动第二个服务
[root@204 data]
Launching tutum/lamp on 192.168.1.204 and mapped port 80 to ...
Announcing to 192.168.1.204:2379...
{"action":"set","node":{"key":"/app/servers/fervent_curie","value":"192.168.1.204:32771","modifiedIndex":5,"createdIndex":5}}
tutum/lamp running on Port 32771 with name fervent_curie
执行上述命令的同时,由于etcd发生了变化,confd订阅的消息会被触发更新Haproxy的配置,以下日志表示更新配置
2016-07-25T16:37:59+08:00 204.localdomain confd[1300]: INFO /etc/haproxy/haproxy.cfg has md5sum b363dce20b5df8e4f82a327532623cd8 should be 2ca9875a74f76e9aa3701c3675d768ed
2016-07-25T16:37:59+08:00 204.localdomain confd[1300]: INFO Target config /etc/haproxy/haproxy.cfg out of sync
2016-07-25T16:37:59+08:00 204.localdomain confd[1300]: INFO Target config /etc/haproxy/haproxy.cfg has been updated
查询下etcd中的配置
[root@204 data]# etcdctl
/app/servers/boring_goldstine
/app/servers/fervent_curie
可见现在有boring_goldstine和fervent_curie两个服务,那么docker中应该也对应这两个NAMES
[root@204 data]# docker ps
CONTAINER ID        IMAGE               COMMAND             CREATED             STATUS              PORTS                                            NAMES
965fceb923a0        tutum/lamp          "/run.sh"           52 seconds ago      Up 50 seconds       0.0.0.0:32771->80/tcp, 0.0.0.0:32770->3306/tcp   fervent_curie
7bedfc46554b        tutum/lamp          "/run.sh"           54 seconds ago      Up 53 seconds       0.0.0.0:32769->80/tcp, 0.0.0.0:32768->3306/tcp   boring_goldstine
好,现在我们整套框架都搭建起来了,可以开始测试。
单独在浏览器去访问两个启动的server,都有响应(如果半天卡死先把防火墙关闭了,但是启动docker的时候则需要打开)http://192.168.1.204:32769/

同样另一台机器得到的结果也相同http://192.168.1.204:32771/

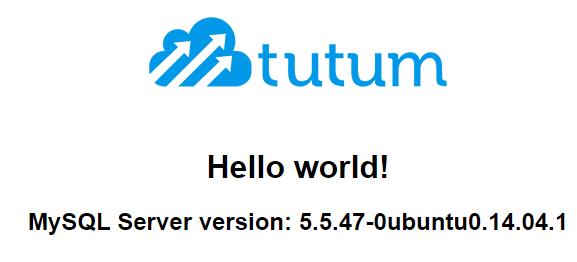
刚才是直接分别访问两个后端服务,那么我们从haproxy的入口处,80端口去访问下http://192.168.1.204

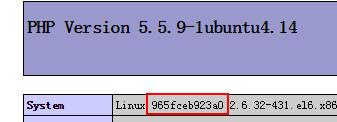
测试haproxy转发到后端机器成功了。为了更直观的看到haproxy到底转发到哪台后端服务器了,我们访问http://192.168.1.204/phpinfo.php,可以在输出的信息中看到机器名称 Linux 7bedfc46554b 2.6.32-431

或者Linux 965fceb923a0 2.6.32-431

,机器名称时不时的变化,说明后端访问分发到不同的服务器上去了。
6.遇到问题
- etcd cluster is unavailable or misconfigured
操作如下命令的时候出错
[root@204 data]# etcdctl mkdir /app
Error: client: etcd cluster is unavailable or misconfigured
error #0: dial tcp 127.0.0.1:2379: getsockopt: connection refused
error #1: dial tcp 127.0.0.1:4001: getsockopt: connection refused
这是因为没有指定ip信息,加上ip就可以了,比如ls命令,这样写
etcdctl –endpoints “http://192.168.1.204:2379,http://192.168.1.204:2380” ls
- 停止一个容器,不要直接去操作docker,要用脚本,否则只停了容器而etcd中的配置信息不会删除掉,如下
[root@204 data]
Stopping thirsty_lovelace...
Found container 08e68416006a
08e68416006a
http://192.168.1.204:2379/v2/keys/app/servers/thirsty_lovelace
Stopped.


 1万+
1万+

 被折叠的 条评论
为什么被折叠?


