


kubernetes-存储
kubernetes-存储
1、卷
容器中的文件在磁盘上是临时存放的,这给在容器中运行较重要的应用带来一些问题。 当容器崩溃或停止时会出现一个问题。此时容器状态未保存, 因此在容器生命周期内创建或修改的所有文件都将丢失。 在崩溃期间,kubelet 会以干净的状态重新启动容器。 当多个容器在一个 Pod 中运行并且需要共享文件时,会出现另一个问题。 跨所有容器设置和访问共享文件系统具有一定的挑战性。
Kubernetes 卷(Volume) 这一抽象概念能够解决这两个问题。
Kubernetes(K8s)中的卷(Volumes)是用于存储数据的持久化存储资源,它们可以被Pod内的容器访问。卷的设计目的是为应用程序提供数据持久化和共享的能力,即使在容器停止或重新启动的情况下,数据也不会丢失。
1.1、卷的作用
- 用来存放数据,保存数据
- 容器是在内存里运行的,停电会丢失数据
- 所以我们需要将容器里的数据永久保存到磁盘上
- 卷—》实现了容器的数据持久化,数据共享
1.2、卷的类型
Kubernetes提供了多种类型的卷,每种类型都有其特定的用途和特性:
-
emptyDir:当Pod被分配到节点上时,emptyDir卷会在节点上创建。它在Pod的生命周期内一直存在,当Pod从节点上删除时,其数据也会被永久删除。这种类型的卷通常用于临时存储。 -
hostPath:hostPath卷允许将节点上的文件系统挂载到Pod中。这种类型的卷可以用来访问节点的资源,但需要谨慎使用,因为它可能会引起安全问题。 -
persistent:persistent卷(PV)和持久化卷声明(PVC)是Kubernetes中的高级存储特性。PV是集群中的一块存储,PVC是用户请求的存储资源。PV和PVC的结合使用,允许动态地分配和管理持久化存储。 -
nfs:网络文件系统(NFS)卷允许你将远程NFS服务器上的目录挂载到Pod中。这种类型的卷适合于需要大规模共享存储的场景。 -
awsElasticBlockStore:这种类型的卷用于在AWS环境中挂载EBS卷。 -
azureDisk:在Azure环境中,azureDisk卷用于挂载Azure磁盘。 -
gcePersistentDisk:在Google Cloud Platform上,gcePersistentDisk卷用于挂载持久化磁盘。
1.3、卷的挂载
卷可以在Pod定义中声明,并挂载到一个或多个容器的文件系统中。挂载卷后,容器可以像操作本地文件系统一样操作卷中的数据。
1.4、卷的生命周期
与Pod同生命周期:如emptyDir和hostPath卷,它们的生命周期与Pod相同,当Pod被删除时,这些卷中的数据也会丢失。独立于Pod的生命周期:如PV,它们的生命周期独立于任何Pod,即使Pod被删除,PV上的数据也不会丢失,可以被新的Pod重新挂载使用。
1.5、使用卷的注意事项
权限和所有权:需要确保卷中的文件和目录具有正确的权限和所有权,以便容器能够正确访问。数据一致性:在使用多个Pod共享同一卷时,需要注意数据一致性问题。存储类别:在请求存储资源时,可以通过storageClassName指定所需的存储类别,以便Kubernetes根据后端存储的配置自动创建PV。
通过合理使用和管理卷,可以确保Kubernetes集群中的数据持久化和共享,从而提高应用程序的可靠性和灵活性。
1.6、emptyDir配置示例
emptyDir—>创建一个空文件夹给pod,零时存放数据
1.编辑yaml文件
[root@master ~]# mkdir /storage
[root@master ~]# cd /storage/
[root@master storage]# vim pod-1.yaml
[root@master storage]# cat pod-1.yaml
apiVersion: v1
kind: Pod
metadata:
  name: test-pd
spec:
  containers:
  - image: busybox
    imagePullPolicy: IfNotPresent
    name: test-container-nginx
    ports:
    - containerPort: 80
    volumeMounts:
    - mountPath: /cache
      name: cache-volume
  volumes:
  - name: cache-volume
    emptyDir:
      sizeLimit: 500Mi
[root@master storage]#
这个pod-1.yaml文件是一个Kubernetes配置文件,用于定义一个Pod的配置。下面是对这个文件内容的逐行解释:
apiVersion: v1
这行指定了Kubernetes的API版本,v1是当前稳定版本。
kind: Pod
这里声明了这个配置文件定义的资源类型是Pod。
metadata:
  name: test-pd
metadata部分包含了元数据信息,这里指定了Pod的名称为test-pd。
spec:
spec部分详细描述了Pod的具体规格和配置。
  containers:
  - image: busybox
    imagePullPolicy: IfNotPresent
    name: test-container-nginx
    ports:
    - containerPort: 80
    volumeMounts:
    - mountPath: /cache
      name: cache-volume
这个部分定义了Pod中的容器规格。这个Pod包含一个名为test-container-nginx的容器,使用的镜像是busybox。imagePullPolicy设置为IfNotPresent意味着如果本地有这个镜像,就不会尝试从远程仓库拉取。容器暴露了80端口,但没有定义协议,默认为TCP。volumeMounts指定了容器内部的挂载点,这里将卷cache-volume挂载到了容器的/cache路径。
  volumes:
  - name: cache-volume
    emptyDir:
      sizeLimit: 500Mi
这个部分定义了Pod的卷。cache-volume是一个emptyDir类型的卷,它会在Pod调度到节点上时被创建,并在Pod从节点上删除时被清空。emptyDir卷的sizeLimit被设置为500Mi(500MiB),这意味着这个卷最多可以使用500MiB的存储空间。
总结一下,这个配置文件定义了一个名为test-pd的Pod,其中包含一个使用busybox镜像的容器,容器暴露了80端口,并且有一个名为cache-volume的emptyDir卷被挂载到容器的/cache目录。这个卷的最大大小被限制为500MiB。当Pod被创建后,这个卷可以在容器内部用于存储数据,但当Pod被删除时,卷中的数据也会丢失。
2.启动
[root@master storage]# kubectl apply -f pod-1.yaml
pod/test-pd created
[root@master taint_toleration]# kubectl get pod -o wide
NAME      READY   STATUS    RESTARTS   AGE     IP             NODE     NOMINATED NODE   READINESS GATES
test-pd   1/1     Running   0          4m25s   10.244.247.2   node-2   <none>           <none>
[root@master taint_toleration]# kubectl exec -it test-pd -- sh
/ # cd /
/ # ls
bin    cache  dev    etc    home   proc   root   sys    tmp    usr    var
/ # cd cache/
/cache # pwd
/cache
/cache #
3.在卷里边建一个文件,查看在node节点的哪个位置
/cache # mkdir sanchuang
/cache #
[root@node-2 ~]# find / -name sanchuang
/var/lib/kubelet/pods/f4703ab1-db1a-4127-b5f7-f4730080326a/volumes/kubernetes.io~empty-dir/cache-volume/sanchuang
[root@node-2 ~]#
1.7、hostPath的使用
hostPath—>在宿主机上指定一个文件夹或者文件进行挂载
1.编写yaml文件
[root@master taint_toleration]# vim pod-2.yaml
apiVersion: v1
kind: Pod
metadata:
  name: test-pd-2
spec:
  containers:
  - image: nginx
    imagePullPolicy: IfNotPresent
    name: test-container-nginx
    ports:
      - containerPort: 80
    volumeMounts:
      - mountPath: /cache
        name: cache-volume
  volumes:
  - name: cache-volume
    hostPath:
      path: /scdata
      type: DirectoryOrCreate
[root@master taint_toleration]#
这个YAML配置文件定义了一个Kubernetes Pod,名为test-pd-2。Pod中包含一个容器,该容器使用Nginx镜像。下面是对这个配置文件的详细解释:
-
apiVersion: v1:指定了Kubernetes API的版本,这里是版本1。 -
kind: Pod:声明这个配置文件是用来定义一个Pod资源的。 -
metadata:包含了Pod的元数据信息。name: test-pd-2:为Pod指定了一个名称,即test-pd-2。
-
spec:定义了Pod的具体规格和内容,包括容器的定义和其他配置。 -
containers:列出了Pod中的容器列表。在这个例子中,只有一个容器。image: nginx:指定容器使用的镜像是nginx。imagePullPolicy: IfNotPresent:拉取策略,表示如果本地没有这个镜像,则从镜像仓库拉取它;如果已存在,则直接使用本地的镜像。name: test-container-nginx:为容器指定了一个名称,即test-container-nginx。ports:定义了容器需要暴露的端口。- containerPort: 80:指定容器内部的80端口需要被暴露出来。
volumeMounts:定义了要挂载到容器中的卷。- mountPath: /cache:指定卷在容器内部的挂载路径是/cache。name: cache-volume:指定要挂载的卷的名称是cache-volume。
-
volumes:定义了Pod可以使用的卷。- name: cache-volume:为卷指定了一个名称,即cache-volume。hostPath:指定了卷的类型是宿主机路径。path: /scdata:指定了宿主机上的路径/scdata作为卷的来源。type: DirectoryOrCreate:指定了卷的类型。DirectoryOrCreate意味着如果指定的路径不存在,Kubernetes将创建它。
总的来说,这个Pod配置文件创建了一个运行Nginx的Pod,并将宿主机上的/scdata目录作为卷挂载到容器的/cache路径。这样,容器就可以读写宿主机上的这个目录,而这个目录在容器内部的表现形式是/cache。
2.启动
[root@master taint_toleration]# kubectl apply -f pod-2.yaml
pod/test-pd-2 created
[root@master taint_toleration]# kubectl get pod -o wide
NAME        READY   STATUS    RESTARTS   AGE   IP              NODE     NOMINATED NODE   READINESS GATES
test-pd-2   1/1     Running   0          9s    10.244.247.11   node-2   <none>           <none>
[root@master taint_toleration]#
可以发现在node-2服务器上可以看到/scdate 可以实现数据共享和持久化
[root@node-2 ~]# cd /scdata/
您在 /var/spool/mail/root 中有新邮件
[root@node-2 scdata]# ls
[root@node-2 scdata]# mkdir gaohui
[root@node-2 scdata]#
[root@master taint_toleration]# kubectl exec -it test-pd-2 -- bash
root@test-pd-2:/# cd /cache/
root@test-pd-2:/cache# ls
gaohui
root@test-pd-2:/cache#
2、configmap
ConfigMap 用于存储非敏感的配置信息,比如环境变量、配置文件、命令行参数等。这些信息可以被 Pod 中的容器用作配置。
理解为一个存放数据的容器,里面的内容是明文的,安全性不高–》理解为一个箱子,里面存放数据
configMap相当于一个透明箱子
secret是一个密码箱子
特点:
- 存储非敏感数据,如配置文件。
- 可以被任何需要访问这些配置信息的 Pod 访问。
- 数据可以被映射到容器的文件系统中,或者作为环境变量注入到容器中。
- 支持通过
kubectl命令行工具查看其内容。 - 一个保存key_value数据的地方,主要用来给应用程序传递参数
- 数据存放在etcd中
使用场景:
- 应用程序的配置参数。
- 应用程序启动时需要的命令行参数。
- 任何需要在多个 Pod 之间共享的非敏感数据。
解耦
- 镜像里边包含了业务代码和启动需要加载的配置文件(yaml文件)
- 然后把他拆分开,镜像里边只放业务代码
- 把配置文件(config.yaml)放到configmap里边
- 假如我启容器的时候要跑业务代码,这个时候我再把config.yaml投射(注入)进去
- 这个时候只需要修改configmap里边的内容就行了
- 这种现象叫做解耦

2.1、configmap小实验
创建configmap
[root@master storage]# mkdir configmap
[root@master storage]# cd configmap/
[root@master configmap]# vim configmap.yaml
apiVersion: v1
kind: ConfigMap
metadata:
  name: game-demo
data:
  # 类属性键;每一个键都映射到一个简单的值
  player_initial_lives: "3"
  ui_properties_file_name: "user-interface.properties"
  color: "blue"

  # 类文件键
  game.properties: |
    enemy.types=aliens,monsters
    player.maximum-lives=5
  user-interface.properties: |
    color.good=purple
    color.bad=yellow
    allow.textmode=true
[root@master configmap]#
这个 ConfigMap 包含了几个键值对,其中:
player_initial_lives设置了玩家初始的生命数为 3。ui_properties_file_name指定了用户界面属性文件的名称为user-interface.properties。color键用来设置游戏的主题颜色为蓝色。
此外,还有两个类文件键:
game.properties包含了游戏相关的配置,例如敌人类型和玩家最大生命数。user-interface.properties包含了用户界面的属性设置,如颜色选项和文本模式的允许状态。
这些配置可以在 Pod 的容器中作为环境变量或配置文件被引用,从而为游戏应用提供所需的配置信息。
应用
[root@master configmap]# kubectl apply -f configmap.yaml
configmap/game-demo created
[root@master configmap]#
'查看'
[root@master configmap]# kubectl get configmap
NAME               DATA   AGE
game-demo          5      25s
kube-root-ca.crt   1      16d
[root@master configmap]#
[root@master configmap]# kubectl describe cm game-demo
Name:         game-demo
Namespace:    default
Labels:       <none>
Annotations:  <none>

Data
====
color:
----
blue
game.properties:
----
enemy.types=aliens,monsters
player.maximum-lives=5

player_initial_lives:
----
3
ui_properties_file_name:
----
user-interface.properties
user-interface.properties:
----
color.good=purple
color.bad=yellow
allow.textmode=true

Events:  <none>
[root@master configmap]#
创建pod使用configmap
[root@master configmap]# vim config-pod.yaml
apiVersion: v1
kind: Pod
metadata:
  name: configmap-demo-pod
spec:
  containers:
    - name: demo
      image: alpine
      command: ["sleep", "3600"]
      env:
        # 定义环境变量
        - name: PLAYER_INITIAL_LIVES # 请注意这里和 ConfigMap 中的键名是不一样的
          valueFrom:
            configMapKeyRef:
              name: game-demo           # 这个值来自 ConfigMap
              key: player_initial_lives # 需要取值的键
        - name: UI_PROPERTIES_FILE_NAME
          valueFrom:
            configMapKeyRef:
              name: game-demo
              key: ui_properties_file_name
      volumeMounts:
      - name: config
        mountPath: "/config"
        readOnly: true
  volumes:
  # 你可以在 Pod 级别设置卷,然后将其挂载到 Pod 内的容器中
  - name: config
    configMap:
      # 提供你想要挂载的 ConfigMap 的名字
      name: game-demo
      # 来自 ConfigMap 的一组键,将被创建为文件
      items:
      - key: "game.properties"
        path: "game.properties"
      - key: "user-interface.properties"
        path: "user-interface.properties"
应用
[root@master configmap]# kubectl apply -f config-pod.yaml
pod/configmap-demo-pod created
[root@master configmap]# kubectl get pod
NAME                 READY   STATUS    RESTARTS   AGE
configmap-demo-pod   1/1     Running   0          33s
sc-pv-pod-nfs        1/1     Running   0          39m
task-pv-pvc-pod      1/1     Running   0          6h25m
test-pd              1/1     Running   0          8h
test-pd-2            1/1     Running   0          8h
查看效果configmap是否投射数据到容器里
[root@master configmap]# kubectl exec -it configmap-demo-pod -- sh
/ # cd /
/ # ls
bin     dev     home    media   opt     root    sbin    sys     usr
config  etc     lib     mnt     proc    run     srv     tmp     var
/ # cd  config/
/config # ls
game.properties            user-interface.properties
/config # cat game.properties
enemy.types=aliens,monsters
player.maximum-lives=5
/config # cat user-interface.properties
color.good=purple
color.bad=yellow
allow.textmode=true
/config #
/config # echo $PLAYER_INITIAL_LIVES
3
/config # echo $UI_PROPERTIES_FILE_NAME
user-interface.properties
/config #
2.2、configmap实验2
1.创建一个configmap,里面存放nginx.conf的配置文件
修改内核参数,调整一个进程可以打开的文件数量
指明进程数量为5个 worker_processes 5; worker_connections 2048;
2.启动一个pod,去使用这个configmap,加载里面的nginx.conf的内容

操作:
1.启动nginx的pod
[root@master configmap]# vim configmap-nginx.yaml
apiVersion: v1
kind: Pod
metadata:
  name: configmap-nginx
spec:
  containers:
    - name: task-configmap-container
      image: nginx:latest
      ports:
        - containerPort: 80
[root@master configmap]#
[root@master configmap]# kubectl apply -f configmap-nginx.yaml
pod/configmap-nginx created
[root@master configmap]# kubectl get pod
NAME                 READY   STATUS    RESTARTS   AGE
configmap-demo-pod   1/1     Running   0          17m
configmap-nginx      1/1     Running   0          27s
nginx                1/1     Running   0          5m52s
sc-pv-pod-nfs        1/1     Running   0          56m
task-pv-pvc-pod      1/1     Running   0          6h43m
test-pd              1/1     Running   0          8h
test-pd-2            1/1     Running   0          8h
[root@master configmap]#
[root@master configmap]# kubectl cp configmap-nginx:/etc/nginx/nginx.conf ./nginx.conf
tar: Removing leading `/' from member names
[root@master configmap]# ls
configmap-nginx.yaml  configmap.yaml  config-pod.yaml  nginx.conf
[root@master configmap]#
↑从启动的nginx中的pod里复制nginx.conf文件到宿主机里
2.修改nginx.conf配置文件,然后制作成configmap
[root@master configmap]# vim nginx.conf
[root@master configmap]# cat nginx.conf

user  nginx;
worker_processes  2;  #修改为2

error_log  /var/log/nginx/error.log notice;
pid        /var/run/nginx.pid;


events {
    worker_connections  2048;  #将1024修改为2048
}


http {
    include       /etc/nginx/mime.types;
    default_type  application/octet-stream;

    log_format  main  '$remote_addr - $remote_user [$time_local] "$request" '
                      '$status $body_bytes_sent "$http_referer" '
                      '"$http_user_agent" "$http_x_forwarded_for"';

    access_log  /var/log/nginx/access.log  main;

    sendfile        on;
    #tcp_nopush     on;

    keepalive_timeout  65;

    #gzip  on;

    include /etc/nginx/conf.d/*.conf;
}
[root@master configmap]#
3.根据nginx.conf文件去创建一个configmap
[root@master configmap]# kubectl create configmap nginx-config-1 --from-file=nginx.conf
configmap/nginx-config-1 created
[root@master configmap]# kubectl get cm
NAME               DATA   AGE
game-demo          5      30m
kube-root-ca.crt   1      16d
nginx-config-1     1      10s
[root@master configmap]# kubectl describe cm nginx-config-1
Name:         nginx-config-1
Namespace:    default
Labels:       <none>
Annotations:  <none>

Data
====
nginx.conf:
----

user  nginx;
worker_processes  2;

error_log  /var/log/nginx/error.log notice;
pid        /var/run/nginx.pid;


events {
    worker_connections  2048;
}


http {
    include       /etc/nginx/mime.types;
    default_type  application/octet-stream;

    log_format  main  '$remote_addr - $remote_user [$time_local] "$request" '
                      '$status $body_bytes_sent "$http_referer" '
                      '"$http_user_agent" "$http_x_forwarded_for"';

    access_log  /var/log/nginx/access.log  main;

    sendfile        on;
    #tcp_nopush     on;

    keepalive_timeout  65;

    #gzip  on;

    include /etc/nginx/conf.d/*.conf;
}

Events:  <none>
[root@master configmap]#
4.启动一个pod,去使用这个configmap,加载里面的nginx.conf的内容
[root@master configmap]# vim nginx-pod-configmap.yaml
apiVersion: v1
kind: Pod
metadata:
  name: nginx-configmap-test
spec:
  containers:
    - name: test-container-configmap
      image: nginx
      imagePullPolicy: IfNotPresent
      volumeMounts:
      - name: config-volume
        mountPath: /etc/nginx/nginx.conf
        subPath: nginx.conf
        #声明nginx.conf是一个文件
  volumes:
    - name: config-volume
      configMap:
        # 提供包含要添加到容器中的文件的 ConfigMap 的名称
        name: nginx-config-1
  restartPolicy: Always
[root@master configmap]#
[root@master configmap]# kubectl apply -f nginx-pod-configmap.yaml
pod/nginx-configmap-test created
[root@master configmap]# kubectl get pod
NAME                   READY   STATUS    RESTARTS   AGE
configmap-demo-pod     1/1     Running   0          28m
configmap-nginx        1/1     Running   0          11m
nginx                  1/1     Running   0          17m
nginx-configmap-test   1/1     Running   0          7s
sc-pv-pod-nfs          1/1     Running   0          67m
task-pv-pvc-pod        1/1     Running   0          6h54m
test-pd                1/1     Running   0          8h
test-pd-2              1/1     Running   0          8h
[root@master configmap]#
5.进入pod里面查看nginx.conf配置文件
[root@master configmap]# kubectl exec -it nginx-configmap-test -- bash
root@nginx-configmap-test:/# cd /etc/nginx/
root@nginx-configmap-test:/etc/nginx# ls
conf.d	fastcgi_params	mime.types  modules  nginx.conf  scgi_params  uwsgi_params
root@nginx-configmap-test:/etc/nginx# cat nginx.conf

user  nginx;
worker_processes  2;

error_log  /var/log/nginx/error.log notice;
pid        /var/run/nginx.pid;


events {
    worker_connections  2048;
}


http {
    include       /etc/nginx/mime.types;
    default_type  application/octet-stream;

    log_format  main  '$remote_addr - $remote_user [$time_local] "$request" '
                      '$status $body_bytes_sent "$http_referer" '
                      '"$http_user_agent" "$http_x_forwarded_for"';

    access_log  /var/log/nginx/access.log  main;

    sendfile        on;
    #tcp_nopush     on;

    keepalive_timeout  65;

    #gzip  on;

    include /etc/nginx/conf.d/*.conf;
}
root@nginx-configmap-test:/etc/nginx#
发现:worker_processes 和 worker_connections 是更改之后的
说明已经将configmap里的nginx.conf投入进入了pod
3、secret
Secret 用于存储敏感信息,如密码、OAuth 令牌、SSH 密钥等。这些信息不应该在容器内部或集群中以明文形式存储或传输。
Secret 是一种包含少量敏感信息例如密码、令牌或密钥的对象。 --》里面存放的数据是加密的
存放进去的时候,会加密,读取出来的时候会自动解密
特点:
- 存储敏感数据,如密码和密钥。
- 通过在 Pod 中引用 Secret,可以将敏感数据注入到容器的文件系统或环境变量中。
Secret的内容不会在日志中输出,也不会在 API 响应中显示,提供了额外的安全性。- 支持通过
kubectl命令行工具创建和管理,但无法查看其内容。
使用场景:
- 数据库密码。
- API 密钥。
- 私钥和证书。
3.1、查看secret
[root@master configmap]# kubectl get secret
NAME                  TYPE                                  DATA   AGE
default-token-zdvg8   kubernetes.io/service-account-token   3      16d
[root@master configmap]#
3.2、secret 的使用
1.新建一个文件夹
[root@master pv-pvc]# mkdir secret
[root@master pv-pvc]# cd secret/
[root@master secret]#
2.给用户名和密码进行base64加密算法进行加密
[root@master secret]# echo  admin  |base64
YWRtaW4K
[root@master secret]#
[root@master secret]# echo  sc123456  |base64
c2MxMjM0NTYK
3.新建一个secret的yaml文件,创建一个secret
[root@master secret]# vim secret.yaml
apiVersion: v1
kind: Secret
metadata:
  name: mysecret
type: Opaque
data:
  username: YWRtaW4K
  password: c2MxMjM0NTYK
[root@master secret]#
4.生成secret
[root@master secret]# kubectl apply -f secret.yaml
secret/mysecret created
[root@master secret]# kubectl get secret
NAME                  TYPE                                  DATA   AGE
default-token-zdvg8   kubernetes.io/service-account-token   3      16d
mysecret              Opaque                                2      12s
[root@master secret]#
[root@master secret]# kubectl describe secret mysecret
Name:         mysecret
Namespace:    default
Labels:       <none>
Annotations:  <none>

Type:  Opaque

Data
====
password:  9 bytes
username:  6 bytes
[root@master secret]#
3.3、使用WordPress+MySQL的案例,演示secret的使用(MySQL密码存入secret里)
下面是整个过程中的关键步骤和配置文件的整理:
1. 创建 MySQL 密码 Secret
您使用了一个名为 kustomization.yaml 的文件来生成一个名为 mysql-pass 的 Secret,其中包含了一个明文密码 sc123456:
secretGenerator:
- name: mysql-pass
  literals:
  - password=sc123456
通过运行 kubectl apply -k ./ 命令,您基于 kustomization.yaml 文件生成了 Secret。
2. 启动 MySQL Pod 和 Service
接下来,使用了一个名为 mysql-deploy.yaml 的文件来定义 MySQL 的 Service、PersistentVolume、PersistentVolumeClaim 和 Deployment:
apiVersion: v1
kind: Service
metadata:
  name: wordpress-mysql
  labels:
    app: wordpress
spec:
  ports:
    - port: 3306
  selector:
    app: wordpress
    tier: mysql
  clusterIP: None

---

apiVersion: v1
kind: PersistentVolume
metadata:
  name: wordpress-pv-volume
  labels:
    type: local
spec:
  storageClassName: wordpress-mysql
  capacity:
    storage: 20Gi
  accessModes:
    - ReadWriteMany
  hostPath:
    path: "/mysqldata"
    type: DirectoryOrCreate

---

apiVersion: v1
kind: PersistentVolumeClaim
metadata:
  name: mysql-pv-claim
  labels:
    app: wordpress
spec:
  accessModes:
    - ReadWriteMany
  resources:
    requests:
      storage: 10Gi
  storageClassName: wordpress-mysql

---

apiVersion: apps/v1
kind: Deployment
metadata:
  name: wordpress-mysql
  labels:
    app: wordpress
spec:
  selector:
    matchLabels:
      app: wordpress
      tier: mysql
  strategy:
    type: Recreate
  template:
    metadata:
      labels:
        app: wordpress
        tier: mysql
    spec:
      containers:
      - image: mysql:8.0
        name: mysql
        env:
        - name: MYSQL_ROOT_PASSWORD
          valueFrom:
            secretKeyRef:
              name: mysql-pass-tghthk249c
              key: password
        - name: MYSQL_DATABASE
          value: wordpress
        - name: MYSQL_USER
          value: wordpress
        - name: MYSQL_PASSWORD
          valueFrom:
            secretKeyRef:
              name: mysql-pass-tghthk249c
              key: password
        ports:
        - containerPort: 3306
          name: mysql
        volumeMounts:
        - name: mysql-persistent-storage
          mountPath: /var/lib/mysql
      volumes:
      - name: mysql-persistent-storage
        persistentVolumeClaim:
          claimName: mysql-pv-claim
通过 kubectl apply -f mysql-deploy.yaml 命令应用了这个配置文件,创建了相关的 Kubernetes 资源。
3. 验证 Secret 里的密码是否成功赋值给 MySQL
最后,通过 kubectl exec 命令进入 MySQL Pod,并尝试使用 Secret 中的密码登录 MySQL:
kubectl exec -it wordpress-mysql-85d8585554-4lblh -- bash
mysql -uroot -p'sc123456'
成功登录了 MySQL,这表明 Secret 中的密码已经正确地赋值给了 MySQL Pod。
请注意,Secret 名称 mysql-pass-tghthk249c 似乎与您在 kustomization.yaml 文件中定义的 Secret 名称 mysql-pass 不匹配。这可能是由于在创建 Secret 时生成的哈希值不同。在实际应用中,请确保在 Deployment 中引用的 Secret 名称与您创建的 Secret 名称一致。
4、pv—>持久卷,pvc—>持久卷申领
pv是一块存储空间
pvc去申领这块空间
在Kubernetes(K8s)中,Persistent Volume(PV)是一个集群中的存储资源,它被设计为与Pod的生命周期独立。PV提供了一种机制,使得集群中的应用程序可以持久化和共享数据,即使在Pod被删除或重新调度的情况下,数据也不会丢失。
4.1、PV的主要特点:
-
独立性:PV的生命周期独立于任何Pod,即使使用PV的Pod被删除,PV上的数据仍然保留在集群中。
-
持久性:PV可以被设计为持久的,这意味着即使在Pod重启或节点故障的情况下,数据也不会丢失。
-
可配置性:PV可以预先配置或动态配置。预先配置的PV是在集群中预先创建的,而动态配置的PV是由Persistent Volume Claim(PVC)自动创建的。
-
可访问性:PV可以被集群中的多个Pod同时访问,这取决于其访问模式(例如,ReadWriteOnce, ReadWriteMany, ReadOnlyMany)。
4.2、PV的类型:
Kubernetes支持多种PV类型,每种类型都有其特定的存储解决方案和配置方式。以下是一些常见的PV类型:
-
NFS网络文件系统,允许多个节点同时读写同一个文件系统。 -
HostPath:将宿主机上的文件或目录挂载到Pod中。这种类型的PV通常用于开发和测试环境。 -
AWS Elastic Block Store (EBS):亚马逊云服务提供的块存储,可以挂载到EC2实例上。 -
Google Persistent Disk:谷歌云平台提供的块存储服务。 -
Azure Disk:微软Azure提供的块存储服务。 -
Local:使用节点上本地存储,这种类型的PV通常用于高性能要求的场景。
4.3、 PV的访问模式:
PV的访问模式定义了Pod如何访问PV上的存储资源。主要的访问模式有:
-
ReadWriteOnce (RWO):可以被单个节点以读写方式挂载。 -
ReadOnlyMany (ROX):可以被多个节点以只读方式挂载。 -
ReadWriteMany (RWX):可以被多个节点以读写方式挂载。 -
ReadWriteOncePod (RWOP):这是Kubernetes 1.18版本引入的新访问模式。它可以被同一节点上的多个Pod以读写方式挂载。这种模式适用于那些需要在同一节点上运行多个Pod并共享存储的场景,例如,为了实现数据的本地性优化。
4.4、PV和PVC的关系:
Persistent Volume Claim(PVC)是用户对存储资源的请求。用户通过PVC来请求特定大小和访问模式的存储资源,而Kubernetes会自动找到或创建一个匹配的PV来满足这个请求。这种分离使得用户不需要关心底层的存储实现细节。
4.5、创建PV:
PV可以通过YAML配置文件预先创建,也可以通过PVC动态创建。创建PV的YAML文件通常包含PV的大小、存储类、访问模式和存储提供者特定的配置。
总之,PV在Kubernetes中扮演着关键的角色,它为集群中的应用程序提供了持久化存储的能力,使得数据管理变得更加灵活和可靠。
4.6、实验:pv-pvc-sc
1.写个yaml,创建pv
[root@master pv-pvc]# vim pv-volume.yaml
apiVersion: v1
kind: PersistentVolume
metadata:
  name: task-pv-volume
  labels:
    type: local
spec:
  storageClassName: manual
  capacity:
    storage: 10Gi
  accessModes:
    - ReadWriteOnce
  hostPath:
    path: "/scdata"
    type: DirectoryOrCreate
[root@master pv-pvc]#
这个pv-volume.yaml文件是一个Kubernetes配置文件,用于创建一个Persistent Volume(PV)。下面是对这个文件内容的逐行解释:
apiVersion: v1
这行指定了Kubernetes API的版本,这里是版本1。
kind: PersistentVolume
这里声明了资源类型是PersistentVolume。
metadata:
  name: task-pv-volume
metadata部分包含了PV的元数据信息。这里为PV指定了一个名称,即task-pv-volume。
  labels:
    type: local
在labels部分,为PV设置了一个键值对,type: local是一个标签,可以用来分类或选择PV。在这个例子中,标签表明这个PV使用的是本地存储。
spec:
spec部分详细描述了PV的规格和配置。
storageClassName: manual
storageClassName指定了PV的存储类。在这个例子中,存储类被命名为manual。存储类允许管理员定义一组预配置的存储,用户在创建PVC时可以请求这些存储类。
  capacity:
    storage: 10Gi
capacity部分定义了PV的存储容量。这里指定了10Gi(Gibibytes)的存储空间。注意,这里使用的是storage而不是sizeLimit。
  accessModes:
    - ReadWriteOnce
accessModes部分定义了PV的访问模式。在这个例子中,PV被配置为ReadWriteOnce,这意味着PV可以被单个节点以读写方式挂载。
  hostPath:
    path: "/scdata"
最后,hostPath部分指定了PV的存储实现。这里使用了宿主机上的/scdata目录作为PV的存储位置。这意味着,当Pod挂载这个PV时,它实际上是在访问宿主机上的这个目录。
总结一下,这个配置文件定义了一个名为task-pv-volume的PV,它使用宿主机的/scdata目录作为存储位置,容量为10Gi,并且可以被单个节点以读写方式挂载。这个PV属于manual存储类,并且有一个标签type: local。通过应用这个配置文件,您可以创建一个PV供集群中的Pod使用。
2.启动
[root@master pv-pvc]# kubectl apply -f pv-volume.yaml
persistentvolume/task-pv-volume created
[root@master pv-pvc]#
3.查看pv
[root@master pv-pvc]# kubectl get pv
NAME             CAPACITY   ACCESS MODES   RECLAIM POLICY   STATUS      CLAIM   STORAGECLASS   REASON   AGE
task-pv-volume   10Gi       RWO            Retain           Available           manual                  53s
[root@master pv-pvc]#
4.创建pvc,持久卷申领
[root@master pv-pvc]# vim pvc.yaml
apiVersion: v1
kind: PersistentVolumeClaim
metadata:
  name: task-pv-claim
spec:
  storageClassName: manual
  accessModes:
    -  ReadWriteOnce
  resources:
    requests:
      storage: 3Gi
[root@master pv-pvc]#
这个pvc.yaml文件是一个Kubernetes配置文件,用于创建一个PersistentVolumeClaim(PVC)。下面是对这个文件内容的逐行解释:
apiVersion: v1
这行指定了Kubernetes API的版本,这里是版本1。
kind: PersistentVolumeClaim
这里声明了资源类型是PersistentVolumeClaim。
metadata:
  name: task-pv-claim
metadata部分包含了PVC的元数据信息。这里为PVC指定了一个名称,即task-pv-claim。
spec:
spec部分详细描述了PVC的规格和配置。
storageClassName: manual
storageClassName指定了PVC应该使用的存储类。在这个例子中,PVC将使用名为manual的存储类。这通常意味着PVC将绑定到一个预先由集群管理员创建的PersistentVolume(PV),该PV具有manual存储类。
  accessModes:
    - ReadWriteOnce
accessModes部分定义了PVC期望的访问模式。在这个例子中,PVC被配置为ReadWriteOnce,这意味着PVC将请求一个可以被单个节点以读写方式挂载的存储资源。
  resources:
    requests:
      storage: 3Gi
resources部分定义了PVC对存储资源的请求。requests字段指定了PVC需要的存储量。在这个例子中,PVC请求了3Gi(Gibibytes)的存储空间。这个请求将由Kubernetes根据可用的PV来满足。
总结一下,这个配置文件定义了一个名为task-pv-claim的PVC,它请求使用manual存储类的3Gi存储空间,并且期望以ReadWriteOnce的访问模式访问这个存储。当这个PVC被创建后,Kubernetes会自动寻找一个匹配的PV来绑定这个PVC,从而为应用程序提供持久化存储。
5.启动且查看pvc
[root@master pv-pvc]# kubectl apply -f pvc.yaml
persistentvolumeclaim/task-pv-claim created
[root@master pv-pvc]# kubectl get pvc
NAME            STATUS   VOLUME           CAPACITY   ACCESS MODES   STORAGECLASS   AGE
task-pv-claim   Bound    task-pv-volume   10Gi       RWO            manual         10s
[root@master pv-pvc]#
Bound表示pv和pvv绑定
6.创建pod使用pvc
前提条件:需要在node-2服务器上新建index.html给nginxpod作为首页使用
[root@node-2 scdata]# echo 'Hello from Kubernetes storage' >>index.html
您在 /var/spool/mail/root 中有新邮件
[root@node-2 scdata]# cat index.html
Hello from Kubernetes storage
[root@node-2 scdata]#
写yaml
[root@master pv-pvc]# vim pv-pod.yaml
apiVersion: v1
kind: Pod
metadata:
  name: task-pv-pvc-pod
spec:
  volumes:
    - name: task-pv-storage
      persistentVolumeClaim:
        claimName: task-pv-claim
  containers:
    - name: task-pv-container
      image: nginx
      ports:
        - containerPort: 80
          name: "http-server"
      volumeMounts:
        - mountPath: "/usr/share/nginx/html"
          name: task-pv-storage
[root@master pv-pvc]#
启动
[root@master pv-pvc]# kubectl apply -f pv-pod.yaml
pod/task-pv-pvc-pod created
[root@master pv-pvc]# kubectl get pod -o wide
NAME              READY   STATUS    RESTARTS   AGE    IP              NODE     NOMINATED NODE   READINESS GATES
task-pv-pvc-pod   1/1     Running   0          82s    10.244.247.16   node-2   <none>           <none>
test-pd           1/1     Running   0          124m   10.244.247.2    node-2   <none>           <none>
test-pd-2         1/1     Running   0          102m   10.244.247.11   node-2   <none>           <none>
[root@master pv-pvc]#

[root@master pv-pvc]#
7.验证一下,访问task-pv-pvc-pod pod里的nginx,查看首页是否是定制的内容
[root@master pv-pvc]# curl 10.244.247.16
Hello from Kubernetes storage
[root@master pv-pvc]#
成功验证了pod加载了pv对于的文件夹/scdata/里的inedx.html首页文件
8.存储使用流程:
pod–>volume–>pvc—>pv—>宿主机里的磁盘空间/scdata
5、pod和pvc和pv之间的关系
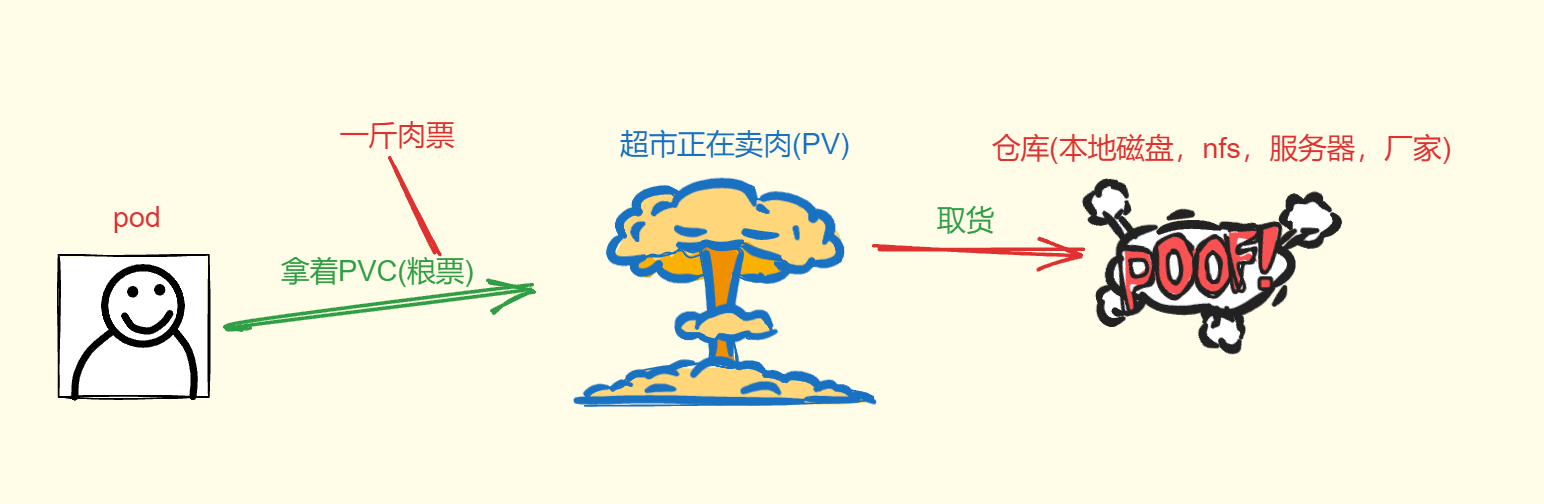
pod拿着pvc(申领)pv(存储空间)
6、sc—>存储类(storageClass)是什么
storageClass:可以动态给pv提供资源,不需要提前创建pv,自己从storageClass里申请空间
storageClass 理解为一个提供存储空间的供应商
pv向storageClass申请空间
pv相当于分区–>storageClass相当于磁盘
pv—》供销社,商店
7、pv+pvc+nfs的实验
7.1、实验的流程
pod–>volume–>pvc—>pv—>nfs—>/web
要卸载的话,先卸pod,从左往右来
7.2、搭建NFS服务器
'给每一台机器都下载'
'建议k8s集群内的所有的节点都安装nfs-utils软件,因为节点服务器里创建卷需要支持nfs网络文件系统在node-1、node-2上都安装nfs-utils软件,不需要启动nfs服务,主要是使用nfs服务器共享的文件夹,需要去挂载nfs文件系统'
yum install nfs-utils -y
只是在nfs服务器上启动nfs服务,就可以了
[root@nfs-server ~]# service nfs  restart
Redirecting to /bin/systemctl restart nfs.service
[root@nfs-server ~]#

nfs服务器上的防火墙和selinux都是禁用的
7.3、设置共享目录
[root@nfs-server ~]# vim /etc/exports
[root@nfs-server ~]# cat /etc/exports
/web 192.168.182.0/24(rw,sync,all_squash)
[root@nfs-server ~]#
7.4、新建共享目录/web
[root@nfs-server ~]# mkdir /web
[root@nfs-server ~]# cd /web/
[root@nfs-server web]# echo "welcome to sanchuang" >index.html
[root@nfs-server web]# ls
index.html
[root@nfs-server web]#
'设置/web文件夹的权限,允许其他人过来读写'
[root@nfs-server web]# chmod 777 /web
[root@nfs-server web]# chown  nfsnobody:nfsnobody /web
[root@nfs-server web]# ll -d /web
drwxrwxrwx 2 nfsnobody nfsnobody 24 3月  19 16:28 /web
[root@nfs-server web]#
7.5、刷新nfs或者重新输出共享目录
exportfs  -a  输出所有共享目录
exportfs  -v  显示输出的共享目录
exportfs  -r 重新输出所有的共享目录
[root@nfs-server web]# exportfs -rv
exporting 192.168.182.0/24:/web
[root@nfs-server web]#
'或者执行'
[root@nfs-server web]# service nfs restart
Redirecting to /bin/systemctl restart nfs.service
[root@nfs-server web]#
7.6、创建一个pv使用nfs服务器共享的目录
[root@master storage]# vim nfs-pv.yaml
[root@master storage]# cat nfs-pv.yaml
apiVersion: v1
kind: PersistentVolume
metadata:
  name: sc-nginx-pv-2
  labels:
    type: sc-nginx-pv-2
spec:
  capacity:
    storage: 5Gi
  accessModes:
    - ReadWriteMany
  storageClassName: nfs         #存储类对应的名字
  nfs:
    path: "/web"       #nfs共享的目录
    server: 192.168.182.136   #nfs服务器的ip地址
    readOnly: false   #访问模式
[root@master storage]#
7.7、应用一下nfs-pv.yaml
[root@master storage]# kubectl apply -f nfs-pv.yaml
persistentvolume/sc-nginx-pv-2 created
[root@master storage]# kubectl get pv
NAME             CAPACITY   ACCESS MODES   RECLAIM POLICY   STATUS   CLAIM                    STORAGECLASS   REASON   AGE
sc-nginx-pv-2    5Gi        RWX            Retain           Bound    default/sc-nginx-pvc-2   nfs                     5s
task-pv-volume   10Gi       RWO            Retain           Bound    default/task-pv-claim    manual                  6h17m
[root@master storage]# kubectl get pvc
NAME             STATUS   VOLUME           CAPACITY   ACCESS MODES   STORAGECLASS   AGE
sc-nginx-pvc-2   Bound    sc-nginx-pv-2    5Gi        RWX            nfs            9m19s
task-pv-claim    Bound    task-pv-volume   10Gi       RWO            manual         5h58m
[root@master storage]#
7.8、创建pvc使用存储类:example-nfs
[root@master storage]# vim pvc-sc.yaml
[root@master storage]# cat pvc-sc.yaml
apiVersion: v1
kind: PersistentVolumeClaim
metadata:
  name: sc-nginx-pvc-2
spec:
  accessModes:
  - ReadWriteMany
  resources:
     requests:
       storage: 1Gi
  storageClassName: nfs
[root@master storage]#
[root@master storage]# kubectl apply -f pvc-sc.yaml
persistentvolumeclaim/sc-nginx-pvc-2 created
[root@master storage]# kubectl get pvc
NAME             STATUS    VOLUME           CAPACITY   ACCESS MODES   STORAGECLASS   AGE
sc-nginx-pvc-2   Pending                                              nfs            8s
task-pv-claim    Bound     task-pv-volume   10Gi       RWO            manual         5h49m
[root@master storage]#
7.9、创建pod启动pvc
[root@master storage]# vim pod-nfs.yaml
[root@master storage]# cat pod-nfs.yaml
apiVersion: v1
kind: Pod
metadata:
  name: sc-pv-pod-nfs
spec:
  volumes:
    - name: sc-pv-storage-nfs
      persistentVolumeClaim:
        claimName: sc-nginx-pvc-2
  containers:
    - name: sc-pv-container-nfs
      image: nginx
      imagePullPolicy: IfNotPresent
      ports:
        - containerPort: 80
          name: "http-server"
      volumeMounts:
        - mountPath: "/usr/share/nginx/html"
          name: sc-pv-storage-nfs
[root@master storage]#
应用一下:
[root@master storage]# kubectl apply -f pod-nfs.yaml
pod/sc-pv-pod-nfs created
[root@master storage]# kubectl get pod
NAME              READY   STATUS    RESTARTS   AGE
sc-pv-pod-nfs     1/1     Running   0          6s
task-pv-pvc-pod   1/1     Running   0          5h46m
test-pd           1/1     Running   0          7h49m
test-pd-2         1/1     Running   0          7h28m
[root@master storage]#
7.10、测试
[root@master storage]# curl 10.244.247.18
welcome to sanchuang
[root@master storage]#
修改nfs中的index.html在master上查看效果
[root@nfs-server web]# vim index.html
welcome to sanchuang
welcome to changsha
[root@nfs-server web]#
[root@master storage]# curl 10.244.247.18
welcome to sanchuang
welcome to changsha
[root@master storage]#
8、小知识点
-
statefulset是deploy 部署控制器的一个变种,也可以控制副本控制器
[root@master taint_toleration]# kubectl get statefulset NAME READY AGE web 6/6 40h [root@master taint_toleration]# kubectl delete statefulset web statefulset.apps "web" deleted -
查看node节点有没有污点
[root@master pv-pvc]# kubectl describe node node-1 | grep -A2 Taints
Taints:             <none>
Unschedulable:      false
Lease:
[root@master pv-pvc]# kubectl describe node node-2 | grep -A2 Taints
Taints:             <none>
Unschedulable:      false
Lease:
[root@master pv-pvc]# kubectl describe node master | grep -A2 Taints
Taints:             node-role.kubernetes.io/master:NoSchedule
Unschedulable:      false
Lease:
[root@master pv-pvc]#


 294
294

 被折叠的 条评论
为什么被折叠?
被折叠的 条评论
为什么被折叠?
 到【灌水乐园】发言


