


1)分词的概念
分词Search是一个构建于Lucene之上的优秀的分布式全文检索引擎(服务器),它是使用Java开发的,提供基于RESTful风格的Web服务接口。表面上我们只要将一段冗长的要检索的目标数据和一串关键字文本丢给它就完事了,事实上ES却不是直接使用完整的关键字文本在完整的目标数据中查找的,它们都要经过一个步骤:拆分成一个个单词、字或词组。
2)了解ES中的分词器(Analyzer)
ES中文本的拆分或者说分词是通过分词器完成的,ES中的分词器主要有standard(ES的默认分词器,将单词转成小写形式,去除标点符号,支持中文【单字分割】)、simple(通过非字母的字符分割文本,将单词转为小写形式,同时去除数字类型的字符)和whitespace(仅去除空格,不支持中文)。当然ES中的分词器不止这些,这里不再一一列举。
3)使用ES中的分词功能
为了直观的看到ES的分词情况,我们可以使用工具对ES发送一些分词请求,看看ES对不同文本的分词结果。
使用standard分词器
首先使用ES中的standard分词器,它也是ES中默认的分词器。我们可以发送一个URL为localhost:9200/_analyze的post请求,然后在请求体中填入如下JSON数据:
{
    "analyzer": "standard",
    "text": "I bought a computer,8761元"
}解释:analyzer字段指定需要的分词器,这里我们使用的是standard分词器(支持中文,简单按字分词),它是支持中文分词的;text字段指定要拆分的文本,这里是"I bought a computer,8761元";
执行结果如下,可以看到ES分词器为我们拆分成了六个最小词元(逗号被去掉了,同时所有的字母都转为小写),中文包含在内:
{
    "tokens": [
        {
            "token": "i",
            "start_offset": ,
            "end_offset": 1,
            "type": "<ALPHANUM>",
            "position":
        },
        {
            "token": "bought",
            "start_offset": 2,
            "end_offset": 8,
            "type": "<ALPHANUM>",
            "position": 1
        },
        {
            "token": "a",
            "start_offset": 9,
            "end_offset": 10,
            "type": "<ALPHANUM>",
            "position": 2
        },
        {
            "token": "computer",
            "start_offset": 11,
            "end_offset": 19,
            "type": "<ALPHANUM>",
            "position": 3
        },
        {
            "token": "8761",
            "start_offset": 20,
            "end_offset": 24,
            "type": "<NUM>",
            "position": 4
        },
        {
            "token": "元",
            "start_offset": 24,
            "end_offset": 25,
            "type": "<IDEOGRAPHIC>",
            "position": 5
        }
    ]
}
使用simple分词器
同样的JSON数据,我们把analzer改成simple分词器:
{
    "analyzer": "simple",
    "text": "I bought a computer,8761元"
}
返回结果变成了五个词元,可以看到simple分词器也是支持中文分词的,但是注意标点符号与数字都被去除了,同时所有字母转小写:
{
    "tokens": [
        {
            "token": "i",
            "start_offset": ,
            "end_offset": 1,
            "type": "word",
            "position":
        },
        {
            "token": "bought",
            "start_offset": 2,
            "end_offset": 8,
            "type": "word",
            "position": 1
        },
        {
            "token": "a",
            "start_offset": 9,
            "end_offset": 10,
            "type": "word",
            "position": 2
        },
        {
            "token": "computer",
            "start_offset": 11,
            "end_offset": 19,
            "type": "word",
            "position": 3
        },
        {
            "token": "元",
            "start_offset": 24,
            "end_offset": 25,
            "type": "word",
            "position": 4
        }
    ]
}
使用whitespace分词器
把analyzer值改为whitespace:
{
    "analyzer": "whitespace",
    "text": "I bought a computer,8761元"
}
whitespace分词器是通过空白符,包括空格、制表符等分割文本的,同时它不会对单词转小写,重要的是它不支持中文的分词,所以从返回结果中我们可以看到最后一个中文字没有被拆分,这里顺便提一下,这里我使用的是全角(中文)逗号,并不是逗号后面还有一个空格,因为不支持中文,自然也是不支持中文符号的:
{
    "tokens": [
        {
            "token": "I",
            "start_offset": ,
            "end_offset": 1,
            "type": "word",
            "position":
        },
        {
            "token": "bought",
            "start_offset": 2,
            "end_offset": 8,
            "type": "word",
            "position": 1
        },
        {
            "token": "a",
            "start_offset": 9,
            "end_offset": 10,
            "type": "word",
            "position": 2
        },
        {
            "token": "computer,8761元",
            "start_offset": 11,
            "end_offset": 25,
            "type": "word",
            "position": 3
        }
    ]
}
4)ES默认中文分词的缺陷
上面我们提到了,standard是ES中的默认分词器,但是对于中文来说只是按字拆分的结果我们能够接受吗?能不能再进一步呢?英文单词可以按照一个个词汇拆分,这是没有任何问题的,拿上面的例子来说,“computer”这个单词专业的术语叫“计算机”,但是如果使用默认的分词器来拆分“计算机”,我们看一下结果:
请求体
{
    "analyzer": "standard",
    "text": "computer 计算机"
}
请求结果
{
    "tokens": [
        {
            "token": "computer",
            "start_offset": ,
            "end_offset": 8,
            "type": "<ALPHANUM>",
            "position":
        },
        {
            "token": "计",
            "start_offset": 9,
            "end_offset": 10,
            "type": "<IDEOGRAPHIC>",
            "position": 1
        },
        {
            "token": "算",
            "start_offset": 10,
            "end_offset": 11,
            "type": "<IDEOGRAPHIC>",
            "position": 2
        },
        {
            "token": "机",
            "start_offset": 11,
            "end_offset": 12,
            "type": "<IDEOGRAPHIC>",
            "position": 3
        }
    ]
}
通过英语单词"computer"我们可以知道一个具体的事物,但是被按字拆分的“计算机”我们已经无法准确知道它要表达什么了,如果它能够更智能一点能够知道“计算机”这三个字所表达的含义,在将这三个字拆分的同时,自动为我们额外保留这三个字为最小词元,结果是不是更好一些呢?
5)IK中文分词器的安装&使用
要解决上面的问题我们可以通过IK分词器做到,IK分词器是通过字典的方式去理解我们日常中一些特定的短语词汇从而为我们保留一些有意义的短语的。
安装
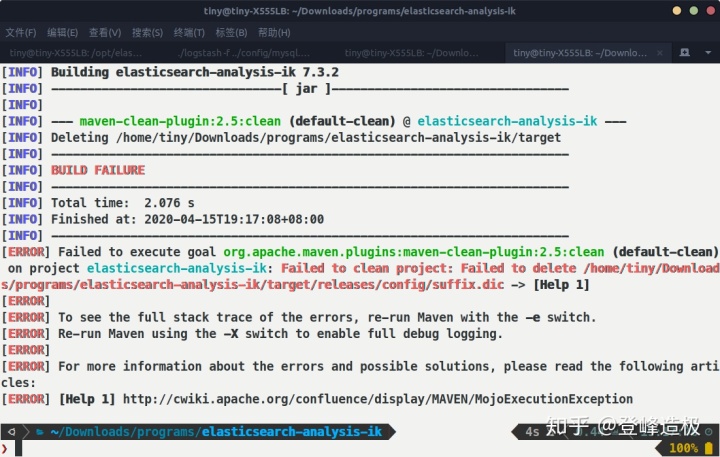
我ES的版本是7.3.2,那么要找的IK也是7.3.2。找到合适的版本下载压缩包文件后解压(我下载的是.zip结尾的源码文件,这里需要使用maven打包),进到解压的文件夹下,执行mvn package打包命令,出现错误Failed to execute goal org.apache.maven.plugins:maven-resources-plugin:2.6:resources (default-resources) on project elasticsearch-analysis-ik: Cannot create resource output directory: /home/tiny/Downloads/programs/elasticsearch-analysis-ik/target/classes
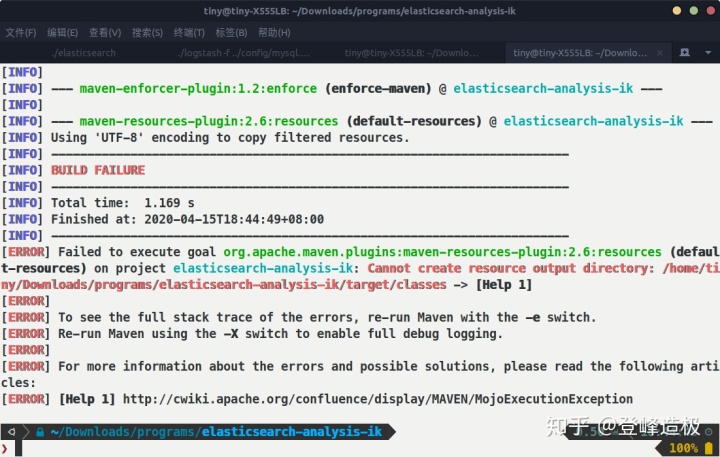
mvn打包出现错误
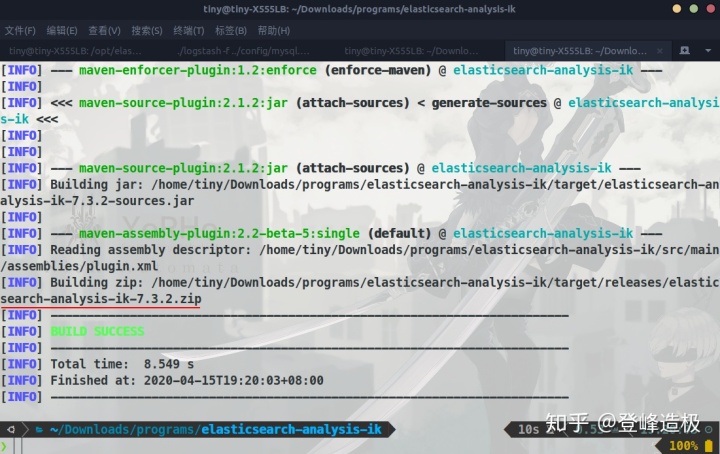
执行命令sudo chown -R tiny:tiny ../elasticsearch-analysis-ik后再次执行mvn package,成功:
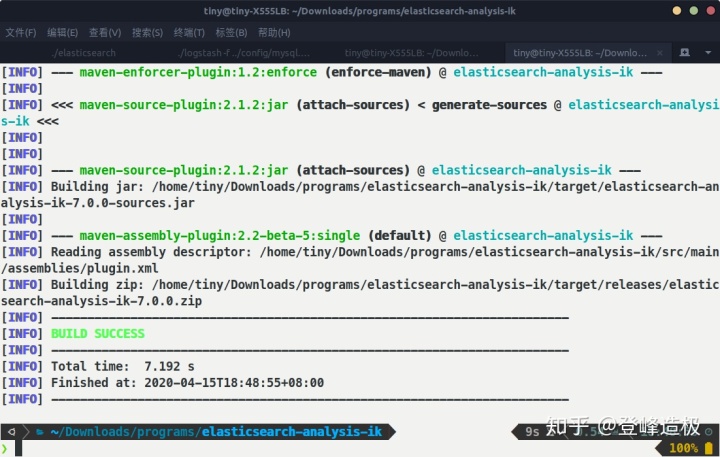
mvn打包成功
进到elasticsearch-analysis-ik/target/releases目录,使用命令sudo unzip elasticsearch-analysis-ik-7.0.0.zip解压,而后将解压出来的所有文件复制到ElasticSearch文件夹的plugins/ik(没有就新建)目录下,之后重启ES。
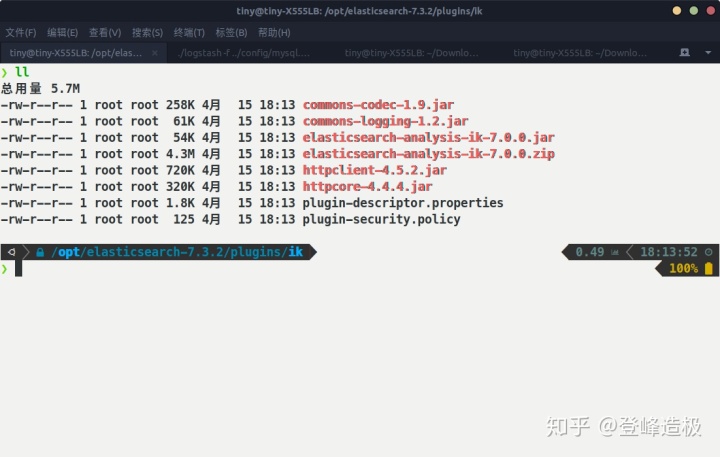
ik分词器放置目录
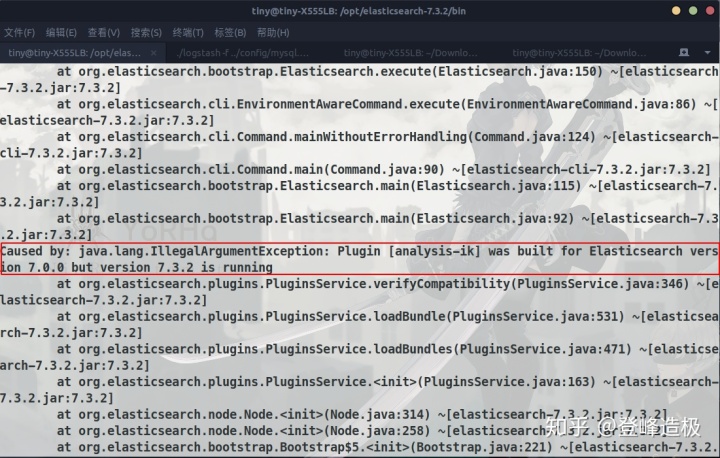
IK安装后导致ES无法启动
意料之外的是ES启动居然报错了,打印了一些日志,主要看框起的一行,大致是说:“IK是为ElasticSearch7.0.0构建的但是7.3.2版本的ElasticSearch正在运行”。如果你没看明白,回过头看看我们解压的文件elasticsearch-analysis-ik-7.0.0.zip也该知道了,确实是7.0.0版本!
安装ik后ES启动失败
这可能是7.3.2版本的一个BUG?我确实下载的是IK的7.3.2版本后打包编译的,但居然打包出一个7.0.0版本的IK文件。关于ES的版本问题,我尝试着到IK项目的pom.xml文件中查看ES的版本:

查看ik项目的pom文件
可以看到ES的版本标注的是7.0.0,我尝试着将pom文件中ES的版本改为7.3.2,保存退出,然后执行mvn clean package,出现错误:
mvn清理并打包出现错误
问题不大,我们手动将target目录删除,然后mvn package,执行成功了,可以看到版本已经是7.3.2:
打包成功
之后再按照之前的步骤解压并复制到ES下的plugins/ik目录(记得把二手手游账号买卖平台ik目录清空再复制),启动ES:
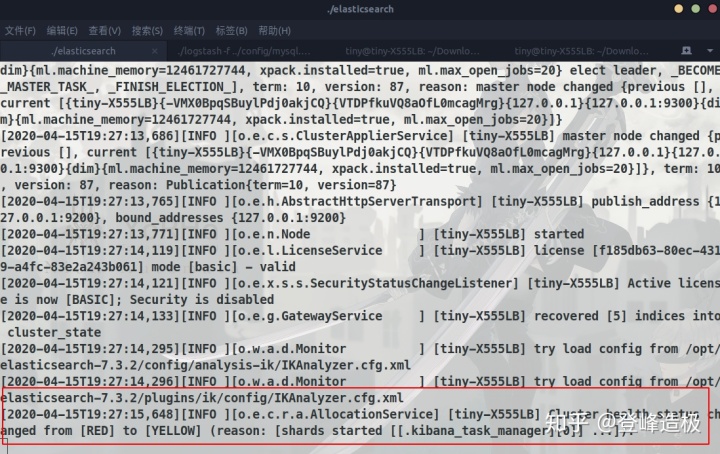
ES启动成功
终于成功了,太艰难了/(ㄒoㄒ)/~~
使用IK中文分词器
ES启动完成后我们来测试一下使用IK分词器分词,看看IK分词器是否安装成功了。同样请求URL还是localhost:9200/_analyze,请求方法还是post,对于各个分词器就不再赘述了,请通过示例自行感受!
ik_smart分词器
请求体
{
    "analyzer": "ik_smart",
    "text": "我买了一台计算机"
}
响应结果
{
    "tokens": [
        {
            "token": "我",
            "start_offset": ,
            "end_offset": 1,
            "type": "CN_CHAR",
            "position":
        },
        {
            "token": "买了",
            "start_offset": 1,
            "end_offset": 3,
            "type": "CN_WORD",
            "position": 1
        },
        {
            "token": "一台",
            "start_offset": 3,
            "end_offset": 5,
            "type": "CN_WORD",
            "position": 2
        },
        {
            "token": "计算机",
            "start_offset": 5,
            "end_offset": 8,
            "type": "CN_WORD",
            "position": 3
        }
    ]
}
ik_max_word分词器
请求体
{
    "analyzer": "ik_max_word",
    "text": "我买了一台计算机"
}
响应结果
{
    "tokens": [
        {
            "token": "我",
            "start_offset": ,
            "end_offset": 1,
            "type": "CN_CHAR",
            "position":
        },
        {
            "token": "买了",
            "start_offset": 1,
            "end_offset": 3,
            "type": "CN_WORD",
            "position": 1
        },
        {
            "token": "一台",
            "start_offset": 3,
            "end_offset": 5,
            "type": "CN_WORD",
            "position": 2
        },
        {
            "token": "一",
            "start_offset": 3,
            "end_offset": 4,
            "type": "TYPE_CNUM",
            "position": 3
        },
        {
            "token": "台",
            "start_offset": 4,
            "end_offset": 5,
            "type": "COUNT",
            "position": 4
        },
        {
            "token": "计算机",
            "start_offset": 5,
            "end_offset": 8,
            "type": "CN_WORD",
            "position": 5
        },
        {
            "token": "计算",
            "start_offset": 5,
            "end_offset": 7,
            "type": "CN_WORD",
            "position": 6
        },
        {
            "token": "算机",
            "start_offset": 6,
            "end_offset": 8,
            "type": "CN_WORD",
            "position": 7
        }
    ]
}
6)IK分词器为何如此智能
通过上面的示例我们也看到了,这种中文的分词效果是ES内置的分词器无法比拟的。那么它是如何做到的呢?不要过于惊讶,因为原理其实非常简单,它是通过索引字典来达到的,这样说可能比较抽象难懂,我们来实际看看ES的plugins/ik/config目录:

ik分词器的字典
看到那些*.dic结尾的文件了吗?其实它就是dictionary(字典)的简写,来实际看看字典内容:

ik分词器的字典内容
实际的词汇量是非常巨大的,根本不可能完全收录到字典中。如果有需要,我们完全可以通过在字典文件中增加我们想要的词语来扩展我们自己的分词规则。
7)如何在实际项目中使用分词器
上面我们通过HTTP的形式知道了ES是如何分词的,但是在实际项目中又该如何使用?有了Spring Boot,一切都变得非常简单,Spring Boot集成了众多框架,并对其繁琐的操作进行简化。要在Spring Boot项目中集成ES,我们只需要引入如下依赖:
<dependency>
            <groupId>org.springframework.boot</groupId>
            <artifactId>spring-boot-starter-data-elasticsearch</artifactId>
 </dependency>
然后就可以在Java类中使用注解的方式定义:
@Data
// 指定实体类对应ES的索引名称为article,类型type是文档类型,使用服务器远程配置
// 为避免每次重启项目都将ES中的数据删除后再同步,createIndex指定为false
@Document(indexName = "article", type = "_doc",
        useServerConfiguration = true, createIndex = false)
public class ElasticArticle {
    @Id // org.springframework.data.annotation.Id
    private Integer id;          // 文章ID

    // 指定字段对应的ES类型是Text,analyzer指定分词器为ik_max_word
    @Field(type = FieldType.Text, analyzer = "ik_max_word")
    private String author;       // 文章作者

    @Field(type = FieldType.Text, analyzer = "ik_max_word")
    private String title;        // 文章标题

    @Field(type = FieldType.Text, analyzer = "ik_max_word")
    private String content;      // 文章正文内容

    // 指定字段对应ES中的类型是Date,使用自定义的日期格式化,pattern指定格式化
    // 规则是“日期时间”或“日期”或“时间毫秒”
    @Field(type = FieldType.Date, format = DateFormat.custom,
            pattern = "yyyy-MM-dd HH:mm:ss||yyyy-MM-dd||epoch_millis")
    private Date createTime;     // 文章创建时间

    @Field(type = FieldType.Date, format = DateFormat.custom,
            pattern = "yyyy-MM-dd HH:mm:ss||yyyy-MM-dd||epoch_millis")
    private Date updateTime;     // 文章更新时间
}
在与ES的交互方面,Spring Boot Data提供了ElasticsearchRepository数据访问接口,我们只需继承此接口便可实现与ES的大部分交互,就像使用Spring-Data-JPA一样简单!


 7468
7468


 被折叠的 条评论
为什么被折叠?
被折叠的 条评论
为什么被折叠?
 到【灌水乐园】发言


