


参考书籍:Java Web 轻量级框架项目化教程 缪勇
建立一个 Dynamic Web Project工程
1、 导入jar包
将下列jar包导入到web-content下的lib文件夹下,右键build path
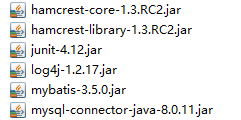
其中
- junit是java用来测试的包
- mysql-connector 可以在安装的数据库目录下找到

- mybatis、hamcrest-core、hamcrest-library 和log4j 为MyBatis需要的jar包
2、在数据库建立数据表
CREATE DATABASE DATABASE_TEST;
use database_test;

#drop table user_info;

create table user_info
(
   id integer primary key,
   userName varchar(16),
   password varchar(16),
   regDate date
);

insert into user_info values(1,'张三',2222,'2019-10-25');
insert into user_info values(2,'李四',111,'2019-10-11');
insert into user_info values(3,'王五',333,'2019-10-13');
insert into user_info values(4,'李泽',9999,'2019-10-17');
insert into user_info values(5,'宋佳',6666,'2019-10-26');
3、根据数据表结构创建实体类
在src目录下新建 com.mybatis.po包,并在其中创建实体类UserInfo(对应数据表user_info)
package com.mybatis.po;

import java.text.SimpleDateFormat;
import java.util.Date;
public class UserInfo {
    private int id;
    private String userName;
    private String password;
    private Date regDate;

    public int getId() {
    	return id;
    }
    public void setId(int id) {
    	this.id=id;
    }
    public String getUserName(){
    	return userName;
    }
    public void setUserName(String userName) {
    	this.userName=userName;
    }
    public String getpassword(){
    	return password;
    }
    public void setpassword(String password) {
    	this.password=password;
    }
    public Date getRegDate() {
    	return regDate;
    }
    public void setRegDate(Date regDate) {
    	this.regDate=regDate;
    }
    //构造函数
    public UserInfo() {}

    public UserInfo(int id,String userName,String password,Date regDate) {
    	this.id=id;
    	this.userName=userName;
    	this.password=password;
    	this.regDate=regDate;
    }

    @Override
    public String toString() {
    	return "UserInfo [id=" + id + ",userName=" + userName +",password=" +password + ".regDate="
                +new SimpleDateFormat("yyyy-MM-dd").format(regDate) + "]";
    }
}
4、创建SQL映射的XML文件
在com.mybatis.po包下创建userInfoMapper.xml
<?xml version="1.0" encoding="UTF-8"?>
<!DOCTYPE mapper
    PUBLIC "-//mybatis.org//DTD Config 3.0//EN"
    "http://mybatis.org/dtd/mybatis-3-mapper.dtd">

<mapper namespace="com.mybatis.po.userInfoMapper">

<insert id="addUserInfo" parameterType="UserInfo">
       insert into user_info(id,userName,password,regDate)
       values(#{id},#{userName},#{password},#{regDate})
</insert>
<delete id="deleteUserInfo" parameterType="int">
       delete from user_info where id=#{id}
</delete>
<update id="updateUserInfo" parameterType="UserInfo">
       update user_info set userName=#{userName},password=#{password},regDate=#{regDate} where id=#{id}
</update>
<select id="getUserInfoById" parameterType="int" resultType="UserInfo">
       select * from user_info where id= #{id}
</select>
<select id="getAllUserInfo" resultType="UserInfo">
       select * from user_info
</select>
</mapper>
实际上在安装好的mybatis-3-mybatis-3.5.0\mybatis-3-mybatis-3.5.0\src\test\java\org\apache\ibatis\submitted\complex_property文件夹下有一个Configuration.xml 根据这个文件模板修改自己的数据库类型以及用户名、密码等
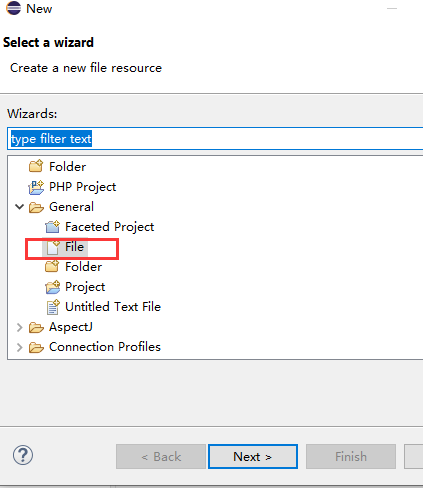
5、创建属性文件db.properties
在src目录下创建,保存数据库的连接信息。
直接选择file,自己输入properties后缀
jdbc.driver=com.mysql.cj.jdbc.Driver
jdbc.url=jdbc:mysql://localhost:3306/database_test?useUnicode=true&characterEncoding=utf-8&serverTimezone=GMT&useSSL=false
jdbc.username=#####
jdbc.password=#####
6、创建XML映射配置文件
在src目录下创建mybatis-config.xml
<?xml version="1.0" encoding="UTF-8" ?>
<!--

       Copyright 2009-2016 the original author or authors.

       Licensed under the Apache License, Version 2.0 (the "License");
       you may not use this file except in compliance with the License.
       You may obtain a copy of the License at

          http://www.apache.org/licenses/LICENSE-2.0

       Unless required by applicable law or agreed to in writing, software
       distributed under the License is distributed on an "AS IS" BASIS,
       WITHOUT WARRANTIES OR CONDITIONS OF ANY KIND, either express or implied.
       See the License for the specific language governing permissions and
       limitations under the License.

-->
<!DOCTYPE configuration
    PUBLIC "-//mybatis.org//DTD Config 3.0//EN"
    "http://mybatis.org/dtd/mybatis-3-config.dtd">

<configuration>
  <!-- <settings>
    <setting name="useGeneratedKeys" value="false"/>
    <setting name="useColumnLabel" value="true"/>
  </settings> -->

  <properties resource="db.properties"></properties>
  <typeAliases>
   <!--  <typeAlias alias="UserAlias" type="org.apache.ibatis.submitted.complex_property.User"/> -->
         <package name="com.mybatis.po"/>
  </typeAliases>

  <environments default="development">
    <environment id="development">
      <transactionManager type="JDBC">
        <property name="" value=""/>
      </transactionManager>
      <dataSource type="POOLED">
        <property name="driver" value="${jdbc.driver}"/>
        <property name="url" value="${jdbc.url}"/>
        <property name="username" value="${jdbc.username}"/>
        <property name="password" value="${jdbc.password}"/>
      </dataSource>
    </environment>
  </environments>

  <mappers>
    <mapper resource="com/mybatis/po/userInfoMapper.xml"/>
  </mappers>

</configuration>
7、创建测试类
创建Junit测试类MybatisTest.java,存放在com.mybatis.test包下
package com.mybatis.test;

import org.apache.ibatis.session.SqlSession;
import org.apache.ibatis.session.SqlSessionFactory;
import org.apache.ibatis.session.SqlSessionFactoryBuilder;
import org.junit.*;

import com.mybatis.po.UserInfo;

import java.io.IOException;
import java.io.InputStream;

import java.util.Date;
import java.util.List;

import org.apache.ibatis.io.Resources;

public class MybatisTest {
	private SqlSessionFactory sqlSessionFactory;
	private SqlSession sqlSession;

	@Before
	public void init() {
		// mybatis配置文件
		String resource = "mybatis-config.xml";
		// 得到配置文件流
		InputStream inputStream;
		try {
			inputStream = Resources.getResourceAsStream(resource);
			// 创建会话工厂,传入mybatis的配置文件信息
			sqlSessionFactory = new SqlSessionFactoryBuilder().build(inputStream);
			// 通过工厂得到SqlSession
			sqlSession = sqlSessionFactory.openSession();

		} catch (IOException e) {
			// TODO Auto-generated catch block
			e.printStackTrace();
		}
	}

	// 添加用户
	@Test
	public void testAddUserInfo() {
		UserInfo ui = new UserInfo(8, "mybatisi", "123456", new Date());
		sqlSession.insert("addUserInfo", ui);
		System.out.println("Insert OK!");
	}

	// 根据id查询用户
	@Test
	public void testGetUserInfoById() {
		// selectOne 查询出一条记录
		UserInfo ui = sqlSession.selectOne("getUserInfoById", 3);
		System.out.println("getUserInfoById OK!");
		System.out.println(ui);
	}

	// 查询所有用户
	@Test
	public void testGetAllUserInfo() {
		List<UserInfo> uiList = sqlSession.selectList("getAllUserInfo");
		System.out.println("getAllUserInfo OK!");
		System.out.println(uiList.size());
//    	 System.out.println(uiList);
	}

	// 修改用户
	@Test
	public void testUpdateUserInfo() {
		// 加载编号id=4的用户
		UserInfo ui = sqlSession.selectOne("getUserInfoById", 4);
		// 修改用户密码
		ui.setpassword("123123");
		// 执行更新操作
		int update = sqlSession.update("updateUserInfo", ui);
		System.out.println("update OK!");
		System.out.println(ui);
	}

	// 删除用户
	@Test
	public void testDeleteUserInfo() {
		int delete = sqlSession.delete("deleteUserInfo", 7);
		System.out.println("delete OK!");
		System.out.println(delete);
	}

	@After
	public void destroy() {
		// 提交事务
		sqlSession.commit();
		// 关闭session
		sqlSession.close();
	}
}
8、配置完成,运行测试类
我的产生了报错,内容如下:
log4j:WARN No appenders could be found for logger (org.apache.hive.jdbc.Utils).
log4j:WARN Please initialize the log4j system properly.
log4j:WARN See http://logging.apache.org/log4j/1.2/faq.html#noconfig for more info.
网上查说是因为日志文件找不到,少日志文件系统配置,我使用的解决方法一,目前一切正常
解决方法一
在src下创建log4j.properties,内容如下(有很多写法,暂列我用的一种)
log4j.rootLogger=INFO, stdout
log4j.appender.stdout=org.apache.log4j.ConsoleAppender
log4j.appender.stdout.layout=org.apache.log4j.PatternLayout
log4j.appender.stdout.layout.ConversionPattern=%d %p [%c] - %m%n
log4j.appender.logfile=org.apache.log4j.FileAppender
log4j.appender.logfile.File=target/spring.log
log4j.appender.logfile.layout=org.apache.log4j.PatternLayout
log4j.appender.logfile.layout.ConversionPattern=%d %p [%c] - %m%n
解决方法二
找到log4j.properties,在web.xml中添加内容如下:
<context-param>
   <param-name>log4jConfigLocation</param-name>
   <param-value>/WEB-INF/properties/log4j.properties</param-value>
</context-param>

<listener>
   <listener-class>
    org.springframework.web.util.Log4jConfigListener
   </listener-class>
</listener>
%n
##### 解决方法二

找到log4j.properties,在web.xml中添加内容如下:

```xml
<context-param>
   <param-name>log4jConfigLocation</param-name>
   <param-value>/WEB-INF/properties/log4j.properties</param-value>
</context-param>

<listener>
   <listener-class>
    org.springframework.web.util.Log4jConfigListener
   </listener-class>
</listener>


 462
462


 被折叠的 条评论
为什么被折叠?
被折叠的 条评论
为什么被折叠?
 到【灌水乐园】发言


