


一 左侧列表展示
1.1 布局 left_fragment.xml
- <ListView xmlns:android="http://schemas.android.com/apk/res/android"
- android:id="@android:id/list"
- android:layout_width="match_parent"
- android:layout_height="match_parent"
- android:background="@android:color/darker_gray"
- android:listSelector="@drawable/onitem_selected_bkcolor"/>
1.2 ListSelector onitem_selected_bkcolor.xml
- <?xml version="1.0" encoding="utf-8"?>
- <selector xmlns:android="http://schemas.android.com/apk/res/android">
- <item
- android:state_window_focused="false"
- android:drawable="@android:color/holo_green_dark"/>
- <item
- android:state_window_focused="true"
- android:drawable="@android:color/holo_green_light"/>
- </selector>
1.3 自定义 ListItem 布局 代替 android.R.layout.simple_list_item_1
- <?xml version="1.0" encoding="utf-8"?>
- <TextView xmlns:android="http://schemas.android.com/apk/res/android"
- android:layout_width="match_parent"
- android:layout_height="30dp"
- android:gravity="center_vertical"
- android:paddingLeft="10dp"
- android:textColor="@android:color/black"/>
1.4 自定义 LeftFragment
- package com.example.myfragments;
- import android.app.Activity;
- import android.app.ListFragment;
- import android.os.Bundle;
- import android.view.LayoutInflater;
- import android.view.View;
- import android.view.ViewGroup;
- import android.widget.ArrayAdapter;
- import android.widget.ListView;
- //自定义回调函数
- interface onItemSeletedListener
- {
- public void onItemSeleted(int position);
- }
- public class LeftFragment extends ListFragment {
- onItemSeletedListener mCallback;
- String[] data = {"item0","item1","item2","item3","item4","item5","item6","item7","item8","item9","item10","item11","item12","item13","item14","item15","item16"};
- @Override
- public View onCreateView(LayoutInflater inflater, ViewGroup container,
- Bundle savedInstanceState) {
- // TODO 自动生成的方法存根
- return inflater.inflate(R.layout.left_fragment, container,false);
- }
- @Override
- public void onActivityCreated(Bundle savedInstanceState) {
- // TODO 自动生成的方法存根
- setListAdapter(new ArrayAdapter<String>(getActivity(),
- R.layout.listitem, data));
- super.onActivityCreated(savedInstanceState);
- }
- @Override
- public void onListItemClick(ListView l, View v, int position, long id) {
- // TODO 自动生成的方法存根
- mCallback.onItemSeleted(position);
- }
- @Override
- public void onAttach(Activity activity) {
- // TODO 自动生成的方法存根
- super.onAttach(activity);
- // This makes sure that the container activity has implemented
- // the callback interface. If not, it throws an exception
- try {
- mCallback = (onItemSeletedListener) activity;
- } catch (ClassCastException e) {
- throw new ClassCastException("必须实现 onItemSeletedListener");
- }
- }
- }
二 右侧内容展示
2.1 布局 right_fragment.xml
- <LinearLayout xmlns:android="http://schemas.android.com/apk/res/android"
- xmlns:tools="http://schemas.android.com/tools"
- android:layout_width="match_parent"
- android:layout_height="match_parent"
- android:background="@android:color/background_dark"
- android:orientation="vertical"
- tools:ignore="HardcodedText,UselessParent" >
- <ScrollView
- android:scrollbars="vertical"
- android:layout_width="match_parent"
- android:layout_height="match_parent">
- <TextView
- android:id="@+id/textview"
- android:layout_width="match_parent"
- android:layout_height="wrap_content"
- android:text="请选择左侧边栏 :)"
- android:textColor="@android:color/holo_orange_dark"
- android:textSize="30sp" />
- </ScrollView>
- </LinearLayout>
2.1 自定义 RightFragment
- package com.example.myfragments;
- import android.app.Fragment;
- import android.os.Bundle;
- import android.view.LayoutInflater;
- import android.view.View;
- import android.view.ViewGroup;
- import android.widget.TextView;
- public class RightFragment extends Fragment {
- @Override
- public View onCreateView(LayoutInflater inflater, ViewGroup container,
- Bundle savedInstanceState) {
- // TODO 自动生成的方法存根
- return inflater.inflate(R.layout.right_fragment, container,false);
- }
- //更新数据
- public void update(int position)
- {
- TextView textview=(TextView)getActivity().findViewById(R.id.textview);
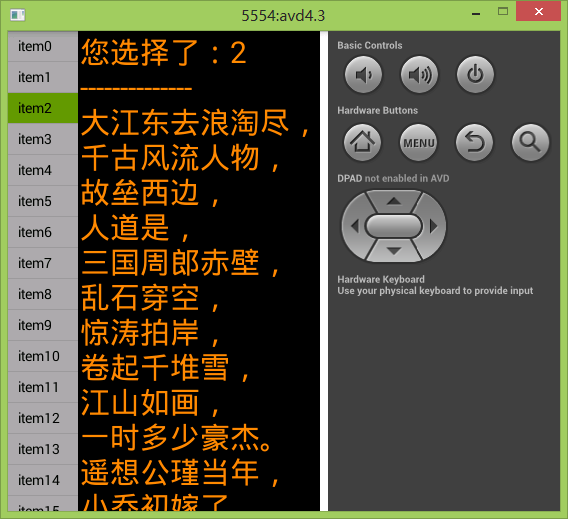
- textview.setText("您选择了:" + String.valueOf(position)+"\n--------------"
- +"\n大江东去浪淘尽,\n千古风流人物,\n故垒西边,\n人道是,\n三国周郎赤壁,\n乱石穿空,\n惊涛拍岸,\n卷起千堆雪,\n江山如画,\n一时多少豪杰。"
- +"\n遥想公瑾当年,\n小乔初嫁了,\n雄姿英发,\n羽扇纶巾,\n谈笑间,\n樯橹灰飞烟灭,\n故国神游,\n多情应笑我,\n早生华发,\n人间如梦,\n一樽还酹江月。");
- }
- }
三 添加到 main_layout.xml 中,附着于 Activity 显示
3.1 布局 main_layout.xml
- <LinearLayout xmlns:android="http://schemas.android.com/apk/res/android"
- xmlns:tools="http://schemas.android.com/tools"
- android:layout_width="match_parent"
- android:layout_height="match_parent"
- android:orientation="horizontal"
- tools:ignore="DisableBaselineAlignment" >
- <fragment
- android:id="@+id/left_fragment"
- android:name="com.example.myfragments.LeftFragment"
- android:layout_width="70dp"
- android:layout_height="match_parent"/>
- <View
- android:layout_width="2dp"
- android:layout_height="match_parent"
- android:background="@android:color/background_dark"/>
- <fragment
- android:id="@+id/right_fragment"
- android:name="com.example.myfragments.RightFragment"
- android:layout_width="wrap_content"
- android:layout_height="match_parent"/>
- </LinearLayout>
3.2 MainActivity
- package com.example.myfragments;
- import android.app.Activity;
- import android.os.Bundle;
- import android.view.Window;
- import android.view.WindowManager;
- public class MainActivity extends Activity implements onItemSeletedListener{
- @Override
- protected void onCreate(Bundle savedInstanceState) {
- super.onCreate(savedInstanceState);
- getWindow().setFlags(WindowManager.LayoutParams.FLAG_FULLSCREEN, WindowManager.LayoutParams.FLAG_FULLSCREEN);
- requestWindowFeature(Window.FEATURE_NO_TITLE);
- setContentView(R.layout.main_layout);
- // //添加
- // FragmentManager fragmentmanager=getFragmentManager();
- // FragmentTransaction fragmenttransaction=fragmentmanager.beginTransaction();
- // LeftFragment leftfragment=new LeftFragment();
- // fragmenttransaction.add(R.id.left_fragment, leftfragment);
- // fragmenttransaction.commit();
- // //删除
- // FragmentManager fragmentmanager=getFragmentManager();
- // FragmentTransaction fragmenttransaction=fragmentmanager.beginTransaction();
- // Fragment leftfragment=fragmentmanager.findFragmentById(R.id.left_fragment);
- // fragmenttransaction.remove(leftfragment);
- // fragmenttransaction.commit();
- // //替换
- // FragmentManager fragmentmanager=getFragmentManager();
- // FragmentTransaction fragmenttransaction=fragmentmanager.beginTransaction();
- // fragmenttransaction.replace(R.id.left_fragment, new LeftFragment());
- // fragmenttransaction.commit();
- }
- @Override
- public void onItemSeleted(int position) {
- RightFragment rightFragment=(RightFragment) getFragmentManager().findFragmentById(R.id.right_fragment);
- if(rightFragment != null)
- rightFragment.update(position);
- }
- }
四 结果展示
转载请注明出处 :)http://blog.csdn.net/mkrcpp/article/details/11478011


 1066
1066

 被折叠的 条评论
为什么被折叠?
被折叠的 条评论
为什么被折叠?
 到【灌水乐园】发言


