


 <?
xml version="1.0" encoding="UTF-8"
?>
<
deployment
xmlns
="http://xml.apache.org/axis/wsdd/"
xmlns:java
="http://xml.apache.org/axis/wsdd/providers/java"
>
<
globalConfiguration
>
<
parameter
name
="adminPassword"
value
="admin"
/>
<
parameter
name
="attachments.Directory"
value
="./attachments"
/>
<
parameter
name
="attachments.implementation"
value
="org.apache.axis.attachments.AttachmentsImpl"
/>
<
parameter
name
="sendXsiTypes"
value
="true"
/>
<
parameter
name
="sendMultiRefs"
value
="true"
/>
<
parameter
name
="sendXMLDeclaration"
value
="true"
/>
<
parameter
name
="axis.sendMinimizedElements"
value
="true"
/>
<
requestFlow
>
<
handler
type
="java:org.apache.axis.handlers.JWSHandler"
>
<
parameter
name
="scope"
value
="session"
/>
</
handler
>
<
handler
type
="java:org.apache.axis.handlers.JWSHandler"
>
<
parameter
name
="scope"
value
="request"
/>
<
parameter
name
="extension"
value
=".jwr"
/>
</
handler
>
</
requestFlow
>
</
globalConfiguration
>
<
handler
name
="LocalResponder"
type
="java:org.apache.axis.transport.local.LocalResponder"
/>
<
handler
name
="URLMapper"
type
="java:org.apache.axis.handlers.http.URLMapper"
/>
<
handler
name
="Authenticate"
type
="java:org.apache.axis.handlers.SimpleAuthenticationHandler"
/>
<
service
name
="AdminService"
provider
="java:MSG"
>
<
parameter
name
="allowedMethods"
value
="AdminService"
/>
<
parameter
name
="enableRemoteAdmin"
value
="false"
/>
<
parameter
name
="className"
value
="org.apache.axis.utils.Admin"
/>
<
namespace
>
http://xml.apache.org/axis/wsdd/
</
namespace
>
</
service
>
<
service
name
="Version"
provider
="java:RPC"
>
<
parameter
name
="allowedMethods"
value
="getVersion"
/>
<
parameter
name
="className"
value
="org.apache.axis.Version"
/>
</
service
>
<
transport
name
="http"
>
<
requestFlow
>
<
handler
type
="URLMapper"
/>
<
handler
type
="java:org.apache.axis.handlers.http.HTTPAuthHandler"
/>
</
requestFlow
>
</
transport
>
<
transport
name
="local"
>
<
responseFlow
>
<
handler
type
="LocalResponder"
/>
</
responseFlow
>
</
transport
>
</
deployment
>
<?
xml version="1.0" encoding="UTF-8"
?>
<
deployment
xmlns
="http://xml.apache.org/axis/wsdd/"
xmlns:java
="http://xml.apache.org/axis/wsdd/providers/java"
>
<
globalConfiguration
>
<
parameter
name
="adminPassword"
value
="admin"
/>
<
parameter
name
="attachments.Directory"
value
="./attachments"
/>
<
parameter
name
="attachments.implementation"
value
="org.apache.axis.attachments.AttachmentsImpl"
/>
<
parameter
name
="sendXsiTypes"
value
="true"
/>
<
parameter
name
="sendMultiRefs"
value
="true"
/>
<
parameter
name
="sendXMLDeclaration"
value
="true"
/>
<
parameter
name
="axis.sendMinimizedElements"
value
="true"
/>
<
requestFlow
>
<
handler
type
="java:org.apache.axis.handlers.JWSHandler"
>
<
parameter
name
="scope"
value
="session"
/>
</
handler
>
<
handler
type
="java:org.apache.axis.handlers.JWSHandler"
>
<
parameter
name
="scope"
value
="request"
/>
<
parameter
name
="extension"
value
=".jwr"
/>
</
handler
>
</
requestFlow
>
</
globalConfiguration
>
<
handler
name
="LocalResponder"
type
="java:org.apache.axis.transport.local.LocalResponder"
/>
<
handler
name
="URLMapper"
type
="java:org.apache.axis.handlers.http.URLMapper"
/>
<
handler
name
="Authenticate"
type
="java:org.apache.axis.handlers.SimpleAuthenticationHandler"
/>
<
service
name
="AdminService"
provider
="java:MSG"
>
<
parameter
name
="allowedMethods"
value
="AdminService"
/>
<
parameter
name
="enableRemoteAdmin"
value
="false"
/>
<
parameter
name
="className"
value
="org.apache.axis.utils.Admin"
/>
<
namespace
>
http://xml.apache.org/axis/wsdd/
</
namespace
>
</
service
>
<
service
name
="Version"
provider
="java:RPC"
>
<
parameter
name
="allowedMethods"
value
="getVersion"
/>
<
parameter
name
="className"
value
="org.apache.axis.Version"
/>
</
service
>
<
transport
name
="http"
>
<
requestFlow
>
<
handler
type
="URLMapper"
/>
<
handler
type
="java:org.apache.axis.handlers.http.HTTPAuthHandler"
/>
</
requestFlow
>
</
transport
>
<
transport
name
="local"
>
<
responseFlow
>
<
handler
type
="LocalResponder"
/>
</
responseFlow
>
</
transport
>
</
deployment
>
注:也可以下载:http://www.cppblog.com/Files/wform/server-config.rar <service></service>中用于添加暴露给客户端的服务(即方法),后面将会给出示例。
二、建立web服务及服务验证
1、编写服务器端程序SayHello.java
新建一个com包,新建一个SayHello.java:
package
com;
 public
class
SayHello
{
public
class
SayHello
{
 public String sayHello(String name){
 return "Hello " + name + ",Welcome!";
 }
} }
}
将sayHello添加到server-config.wsdd中:
如下所示:
<?
xml version="1.0"
?>
<
project
basedir
="."
default
="compile"
>
<!--
这里是jwsdp的安装目录
-->
<
property
name
="jwsdp.home"
value
="C:jwsdp-2.0"
/>
<
path
id
="classpath"
>
<
pathelement
path
="build"
/>
<
fileset
dir
="${jwsdp.home}"
includes
="jaxb/lib/*.jar"
/>
<
fileset
dir
="${jwsdp.home}"
includes
="jwsdp-shared/lib/*.jar"
/>
<
fileset
dir
="${jwsdp.home}"
includes
="jaxp/lib/**/*.jar"
/>
</
path
>
<
taskdef
name
="xjc"
classname
="com.sun.tools.xjc.XJCTask"
>
<
classpath
refid
="classpath"
/>
</
taskdef
>
<!--
compile Java source files
-->
<
target
name
="compile"
>
<!--
generate the Java content classes from the schema
-->
<
echo
message
="Compiling the schema external binding file..."
/>
<
xjc
schema
="po.xsd"
package
="primer.po"
target
="src"
/>
<!--
compile all of the java sources
-->
<
echo
message
="Compiling the java source files..."
/>
</
target
>
</
project
>
Run As -> Ant Build XML Schema就可以生成对应的实体类,当然po.sxd 和 build.xml都应位于工程的根目录下!
3、写一个测试的java文件
Main.java:
import
java.io.FileOutputStream;
import
java.io.IOException;
import
java.math.BigDecimal;
import
java.math.BigInteger;
import
java.util.GregorianCalendar;
import
java.util.List;
import
javax.xml.bind.JAXBContext;
import
javax.xml.bind.JAXBElement;
import
javax.xml.bind.JAXBException;
import
javax.xml.bind.Marshaller;
import
javax.xml.bind.
*
;
import
javax.xml.datatype.DatatypeFactory;
import
javax.xml.datatype.XMLGregorianCalendar;
import
javax.xml.datatype.DatatypeConfigurationException;
import
primer.po.
*
;
public
class
Main {
public static void main( String[] args ) { try { JAXBContext jc = JAXBContext.newInstance( "primer.po" ); PurchaseOrderType po = new PurchaseOrderType(); po.setOrderDate( getDate() ); USAddress shipTo = createUSAddress( "Alice Smith", "123 Maple Street", "Cambridge", "MA", "12345" ); po.setShipTo( shipTo ); USAddress billTo = createUSAddress( "Robert Smith", "8 Oak Avenue", "Cambridge", "MA", "12345" ); po.setBillTo( billTo ); Items items = new Items(); List<Items.Item> itemList = items.getItem(); // start adding ItemType objects into it itemList.add( createItem( "Nosferatu - Special Edition (1929)", new BigInteger( "5" ), new BigDecimal( "19.99" ), null, null, "242-NO" ) ); itemList.add( createItem( "The Mummy (1959)", new BigInteger( "3" ), new BigDecimal( "19.98" ), null, null, "242-MU" ) ); itemList.add( createItem( "Godzilla and Mothra: Battle for Earth/Godzilla vs. King Ghidora", new BigInteger( "3" ), new BigDecimal( "27.95" ), null, null, "242-GZ" ) ); po.setItems( items ); JAXBElement<PurchaseOrderType> poElement = (new ObjectFactory()).createPurchaseOrder(po); Marshaller m = jc.createMarshaller(); m.setProperty( Marshaller.JAXB_FORMATTED_OUTPUT, Boolean.TRUE ); m.marshal(poElement, new FileOutputStream("test.xml")); m.marshal(poElement, System.out); } catch( JAXBException je ) { je.printStackTrace(); } catch( IOException ioe ) { ioe.printStackTrace(); } } public static USAddress createUSAddress( String name, String street, String city, String state, String zip ){ USAddress address = new USAddress(); address.setName( name ); address.setStreet( street ); address.setCity( city ); address.setState( state ); address.setZip( new BigDecimal( zip ) ); return address; } public static Items.Item createItem( String productName, BigInteger quantity, BigDecimal price, String comment, XMLGregorianCalendar shipDate, String partNum ) { Items.Item item = new Items.Item(); item.setProductName( productName ); item.setQuantity( quantity ); item.setUSPrice( price ); item.setComment( comment ); item.setShipDate( shipDate ); item.setPartNum( partNum ); return item;} private static XMLGregorianCalendar getDate() { try { return DatatypeFactory.newInstance().newXMLGregorianCalendar(new GregorianCalendar()); } catch (DatatypeConfigurationException e) { throw new Error(e); } }}
用Java Application运行 SayHelloClient.java
输出结果:
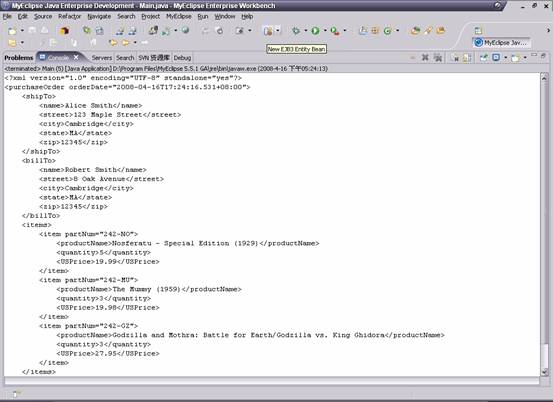
在axisweb工程根目录下生成了一个test.xml 的文件,内容和上面一样!
<
service
name
="sayHello"
provider
="java:RPC"
>
<
parameter
name
="className"
value
="com.SayHello"
/>
<
parameter
name
="allowedMethods"
value
="sayHello"
/>
*代表所有方法
</
service
>
2、验证服务是否可行:
在浏览器中输入 http://localhost:端口号/axisweb/services
可以看到如下结果:
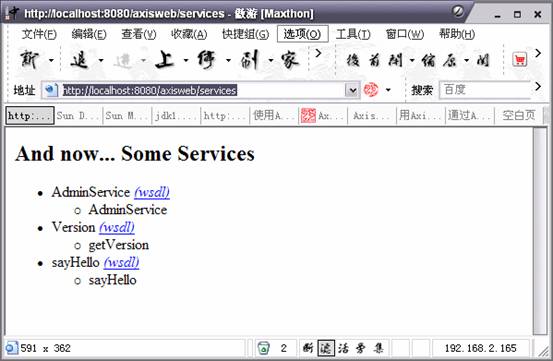
我们可以看到自动生成了wsdl文件,三个wsdl分别对应到了server-config.wsdd中的三个<service>节点,wsdl就是我们把要提供给客户端的。客户端通过wsdl文件,可以知道他可以用的服务。在这里sayHello 为客户端提供了一个返回一句”Hello ** ,welcome!”功能的服务。
3、编写客户端程序:SayHelloClient.java:
import
org.apache.axis.client.Call;
import
org.apache.axis.client.Service;
import
javax.xml.rpc.ParameterMode;
import
org.apache.axis.encoding.XMLType;
public
class
SayHelloClient
{ public static void main(String[] args) { try { String endpoint = "http://localhost:8080/axisweb/services/sayHello"; String name=" tongxiaodao"; Service service = new Service(); Call call = (Call) service.createCall(); call.setTargetEndpointAddress(new java.net.URL(endpoint)); call.addParameter("param",XMLType.XSD_STRING,ParameterMode.IN); call.setOperationName( "sayHello" ); call.setReturnType( XMLType.XSD_STRING ); String ret = (String) call.invoke( new Object[]{ name } ); System.out.println(ret); } catch (Exception ex) { ex.printStackTrace(); } }}
(1)用Java Application运行 SayHelloClient.java
得到结果如下:

(2)可以用wsCaller 调用服务端的服务。
wsCaller下载地址:http://www.tiantiansoft.com/files_down/java/200551084214548.rar
调用过程好下:
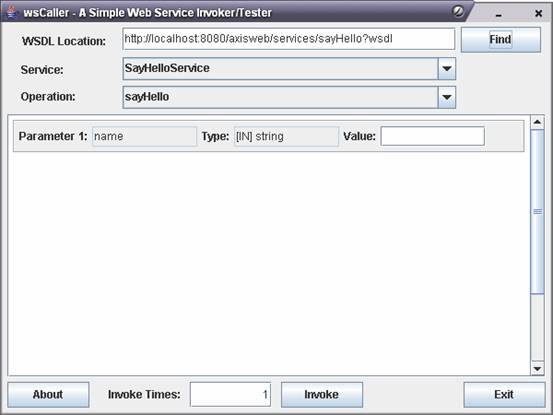
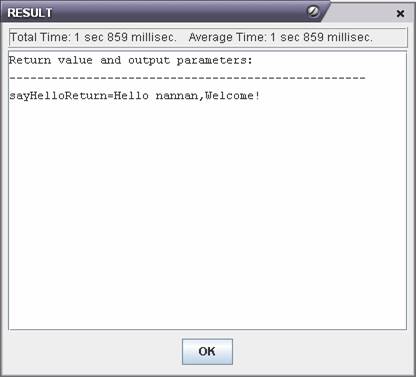
可以看到要输入一下参数name ,在这我们输入 nannan,点击invoke 进行调用,返回如下:


 136
136


 被折叠的 条评论
为什么被折叠?
被折叠的 条评论
为什么被折叠?
 到【灌水乐园】发言


