


Angular内置指令
指令使我们用来扩展浏览器能力的技术之一。在DOM编译期间,和HTML关联着的指令会被检测到,并且被执行。这使得指令可以为DOM指定行为,或者改变它。
AngularJS有一套完整的、可扩展的、用来帮助web应用开发的指令集,它使得HTML可以转变成“特定领域语言(DSL)”。
指令遵循驼峰式命名,如ngBind。指令可以通过使用指定符号转化成链式风格的的名称来调用,特定符号包括 : ,-,_。你好可以选择给指令加上前缀,比如“x-”,“data-”来让它符合html的验证规则。这里有以下可以用的指令名称例子:ng:bind, ng-bind, ng_bind, x-ng-bind , data-ng-bind。
指令可以做为元素名,属性名,类名,或者注释。
1. Application指令
(1) ng-app
任何标记ng-app的DOM元素会创建$rootScope.$rootScope是作用域链的起点,任何嵌套在里面的指令都会继承它.在JS里面通过run方法来访问$rootScope.ng-app这个指令比较特殊,一个html文档最好只出现一次,如果出现多次也是只有第一个起作用,并且可以出现在html文档的任何一个元素上。
ng-app作用是告诉子元素一下的指令是归angularJs的,angularJs会识别的。
ng-app的值可以为空,当然在练习的时候,在项目中则一定是要赋值的。也就是后面所说的模块。angularJs的使用,不是有一句一定要牢记在的话“一切都是由模块开始的”。
例如:
<html ng-app="AngularStudy">$rootScope是由angularJS加载模块的时候自动创建的,每个模块只会有1个rootScope。rootScope创建好会以服务的形式加入到 $injector中。也就是说通过 $injector.get("$ rootScope ");能够获取到某个模块的根作用域。更准确的来说,$rootScope是由angularJS的核心模块ng创建的。
scope是html和单个controller之间的桥梁,数据绑定就靠他了。rootscope是各个controller中scope的桥梁。用rootscope定义的值,可以在各个controller中使用。
<body ng-app="AngularStudy">
    <div ng-controller='AngularController1'>
        <span>{{title}}</span>
        <br />
        <span>{{item}}</span>
    </div>
    <div ng-controller='AngularController2'>
        <span>{{title}}</span>
        <br />
        <span>{{item}}</span>
    </div>

    <script type="text/javascript">
        var angularModule = angular.module("AngularStudy", []);
        angularModule.controller('AngularController1', ['$scope', '$rootScope', function ($scope, $rootScope) {
            // 局部的变量,只有在AngularController1中才会显示
            $scope.title = 'angular controller 1';

            // 全局的变量,都可以调用
            $rootScope.item = 'angular';
        }]);

        angularModule.controller('AngularController2', function ($scope, $timeout) {
            // 局部的变量,只有在AngularController2中才会显示
            $scope.title = 'angular controller 2';
        });
    </script>
</body>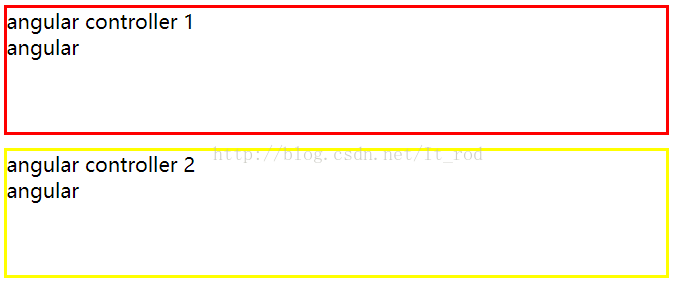
在网上看到一些文章说到$injector与$rootscope也会有关联,具体的关联后面的会学习到,当前这一块就先了解到这里吧。
(2) ng-controller
该指令会为嵌套在里面的指令创建一个子作用域,避免所有的操作与模型都在$rootScope上.不同的controller他们scope对象是不一样的,即使都是用了同名称的变量,可以看出controller之间是封闭的,可是有时候我们面对两个模块之间进行数据交互,必然在两个controller之间进行通信,这就涉及到angular中的service操作,或者是使用$rootscope,后面学习服务。请看上面的例子。
2.布尔属性指令
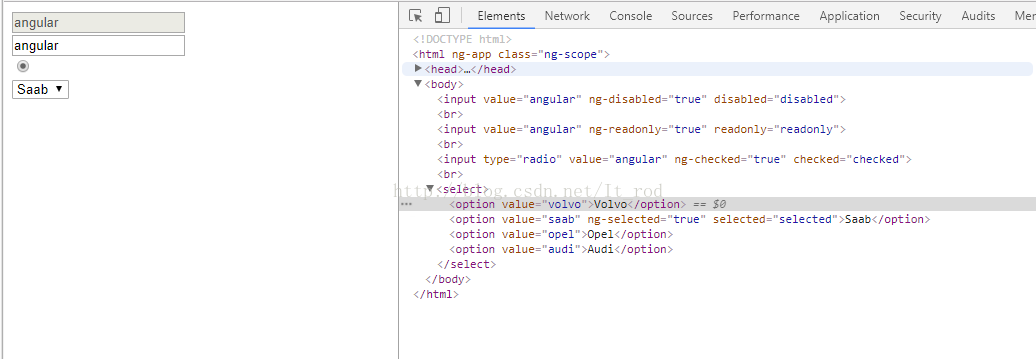
ng-disabled: 用于select button input textarea ,禁止输入
<input value="angular" ng-disabled="true"/>ng-readonly : 只读
<input value="angular" ng-readonly="true"/>ng-checked : 单选,多选的选中状态,ng-checked控制radio和checkbox的选中状态
<input type="radio" value="angular" ng-checked="true"/>ng-selected : 下拉列表的选中
<select>
    <option value="volvo">Volvo</option>
    <option value="saab" ng-selected="true">Saab</option>
    <option value="opel">Opel</option>
    <option value="audi">Audi</option>
</select>
ng-multiple控制多选
3.binding指令
(1) ng-bind \ ng-model \ {{}}
AngularJS的数据绑定有三种分别为{{}}、ng-bind和ng-model{{}}和ng-bind都是单向绑定,由作用于$scope到view层,且在HTML控件(HTML控件有:input、select、button和textarea)中不可显示。
ng-model是双向绑定,$scope<--->view层。
看一个例子:
<div ng-controller='AngularController'>
    <input type="text" name="" ng-model='title'/>
    <br />
    <span>$.title的value: {{title}}</span>
    <br />
    <input type="text" name="" ng-bind='title'/>
    <br />
    <span ng-bind='title'>$.title的value:</span>
</div>

<script type="text/javascript">
    var angularModule = angular.module("AngularStudy", []);
    angularModule.controller('AngularController', ['$scope', '$rootScope', function ($scope, $rootScope) {
        $scope.title = 'rod chen';


        $scope.reset = function() {
            $scope.title = 'rod chen'
        }
    }]);
</script>
然后对应页面上的结果是:

第一个和第三个分别是{},以及ng-bind在span上的展示,可以看到{{}}可以保持原有值得情况下添加响应的内容,但是ng-bind确实会将原来的内容全部替换成新的内容。
(2) ng-init
初始化应用时创建一个变量,ng-init 指令添加一些不必要的逻辑到 scope 中,建议你可以在控制器中 ng-controller 指令执行它 。<element ng-init="expression" ></element>
<input ng-init='title = 1; rodchen="234"' type="text" name="" ng-model='title'/>4. style相关指令
(1) ng-class
angular 三种处理classa. scope变量绑定。(不推荐使用,class应该放在html中,不应该占用controller $scope)
<body ng-app="AngularStudy">
    <div ng-controller='AngularController'>
       <div class="{{className}}">test ng-class</div>
    </div>


    <script type="text/javascript">
        var angularModule = angular.module("AngularStudy", []);
        angularModule.controller('AngularController', ['$scope', '$rootScope', function ($scope, $rootScope) {
            $scope.className = 'angular-class';
        }]);
    </script>
</body>b. 字符串数组形式
<div ng-class="{true:'angular-red-class', false:'angular-yellow-class'}[showRed]">test ng-class</div>下面的例子可以通过option的选择来选择不同的class
<body ng-app="AngularStudy">
    <div ng-controller='AngularController'>
        <select ng-model='showRed'>
            <option value='true'>red</option>
            <option value='false'>yellow</option>
        </select>
       <div ng-class="{true:'angular-red-class', false:'angular-yellow-class'}[showRed]">test ng-class</div>
    </div>


    <script type="text/javascript">
        var angularModule = angular.module("AngularStudy", []);
        angularModule.controller('AngularController', ['$scope', '$rootScope', function ($scope, $rootScope) {
            $scope.showRed = 'true';
        }]);
    </script>
</body><div ng-class="['angular-red-class', 'angular-font-class']">test ng-class</div>
注意这里的class是带有单引号的,与上面的有所不同。
c. 对象key/value处理
<body ng-app="AngularStudy">
    <div ng-controller='AngularController'>
       <div ng-class="{'angular-red-class': showRed, 'angular-font-class': fontSizeUpdate}">test ng-class</div>
    </div>
    <script type="text/javascript">
        var angularModule = angular.module("AngularStudy", []);
        angularModule.controller('AngularController', ['$scope', '$rootScope', function ($scope, $rootScope) {
            $scope.showRed = true;
            $scope.fontSizeUpdate = true;
        }]);
    </script>
</body>
(2) ng-style
ng-style用来绑定元素的css样式,其表达式的返回值为一个js对象,键为css样式名,值为该样式对应的合法取值。用法比较简单:<div ng-style="{color:'red'}">test ng-class</div>(3) ng-show / ng-hide
对于比较常用的元素显隐控制,ng也做了封装,ng-show和ng-hide的值为boolean类型的表达式,当值为true时,对应的show或hide生效。框架会用display:block和display:none来控制元素的显隐。<div ng-show='false' ng-hide='false'>test ng-class</div>5. 表单指令
常用的表单验证指令(1) 必填项验证
某个表单输入是否已填写,只要在输入字段元素上添加HTML5标记required即可:<input type="text" required /> (2) 最小长度
验证表单输入的文本长度是否大于某个最小值,在输入字段上使用指令ng-minleng= "{number}":<input type="text" ng-minlength="5" /> (3) 最大长度
验证表单输入的文本长度是否小于或等于某个最大值,在输入字段上使用指令ng-maxlength="{number}":<input type="text" ng-maxlength="20" />(4) 模式匹配
使用ng-pattern="/PATTERN/"来确保输入能够匹配指定的正则表达式:<input type="text" ng-pattern="/[a-zA-Z]/" /> 电子邮件
验证输入内容是否是电子邮件,只要像下面这样将input的类型设置为email即可:<input type="email" name="email" ng-model="user.email" /> 数字
验证输入内容是否是数字,将input的类型设置为number:<input type="number" name="age" ng-model="user.age" /> URL
验证输入内容是否是URL,将input的类型设置为 url:<input type="url" name="homepage" ng-model="user.facebook_url" />ng form 表单验证示例 (针对以上的几种验证)
<!DOCTYPE html>
<html>
<head>
    <meta charset="utf-8" />
    <title>Angular</title>
    <style>
        .ng-select {
            color: red;
        }

        .ng-invalid {
            border-color: red;
        }
    </style>
    <script type="text/javascript" src="./angular/jquery-1.8.2.min.js"></script>
    <script type="text/javascript" src="./angular/angular.js"></script>
</head>
<body ng-app="AngularStudy">
    <div ng-controller='AngularController'>
         <div class="col-md-6">
            <form role="form" name="myForm" ng-submit="submit(myForm)" class="form-horizontal">
                <div class="form-group  has-feedback">
                    <div class="col-md-4">
                        <label for="name">1.必填项</label>
                    </div>
                    <div class="col-md-8">
                        <input class="form-control" id="name" name="name" type="text" required ng-model='user.name' />
                        <span class="glyphicon glyphicon-ok form-control-feedback"
                              ng-show="myForm.name.$dirty && myForm.name.$valid">ok</span>
                    </div>
                </div>
                <div class="form-group  has-feedback">
                    <div class="col-md-4">
                        <label for="minlength">2.最小长度=5</label>
                    </div>
                    <div class="col-md-8">
                        <input type="text" id="minlength" name="minlength" ng-minlength="5" ng-model="user.minlength" class="form-control" />
                        <span class="glyphicon glyphicon-ok form-control-feedback"
                              ng-show="myForm.minlength.$dirty && myForm.minlength.$valid"></span>
                    </div>
                </div>
                <div class="form-group  has-feedback">
                    <div class="col-md-4">
                        <label for="maxlength">3.最大长度=20</label>
                    </div>
                    <div class="col-md-8">
                        <input type="text" id="maxlength" name="maxlength" ng-model="user.maxlength" ng-maxlength="20" class="form-control" />
                        <span class="glyphicon glyphicon-ok form-control-feedback"
                              ng-show="myForm.maxlength.$dirty && myForm.maxlength.$valid"></span>
                    </div>
                </div>
                <div class="form-group  has-feedback">
                    <div class="col-md-4">
                        <label for="pattern">4. 模式匹配</label>
                    </div>
                    <div class="col-md-8">
                        <input type="text" id="pattern" name="pattern" ng-model="user.pattern" ng-pattern="/^[a-zA-Z]*\d$/" class="form-control" />
                        <span class="glyphicon glyphicon-ok form-control-feedback"
                              ng-show="myForm.pattern.$dirty && myForm.pattern.$valid"></span>
                    </div>
                </div>
                <div class="form-group  has-feedback">
                    <div class="col-md-4">
                        <label for="email">5. 电子邮件</label>
                    </div>
                    <div class="col-md-8">
                        <input type="email" id="email" name="email" ng-model="user.email" class="form-control" />
                        <span class="glyphicon glyphicon-ok form-control-feedback"
                              ng-show="myForm.email.$dirty && myForm.email.$valid"></span>
                    </div>
                </div>
                <div class="form-group  has-feedback">
                    <div class="col-md-4">
                        <label for="age">6. 数字</label>
                    </div>
                    <div class="col-md-8">
                        <input type="number" id="age" name="age" ng-model="user.age" class="form-control" />


                        <span class="glyphicon glyphicon-ok form-control-feedback"
                              ng-show="myForm.age.$dirty && myForm.age.$valid"></span>
                    </div>
                </div>
                <div class="form-group  has-feedback">
                    <div class="col-md-4">
                        <label for="url"> 7. URL</label>
                    </div>
                    <div class="col-md-8">
                        <input type="url" id="url" name="url" ng-model="user.url" class="form-control" />
                        <span class="glyphicon glyphicon-ok form-control-feedback"
                              ng-show="myForm.url.$dirty && myForm.url.$valid"></span>
                    </div>
                </div>
                <div class="form-group  text-center">
                    <input class="btn btn-primary btn-lg"  type="submit" value="提交" />
                </div>
            </form>
        </div>
        <div class="col-md-12">
            1.必填项:{{user.name}}
            <span ng-class="{true:'ng-select'}[myForm.name.$pristine]">$pristine 【没修改】:{{myForm.name.$pristine }}  </span>
            <span ng-class="{true:'ng-select'}[myForm.name.$dirty]">$dirty【修改过】:{{myForm.name.$dirty}}  </span>
            <span ng-class="{true:'ng-select'}[myForm.name.$invalid]">$invalid【验证失败】:{{myForm.name.$invalid}}  </span>
            <span ng-class="{true:'ng-select'}[myForm.name.$valid]">$invalid【验证成功】:{{myForm.name.$valid}}  </span>
            <span ng-class="{true:'ng-select'}[myForm.name.$error.required]">required:{{myForm.name.$error.required}}  </span>
            <br>
            <br>
            2.最小长度=5:{{user.minlength}}
            <span ng-class="{true:'ng-select'}[myForm.minlength.$pristine]">$pristine 【没修改】:{{myForm.minlength.$pristine }}  </span>
            <span ng-class="{true:'ng-select'}[myForm.minlength.$dirty]">$dirty【修改过】:{{myForm.minlength.$dirty}}  </span>
            <span ng-class="{true:'ng-select'}[myForm.minlength.$invalid]">$invalid【验证失败】:{{myForm.minlength.$invalid}}  </span>
            <span ng-class="{true:'ng-select'}[myForm.minlength.$valid]">$invalid【验证成功】:{{myForm.minlength.$valid}}  </span>
            <span ng-class="{true:'ng-select'}[myForm.minlength.$error]">$error【错误详情】:{{myForm.minlength.$error}}  </span>
            <br>
        </div>


    <script type="text/javascript">
        var angularModule = angular.module("AngularStudy", []);
        angularModule.controller('AngularController', ['$scope', '$rootScope', function ($scope, $rootScope) {
            $scope.user = {
                name :'rodchen',
                minlength: '12345',
                maxlength: '12345678912345678912',
                pattern: 'asdfasdf4',
                email: 'rodchen_king@outlook.com',
                age: 25,
                url: 'http://www.baidu.com'
            }


            $scope.submit = function(form) {
                console.log(form);
            }
        }]);
    </script>
</body>
</html>
接下来我们会在这个示例中去观察一些点(对于上面的验证):

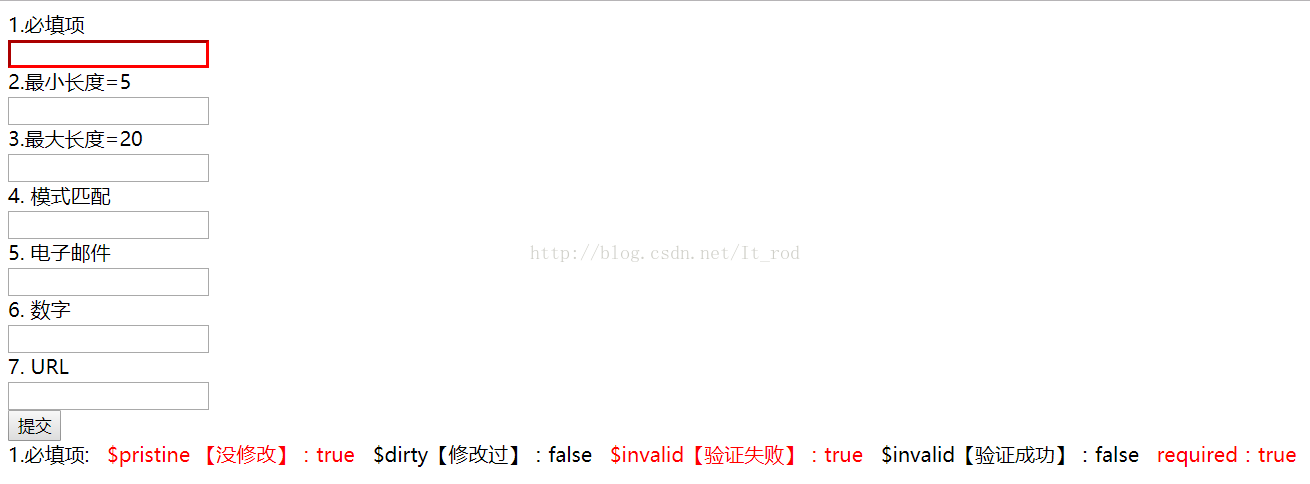
首先看一下页面上展示的红色框内,这里对应的代码为:
<div class="col-md-12">
    1.必填项:{{user.name}}
    <span ng-class="{true:'ng-select'}[myForm.name.$pristine]">$pristine 【没修改】:{{myForm.name.$pristine }}  </span>
    <span ng-class="{true:'ng-select'}[myForm.name.$dirty]">$dirty【修改过】:{{myForm.name.$dirty}}  </span>
    <span ng-class="{true:'ng-select'}[myForm.name.$invalid]">$invalid【验证失败】:{{myForm.name.$invalid}}  </span>
    <span ng-class="{true:'ng-select'}[myForm.name.$valid]">$invalid【验证成功】:{{myForm.name.$valid}}  </span>
    <span ng-class="{true:'ng-select'}[myForm.name.$error.required]">required:{{myForm.name.$error.required}}  </span>
    <br>
    <br>
    2.最小长度=5:{{user.minlength}}
    <span ng-class="{true:'ng-select'}[myForm.minlength.$pristine]">$pristine 【没修改】:{{myForm.minlength.$pristine }}  </span>
    <span ng-class="{true:'ng-select'}[myForm.minlength.$dirty]">$dirty【修改过】:{{myForm.minlength.$dirty}}  </span>
    <span ng-class="{true:'ng-select'}[myForm.minlength.$invalid]">$invalid【验证失败】:{{myForm.minlength.$invalid}}  </span>
    <span ng-class="{true:'ng-select'}[myForm.minlength.$valid]">$invalid【验证成功】:{{myForm.minlength.$valid}}  </span>
    <span ng-class="{true:'ng-select'}[myForm.minlength.$error]">$error【错误详情】:{{myForm.minlength.$error}}  </span>
    <br>
</div>
a. 提到这里就不得不提一些form属性:
formName.inputFieldName.$pristine :布尔值属性,表示用户是否修改了表单。如果为ture,表示没有修改过;false表示修改过
formName.inputFieldName.$dirty :布尔型属性,当且仅当用户实际已经修改的表单。不管表单是否通过验证
formName.inputFieldName.$valid :布尔型属性,它指示表单是否通过验证。如果表单当前通过验证,他将为true
formName.inputFieldName.$invalid :布尔型属性,未通过验证的表单
这里的formName指的是form的name属性值,inputFieldName指的是input标签的name属性值。例如myForm.name.$pristine。
b. 这里的这些验证情况当然通过ng-submit提交表单的时候传入表单的name,然后在处理方法中查看验证信息,如下图

c. 对于表单验证初始都是没有值的,然后我们把当前例子中的初始值去掉,然后看一下页面的显示:
我们把ng-invalid换一个名称ng-error,然后修改一下input的代码。
<input class="form-control" id="name" name="name" type="text" required ng-model='user.name' ng-class="{true:'ng-error'}[myForm.name.$dirty && myForm.name.$invalid]"/>d. 在(3)中我们提到了ng-invalid class,这个class的名称不是我们自定义的,是ng自己定义的名称。
.ng-valid         {  }
.ng-invalid     {  }
.ng-pristine     {  }
.ng-dirty         {  }
.ng-invalid-required         {  }
.ng-invalid-minlength         {  }
.ng-valid-max-length { }例如当某个字段中的输入非法时,.ng-invlid类会被添加到这个字段上。 你可以编辑自己喜欢的CSS . 你可以私有定制化这些类来实现特定的场景应用.
e. 还有就是其实浏览器对于表单的验证有着自己的默认行为,例如下图
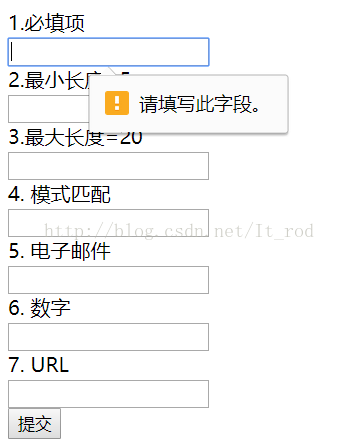
<form role="form" name="myForm" ng-submit="submit(myForm)" class="form-horizontal" novalidate>(5) ng-true-value / ng-false-value
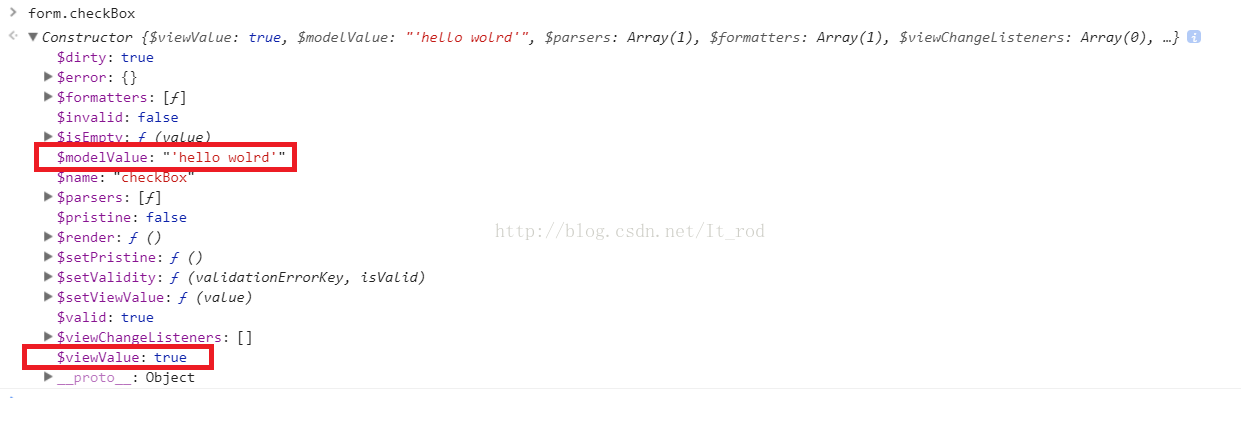
当我们点击checkbox 选中复选框时,ng-model 的绑定默认值是true,取消选中时为false.如果我们需要获取的值为字符串或者数字呢?那么就需要用到 ng-true-value 和ng-false-value.
<input ng-model="checkboxModel" name='checkBox' type="checkbox" ng-true-value=" 'hello wolrd' " > //注意 ng-true-value 中的值 如果需要显示字符串的话必须使用单引号.然后我们看一下具体的这个input标签内部的信息:
(6) ng-option
ng-options不需要option,会自动生成,ng-options 一定要和ng-model 搭配a. 先看一个简单的方式(label for value in array)
<body ng-app="AngularStudy">
    <div ng-controller='AngularController'>
         <div class="col-md-6">
              <p>usage:label for value in array</p>
              <p>选项,{{optData.Selected}}</p>
              <select ng-change="selectAction()" ng-model="optData.Selected" ng-options="o for o in optData.Data">
                <option value="">-- 请选择 --</option>
              </select>
        </div>

    <script type="text/javascript">
        var angularModule = angular.module("AngularStudy", []);
        angularModule.controller('AngularController', ['$scope', '$rootScope', function ($scope, $rootScope) {
            $scope.optData= {
                Data: ['rod', 'road', 'deed'],
                Selected: ''
            };

            $scope.selectAction = function(item) {
                console.log($scope.optData.Selected);
            };
    </script>
</body>
b. 自定义下拉显示名称(label for value in array) label可以根据需要拼接出不同的字符串
<body ng-app="AngularStudy">
    <div ng-controller='AngularController'>
         <div class="col-md-6">
              <p>usage:label for value in array</p>
              <p>选项,{{optData.Selected}}</p>
              <select ng-change="selectAction()" ng-model="optData.Selected" ng-options="o.id + '-' + o.MainCategory for o in optData.Data">
                <option value="">-- 请选择 --</option>
              </select>
        </div>

    <script type="text/javascript">
        var angularModule = angular.module("AngularStudy", []);
        angularModule.controller('AngularController', ['$scope', '$rootScope', function ($scope, $rootScope) {
            $scope.optData= {
                Data: [{
                    id: 10001,
                    MainCategory: 'man',
                    ProductName: 'sleeve',
                    ProductColor: 'white'
                },{
                    id: 10002,
                    MainCategory: 'women',
                    ProductName: 'cotta',
                    ProductColor: 'yellow'
                },{
                    id: 10003,
                    MainCategory: 'women',
                    ProductName: 'cotta',
                    ProductColor: 'blue'
                }],
                Selected: ''
            };


            $scope.selectAction = function(item) {
                console.log($scope.optData.Selected);
            };
        }]);
    </script>
</body>
主要的改变是:
<select ng-change="selectAction()" ng-model="optData.Selected" ng-options="o.id + '-' + o.MainCategory for o in optData.Data"> c. ng-options 选项分组 group by分组项
<select ng-change="selectAction()" ng-model="optData.Selected" ng-options="o.id + '-' + o.MainCategory group by o.MainCategory for o in optData.Data">d. ng-options 自定义ngModel的绑定
下面selected的值为optData的id,这里show的是ProductName,选择的是id<body ng-app="AngularStudy">
<div ng-controller='AngularController'>
<div class="col-md-6">
<p>usage:label for value in array</p>
<p>选项,{{optData.Selected}}</p>
<select ng-change="selectAction(optData.Selected)" ng-model="optData.Selected" ng-options="o.id as o.ProductName for o in optData.Data">
<option value="">-- 请选择 --</option>
</select>
</div>
<script type="text/javascript">
var angularModule = angular.module("AngularStudy", []);
angularModule.controller('AngularController', ['$scope', '$rootScope', function ($scope, $rootScope) {
$scope.optData= {
Data: [{
id: 10001,
MainCategory: 'man',
ProductName: 'sleeve',
ProductColor: 'white'
},{
id: 10002,
MainCategory: 'women',
ProductName: 'cotta',
ProductColor: 'yellow'
},{
id: 10003,
MainCategory: 'women',
ProductName: 'cotta',
ProductColor: 'blue'
}],
Selected: ''
};
$scope.selectAction = function(item) {
console.log(item);
};
}]);
</script>
</body>可以看到show出来的值与选择获取到的值是不一样的:

e. 二级菜单
<body ng-app="AngularStudy">
    <div ng-controller='AngularController'>
        <select ng-model="selectedPerson" ng-options="obj.name for obj in people">
        </select>
        <select ng-model="selectedPerson1" ng-options="label for label in people[selectedPerson.id].interest">
        </select>
    </div>

    <script type="text/javascript">
        var angularModule = angular.module("AngularStudy", []);
        angularModule.controller('AngularController', ['$scope', '$rootScope', function ($scope, $rootScope) {
            $scope.people = [
                    {
                            id: 0,
                            name: '张三',
                            interest: [
                            '爬山',
                            '游泳',
                            '旅游',
                            '美食'
                        ]
                    },
                    {
                        id: 1,
                        name: '李四',
                        interest: [
                            '音乐',
                            '美食',
                            'Coffee',
                            '看书'
                        ]
                    },
                    {
                        id: 2,
                        name: '王五',
                        interest: [
                            '音乐',
                            '电影',
                            '中国好声音',
                            '爸爸去哪了',
                            '非常静距离'
                        ]
                    },
                    {
                        id: 3,
                        name: '小白',
                        interest: [
                            '游泳',
                            '游戏',
                            '宅家里'
                        ]
                    }
                ];


            $scope.selectAction = function(item) {
                console.log(item);
            };
        }]);
    </script>
</body>
(7) ng-selected 指令用于设置 <select> 列表中的 <option> 元素的 selected 属性。
具体的使用在(6)中已经有着例子了。(8) ng-submit
ng-submit 指令用于在表单提交后执行指定函数,作用在form元素上。<form role="form" name="myForm" ng-submit="submit(myForm)" class="form-horizontal">
6. template指令
(1) ng-csp
ng-csp 指令用于修改 AngularJS 的安全策略。如果使用了 ng-csp 指令, AngularJS 将不会执行eval 函数,这样就无法注入内联样式。
设置 ng-csp 指令为 no-unsafe-eval, 将阻止 AngularJS 执行 eval 函数,但允许注入内联样式。
设置 ng-csp 指令为 no-inline-style, 将阻止 AngularJS 注入内联样式,但允许 执行 eval 函数。
如果开发 Google Chrome 扩展或 Windows 应用 ng-csp 指令是必须的。
注意:ng-csp 指令不会影响 JavaScript,但会修改 AngularJS 的工作方式,这就意味着: 你仍然可以编写 eval 函数, 且也可以正常执行, 但是 AngularJS 不能执行它自己的 eval 函数。如果采用兼容模式,会降低 30% 的性能。
<element ng-csp="no-unsafe-eval | no-inline-style"></element>no-unsafe-eval
no-inline-style
值可设置为空,意味着 eval 和 内联样式都不被允许。
可以设置其中一个值。
你也可以同时设置两个值使用分号隔开,但这与留空的效果是一样的。
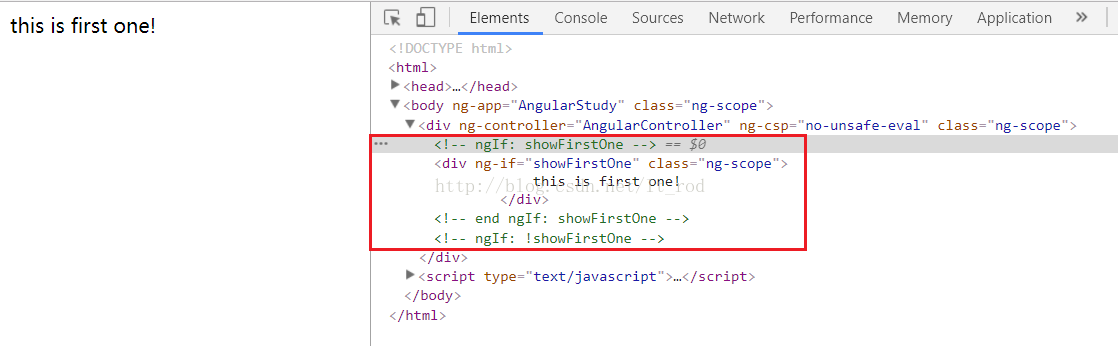
(2) ng-if
ng-if 指令用于在表达式为 false 时移除 HTML 元素。如果 if 语句执行的结果为 true,会添加移除元素,并显示。
ng-if 指令不同于 ng-hide, ng-hide 隐藏元素,而 ng-if 是从 DOM 中移除元素。
<element ng-if="expression"></element>所有的 HTML 元素都支持该指令。
<body ng-app="AngularStudy">
    <div ng-controller='AngularController'  ng-csp='no-unsafe-eval'>
        <div ng-if="showFirstOne">
            this is first one!
        </div>
        <div ng-if="!showFirstOne">
            this is second one!
        </div>
    </div>

    <script type="text/javascript">
        var angularModule = angular.module("AngularStudy", []);
        angularModule.controller('AngularController', ['$scope', '$rootScope', function ($scope, $rootScope) {
           $scope.showFirstOne = true;
        }]);
    </script>
</body>
看一下页面的显示,清注意红色框的内容:
(3)ng-repeat
ng-repeat 指令用于循环输出指定次数的 HTML 元素。集合必须是数组或对象。
<element ng-repeat="expression"></element>a. 遍历数组
<element ng-repeat="item in array">{{item}}</element><div ng-controller='AngularController'>
<table border="1">
<tr>
<th>颜色</th>
<th>值</th>
</tr>
<tr ng-repeat="data in dataList">
<td>{{data.name}}</td>
<td>{{data.age}}</td>
</tr>
</table>
</div>
<script type="text/javascript">
var angularModule = angular.module("AngularStudy", []);
angularModule.controller('AngularController', ['$scope', '$rootScope', '$filter',function ($scope, $rootScope, $filter) {
$scope.dataList = [
{name : 'red',age : 20},
{name : 'yellow',age : 30},
{name : 'blue',age : 40},
{name : 'green',age : 50}
];
</script>b. 遍历对象
<element ng-repeat="(key,value) in obj">{{key}} | {{value}}</element><div ng-controller='AngularController'>
<table border="1">
<tr>
<th>key</th>
<th>value</th>
</tr>
<tr ng-repeat="(key, value) in dataList">
<td>{{key}}</td>
<td>{{value}}</td>
</tr>
</table>
</div>
<script type="text/javascript">
var angularModule = angular.module("AngularStudy", []);
angularModule.controller('AngularController', ['$scope', '$rootScope', '$filter',function ($scope, $rootScope, $filter) {
$scope.dataList = {
name : 'rod',
age : 20,
company: 'Aug'
};
}]);
</script>c. 绑定$haskKey
给每个item绑定唯一ID,当数组发生变化时,ID不变! $index会随着数组的变化而变化<element ng-repeat="item in items track by $id(item)"></element><div ng-controller='AngularController' ng-csp='no-unsafe-eval'>
<table border="1">
<tr>
<th ng-click="fnSort('name')">颜色</th>
<th ng-click="fnSort('age')">值</th>
</tr>
<tr ng-repeat="data in dataList track by $id(data)">
<td>{{data.name}}</td>
<td>{{data.age}}</td>
<td>{{$id}}</td>
<td>{{$index}}</td>
</tr>
</table>
</div>
<script type="text/javascript">
var angularModule = angular.module("AngularStudy", []);
angularModule.controller('AngularController', ['$scope', '$rootScope', '$filter',function ($scope, $rootScope, $filter) {
$scope.dataList = [
{name : 'red',age : 20},
{name : 'red',age : 20},
{name : 'yellow',age : 30},
{name : 'blue',age : 40},
{name : 'green',age : 50}
];
$scope.fnSort = function(type){
arguments.callee['fnSort' + type] = !arguments.callee['fnSort' + type];
$scope.dataList = $filter('orderBy')($scope.dataList,type,arguments.callee['fnSort' + type]);
};
}]);
</script>d. 过滤器
对item的每个属性进行模糊匹配 <li ng-repeat="item in items |filter: 25"></li>e. 绑定属性过滤
对item的某个属性进行模糊匹配<li ng-repeat="item in items |filter: 25 track by item.age"></li>f. 保存匹配结果
把匹配到的结果另存到results数组变量,可供外部使用<li ng-repeat="item in items |filter: 25 as results"></li>保存针对某个属性的过滤结果:
<li ng-repeat="item in items |filter: 25 as results track by item.age "></li>e. 对于d.e.f由于涉及到filter,所以我现在没有深刻去看,不过对于$id,$index等值我们还是了解一下的
<div ng-controller='AngularController'  ng-csp='no-unsafe-eval'>
    <table border="1">
    <tr>
        <th ng-click="fnSort('name')">颜色</th>
        <th ng-click="fnSort('age')">值</th>
        <th >$id</th>
        <th >index</th>
        <th >$first</th>
        <th >$middle</th>
        <th >$last</th>
        <th >$even</th>
        <th >$odd</th>
    </tr>
    <tr ng-repeat="data in dataList track by $id(data)">
        <td>{{data.name}}</td>
        <td>{{data.age}}</td>
        <td>{{$id}}</td>
        <td>{{$index}}</td>
        <td>{{$first}}</td>
        <td>{{$middle}}</td>
        <td>{{$last}}</td>
        <td>{{$even}}</td>
        <td>{{$odd}}</td>
    </tr>
</table>
</div>


<script type="text/javascript">
    var angularModule = angular.module("AngularStudy", []);
    angularModule.controller('AngularController', ['$scope', '$rootScope', '$filter',function ($scope, $rootScope, $filter) {
       $scope.dataList = [
        {name : 'red',age : 20},
        {name : 'yellow',age : 30},
        {name : 'blue',age : 40},
        {name : 'green',age : 50}
    ];
    $scope.fnSort = function(type){
        arguments.callee['fnSort' + type] = !arguments.callee['fnSort' + type];
        $scope.dataList = $filter('orderBy')($scope.dataList,type,arguments.callee['fnSort' + type]);
    };
    }]);
</script>
看一下页面的结果吧:

$first : 当元素是遍历的第一个值时候为true
$middle : 当元素是遍历的第一个与最后一个元素之间的值时候为true
$last : 当元素是遍历的最后一个值时候为true
$even : 当元素是遍历的偶数时候为true
$add : 当元素是遍历的技术时候为true
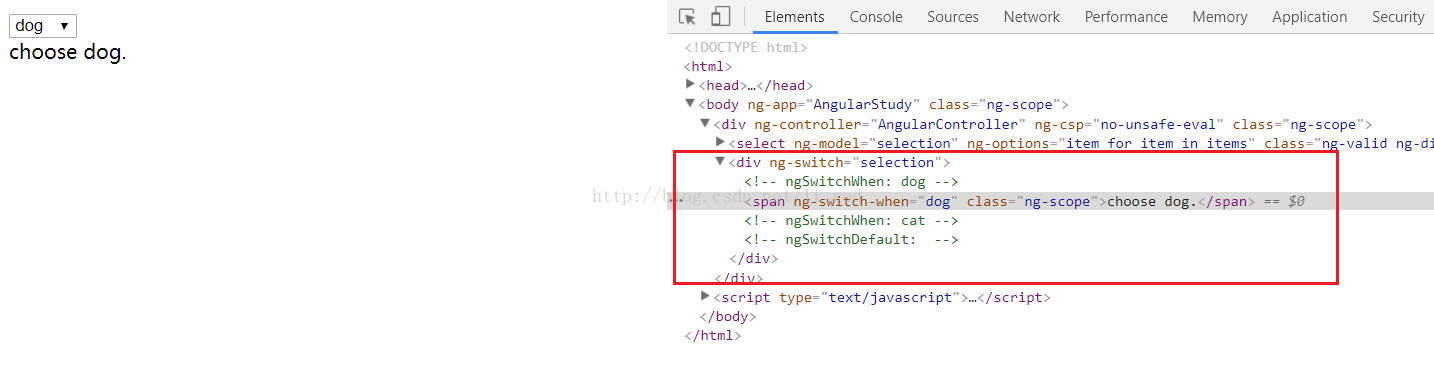
(4) ng-switch
ng-switch 指令根据表达式显示或隐藏对应的部分。对应的子元素使用 ng-switch-when 指令,如果匹配选中选择显示,其他为匹配的则移除。
你可以通过使用 ng-switch-default 指令设置默认选项,如果都没有匹配的情况,默认选项会显示。
<element ng-switch="expression">
 <element ng-switch-when="value"></element>
 <element ng-switch-when="value"></element>
 <element ng-switch-when="value"></element>
 <element ng-switch-default></element>
</element>
看一个示例:
<div ng-controller='AngularController'  ng-csp='no-unsafe-eval'>
    <select ng-model="selection" ng-options="item for item in items"></select>


    <div ng-switch="selection">
        <span ng-switch-when="dog">choose dog.</span>
        <span ng-switch-when="cat">choose cat.</span>
        <span ng-switch-default>choose other.</span>
    </div>
</div>


<script type="text/javascript">
    var angularModule = angular.module("AngularStudy", []);
    angularModule.controller('AngularController', ['$scope', '$rootScope', '$filter',function ($scope, $rootScope, $filter) {
        $scope.items = ['dog', 'cat', 'other'];
        $scope.selection = $scope.items[0];
    }]);
</script>
然后看一下html的元素:
和ng-switch相关的还有一个on,我们可以将<div ng-switch="selection"> 改成<div ng-switch on="selection">
(5) ng-transclude 规定填充的目标位置
具体的用法我想等到学习玩自定义指令之后再去学习。(6) ng-include : 可以加载,编辑,并包含外部HTML片段到当前应用中.
filename 文件名,可以使用表达式来返回文件名。onload 可选, 文件载入后执行的表达式。
autoscroll 可选,包含的部分是否在指定视图上可滚动。
<element ng-include="filename" οnlοad="expression" autoscroll="expression" ></element><ng-include src="filename" οnlοad="expression" autoscroll="expression" ></ng-include>特别说明:
* ng-include,如果单纯指定地址,必须要加引号
* ng-include,加载外部html,script标签中的内容不执行,不能加载,如果需要控制器处理需要在主页中注册
* ng-include,加载外部html中含有style标签样式可以识别
* ng-inclue,记载外部html中的link标签可以加载
举例:
<div ng-controller="AngularController">
    <!--<div ng-include="'../Template/ngInclude.html'" οnlοad="onload()" autoscroll=true></div>-->
    <ng-include src="'../Template/ngInclude.html'" οnlοad="onload()" autoscroll=true></ng-include>
    {{title}}
    <div>
        <span>
            The content is belong to index.cshtml.
        </span>
    </div>
</div>
<!--ngInclude.html-->
<link href="../Content/Site.css" rel="stylesheet" />
<style>
.includeClass {
height: 100px;
width: 100px;
border: 1px solid red;
font-size: 18px;
color: red;
overflow: hidden;
}
span {
}
</style>
<div class="includeClass">
{{title}}
<br />
<span>
The content is from another html model.
I am rod chen.
</span>
</div>
<script type="text/javascript">
console.log('I am the function in ng-include!');
</script>
从绿色框中看到的内容对应了上面特别说明的内容,自行领会(因为图片上传的限制,所以图片被缩小了)。
(7) ng-view
涉及到路由的信息,所以后面会有单独的文章去学习。7. event事件指令
(1) ng-click
适用标签:所有触发条件:单击
<div ng-click="click()">click me</div>(2) ng-dblclick
适用标签:所有触发条件:双击
<div ng-dblclick="dblclick()">click me</div>(3) ng-blur
适用标签:a / input / select / textarea触发条件:失去焦点
<a href="" ng-blur="blur()">link</a>(4) ng-focus
适用标签:a / input / select / textarea触发条件:获取焦点
<a href="" ng-focus="focus()">link</a>(5) ng-change
适用标签:input / select / textarea触发条件:model更新
对于input标签,当我每按下key的时候,input都会触发change,对于select则是不同option的切换。
<input type="text" ng-model="text" ng-change="change()" ng-minlength="5"/>(6) ng-copy
适用标签:所有 HTML 元素都支持。一般常用的就是input和textarea。触发条件:复制。鼠标右键复制和快捷键Ctrl+C都会触发。
<input type="text" ng-copy="copy()"/>
<textarea cols="30" rows="10" ng-copy="copy()"></textarea>
(7) ng-cut
适用标签:a / input / select / textarea触发条件:剪切。鼠标右键剪切和快捷键Ctrl+X都会触发。
<input type="text" ng-cut="cut()"/>
<textarea cols="30" rows="10" ng-cut="cut()"></textarea>
(8) ng-paste
适用标签:a / input / select / textarea触发条件:粘贴。鼠标右键粘贴和快捷键Ctrl+V都会触发。
<input type="text" ng-paste="paste()"/>
<textarea cols="30" rows="10" ng-paste="paste()"></textarea>
(9) ng-keydown
适用标签:所有触发条件:键盘按键按下
要把$event传过去,一般都是要判断按了哪个按键的。
<input type="text" ng-keydown="keydown($event)"/>
<textarea cols="30" rows="10" ng-keydown="keydown($event)"></textarea>
(10) ng-keyup
适用标签:所有触发条件:键盘按键按下并松开
<input type="text" ng-keyup="keyup($event)"/>
<textarea cols="30" rows="10" ng-keyup="keyup($event)"></textarea>
(11) ng-keypress
适用标签:所有触发条件:键盘按键按下
<input type="text" ng-keypress="keypress($event)"/>
<textarea cols="30" rows="10" ng-keypress="keypress($event)"></textarea>
(12) keydown,keypress,keydown三者区别
引发事件的按键非字符键不会引发 KeyPress 事件,但非字符键却可以引发 KeyDown 和 KeyUp 事件。
事件引发的时间
KeyDown 和 KeyPress 事件在按下键时发生,KeyUp 事件在释放键时发生。
事件发生的顺序
KeyDown -> KeyPress -> KeyUp。如果按一个键很久才松开,发生的事件为:KeyDown -> KeyPress -> KeyDown -> KeyPress -> KeyDown -> KeyPress -> ... -> KeyUp。
KeyDown触发后,不一定触发KeyUp,当KeyDown 按下后,拖动鼠标,那么将不会触发KeyUp事件。
KeyPress主要用来捕获数字(注意:包括Shift+数字的符号)、字母(注意:包括大小写)、小键盘等除了F1-12、SHIFT、Alt、Ctrl、Insert、Home、PgUp、Delete、End、PgDn、ScrollLock、Pause、NumLock、{菜单键}、{开始键}和方向键外的ANSI字符。
KeyDown 和KeyUp 通常可以捕获键盘除了PrScrn所有按键(这里不讨论特殊键盘的特殊键)。
KeyPress 只能捕获单个字符。
KeyDown 和KeyUp 可以捕获组合键。
KeyPress 可以捕获单个字符的大小写。
KeyDown和KeyUp 对于单个字符捕获的KeyValue 都是一个值,也就是不能判断单个字符的大小写。
KeyPress 不区分小键盘和主键盘的数字字符。
KeyDown 和KeyUp 区分小键盘和主键盘的数字字符。
其中PrScrn 按键KeyPress、KeyDown和KeyUp 都不能捕获。
(13) ng-mousedown
适用标签:所有触发条件:鼠标按下,左右中间按下都会触发
<button ng-mousedown="mousedown($event)">button</button>(14) ng-mouseup
适用标签:所有触发条件:鼠标按下弹起,左右中间按下弹起都会触发
<button ng-mouseup="mouseup($event)">button</button>(15)ng-mouseenter
适用标签:所有触发条件:鼠标进入
<button ng-mouseenter="mouseenter()">button</button>(16) ng-mouseleave
适用标签:所有触发条件:鼠标离开
<button ng-mouseleave="mouseleave()">button</button>(17) ng-mousemove
适用标签:所有触发条件:鼠标移动
<button ng-mousemove="mousemove()">button</button>(18)ng-mouseover
适用标签:所有触发条件:鼠标进入
<button ng-mouseover="mouseover()">button</button>8. 特殊的ng-src / ng-href指令
(1) ng-href: 引入A标签链接的URL,多用于动态生成URL,存在一个问题就是如果还没动态生成URL,用户就点击了,那么就会跳转到404页面.Angular会等到插值生效再执行链接点击行为.
<a ng-href='{{href1}}'>Test ng-href</a>
<br />
<a ng-href='{{href2}}'>Test ng-href($timeout)</a>
<br />
<a ng-href='{{href3}}'>Test ng-href(timeout)</a>
<script type="text/javascript">
var angularModule = angular.module("AngularStudy", []);
angularModule.controller('AngularController', function ($scope, $timeout) {
$scope.href1 = 'rod chen';
$timeout(function($scope){
$scope.href2 = 'rod chen';
}, 5000);
setTimeout(function() {
$scope.href3 = 'rod chen';
}, 5000);
});
</script>在页面渲染完成之后没有过了我写的5000ms钱,看一下页面的加载情况:

这个时候由于href2还没有生成,所以这个时候这个a标签是不可以点击的,这也是上面的描述。
然后再看一下经过5000ms之后页面的渲染:

可以看到href2动态生成之后,a标签页可以点击了,至于href3存在的意义在于说明这个地方我们只可以使用$timeout,而不能使用setTimeout来进行时间的延迟,否则的话不会有效果。
至于原因我没有去了解,但是大致猜测一下,angular.js的$timeout指令对window.setTimeout做了一个封装,它的返回值是一个promise对象,promise是一个基于任务队列的对象,但是原生的setTimeout基于事件循环队列的,当执行setTimeout的时候尽管我们已经给予href3赋值,但是这个$scope对象已经返回到angular了。具体的原因需要我们真正了解到angular执行的机制才能了解到了,为了证明前面的话,现在我们将code修改一下。
<script type="text/javascript">
    var angularModule = angular.module("AngularStudy", []);
    angularModule.controller('AngularController', function ($scope, $timeout) {
        $scope.href1 = 'rod chen';


        $timeout(function(){
            $scope.href2 = 'rod chen';
        }, 6000);


        setTimeout(function() {
            $scope.href3 = 'rod chen';
        }, 5000);
    });
</script>
然后我们等到6000ms之后再看一下结果:

看到这个时候我们的href3的效果已经在页面上显示出来了,这也是promise基于任务队列的功能展示,相信具体的DOM在angular环境下的渲染会和任务队列有关系,期待后面的学习。
(2) ng-src:Angular会告诉浏览器在ng-src表达式生效之前不会显示图像.
这个其实和ng-href类似,在src没有动态生成之前,图像是不会在页面上显示,此时的html<img ng-src="">
当ng-src生成时候,html的结果如下:
<img ng-src="./img.bmp" src="./img.bmp">
暂时先把内置指令学习到这里,接下来就是自定义指令已经本文里遗留下来的几个指令!


 1143
1143


 被折叠的 条评论
为什么被折叠?
被折叠的 条评论
为什么被折叠?
 到【灌水乐园】发言


