


Windows Via C/C++ 读书笔记 11
Memory-Mapped Files(内存映射文件)
1. Overview
Memroy-Mapped Files(MMFs)是提供一种像访问内存一样访问文件的方案。
Memroy-Mapped Files(MMFs)的作用有3个:
1. 系统用MMFs读取exe和dll文件。还记得前面讲的物理内存和磁盘内存(page files)吗,如果系统需要加载exe和dll文件,把它们都拷贝到内存中,速度是非常慢的。因此,系统采取把exe和dll文件直接转为MMFs,不再做拷贝操作,提高效率。
2. 它本身的特点,访问内存一样访问文件,可以避免烦琐的IO操作,因为可以随意访问文件的任何位置(像访问内存指针一样)。
3. 同一个机器不同进程间共享数据。强大的IPC方法之一,非常常用,也称为共享内存(完全加载到物理内存中,访问速度非常快)。
2. 内存映射exe和dll
2.1. 多个程序共享内存映射文件
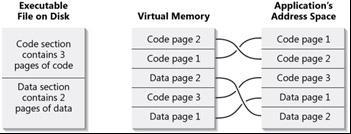
前面提到,当系统需要执行exe的时候,会把exe文件映射到内存中,然后加载exe需要的dll,同样把dll文件也映射到内存。如果dll还要加载其它dll,重复这一过程。
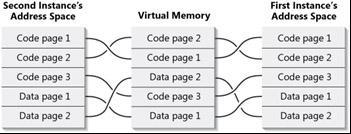
如果exe和dll被多次使用,例如一个exe启了多个进程,或者多个进程都使用了同一个dll。系统是不会做映射工作多次,而是重复利用这块MMF。
下图展示了文件如何映射到内存,内存如何和程序的地址空间对应。
下图展示多个程序共用同一块内存。
2.2. 多个程序不共享static静态变量
因为多个程序(exe 和 dll 都成为程序)共用相同的代码页,如果有一个线程修改了全局变量(静态变量static),所有线程的变量都会被修改,这是不允许的。Windows采用copy-on-write的策略避免这个问题,当线程需要写一个变量的时候,它会自动分配一个新的页,让修改线程使用新的页,其它线程继续使用老的页。如下图。
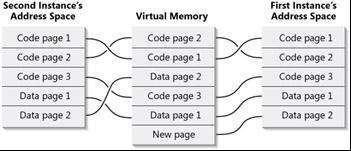
因此默认情况下,进程和dll不能通过全局变量共享数据。
2.3. 多个程序共享static静态变量
如果想利用共享变量实现同一个exe或dll的不同拷贝共享数据,可以在编译的时候把变量指定为共享型。
#pragma data_seg("Shared")
LONG g_lInstanceCount = 0;
#pragma data_seg()
注意,编译器只把初始化的变量放入shared section。下面的代码是不共享的。
#pragma data_seg("Shared")
LONG g_lInstanceCount;
#pragma data_seg()
这段编译指令的用法是
#pragma data_seg("sectionname")
Section的意思是,程序文件被分为不同的段来保存不同的数据,可以用微软VS提供的dumpbin查看。我装的是VS2005,以此为例,从开始菜单打开visual studio-visual studio tools-"xx 2005 command prompt",运行dumpbin,使用/HEADERS参数查看exe或dll文件。可以看到存储分配情况。
| Attribute | Meaning |
| READ | The bytes in the section can be read from. |
| WRITE | The bytes in the section can be written to. |
| EXECUTE | The bytes in the section can be executed. |
| SHARED | The bytes in the section are shared across multiple instances. (This attribute effectively turns off the copy-on-write mechanism.) |
| Section Name | Purpose |
| .bss | Uninitialized data |
| .CRT | Read-only C run-time data |
| .data | Initialized data |
| .debug | Debugging information |
| .didata | Delay imported names table |
| .edata | Exported names table |
| .idata | Imported names table |
| .rdata | Read-only run-time data |
| .reloc | Relocation table information |
| .rsrc | Resources |
| .text | .exe's or DLL's code |
| .textbss | Generated by the C++ compiler when the Incremental Linking option is enabled |
| .tls | Thread-local storage |
| .xdata | Exception-handling table |
输出片段:
SECTION HEADER #3
.data name
560 virtual size
14000 virtual address
1000 size of raw data
14000 file pointer to raw data
0 file pointer to relocation table
0 file pointer to line numbers
0 number of relocations
0 number of line numbers
C0000040 flags
Initialized Data
Read Write
3. 内存映射数据文件
可以把文件映射到进程的地址空间,然后像访问内存一样读写文件。操作系统负责caching,定位等操作。是一种读写大文件的解决方案。
内存映射文件不能保证当程序异常崩溃的时候,能完成文件读写的事务,同样会造成数据错误。
4. 使用内存映射数据文件
使用内存映射文件有3步:
1. 创建或者打开一个文件内核对象。
HANDLE CreateFile(
PCSTR pszFileName,
DWORD dwDesiredAccess,
DWORD dwShareMode,
PSECURITY_ATTRIBUTES psa,
DWORD dwCreationDisposition,
DWORD dwFlagsAndAttributes,
HANDLE hTemplateFile);
2. 创建一个文件映射内核对象,与指定文件内核对象关联,并告诉系统映射文件需要的大小(这个大小会影响文件的大小,见后面例子)。
HANDLE CreateFileMapping(
HANDLE hFile,
PSECURITY_ATTRIBUTES psa,
DWORD fdwProtect,
DWORD dwMaximumSizeHigh,
DWORD dwMaximumSizeLow,
PCTSTR pszName);
3. 映射文件数据到程序的地址空间。
PVOID MapViewOfFile(
HANDLE hFileMappingObject,
DWORD dwDesiredAccess,
DWORD dwFileOffsetHigh,
DWORD dwFileOffsetLow,
SIZE_T dwNumberOfBytesToMap);
如果在NUMA系统(多CPU,多节点,见wiki)上使用,可以指定映射文件不会跨节点。使用下面两个API。
HANDLE CreateFileMappingNuma(
HANDLE hFile,
PSECURITY_ATTRIBUTES psa,
DWORD fdwProtect,
DWORD dwMaximumSizeHigh,
DWORD dwMaximumSizeLow,
PCTSTR pszName,
DWORD dwPreferredNumaNode
);
PVOID MapViewOfFileExNuma(
HANDLE hFileMappingObject,
DWORD dwDesiredAccess,
DWORD dwFileOffsetHigh,
DWORD dwFileOffsetLow,
SIZE_T dwNumberOfBytesToMap,
LPVOID lpBaseAddress,
DWORD dwPreferredNumaNode
);
使用完毕后反过来做上面3步操作释放资源:
1. 解除映射。
2. 关闭文件映射内核对象。
3. 关闭文件内核对象。
4.1. 例子1
这个例子展示了这么一种情况:如果文件是以WRITE模式打开,而且在创建文件映射内核对象时,指定的最大大小大于文件实际大小,那么文件会被增大。如果是只读模式打开,那么不会有影响。
int WINAPI _tWinMain(HINSTANCE, HINSTANCE, PTSTR, int) {
// Before executing the line below, C:/ does not have
// a file called "MMFTest.Dat"
HANDLE hFile = CreateFile(TEXT("C://MMFTest.Dat"),
GENERIC_READ | GENERIC_WRITE,
FILE_SHARE_READ | FILE_SHARE_WRITE, NULL, CREATE_ALWAYS,
FILE_ATTRIBUTE_NORMAL, NULL);
// Before executing the line below, the MMFTest.Dat
// file does exist but has a file size of 0 bytes.
HANDLE hFileMap = CreateFileMapping(hFile, NULL, PAGE_READWRITE,
0, 100, NULL);
// After executing the line above, the MMFTest.Dat
// file has a size of 100 bytes.
// Cleanup
CloseHandle(hFileMap);
CloseHandle(hFile);
// When the process terminates, MMFTest.Dat remains
// on the disk with a size of 100 bytes.
return(0);
}
4.2. 例子2
这个例子展示了基本的操作,并对文件进行了读写。
// Open the file that we want to map.
HANDLE hFile = CreateFile(pszFileName, GENERIC_READ | GENERIC_WRITE, 0, NULL,
OPEN_ALWAYS, FILE_ATTRIBUTE_NORMAL, NULL);
// Create a file-mapping object for the file.
HANDLE hFileMapping = CreateFileMapping(hFile, NULL, PAGE_WRITECOPY,
0, 0, NULL);
// Map a copy-on-write view of the file; the system will commit
// enough physical storage from the paging file to accommodate
// the entire file. All pages in the view will initially have
// PAGE_WRITECOPY access.
PBYTE pbFile = (PBYTE) MapViewOfFile(hFileMapping, FILE_MAP_COPY,
0, 0, 0);
// Read a byte from the mapped view.
BYTE bSomeByte = pbFile[0];
// When reading, the system does not touch the committed pages in
// the paging file. The page keeps its PAGE_WRITECOPY attribute.
// Write a byte to the mapped view.
pbFile[0] = 0;
// When writing for the first time, the system grabs a committed
// page from the paging file, copies the original contents of the
// page at the accessed memory address, and maps the new page
// (the copy) into the process' address space. The new page has
// an attribute of PAGE_READWRITE.
// Write another byte to the mapped view.
pbFile[1] = 0;
// Because this byte is now in a PAGE_READWRITE page, the system
// simply writes the byte to the page (backed by the paging file).
// When finished using the file's mapped view, unmap it.
// UnmapViewOfFile is discussed in the next section.
UnmapViewOfFile(pbFile);
// The system decommits the physical storage from the paging file.
// Any writes to the pages are lost.
// Clean up after ourselves.
CloseHandle(hFileMapping);
CloseHandle(hFile);
5. Memory-Mapped Files and Coherence(一致性)
如果同一个文件被映射到多个MMFs(Memory-Mapped Files),那么任何MMF做出的修改都会影响到其它的MMF。操作系统会自动实现,实际上多个MMF映射到的内存Page是相同的,非常类似内存映射exe的处理方式。即同一个文件的同一个部分,在内存中只映射一次,所有的MMF共用这个部分。
如果要保证数据一致性(事务4属性,一致性 原子性等),还是得加同步操作,简单的话可以指定只许一个内核对象打开文件,在CreateFile的时候指定dwShareMode参数为0。
6. 设定MMF的基地址
设定MMF的基地址,意思是指设定把文件映射到进程地址空间的起始地址。它在程序需要保存指针数据到文件的时候有用。因为指针保存的地址是和进程的地址空间有关的,考虑这么一种的情况,进程A打开了一个MMF,把它映射到它的地址空间。然后在MMF中保存了一个指针,它指向MMF中的一个变量,变量的地址为a。注意这个地址a是和进程的地址空间相关的地址。如果另个程序再打开这个文件,试图用地址a访问这个变量的时候,因为文件在进程地址空间的首地址不一样,因此是无法访问到的。根本原因是MMF在不同的映射中,在进程的地址空间中有不同的偏移。
如果要避免这种情况,一种方法是保存MMF的相对地址,然后用MMF的首地址加上这个相对地址;另一种方法就是使用MapViewOfFileEx,可以指定映射的起始地址,那么每次的偏移都会是相同的。
7. 使用MMF做IPC(进程间通信)
用MMF做IPC有两种方式,一种是用得比较多的共享内存方式。在CreateFileMapping的时候,把文件内核指针置为0xFFFFFFFF,告诉操作系统是共享内存。还有一种就是这章讲的,利用进程加载exe共用MMF拷贝(见第二章)。系统会调用MapViewOfFileEx来映射exe文件,而exe文件的起始地址是保存在exe文件中的(可以用编译指令设定,也可以用默认值)。因此不同进程会有相同的地址。第二种方法的限制是只能在相同的exe共享数据。


 1万+
1万+

 被折叠的 条评论
为什么被折叠?
被折叠的 条评论
为什么被折叠?
 到【灌水乐园】发言


