


本文所讲到的是LinearLayout + Button + EditText + AlertDialog的简单使用。
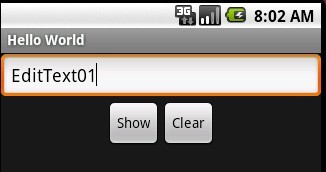
Activity以 LinearLayout排列,共用到两个 LinearLayout,第一个是用于全窗体,第二个用于存放两个Button,第二个 LinearLayout放在EditText控件下面,以下给出main.xml的代码:
- <?xmlversion="1.0"encoding="utf-8"?>
- <LinearLayoutxmlns:android="http://schemas.android.com/apk/res/android"
- android:orientation="vertical"
- android:layout_width="fill_parent"
- android:layout_height="fill_parent"
- >
- <EditTextandroid:text="EditText01"android:layout_height="wrap_content"android:layout_width="fill_parent"android:id="@+id/edtInput"></EditText>
- <LinearLayoutandroid:id="@+id/LinearLayout01"android:layout_height="wrap_content"android:layout_width="fill_parent"android:gravity="center">
- <Buttonandroid:layout_width="wrap_content"android:layout_height="wrap_content"android:text="Show"android:id="@+id/btnShow"></Button>
- <Buttonandroid:layout_width="wrap_content"android:layout_height="wrap_content"android:text="Clear"android:id="@+id/btnClear"></Button>
- </LinearLayout>
- </LinearLayout>
<?xml version="1.0" encoding="utf-8"?> <LinearLayout xmlns:android="http://schemas.android.com/apk/res/android" android:orientation="vertical" android:layout_width="fill_parent" android:layout_height="fill_parent" > <EditText android:text="EditText01" android:layout_height="wrap_content" android:layout_width="fill_parent" android:id="@+id/edtInput"></EditText> <LinearLayout android:id="@+id/LinearLayout01" android:layout_height="wrap_content" android:layout_width="fill_parent" android:gravity="center"> <Button android:layout_width="wrap_content" android:layout_height="wrap_content" android:text="Show" android:id="@+id/btnShow"></Button> <Button android:layout_width="wrap_content" android:layout_height="wrap_content" android:text="Clear" android:id="@+id/btnClear"></Button> </LinearLayout> </LinearLayout>
main.xml用于 Activity的UI设计,目前设计起来的速度,比 J2ME上的LWUIT略快(两者类似,Android提供了GUI设计工具),比WM上的.NET CF略慢(.NETCF 是RAD)。
接下来给出JAVA代码:
- packagecom.studio.android;
- importandroid.app.Activity;
- importandroid.app.AlertDialog;
- importandroid.os.Bundle;
- importandroid.view.View;
- importandroid.view.View.OnClickListener;
- importandroid.widget.Button;
- importandroid.widget.EditText;
- publicclassHelloAndroidextendsActivity{
- /**Calledwhentheactivityisfirstcreated.*/
- ButtonbtnShow;
- ButtonbtnClear;
- EditTextedtInput;
- @Override
- publicvoidonCreate(BundlesavedInstanceState){
- super.onCreate(savedInstanceState);
- setContentView(R.layout.main);
- btnShow=(Button)findViewById(R.id.btnShow);//控件与代码绑定
- btnClear=(Button)findViewById(R.id.btnClear);//控件与代码绑定
- edtInput=(EditText)findViewById(R.id.edtInput);//控件与代码绑定
- btnShow.setOnClickListener(newClickListener());//使用点击事件
- btnClear.setOnClickListener(newClickListener());//使用点击事件
- }
- classClickListenerimplementsOnClickListener
- {
- publicvoidonClick(Viewv)
- {
- if(v==btnShow)
- {
- newAlertDialog.Builder(HelloAndroid.this)
- .setIcon(android.R.drawable.ic_dialog_alert)
- .setTitle("Information")
- .setMessage(edtInput.getText())
- .show();
- }
- elseif(v==btnClear)
- {
- edtInput.setText("HelloAndroid");
- }
- }
- }
- }
package com.studio.android; import android.app.Activity; import android.app.AlertDialog; import android.os.Bundle; import android.view.View; import android.view.View.OnClickListener; import android.widget.Button; import android.widget.EditText; public class HelloAndroid extends Activity { /** Called when the activity is first created. */ Button btnShow; Button btnClear; EditText edtInput; @Override public void onCreate(Bundle savedInstanceState) { super.onCreate(savedInstanceState); setContentView(R.layout.main); btnShow=(Button)findViewById(R.id.btnShow);//控件与代码绑定 btnClear=(Button)findViewById(R.id.btnClear);//控件与代码绑定 edtInput=(EditText)findViewById(R.id.edtInput);//控件与代码绑定 btnShow.setOnClickListener(new ClickListener());//使用点击事件 btnClear.setOnClickListener(new ClickListener());//使用点击事件 } class ClickListener implements OnClickListener { public void onClick(View v) { if(v==btnShow) { new AlertDialog.Builder(HelloAndroid.this) .setIcon(android.R.drawable.ic_dialog_alert) .setTitle("Information") .setMessage(edtInput.getText()) .show(); } else if(v==btnClear) { edtInput.setText("HelloAndroid"); } } } }
刚开始Android的开发,界面设计是J2ME程序员的瓶颈之处,不过以后Android的开发工具会越来越智能化,期待 Netbeans 推出更好的 ADT出来(Netbeans目前已经有Android插件)。


 166
166

 被折叠的 条评论
为什么被折叠?
被折叠的 条评论
为什么被折叠?
 到【灌水乐园】发言


