5、Session Management Service的实现
现在我们来看看Session Management真正的实现,和我以前的例子不同,我不是把所有的实现都写在WCF service上,而是定义了另一个class来实现所有的业务逻辑:SessionManager。我们分析一下具体的实现逻辑。
namespace Artech.SessionManagement.Service
{
public static class SessionManager
{
private static object _syncHelper = new object();
internal static TimeSpan Timeout
{ get; set; }
public static IDictionary<Guid, SessionInfo> CurrentSessionList
{ get; set; }
public static IDictionary<Guid, ISessionCallback> CurrentCallbackList
{ get; set; }
static SessionManager()
{
string sessionTimeout = ConfigurationManager.AppSettings["SessionTimeout"];
if (string.IsNullOrEmpty(sessionTimeout))
{
throw new ConfigurationErrorsException("The session timeout application setting is missing");
}
double timeoutMinute;
if (!double.TryParse(sessionTimeout, out timeoutMinute))
{
throw new ConfigurationErrorsException("The session timeout application setting should be of doubdle type.");
}
Timeout = new TimeSpan(0, 0, (int)(timeoutMinute * 60));
CurrentSessionList = new Dictionary<Guid, SessionInfo>();
CurrentCallbackList = new Dictionary<Guid, ISessionCallback>();
}
… … … … … … … … … … … … … … … …… … … … … … … … … … … … … … … …
}
}
首先来看Field、Property和static constructor的定义。_syncHelper 用于实现多线程同步之用;Timeout是session timeout的时间,可配置;CurrentSessionList和CurrentCallbackList两个dictionary在上面我们已经作过介绍,分别代表当前活动的session列表和callback列表,key均为SessionID。在静态构造函数中,初始化session timeout的时间,和实例化CurrentSessionList和CurrentCallbackList。
接着我们来看看StartSession和EndSession两个方法,这两个方法分别代表Session的开始和结束。
public static Guid StartSession(SessionClientInfo clientInfo)
{
Guid sessionID = Guid.NewGuid();
ISessionCallback callback = OperationContext.Current.GetCallbackChannel<ISessionCallback>();
SessionInfo sesionInfo = new SessionInfo() { SessionID = sessionID, StartTime = DateTime.Now, LastActivityTime = DateTime.Now, ClientInfo = clientInfo };
lock (_syncHelper)
{
CurrentSessionList.Add(sessionID, sesionInfo);
CurrentCallbackList.Add(sessionID, callback);
}
return sessionID;
}
public static void EndSession(Guid sessionID)
{
if (!CurrentSessionList.ContainsKey(sessionID))
{
return;
}
lock (_syncHelper)
{
CurrentCallbackList.Remove(sessionID);
CurrentSessionList.Remove(sessionID);
}
}
在StartSession方法中,首先创建一个GUID作为SessionID。通过OperationContext.Current获得callback对象,并根据client端传入的SessionClientInfo 对象创建SessionInfo 对象,最后将callback对象和SessionInfo 对象加入CurrentCallbackList和CurrentSessionList中。由于这两个集合会在多线程的环境下频繁地被访问,所以在对该集合进行添加和删除操作时保持线程同是显得尤为重要,所在在本例中,所有对列表进行添加和删除操作都需要获得_syncHelper加锁下才能执行。与StartSession相对地,EndSession方法仅仅是将SessionID标识的callback对象和SessionInfo 对象从列表中移除。
然后我们来看看如何强行中止掉一个或多个活动的session:KillSessions。
public static void KillSessions(IList<Guid> sessionIDs)
{
lock (_syncHelper)
{
foreach (Guid sessionID in sessionIDs)
{
if (!CurrentSessionList.ContainsKey(sessionID))
{
continue;
}
SessionInfo sessionInfo = CurrentSessionList[sessionID];
CurrentSessionList.Remove(sessionID);
CurrentCallbackList[sessionID].OnSessionKilled(sessionInfo);
CurrentCallbackList.Remove(sessionID);
}
}
}
逻辑很简单,就是先从CurrentSessionList中获得对应的SessionInfo 对象,然后将其从CurrentSessionList中移除,然后根据SessionID获得对用的Callback对象,调用OnSessionKilled方法实时通知client session被强行中止,最后将callback对象从CurrentCallbackList中清楚。需要注意的是OnSessionKilled是One-way方式调用的,所以是异步的,时间的消耗可以忽略不计,也不会抛出异常,所以对_syncHelper的锁会很开释放,所以不会对并发造成太大的影响。
Session的管理最终要、也是作复杂的事对Timeout的实现,再我们的例子中,我们通过定期对CurrentSessionList中的每个session进行轮询实现。每次轮询通过RenewSessions方法实现,我们来看看该方法的定义:
[MethodImpl(MethodImplOptions.Synchronized)]
public static void RenewSessions()
{
IList<WaitHandle> waitHandleList = new List<WaitHandle>();
foreach (var session in CurrentSessionList)
{
RenewSession renewsession = delegate(KeyValuePair<Guid, SessionInfo> sessionInfo)
{
if (DateTime.Now - sessionInfo.Value.LastActivityTime < Timeout)
{
return;
}
try
{
TimeSpan renewDuration = CurrentCallbackList[sessionInfo.Key].Renew();
if (renewDuration.TotalSeconds > 0)
{
sessionInfo.Value.LastActivityTime += renewDuration;
}
else
{
sessionInfo.Value.IsTimeout = true;
CurrentCallbackList[session.Key].OnSessionTimeout(sessionInfo.Value);
}
}
catch (CommunicationObjectAbortedException)
{
sessionInfo.Value.IsTimeout = true;
return;
}
};
IAsyncResult result = renewsession.BeginInvoke(session, null, null);
waitHandleList.Add(result.AsyncWaitHandle);
}
if (waitHandleList.Count == 0)
{
return;
}
WaitHandle.WaitAll(waitHandleList.ToArray<WaitHandle>());
ClearSessions();
}
public delegate void RenewSession(KeyValuePair<Guid, SessionInfo> session);
首先我定义了一个delegate:RenewSession,来实现表示对单个session的renew操作。在RenewSessions方法中,我们遍历CurrentSessionList中的每个SessionInfo对象,根据LastActivityTime判断是否需要对该Session进行Renew操作(DateTime.Now - sessionInfo.Value.LastActivityTime < Timeout,意味着单单从server来看,Session都尚未过期),如何需要,则通过SessionID从CurrentCallbackList中取出callback对象,调用Renew方法。如何返回的的Timespan大于零,则表明,client端需要延长session的生命周期,则让LastActivityTime 加上该值。如何返回的值小于零,表明session真的过期了,那么通过调用callback对象的OnSessionTimeout方法实现对client的实时的通知,并将SessionInfo对象的IsTimeout 设置为true。等所以得操作结束之后,在将IsTimeout 为true的SessionInfo对象和对应的callback对象从列表中移除。
在这里有3点需要注意:
1)由于在client过多的情况下,CurrentSessionList得数量太多,按照同步的方式逐个进行状态的检测、callback的调用可以需要很长的时间,会严重影响实时性。所以我们采用的是异步的方式,这是通过将操作定义到RenewSession delegate中,并掉用BeginInvoke方法实现的。
2)在调用Callback的Renew方法的时候,很有可以client端的程序已经正常或者非正常关闭,在这种情况下会抛出CommunicationObjectAbortedException异常,我们应该把这种情况视为timeout。所以我们也将IsTimeout 设置为true。
3)我们之所以现在遍历之后才对session进行清理,主要考虑到我们的操作时在对线程环境中执行,如何在并发操作的情况下对集合进行删除,会出现一些意想不到的不同步情况下。我们通过WaitHandle保证所有的并发操作都结束了:我先创建了一个IList<WaitHandle>对象waitHandleList ,将每个基于session对象的异步操作的WaitHandle添加到该列表(waitHandleList.Add(result.AsyncWaitHandle);)通过
WaitHandle.WaitAll(waitHandleList.ToArray<WaitHandle>());保证所有的操作都结束了。
有了SessionManager,我们的Service就显得很简单了:
namespace Artech.SessionManagement.Service
{
[ServiceBehavior(InstanceContextMode = InstanceContextMode.Single, ConcurrencyMode =ConcurrencyMode.Multiple)]
public class SessionManagementService:ISessionManagement
{
#region ISessionManagement Members
public Guid StartSession(SessionClientInfo clientInfo,out TimeSpan timeout)
{
timeout = SessionManager.Timeout;
return SessionManager.StartSession(clientInfo);
}
public void EndSession(Guid sessionID)
{
SessionManager.EndSession(sessionID);
}
public IList<SessionInfo> GetActiveSessions()
{
return new List<SessionInfo>(SessionManager.CurrentSessionList.Values.ToArray<SessionInfo>());
}
public void KillSessions(IList<Guid> sessionIDs)
{
SessionManager.KillSessions(sessionIDs);
}
#endregion
}
}
基本上就是调用SessionManager对应的方法。
6、Service Hosting
在Artech.SessionManagement.Hosting.Program中的Main()方法中,实际上是做了两件事情:
I、对SessionManagementService的Host。
II、通过Timer对象实现对Session列表的定期(5s)轮询。
namespace Artech.SessionManagement.Hosting
{
class Program
{
static void Main(string[] args)
{
using (ServiceHost host = new ServiceHost(typeof(SessionManagementService)))
{
host.Opened += delegate
{
Console.WriteLine("The session management service has been started up!");
};
host.Open();
Timer timer = new Timer(
delegate { SessionManager.RenewSessions(); }, null, 0, 5000);
Console.Read();
}
}
}
}
这是configuration,除了system.serviceModel相关配置外,还定义了配置了session timeout的时间,单位为”分”:
<?xml version="1.0" encoding="utf-8" ?>
<configuration>
<appSettings>
<add key="SessionTimeout" value="0.5"/>
</appSettings>
<system.serviceModel>
<services>
<service name="Artech.SessionManagement.Service.SessionManagementService">
<endpoint binding="netTcpBinding" bindingConfiguration="" contract="Artech.SessionManagement.Contract.ISessionManagement" />
<host>
<baseAddresses>
<add baseAddress="net.tcp://127.0.0.1:9999/sessionservice" />
</baseAddresses>
</host>
</service>
</services>
</system.serviceModel>
</configuration>
7、如何定义Client
这个service的实现已经完成,我们最后来介绍如何根据service的特点来定义我们的client程序了。我们的client是一个GUI应用(WinForm)。为了简便,我们把所有的逻辑定义在一个facade class上面:SessionUtility。
namespace Artech.SessionManagement.Client
{
public static class SessionUtility
{
static SessionUtility()
{
Callback = new SessionCallback();
Channel = new DuplexChannelFactory<ISessionManagement>(Callback, "sessionservice").CreateChannel();
}
private static ISessionManagement Channel
{ get; set; }
private static ISessionCallback Callback
{ get; set; }
public static DateTime LastActivityTime
{ get; set; }
public static Guid SessionID
{ get; set; }
public static TimeSpan Timeout
{ get; set; }
public static void StartSession(SessionClientInfo clientInfo)
{
TimeSpan timeout;
SessionID = Channel.StartSession(clientInfo, out timeout);
Timeout = timeout;
}
public static IList<SessionInfo> GetActiveSessions()
{
return Channel.GetActiveSessions();
}
public static void KillSessions(IList<Guid> sessionIDs)
{
Channel.KillSessions(sessionIDs);
}
}
}
SessionUtility定义了连个public property:SessionID代表当前session的ID,Timeout代表Session timeout的时间,这两个属性都在StartSession中被初始化,而LastActivityTime代表的是最后一次用户交互的时间。上面的代码和简单,在这里就不多作介绍了。这里需要着重介绍我们的Callback class:
public class SessionCallback : ISessionCallback
{
#region ISessionCallback Members
public TimeSpan Renew()
{
return SessionUtility.Timeout - (DateTime.Now - SessionUtility.LastActivityTime);
}
public void OnSessionKilled(SessionInfo sessionInfo)
{
MessageBox.Show("The current session has been killed!", sessionInfo.SessionID.ToString(), MessageBoxButtons.OK, MessageBoxIcon.Information);
Application.Exit();
}
public void OnSessionTimeout(SessionInfo sessionInfo)
{
MessageBox.Show("The current session timeout!", sessionInfo.SessionID.ToString(), MessageBoxButtons.OK, MessageBoxIcon.Information);
Application.Exit();
}
#endregion
}
Renew()方法根据Timeout 和LastActivityTime计算出需要对该session延长的时间;OnSessionKilled和OnSessionTimeout在通过MessageBox显示相应的message后将程序退出。
我们简单简单一下本例子提供的client application。具有一个Form。我们把所有的功能集中在该Form中:开始一个新session、获得所有的活动的session列表、强行中止一个或多个Session。
这是StartSession按钮的click event handler:
private void buttonStartSession_Click(object sender, EventArgs e)
{
string hostName = Dns.GetHostName();
IPAddress[] ipAddressList = Dns.GetHostEntry(hostName).AddressList;
string ipAddress = string.Empty;
foreach (IPAddress address in ipAddressList)
{
if (address.AddressFamily == AddressFamily.InterNetwork)
{
ipAddress += address.ToString() + ";";
}
}
ipAddress = ipAddress.TrimEnd(";".ToCharArray());
string userName = this.textBoxUserName.Text.Trim();
if (string.IsNullOrEmpty(userName))
{
return;
}
SessionClientInfo clientInfo = new SessionClientInfo() { IPAddress = ipAddress, HostName = hostName, UserName = userName };
SessionUtility.StartSession(clientInfo);
this.groupBox2.Enabled = false;
}
获得当前PC的主机名称和IP地址,连同输入的user name创建SessionClientInfo 对象,调用SessionUtility的StartSession开始新的Session。
“Get All Active Session”,获取当前所有的活动的session,绑定到Datagrid:
private void buttonGet_Click(object sender, EventArgs e)
{
IList<SessionInfo> activeSessions = SessionUtility.GetActiveSessions();
this.dataGridViewSessionList.DataSource = activeSessions;
foreach (DataGridViewRow row in this.dataGridViewSessionList.Rows)
{
Guid sessionID = (Guid)row.Cells["SessionID"].Value;
row.Cells["IPAddress"].Value = activeSessions.Where(session=> session.SessionID == sessionID).ToList<SessionInfo>()[0].ClientInfo.IPAddress;
row.Cells["UserName"].Value = activeSessions.Where(session => session.SessionID == sessionID).ToList<SessionInfo>()[0].ClientInfo.UserName;
}
}
“Kill Selected Session”按钮被点击,强行中止选中的Session:
private void buttonKill_Click(object sender, EventArgs e)
{
IList<Guid> sessionIDs = new List<Guid>();
foreach ( DataGridViewRow row in this.dataGridViewSessionList.Rows)
{
if ((string)row.Cells["Select"].Value == "1")
{
Guid sessionID = new Guid(row.Cells["SessionID"].Value.ToString());
if (sessionID == SessionUtility.SessionID)
{
MessageBox.Show("You cannot kill your current session!", "Error", MessageBoxButtons.OK, MessageBoxIcon.Error);
return;
}
sessionIDs.Add(sessionID);
}
}
SessionUtility.KillSessions(sessionIDs);
}
由于不能中止自己当前的Session,所以当选中的列表中包含自己的SessionID,会显示一个messagebox提示不应该杀掉属于自己session。
到这里,实际上还有一件重要的事情没有解决,那就是如何动态修正SessionUtility.LastActivityTime。我们希望的事SessionUtility.LastActivityTime能够真正反映最后一次用户交互的时间。为此我们递归地注册每个control的MouseMove事件:
private void RegisterMouseMoveEvent(Control control)
{
control.MouseHover += delegate
{
SessionUtility.LastActivityTime = DateTime.Now;
};
foreach (Control child in control.Controls)
{
this.RegisterMouseMoveEvent(child);
}
}
private void FormSessionManagement_Load(object sender, EventArgs e)
{
this.dataGridViewSessionList.AutoGenerateColumns = false;
this.RegisterMouseMoveEvent(this);
}
如何你运行我们程序,输入user name开始session后,如果在30s内没有任何鼠标操作,下面的MessageBox将会弹出,当你点击OK按钮,程序会退出。![image_thumb[1] image_thumb[1]](http://images.cnblogs.com/cnblogs_com/artech/WindowsLiveWriter/WCF9WCFSessionPartII_14F05/image_thumb%5B1%5D_3dd53a63-c7ea-403e-ac66-0ae7c65cb763.png)
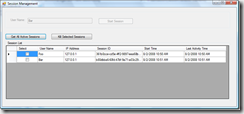
如何你同时开启多个client端程序,点击“Kill Selected Session”按钮,将会列出所有的Active session,就象我们在上面的截图所示的一样。你可以选择某个session,然后通过点击“Kill selected sessions”按钮强行中止它。通过另一个client application将马上得到反馈:弹出下面一个MessageBox。当你点击OK按钮,程序会退出
WCF后续之旅:
[原创]WCF后续之旅(1): WCF是如何通过Binding进行通信的
[原创]WCF后续之旅(2): 如何对Channel Layer进行扩展——创建自定义Channel
[原创]WCF后续之旅(3): WCF Service Mode Layer 的中枢—Dispatcher
[原创]WCF后续之旅(4):WCF Extension Point 概览
[原创]WCF后续之旅(5): 通过WCF Extension实现Localization
[原创]WCF后续之旅(6): 通过WCF Extension实现Context信息的传递
[原创]WCF后续之旅(7):通过WCF Extension实现和Enterprise Library Unity Container的集成
[原创]WCF后续之旅(8):通过WCF Extension 实现与MS Enterprise Library Policy Injection Application Block 的集成
[原创]WCF后续之旅(9):通过WCF的双向通信实现Session管理[Part I]
[原创]WCF后续之旅(9): 通过WCF双向通信实现Session管理[Part II]
[原创]WCF后续之旅(10): 通过WCF Extension实现以对象池的方式创建Service Instance
我的WCF之旅:
[原创]我的WCF之旅(1):创建一个简单的WCF程序
[原创]我的WCF之旅(2):Endpoint Overview
[原创]我的WCF之旅(3):在WCF中实现双向通信(Bi-directional Communication)
[原创]我的WCF之旅(4):WCF中的序列化(Serialization)- Part I
[原创]我的WCF之旅(4):WCF中的序列化(Serialization)- Part II
[原创]我的WCF之旅(5):Service Contract中的重载(Overloading)
[原创]我的WCF之旅(6):在Winform Application中调用Duplex Service出现TimeoutException的原因和解决方案
[原创]我的WCF之旅(7):面向服务架构(SOA)和面向对象编程(OOP)的结合——如何实现Service Contract的继承
[原创]我的WCF之旅(8):WCF中的Session和Instancing Management
[原创]我的WCF之旅(9):如何在WCF中使用tcpTrace来进行Soap Trace
[原创]我的WCF之旅(10): 如何在WCF进行Exception Handling
[原创]我的WCF之旅(11):再谈WCF的双向通讯-基于Http的双向通讯 V.S. 基于TCP的双向通讯
[原创]我的WCF之旅(12):使用MSMQ进行Reliable Messaging
[原创]我的WCF之旅(13):创建基于MSMQ的Responsive Service


![image_thumb[5] image_thumb[5]](http://images.cnblogs.com/cnblogs_com/artech/WindowsLiveWriter/WCF9WCFSessionPartII_14F05/image_thumb%5B5%5D_191f6ed4-c620-449d-94a8-7ef20b338ac0.png)


 1223
1223


 被折叠的 条评论
为什么被折叠?


