这篇文章是我找关于如何将Strust2的拦截器配置到Spring中管理是看到的,觉得受益匪浅,转过来同大家一起分享
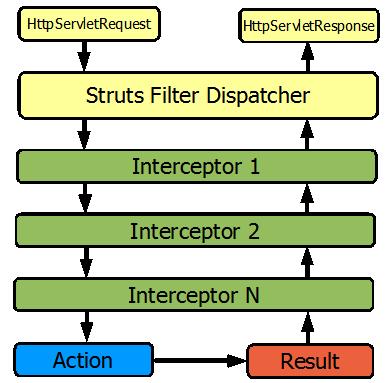
Apache Struts 作为最成功的 MVC Web 框架早已得到了广泛的应用,但是其自身也暴露出不少缺点,从而引出了 Struts 2 。 Struts 2 摒弃了原来 Struts 1 的设计, 而是转向了 webwork2,并结合 Struts 已有的优点,试图打造出一个集众家所长的完美 Web 框架。 Struts 2 因此也具备 webwork2 中的一个非常重要的特性 - 拦截器 (Interceptor) 。拦截器会在 Action 执行之前和之后被执行(如下图),是一种典型 AOP 实现。
图 1. Struts 2 的体系结构
Struts 2 本身提供了一个 org.apache.struts2.interceptor.RolesInterceptor 拦截器以方便开发人员来实现存取控制。但该拦截器的实现是建立在 J2EE 容器提供的存取控制机制之上的。容器提供的存取控制实现粒度较粗,往往无法满足多数应用的需求。在许多项目中,用户所应该具有的权限是由多种因素而决定,往往在不同的上下文中拥有不同的角色。例如在一个社交项目中,一个用户会在不同的社团里拥有不同的角色,如成员,管理员,来宾等。他的具体角色取决于当前所处社团的标识符。另外,用户的角色还和他所要操作的资源类型有关。比如,在这个社交站点中,用户可以创建自己的日程表,把这个日程表共享给其他用户或者委托给其他人管理。这样对日程表这种类型资源,就会有创建者,阅览者和管理者三种角色。在更复杂应用中,用户的角色可能还会受更多因素决定,这就要求存取控制要有更细的粒度,能够处理更加复杂的逻辑。
为了满足这个需求,在基于 Struts 2 的 Web 应用开发中,我们也可以利用拦截器来实现一个应用托管的基于角色的存取控制(RBAC, Role-Based Access Control)系统, 让其能够管理更细粒度的资源。该系统在 Struts 2 的配置文件中定义 Action 可以由那些角色来调用,即对角色进行授权。拦截器在 Action 调用之前,对当前用户进行权限认证来决定 Action 是否应该被执行。
下面我们就基于 Hibernate+Spring+Struts2 框架来完成这个系统的实现。为了使系统结构更加清晰易于维护,我们将这个系统分为域模型层、持久层和服务层来实现。这种分层结构是目前 Web 开发广为使用的一种模式。
模型层实现
这系统中我们只需要一个实体 UserRole, 用来定义用户在不同的上下文中所具有的角色。在清单中,我们使用了 Java Persistence API (Hibernate 从 3.2 开始已经开始支持 JPA)中提供的 JDK 5.0 注解来对模型到数据库表之间的映射进行定义。
清单 1.
 @Entity

 public class UserRole {

  private Long id;

  private User user;

  private String objectType;

  private Long objectId;

  private String role;

  public UserRole(Long userId, String role, String objectType, Long objectId) {

    User user = new User();

    user.setId(userId);

    this.user = user;

    this.role = role;

    this.objectType = objectType;

    this.objectId = objectId;

  }

  @Id

  @GeneratedValue(strategy = GenerationType.AUTO)

  public Long getId() {

    return id;

  }

  public void setId(Long id) {

    this.id = id;

  }

  @ManyToOne

  @JoinColumn(name = "userId", nullable = false)

  public User getUser() {

    return user;

  }

  public void setUser(User user) {

    this.user = user;

  }

  public String getObjectType() {

    return objectType;

  }

  public void setObjectType(String objectType) {

    this.objectType = objectType;

  }

  public Long getObjectId() {

    return objectId;

  }

  public void setObjectId(Long objectId) {

    this.objectId = objectId;

  }

  public String getRole() {

    return role;

  }

  public void setRole(String role) {

    this.role = role;

  }

} |
注意这里边有两个比较特殊的字段 objectType 和 objectId ,它们用来表明用户在具体哪个资源上拥有的角色。 objectType 指资源的类型,objectId 指资源的标识。比如我们要将用户 Mike 加为某个日程表的管理员,则表中新增记录的 user 字段为 Mike 在 user 表中的 ID,objectType 为“calendar”,objectID 为这个日程表 ID,role 为角色的名字“admin”。当然,如果您的应用中不同类型资源都使用唯一的全局 ID,objectType 这个字段也可以省略。
DAO 层实现
代码清单 2 定义了对 UserRole 进行 CRUD 的 DAO 接口,代码清单 3 则是它的实现。通过 @PersistenceContext 注解来让容器注入 JPA 中的实体管理器 EntityManager 。 UserRoleDaoImpl 调用 EntityManager 来对 UserRole 进行持久化到数据库中。
清单 2
public interface UserRoleDao {

 public void create(UserRole userRole);

 public void update(UserRole userRole);

 public UserRole find(Long userId, String objectType, Long objectId);

} |
清单 3
public class UserRoleDaoImpl implements UserRoleDao {

  private EntityManager entityManager;

  public EntityManager getEntityManager() {

    return entityManager;

  }


  @PersistenceContext

  public void setEntityManager(EntityManager entityManager) {

    this.entityManager = entityManager;

  }


  public void create(UserRole userRole) {

    entityManager.persist(userRole);

  }


  public UserRole find(Long userId, String objectType, Long objectId) {

    Query query = entityManager.createQuery(

      "FROM UserRole ur WHERE ur.user.id=" +

      userId +

      " AND ur.objectType='" +

      objectType +

      "' AND ur.objectId=" +

      objectId);

    List result = query.getResultList();

    if (result.size() == 0)

      return null;

    return (UserRole)result.get(0);

  }


  public void update(UserRole userRole) {

    entityManager.merge(userRole);

  }

} |
服务层实现
创建一个 RoleService 接口 (清单 4) 作为 façade, 清单 5 是具体实现。 RoleServiceImpl 的实现很简单,主要是封装了为用户分配角色和查询用户角色。注解 Transactional 用来将方法放置在一个事务中进行。在类声明上的 @Transactional(readOnly = true) 表示默认的事务为只读。 setUserRole 方法需要写入数据到数据库中,因此我们将其 readOnly 属性设置成 false.
清单 4
public interface RoleService {

    public void setUserRole(Long userId, String role, String objectType, Long objectId);

    public String findRole(Long userId, String objectType, Long objectId);

} |
清单 5
@Transactional(readOnly = true)

 public class RoleServiceImpl implements RoleService {


 private UserRoleDao userRoleDao;


 public void setUserRoleDao(UserRoleDao userRoleDao) {

    this.userRoleDao = userRoleDao;

 }


  @Transactional(readOnly = false)

  public void setUserRole(Long userId, String role, String objectType, Long objectId) {

    UserRole userRole = new UserRole(userId, role, objectType, objectId);

    UserRole userRoleInDB = userRoleDao.find(userId, objectType, objectId);

    if (null == userRoleInDB) {

      userRoleDao.create(userRole);

    } else {

      userRole.setId(userRoleInDB.getId());

      userRoleDao.update(userRole);

    }

  }


  public String findRole(Long userId, String objectType, Long objectId) {

    UserRole userRole = userRoleDao.find(userId, objectType, objectId);

    if (userRole == null) {

      return null;

    }

    return userRole.getRole();

  }

} |
拦截器的实现
拦截器会在 Action 被执行之前被 Struts 2 框架所调用,我们利用这个特性来完成对用户身份的认证,只有用户具有正确角色方能执行 Action 。具体哪些角色可以执行 Action,需要在 Struts 2 的配置文件中指定,将在下一小节中详细阐述。这一点和 Struts 2 内置的 RolesInterceptor 类似,但我们的拦截器可以通过 objectType 和 objectId 来实现更加细粒度的认证。
要创建一个用于用户角色认证的拦截器。需要让其实现 com.opensymphony.xwork2.interceptor.Interceptor 接口并对 String intercept(ActionInvocation actionInvocation) throws Exception 方法进行实现。 如清单 6 。成员变量 roleService 是通过 Spring 的依赖注入被赋予 RoleServiceImpl 。 allowedRoles 和 disallowedRoles 分别存储了允许和不允许执行 Action 的角色,两者不能同时存在。 objectType 和 objectIdKey 分别表示资源的类型和资源 ID 在 HTTP 请求中的参数名。它们是做为 Interceptor 的参数在 Struts 2 配置文件中进行设置,会自动由 Struts 2 框架填充进来。
清单 6
public class RBACInterceptor implements Interceptor {

   public static final String FORBIDDEN = "forbidden";

   private List<String> allowedRoles = new ArrayList<String>();

   private List<String> disallowedRoles = new ArrayList<String>();

   private RoleService roleService;

   private String objectType;

   private String objectIdKey;


   public void setRoleService(RoleService roleService) {

  this.roleService = roleService;

   }


   public void setObjectType(String objectType) {

    this.objectType = objectType;

  }

  public void setObjectIdKey(String objectIdKey) {

    this.objectIdKey = objectIdKey;

  }


  public void setAllowedRoles(String roles) {

    if (roles != null)

      allowedRoles = Arrays.asList(roles.split("[ ]*,[ ]*"));

  }


  public void setDisallowedRoles(String roles) {

    if (roles != null)

      disallowedRoles = Arrays.asList(roles.split("[ ]*,[ ]*"));

  }


  public void init() {

  }


  public void destroy() {

  }


  public String intercept(ActionInvocation actionInvocation) throws Exception {

    HttpServletRequest request = ServletActionContext.getRequest();

    // Get object id

    Long objectId = Long.valueOf(request.getParameter(objectIdKey));

    Map session = actionInvocation.getInvocationContext().getSession();

    // Get current user id

    Long userId = (Long) session.get(Constant.KEY_CURRENT_USER);

    // Get the user role

    String userRole = roleService.findRole(userId, objectType, objectId);


    if (!isAllowed(userRole)) {

      // forbid invoking the action

      return FORBIDDEN;

    } else {

      // allow invoking the action

      return actionInvocation.invoke();

    }

  }


  // Check if the current user has correct role to invoke the action

  protected boolean isAllowed(String userRole) {

    if (allowedRoles.size() > 0) {

      if (userRole == null)

        return false;

      return allowedRoles.contains(userRole);

    } else if (disallowedRoles.size() > 0) {

      if (userRole == null)

        return true;

      return !disallowedRoles.contains(userRole);

    }

    return true;

  }

} |
在 intercept 方法中我们根据当前用户的 ID,HTTP 请求参数中获得资源的 ID,所存取的资源类型来调用 RoleService 获得用户的角色。 然后再判断该角色是否在 allowedRoles 和 disallowedRoles 中来确定用户是否有权限调用 Action 。如果用户没权限,则将请求发送到名为“forbidden”的 result 。从这里可以看出,用户的角色验证与身份验证的作用完全不同。身份验证是验证用户是否网站注册用户,而角色认证是在用户为注册用户的前提下对用户相对于站内各种资源扮演的角色的辨别。
上面代码中用到了判断用户是否具有运行 Action 所要求的角色的函数 isAllowed() 。它首先根据用户 ID 和 Action 作用于的对象的类型和 ID 从数据库查询到用户对应的角色,然后将用户角色与允许角色的列表逐个比较。如果允许角色列表包含用户实际角色则返回真,否则返回假;如果允许角色列表为空,则将用户角色与禁止角色的列表比较,如果用户的角色被禁止,则返回假,否则返回真。如果两个列表都为空,也返回真。这样既可以对某个 Action 配置允许访问角色列表,也可以配置拒绝访问列表。
使用
首先我需要在 Spring 的配置文件中添加系统中所涉及到各个 POJO,如清单 7 。
清单 7
<!-- Data Access Objects -->

  <bean id="userRoleDao" class="com.sample.security.dao.impl.UserRoleDaoImpl"/>


  <!-- Service Objects -->

  <bean id="roleService"

    class="com. sample.security.service.impl.RoleServiceImpl" >

    <property name="userRoleDao" ref="userRoleDao" />

  </bean>


  <!-- Interceptor Objects -->

  <bean id="RBACInterceptor" scope="prototype"

    class="com. sample.security.interceptor. RBACInterceptor ">

    <property name="roleService"  ref="roleService" />

</bean> |
然后需要在 Struts 配置文件中对需要进行存取控制的 Action 进行配置。首先定义我们实现的拦截器,并把其加到拦截器栈中。在 <interceptors> …… </interceptors> 中添加下面的代码。
<interceptor name="RBAC ” class="RBACInterceptor" /> |
现在我们可以将 RBAC 拦截器添加到任意的 interceptor-stack 中,或者直接配置到任意的 Action 。添加下面清单中的内容到 Struts 2 配置文件中,将能够对在一个日程表中删除会议进行控制。
清单 8
<action name="deleteMeeting" class="com.demo.action.DeleteMeetingAction">

 <result>/WEB-INF/jsp/deleteMeetingResult.jsp</result>

 <result name="forbidden">/WEB-INF/jsp/forbidden.jsp</result>

    <interceptor-ref name="RBAC">

        <param name="allowedRoles">admin, owner</param>

        <param name="objectType">calendar</param>

 <param name="objectIdKey">id</param>

 </interceptor-ref>

 <interceptor-ref name="defaultStack" />

</action> |
至于用户角色的分配,我们可以定义一个 Action 通过 RoleService 来创建。如下面清单 9 的配置和清单 10 的代码实现了一个 Action 允许日程表的创建者来分配角色给其它人。
清单 9
<action name="assignCalendarRole" class="com.demo.action.AssignCalendarRoleAction">

 <result>/WEB-INF/jsp/deleteMeetingResult.jsp</result>

 <result name="forbidden">/WEB-INF/jsp/forbidden.jsp</result>

    <interceptor-ref name="RBAC">

        <param name="allowedRoles">owner</param>

        <param name="objectType">calendar</param>

 <param name="objectIdKey">id</param>

 </interceptor-ref>

 <interceptor-ref name="defaultStack" />

</action> |
清单 10
public class AssignCalendarRoleAction extends ActionSupport {

  private RoleService roleService;

  private Long userId = 0;

  private String userRole = "reader";

 private Long id = 0;


  public AssignCalendarRoleAction (RoleService roleService) {

    this.roleService = roleService;

  }


 public String execute() {

 roleService.setUserRole(userId, userRole, "calendar", id);

 return SUCCESS;

  }

} |


 3865
3865


 被折叠的 条评论
为什么被折叠?
被折叠的 条评论
为什么被折叠?
 到【灌水乐园】发言


