


个人觉得最好还是不要再pom.xml中写入关于maven-jetty-plugin的信息,这个应该是和项目无关的。只需在eclipse设置变量即可。
Maven2代比1代改进很多,其中主要强调的是--它不仅仅是个依赖包管理器!
开始先要推荐一个专讲Maven2的电子书给大家,对MAVEN学习相当有助益:Better Builds with Maven
下面就专门介绍下Maven2对WEBAPP在管理和调试方面的支持。
1.创建项目
mvn archetype:create -DgroupId=com.mycompany.app -DartifactId=my-webapp -DarchetypeArtifactId=maven-archetype-webapp
也可参看这里
创建要注意遵循MAVEN的目录结构,尤其要注意源文件要放在main/java下:
2. POM文件的配置
这里要特别注意对resource一节的配置,因为我的SPRING以及WEB相关的XML是放在WEB-INF目录,为了在unit test的时候也能用,加入了对这些配置文件的引用。相当于加了一个classpath。
这里还有个插曲:不知为何MAVEN2里没有JTA的包,自动下载时会有提示教你如何手工通过命令加入,非常简单。
JETTY的plugin是为后面用它来调试做准备。
DWR也是目前WEB开发一个热选。
另外,为使用JAVA5代来编译,加入了maven-compiler-plugin一节。
 <
project
xmlns
="http://maven.apache.org/POM/4.0.0"
xmlns:xsi
="http://www.w3.org/2001/XMLSchema-instance"
xsi:schemaLocation
="http://maven.apache.org/POM/4.0.0 http://maven.apache.org/maven-v4_0_0.xsd"
>
<
modelVersion
>
4.0.0
</
modelVersion
>
<
groupId
>
com.exchangebit.nms
</
groupId
>
<
artifactId
>
ebnms
</
artifactId
>
<
packaging
>
war
</
packaging
>
<
version
>
1.0-SNAPSHOT
</
version
>
<
name
>
ebnms Maven Webapp
</
name
>
<
url
>
http://maven.apache.org
</
url
>
<
build
>
<
finalName
>
ebnms
</
finalName
>
<
resources
>
<
resource
>
<
directory
>
src/main/java
</
directory
>
<
includes
>
<
include
>
**/*.xml
</
include
>
</
includes
>
</
resource
>
<
resource
>
<
directory
>
src/main/webapp/WEB-INF
</
directory
>
<
includes
>
<
include
>
**/*.xml
</
include
>
<
include
>
**/log4j.properties
</
include
>
</
includes
>
</
resource
>
</
resources
>
<
plugins
>
<
plugin
>
<
groupId
>
org.apache.maven.plugins
</
groupId
>
<
artifactId
>
maven-compiler-plugin
</
artifactId
>
<
configuration
>
<
source
>
1.5
</
source
>
<
target
>
1.5
</
target
>
</
configuration
>
</
plugin
>
<
plugin
>
<
groupId
>
org.mortbay.jetty
</
groupId
>
<
artifactId
>
maven-jetty-plugin
</
artifactId
>
</
plugin
>
</
plugins
>
</
build
>
<
dependencies
>
<
dependency
>
<
groupId
>
junit
</
groupId
>
<
artifactId
>
junit
</
artifactId
>
<
version
>
3.8.1
</
version
>
<
scope
>
test
</
scope
>
</
dependency
>
<
dependency
>
<
groupId
>
org.hibernate
</
groupId
>
<
artifactId
>
hibernate
</
artifactId
>
<
version
>
3.1
</
version
>
</
dependency
>
<
dependency
>
<
groupId
>
log4j
</
groupId
>
<
artifactId
>
log4j
</
artifactId
>
<
version
>
1.2.11
</
version
>
</
dependency
>
<
dependency
>
<
groupId
>
mysql
</
groupId
>
<
artifactId
>
mysql-connector-java
</
artifactId
>
<
version
>
3.1.11
</
version
>
<
scope
>
runtime
</
scope
>
</
dependency
>
<
dependency
>
<
groupId
>
javax.servlet
</
groupId
>
<
artifactId
>
servlet-api
</
artifactId
>
<
version
>
2.4
</
version
>
<
scope
>
provided
</
scope
>
</
dependency
>
<
dependency
>
<
groupId
>
javax.servlet
</
groupId
>
<
artifactId
>
jstl
</
artifactId
>
<
version
>
1.1.2
</
version
>
<
scope
>
runtime
</
scope
>
</
dependency
>
<
dependency
>
<
groupId
>
taglibs
</
groupId
>
<
artifactId
>
standard
</
artifactId
>
<
version
>
1.1.2
</
version
>
<
scope
>
runtime
</
scope
>
</
dependency
>
<
dependency
>
<
groupId
>
org.springframework
</
groupId
>
<
artifactId
>
spring
</
artifactId
>
<
version
>
1.2.6
</
version
>
</
dependency
>
<
dependency
>
<
groupId
>
dwr
</
groupId
>
<
artifactId
>
dwr
</
artifactId
>
<
version
>
1.1.3
</
version
>
</
dependency
>
</
dependencies
>
</
project
>
<
project
xmlns
="http://maven.apache.org/POM/4.0.0"
xmlns:xsi
="http://www.w3.org/2001/XMLSchema-instance"
xsi:schemaLocation
="http://maven.apache.org/POM/4.0.0 http://maven.apache.org/maven-v4_0_0.xsd"
>
<
modelVersion
>
4.0.0
</
modelVersion
>
<
groupId
>
com.exchangebit.nms
</
groupId
>
<
artifactId
>
ebnms
</
artifactId
>
<
packaging
>
war
</
packaging
>
<
version
>
1.0-SNAPSHOT
</
version
>
<
name
>
ebnms Maven Webapp
</
name
>
<
url
>
http://maven.apache.org
</
url
>
<
build
>
<
finalName
>
ebnms
</
finalName
>
<
resources
>
<
resource
>
<
directory
>
src/main/java
</
directory
>
<
includes
>
<
include
>
**/*.xml
</
include
>
</
includes
>
</
resource
>
<
resource
>
<
directory
>
src/main/webapp/WEB-INF
</
directory
>
<
includes
>
<
include
>
**/*.xml
</
include
>
<
include
>
**/log4j.properties
</
include
>
</
includes
>
</
resource
>
</
resources
>
<
plugins
>
<
plugin
>
<
groupId
>
org.apache.maven.plugins
</
groupId
>
<
artifactId
>
maven-compiler-plugin
</
artifactId
>
<
configuration
>
<
source
>
1.5
</
source
>
<
target
>
1.5
</
target
>
</
configuration
>
</
plugin
>
<
plugin
>
<
groupId
>
org.mortbay.jetty
</
groupId
>
<
artifactId
>
maven-jetty-plugin
</
artifactId
>
</
plugin
>
</
plugins
>
</
build
>
<
dependencies
>
<
dependency
>
<
groupId
>
junit
</
groupId
>
<
artifactId
>
junit
</
artifactId
>
<
version
>
3.8.1
</
version
>
<
scope
>
test
</
scope
>
</
dependency
>
<
dependency
>
<
groupId
>
org.hibernate
</
groupId
>
<
artifactId
>
hibernate
</
artifactId
>
<
version
>
3.1
</
version
>
</
dependency
>
<
dependency
>
<
groupId
>
log4j
</
groupId
>
<
artifactId
>
log4j
</
artifactId
>
<
version
>
1.2.11
</
version
>
</
dependency
>
<
dependency
>
<
groupId
>
mysql
</
groupId
>
<
artifactId
>
mysql-connector-java
</
artifactId
>
<
version
>
3.1.11
</
version
>
<
scope
>
runtime
</
scope
>
</
dependency
>
<
dependency
>
<
groupId
>
javax.servlet
</
groupId
>
<
artifactId
>
servlet-api
</
artifactId
>
<
version
>
2.4
</
version
>
<
scope
>
provided
</
scope
>
</
dependency
>
<
dependency
>
<
groupId
>
javax.servlet
</
groupId
>
<
artifactId
>
jstl
</
artifactId
>
<
version
>
1.1.2
</
version
>
<
scope
>
runtime
</
scope
>
</
dependency
>
<
dependency
>
<
groupId
>
taglibs
</
groupId
>
<
artifactId
>
standard
</
artifactId
>
<
version
>
1.1.2
</
version
>
<
scope
>
runtime
</
scope
>
</
dependency
>
<
dependency
>
<
groupId
>
org.springframework
</
groupId
>
<
artifactId
>
spring
</
artifactId
>
<
version
>
1.2.6
</
version
>
</
dependency
>
<
dependency
>
<
groupId
>
dwr
</
groupId
>
<
artifactId
>
dwr
</
artifactId
>
<
version
>
1.1.3
</
version
>
</
dependency
>
</
dependencies
>
</
project
>
代码放入/main/java后,可以在项目目录下执行:
mvn compile来做编译尝试,
也可以用mvn war直接生成打包文件,
当然最后可以用 mvn jetty:run来运行你的WEBAPP!
3. 在Eclipse中配置jetty进行调试
要把之前的项目导入Eclipse首先让maven为我们生成Eclipse工程文件,执行:
mvn eclipse:eclipse
再把M2_REPO加入到Eclipse的classpath中,有两种方法,其中的b)方法是有效的:
a) mvn -Declipse.workspace=<path-to-eclipse-workspace> eclipse:add-maven-repo
b) Window > Preferences. Select the Java > Build Path > Classpath Variables page
之后,就可以通过Eclipse的File->Import功能将工程导入。
有人为了使用WEBAPP开发功能,而装象MYECLIPSE这样的巨物。有了JETTY,通过轻松配置就可以实现比TOMCAT更快更便捷的容器,所以在调试时强力推荐这个东东。下面就来看下如何配置。
先下配置一个外部工具,来运行JETTY:
选择菜单Run->External Tools->External Tools ...在左边选择Program,再点New:
配置Location为mvn完整命令行。
选择Working Directory为本项目。
Arguments填写:jetty:run org.mortbay.jetty:maven-jetty-plugin:run
再点选Enviroment页:加入MAVEN_OPTS变量,值为:
-Xdebug -Xnoagent -Djava.compiler=NONE -Xrunjdwp:transport=dt_socket,address=4000,server=y,suspend=y
其中,如果suspend=n 表示不调试,直接运行。
然后,点APPLY,再关闭本对话框。
另外注意一点,好像external tool菜单项在java browering的perspective下才会出现。如果在java下看不见,可以切换下试试。
下面新建运行配置:
点选run->debug...
选中左树中的Remote Java Application,再点New。
选择你的项目,关键是要填和之前设置外部工具时相同的端口号。
配置就完成了,正面开始调试运行:
首先要把JETTY运行起来(有点象TOMCAT里的运行APPSERVER),从Run->External Tools中选择之前配置的外部工具运行,这时LOG里会显示:
listening at port 4000字样,
再选择Run->Debug选择我们刚建的运行配置,这时程序就RUN起来了,可以通过WEB进行访问,设置断点调试了。
============================================================================
适用于6.1.3以上,包括6.1.5的JETTY。
它主要是利用了JDK的代码自动更换性能(code hot replace),可以不用重启JETTY就调试、更换资源文件。注意:一定是DEBUG方式运行才有这项功能。
所以应该说这篇文章的方法更好:
在Run->Debug中,New一个Java Application的配置,填入:
org.mortbay.xml.XmlConfiguration
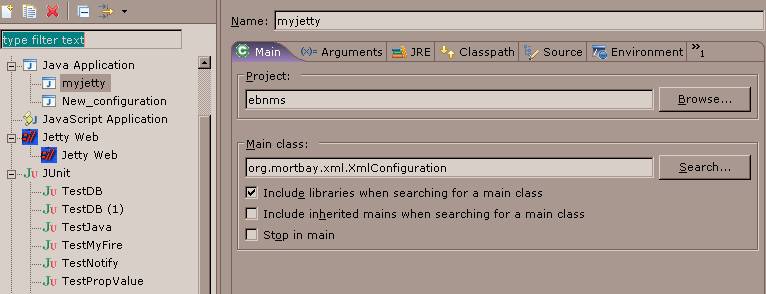
参数填入一个自己的JETTY配置文件:

完成的myjetty.xml配置文件,请将其中的相应目录修改成自己项目的目录:
<?
xml version="1.0"
?>
<!
DOCTYPE Configure PUBLIC "-//Mort Bay Consulting//DTD Configure//EN" "http://jetty.mortbay.org/configure.dtd"
>
<!--
===============================================================
-->
<!--
Configure the Jetty Server
-->
<!--
-->
<!--
Documentation of this file format can be found at:
-->
<!--
http://docs.codehaus.org/display/JETTY/jetty.xml
-->
<!--
-->
<!--
===============================================================
-->
<
Configure
id
="Server"
class
="org.mortbay.jetty.Server"
>
<!--
===========================================================
-->
<!--
Server Thread Pool
-->
<!--
===========================================================
-->
<
Set
name
="ThreadPool"
>
<!--
Default bounded blocking threadpool
-->
<
New
class
="org.mortbay.thread.BoundedThreadPool"
>
<
Set
name
="minThreads"
>
10
</
Set
>
<
Set
name
="maxThreads"
>
250
</
Set
>
<
Set
name
="lowThreads"
>
25
</
Set
>
</
New
>
<!--
Optional Java 5 bounded threadpool with job queue <New class="org.mortbay.thread.concurrent.ThreadPool"> <Set name="corePoolSize">250</Set> <Set name="maximumPoolSize">250</Set> </New>
-->
</
Set
>
<!--
===========================================================
-->
<!--
Set connectors
-->
<!--
===========================================================
-->
<!--
One of each type!
-->
<!--
===========================================================
-->
<!--
Use this connector for many frequently idle connections and for threadless continuations.
-->
<
Call
name
="addConnector"
>
<
Arg
>
<
New
class
="org.mortbay.jetty.nio.SelectChannelConnector"
>
<
Set
name
="port"
><
SystemProperty
name
="jetty.port"
default
="8080"
/></
Set
>
<
Set
name
="maxIdleTime"
>
30000
</
Set
>
<
Set
name
="Acceptors"
>
2
</
Set
>
<
Set
name
="statsOn"
>
false
</


 7288
7288

 被折叠的 条评论
为什么被折叠?
被折叠的 条评论
为什么被折叠?
 到【灌水乐园】发言


