


Struts包介绍
| 包名 | 说明 |
| org.apache.struts2. components | 该包封装视图组件, Struts2在视图组件上有了很大加强,不仅增加了组件的属性个数,更新增了几个非常有用的组件,如 updownselect、 doubleselect、 datetimepicker、 token、 tree等。 另外, Struts2可视化视图组件开始支持主题 (theme),缺省情况下,使用自带的缺省主题,如果要自定义页面效果,需要将组件的 theme属性设置为 simple。 |
| org.apache.struts2. config | 该包定义与配置相关的接口和类。实际上,工程中的 xml和 properties文件的读取和解析都是由 WebWork完成的, Struts只做了少量的工作。 |
| org.apache.struts2.dispatcher | Struts2的核心包,最重要的类都放在该包中。 |
| org.apache.struts2.impl | 该包只定义了 3个类,他们是 StrutsActionProxy、 StrutsActionProxyFactory、 StrutsObjectFactory,这三个类都是对 xwork的扩展。 |
| org.apache.struts2.interceptor | 定义内置的截拦器。 |
| org.apache.struts2.util | 实用包。 |
| org.apache.struts2.validators | 只定义了一个类: DWRValidator。 |
| org.apache.struts2.views | 提供 freemarker、 jsp、 velocity等不同类型的页面呈现。 |
下表是对一些重要类的说明:
| 类名 | 说明 |
| org.apache.struts2.dispatcher. Dispatcher | 该类有两个作用: 1、初始化 2、调用指定的 Action的 execute()方法。 |
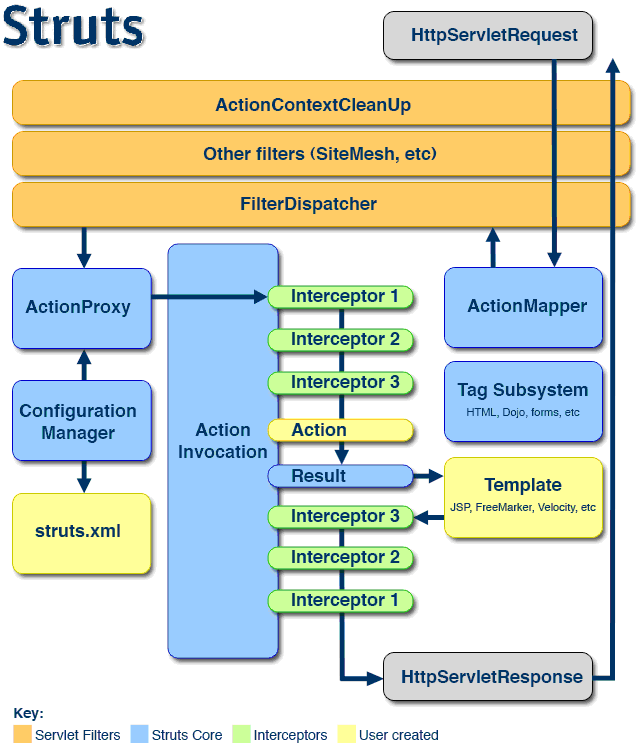
| org.apache.struts2.dispatcher. FilterDispatcher | 这是一个过滤器。文档中已明确说明,如果没有经验,配置时请将 url-pattern的值设成 /*。 该类有四个作用: 1、执行 Action 2、清理 ActionContext,避免内存泄漏 3、处理静态内容( Serving static content) 4、为请求启动 xwork’s的截拦器链。 |
| com.opensymphony.xwork2. ActionProxy | Action的代理接口。 |
| com.opensymphony.xwork2. ctionProxyFactory | 生产 ActionProxy的工厂。 |
| com.opensymphony.xwork2.ActionInvocation | 负责调用 Action和截拦器。 |
| com.opensymphony.xwork2.config.providers. XmlConfigurationProvider | 负责 Struts2的配置文件的解析。 |
- public void init() {
- if (configurationManager == null ) {
- configurationManager = new ConfigurationManager(BeanSelectionProvider.DEFAULT_BEAN_NAME);
- }
- init_DefaultProperties(); // [1]
- init_TraditionalXmlConfigurations(); // [2]
- init_LegacyStrutsProperties(); // [3]
- init_ZeroConfiguration(); // [4]
- init_CustomConfigurationProviders(); // [5]
- init_MethodConfigurationProvider();
- init_FilterInitParameters() ; // [6]
- init_AliasStandardObjects() ; // [7]
- Container container = init_PreloadConfiguration();
- init_CheckConfigurationReloading(container);
- init_CheckWebLogicWorkaround(container);
- }
- private void init_DefaultProperties() {
- configurationManager.addConfigurationProvider( new DefaultPropertiesProvider());
- }
- //DefaultPropertiesProvider
- public void register(ContainerBuilder builder, LocatableProperties props)
- throws ConfigurationException {
- Settings defaultSettings = null ;
- try {
- defaultSettings = new PropertiesSettings( "org/apache/struts2/default" );
- } catch (Exception e) {
- throw new ConfigurationException( "Could not find or error in org/apache/struts2/default.properties" , e);
- }
- loadSettings(props, defaultSettings);
- }
- //PropertiesSettings
- //读取org/apache/struts2/default.properties的配置信息,如果项目中需要覆盖,可以在classpath里的struts.properties里覆写
- public PropertiesSettings(String name) {
- URL settingsUrl = ClassLoaderUtils.getResource(name + ".properties" , getClass());
- if (settingsUrl == null ) {
- LOG.debug(name + ".properties missing" );
- settings = new LocatableProperties();
- return ;
- }
- //settings的类型为LocatableProperties,继承Properties
- settings = new LocatableProperties( new LocationImpl( null , settingsUrl.toString()));
- // Load settings
- InputStream in = null ;
- try {
- in = settingsUrl.openStream();
- settings.load(in);
- } catch (IOException e) {
- throw new StrutsException( "Could not load " + name + ".properties:" + e, e);
- } finally {
- if (in != null ) {
- try {
- in.close();
- } catch (IOException io) {
- LOG.warn( "Unable to close input stream" , io);
- }
- }
- }
- }
- private void init_TraditionalXmlConfigurations() {
- //首先读取web.xml中的config初始参数值
- //如果没有配置就使用默认的"struts-default.xml,struts-plugin.xml,struts.xml",
- //这儿就可以看出为什么默认的配置文件必须取名为这三个名称了
- //如果不想使用默认的名称,直接在web.xml中配置config初始参数即可
- String configPaths = initParams.get( "config" );
- if (configPaths == null ) {
- configPaths = DEFAULT_CONFIGURATION_PATHS;
- }
- String[] files = configPaths.split( "//s*[,]//s*" );
- //依次解析配置文件,xwork.xml单独解析
- for (String file : files) {
- if (file.endsWith( ".xml" )) {
- if ( "xwork.xml" .equals(file)) {
- configurationManager.addConfigurationProvider( new XmlConfigurationProvider(file, false ));
- } else {
- configurationManager.addConfigurationProvider( new StrutsXmlConfigurationProvider(file, false , servletContext));
- }
- } else {
- throw new IllegalArgumentException( "Invalid configuration file name" );
- }
- }
- }
- protected PackageConfig addPackage(Element packageElement) throws ConfigurationException {
- PackageConfig.Builder newPackage = buildPackageContext(packageElement);
- if (newPackage.isNeedsRefresh()) {
- return newPackage.build();
- }
- if (LOG.isDebugEnabled()) {
- LOG.debug( "Loaded " + newPackage);
- }
- // add result types (and default result) to this package
- addResultTypes(newPackage, packageElement);
- // load the interceptors and interceptor stacks for this package
- loadInterceptors(newPackage, packageElement);
- // load the default interceptor reference for this package
- loadDefaultInterceptorRef(newPackage, packageElement);
- // load the default class ref for this package
- loadDefaultClassRef(newPackage, packageElement);
- // load the global result list for this package
- loadGlobalResults(newPackage, packageElement);
- // load the global exception handler list for this package
- loadGobalExceptionMappings(newPackage, packageElement);
- // get actions
- NodeList actionList = packageElement.getElementsByTagName( "action" );
- for ( int i = 0 ; i < actionList.getLength(); i++) {
- Element actionElement = (Element) actionList.item(i);
- addAction(actionElement, newPackage);
- }
- // load the default action reference for this package
- loadDefaultActionRef(newPackage, packageElement);
- PackageConfig cfg = newPackage.build();
- configuration.addPackageConfig(cfg.getName(), cfg);
- return cfg;
- }
- private List loadConfigurationFiles(String fileName, Element includeElement) {
- List<Document> docs = new ArrayList<Document>();
- if (!includedFileNames.contains(fileName)) {
- ...........
- Element rootElement = doc.getDocumentElement();
- NodeList children = rootElement.getChildNodes();
- int childSize = children.getLength();
- for ( int i = 0; i < childSize; i++) {
- Node childNode = children.item(i);
- if (childNode instanceof Element) {
- Element child = (Element) childNode;
- final String nodeName = child.getNodeName();
- //解析每个action配置是,对于include文件可以使用通配符*来进行配置
- //如Struts.xml中可配置成<include file="actions_*.xml"/>
- if (nodeName.equals( "include" )) {
- String includeFileName = child.getAttribute( "file" );
- if (includeFileName.indexOf( '*' ) != -1 ) {
- // handleWildCardIncludes(includeFileName, docs, child);
- ClassPathFinder wildcardFinder = new ClassPathFinder();
- wildcardFinder.setPattern(includeFileName);
- Vector<String> wildcardMatches = wildcardFinder.findMatches();
- for (String match : wildcardMatches) {
- docs.addAll(loadConfigurationFiles(match, child));
- }
- }
- else {
- docs.addAll(loadConfigurationFiles(includeFileName, child));
- }
- }
- }
- }
- docs.add(doc);
- loadedFileUrls.add(url.toString());
- }
- }
- return docs;
- }
- public void doFilter(ServletRequest req, ServletResponse res, FilterChain chain) throws IOException, ServletException {
- HttpServletRequest request = (HttpServletRequest) req;
- HttpServletResponse response = (HttpServletResponse) res;
- ServletContext servletContext = getServletContext();
- String timerKey = "FilterDispatcher_doFilter: " ;
- try {
- UtilTimerStack.push(timerKey);
- //根据content type来使用不同的Request封装,可以参见Dispatcher的wrapRequest
- request = prepareDispatcherAndWrapRequest(request, response);
- ActionMapping mapping;
- try {
- //根据url取得对应的Action的配置信息--ActionMapping,actionMapper是通过Container的inject注入的
- mapping = actionMapper.getMapping(request, dispatcher.getConfigurationManager());
- } catch (Exception ex) {
- LOG.error( "error getting ActionMapping" , ex);
- dispatcher.sendError(request, response, servletContext, HttpServletResponse.SC_INTERNAL_SERVER_ERROR, ex);
- return ;
- }
- //如果找不到对应的action配置,则直接返回。比如你输入***.jsp等等
- //这儿有个例外,就是如果path是以“/struts”开头,则到初始参数packages配置的包路径去查找对应的静态资源并输出到页面流中,当然.class文件除外。如果再没有则跳转到404
- if (mapping == null ) {
- // there is no action in this request, should we look for a static resource?
- String resourcePath = RequestUtils.getServletPath(request);
- if ( "" .equals(resourcePath) && null != request.getPathInfo()) {
- resourcePath = request.getPathInfo();
- }
- if (serveStatic && resourcePath.startsWith( "/struts" )) {
- String name = resourcePath.substring( "/struts" .length());
- findStaticResource(name, request, response);
- } else {
- // this is a normal request, let it pass through
- chain.doFilter(request, response);
- }
- // The framework did its job here
- return ;
- }
- //正式开始执行Action的方法了
- dispatcher.serviceAction(request, response, servletContext, mapping);
- } finally {
- try {
- ActionContextCleanUp.cleanUp(req);
- } finally {
- UtilTimerStack.pop(timerKey);
- }
- }
- }
- public void serviceAction(HttpServletRequest request, HttpServletResponse response, ServletContext context,
- ActionMapping mapping) throws ServletException {
- Map<String, Object> extraContext = createContextMap(request, response, mapping, context);
- // If there was a previous value stack, then create a new copy and pass it in to be used by the new Action
- ValueStack stack = (ValueStack) request.getAttribute(ServletActionContext.STRUTS_VALUESTACK_KEY);
- if (stack != null ) {
- extraContext.put(ActionContext.VALUE_STACK, ValueStackFactory.getFactory().createValueStack(stack));
- }
- String timerKey = "Handling request from Dispatcher" ;
- try {
- UtilTimerStack.push(timerKey);
- String namespace = mapping.getNamespace();
- String name = mapping.getName();
- String method = mapping.getMethod();
- Configuration config = configurationManager.getConfiguration();
- ActionProxy proxy = config.getContainer().getInstance(ActionProxyFactory. class ).createActionProxy(namespace, name, extraContext, true , false );
- proxy.setMethod(method);
- request.setAttribute(ServletActionContext.STRUTS_VALUESTACK_KEY, proxy.getInvocation().getStack());
- // if the ActionMapping says to go straight to a result, do it!
- if (mapping.getResult() != null ) {
- Result result = mapping.getResult();
- result.execute(proxy.getInvocation());
- } else {
- proxy.execute();
- }
- // If there was a previous value stack then set it back onto the request
- if (stack != null ) {
- request.setAttribute(ServletActionContext.STRUTS_VALUESTACK_KEY, stack);
- }
- } catch (ConfigurationException e) {
- LOG.error( "Could not find action or result" , e);
- sendError(request, response, context, HttpServletResponse.SC_NOT_FOUND, e);
- } catch (Exception e) {
- throw new ServletException(e);
- } finally {
- UtilTimerStack.pop(timerKey);
- }
- }
- public HashMap<String,Object> createContextMap(Map requestMap,
- Map parameterMap,
- Map sessionMap,
- Map applicationMap,
- HttpServletRequest request,
- HttpServletResponse response,
- ServletContext servletContext) {
- HashMap<String,Object> extraContext = new HashMap<String,Object>();
- extraContext.put(ActionContext.PARAMETERS, new HashMap(parameterMap));
- extraContext.put(ActionContext.SESSION, sessionMap);
- extraContext.put(ActionContext.APPLICATION, applicationMap);
- Locale locale;
- if (defaultLocale != null ) {
- locale = LocalizedTextUtil.localeFromString(defaultLocale, request.getLocale());
- } else {
- locale = request.getLocale();
- }
- extraContext.put(ActionContext.LOCALE, locale);
- //extraContext.put(ActionContext.DEV_MODE, Boolean.valueOf(devMode));
- extraContext.put(StrutsStatics.HTTP_REQUEST, request);
- extraContext.put(StrutsStatics.HTTP_RESPONSE, response);
- extraContext.put(StrutsStatics.SERVLET_CONTEXT, servletContext);
- // helpers to get access to request/session/application scope
- extraContext.put( "request" , requestMap);
- extraContext.put( "session" , sessionMap);
- extraContext.put( "application" , applicationMap);
- extraContext.put( "parameters" , parameterMap);
- AttributeMap attrMap = new AttributeMap(extraContext);
- extraContext.put( "attr" , attrMap);
- return extraContext;
- }
- public void init(ActionProxy proxy) {
- this .proxy = proxy;
- Map contextMap = createContextMap();
- //设置ActionContext,把ActionInvocation和Action压入ValueStack
- ActionContext actionContext = ActionContext.getContext();
- if (actionContext != null ) {
- actionContext.setActionInvocation( this );
- }
- //创建Action,可以看出Struts2里是每次请求都新建一个Action,careateAction方法可以自己参考
- createAction(contextMap);
- if (pushAction) {
- stack.push(action);
- contextMap.put( "action" , action);
- }
- invocationContext = new ActionContext(contextMap);
- invocationContext.setName(proxy.getActionName());
- List interceptorList = new ArrayList(proxy.getConfig().getInterceptors());
- interceptors = interceptorList.iterator();
- }
- protected void createAction(Map contextMap) {
- String timerKey = "actionCreate: " +proxy.getActionName();
- try {
- UtilTimerStack.push(timerKey);
- //这儿默认建立Action是StrutsObjectFactory,实际中我使用的时候都是使用Spring创建的Action,这个时候使用的是SpringObjectFactory
- action = objectFactory.buildAction(proxy.getActionName(), proxy.getNamespace(), proxy.getConfig(), contextMap);
- }
- .......
- catch (Exception e) {
- ........
- throw new XWorkException(gripe, e, proxy.getConfig());
- } finally {
- UtilTimerStack.pop(timerKey);
- }
- if (actionEventListener != null ) {
- action = actionEventListener.prepare(action, stack);
- }
- }
- public String invoke() throws Exception {
- String profileKey = "invoke: " ;
- try {
- UtilTimerStack.push(profileKey);
- if (executed) {
- throw new IllegalStateException( "Action has already executed" );
- }
- //先执行interceptors
- if (interceptors.hasNext()) {
- final InterceptorMapping interceptor = (InterceptorMapping) interceptors.next();
- UtilTimerStack.profile( "interceptor: " +interceptor.getName(),
- new UtilTimerStack.ProfilingBlock<String>() {
- public String doProfiling() throws Exception {
- resultCode = interceptor.getInterceptor().intercept(DefaultActionInvocation. this );
- return null ;
- }
- });
- } else {
- //interceptor执行完了之后执行action
- resultCode = invokeActionOnly();
- }
- if (!executed) {
- if (preResultListeners != null ) {
- for (Iterator iterator = preResultListeners.iterator();
- iterator.hasNext();) {
- PreResultListener listener = (PreResultListener) iterator.next();
- String _profileKey= "preResultListener: " ;
- try {
- UtilTimerStack.push(_profileKey);
- listener.beforeResult( this , resultCode);
- }
- finally {
- UtilTimerStack.pop(_profileKey);
- }
- }
- }
- // now execute the result, if we're supposed to
- if (proxy.getExecuteResult()) {
- executeResult();
- }
- executed = true ;
- }
- return resultCode;
- }
- finally {
- UtilTimerStack.pop(profileKey);
- }
- }
- protected String invokeAction(Object action, ActionConfig actionConfig) throws Exception {
- String methodName = proxy.getMethod();
- String timerKey = "invokeAction: " +proxy.getActionName();
- try {
- UtilTimerStack.push(timerKey);
- boolean methodCalled = false ;
- Object methodResult = null ;
- Method method = null ;
- try {
- //获得Action对应的方法
- method = getAction().getClass().getMethod(methodName, new Class[ 0 ]);
- } catch (NoSuchMethodException e) {
- try {
- //如果没有对应的方法,则使用do+Xxxx来再次获得方法
- String altMethodName = "do" + methodName.substring( 0 , 1 ).toUpperCase() + methodName.substring( 1 );
- method = getAction().getClass().getMethod(altMethodName, new Class[ 0 ]);
- } catch (NoSuchMethodException e1) {
- .....
- }
- }
- if (!methodCalled) {
- methodResult = method.invoke(action, new Object[ 0 ]);
- }
- //根据不同的Result类型返回不同值
- if (methodResult instanceof Result) {
- this .explicitResult = (Result) methodResult;
- return null ;
- } else {
- return (String) methodResult;
- }
- }
- ....
- } finally {
- UtilTimerStack.pop(timerKey);
- }
- }
- private void executeResult() throws Exception {
- //根据ResultConfig创建Result
- result = createResult();
- String timerKey = "executeResult: " +getResultCode();
- try {
- UtilTimerStack.push(timerKey);
- if (result != null ) {
- //这儿正式执行:)
- //可以参考Result的实现,如用了比较多的 ServletDispatcherResult,ServletActionRedirectResult,ServletRedirectResult
- result.execute( this );
- } else if (resultCode != null && !Action.NONE.equals(resultCode)) {
- throw new ConfigurationException( "No result defined for action " + getAction().getClass().getName()
- + " and result " + getResultCode(), proxy.getConfig());
- } else {
- if (LOG.isDebugEnabled()) {
- LOG.debug( "No result returned for action " +getAction().getClass().getName()+ " at " +proxy.getConfig().getLocation());
- }
- }
- } finally {
- UtilTimerStack.pop(timerKey);
- }
- }
- public Result createResult() throws Exception {
- if (explicitResult != null ) {
- Result ret = explicitResult;
- explicitResult = null ;;
- return ret;
- }
- ActionConfig config = proxy.getConfig();
- Map results = config.getResults();
- ResultConfig resultConfig = null ;
- synchronized (config) {
- try {
- //根据result名称获得ResultConfig,resultCode就是result的name
- resultConfig = (ResultConfig) results.get(resultCode);
- } catch (NullPointerException e) {
- }
- if (resultConfig == null ) {
- //如果找不到对应name的ResultConfig,则使用name为*的Result
- resultConfig = (ResultConfig) results.get( "*" );
- }
- }
- if (resultConfig != null ) {
- try {
- //参照StrutsObjectFactory的代码
- Result result = objectFactory.buildResult(resultConfig, invocationContext.getContextMap());
- return result;
- } catch (Exception e) {
- LOG.error( "There was an exception while instantiating the result of type " + resultConfig.getClassName(), e);
- throw new XWorkException(e, resultConfig);
- }
- } else if (resultCode != null && !Action.NONE.equals(resultCode) && unknownHandler != null ) {
- return unknownHandler.handleUnknownResult(invocationContext, proxy.getActionName(), proxy.getConfig(), resultCode);
- }
- return null ;
- }
- // StrutsObjectFactory
- public Result buildResult(ResultConfig resultConfig, Map extraContext) throws Exception {
- String resultClassName = resultConfig.getClassName();
- if (resultClassName == null )
- return null ;
- //创建Result,因为Result是有状态的,所以每次请求都新建一个
- Object result = buildBean(resultClassName, extraContext);
- reflectionProvider.setProperties(resultConfig.getParams(), result, extraContext);
- if (result instanceof Result)
- return (Result) result;
- throw new ConfigurationException(result.getClass().getName() + " does not implement Result." );
- }


 1万+
1万+


 被折叠的 条评论
为什么被折叠?
被折叠的 条评论
为什么被折叠?
 到【灌水乐园】发言


