


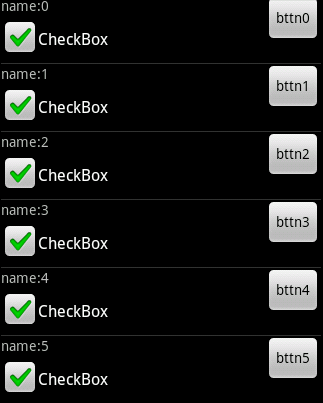
我们先看一下一个 ListView绑定6行数据,每行数据上包括了三个控件:TextView,CheckBox,Button,运行效果如下图所示:
绑定代码:
ListView lstView = (ListView) this.findViewById(R.id.listView1);
List<HashMap<String, Object>> list = new ArrayList<HashMap<String, Object>>();
for (int i = 0; i < 6; i++) {
HashMap<String, Object> hashMap = new HashMap<String, Object>();
hashMap.put("t1", "name:" + i);
hashMap.put("c1", true);
hashMap.put("b1", "bttn" + i);
list.add(hashMap);
}
SimpleAdapter adapter = new SimpleAdapter(this, list,
R.layout.list_item, new String[] { "t1", "c1", "b1" },
new int[] { R.id.textView1, R.id.checkBox1, R.id.button1 });
lstView.setAdapter(adapter);再看看list_item的布局:
<?xml version="1.0" encoding="utf-8"?>
<RelativeLayout xmlns:android="http://schemas.android.com/apk/res/android"
android:layout_width="fill_parent" android:layout_height="fill_parent"
<LinearLayout android:layout_width="wrap_content"
android:orientation="vertical" android:layout_alignParentLeft="true"
android:layout_height="wrap_content">
<TextView android:text="TextView" android:id="@+id/textView1"
android:layout_width="wrap_content" android:layout_height="wrap_content"></TextView>
<CheckBox android:layout_width="wrap_content" android:text="CheckBox"
android:layout_alignParentTop="true" android:layout_height="wrap_content"
android:id="@+id/checkBox1"></CheckBox>
</LinearLayout><Button android:text="Button" android:layout_width="wrap_content"
android:layout_alignParentRight="true" android:id="@+id/button1"
android:layout_height="wrap_content"></Button>
</RelativeLayout>好了,绑定操作一切正常,我们现在运行本例子,点击一下操作试试,多次点击后,发现一个问题,ListView的项是不能点击的,但是Button,CheckBox是可以点击,细心的朋友会发现,如果不使用CheckBox或ButtonListView的项是可以点击,但为什么现在不可以 点击了呢,原因很简单 是因为list_item项无法获得focusable,也就是说listviw的每一项的布局获取不到焦点,那焦点都去哪了呢,原因是选项添加了CheckBox和Button,被这两个控件抢去了焦点。如果想实现点击 ListView的每一项,只有将这两个控件的焦点隐藏掉也就添加android:focusable="false"属性,修改完代码的选项布局文件如下:
<RelativeLayout xmlns:android="http://schemas.android.com/apk/res/android"
android:layout_width="fill_parent" android:layout_height="fill_parent"
>
<LinearLayout android:layout_width="wrap_content"
android:orientation="vertical" android:layout_alignParentLeft="true"
android:layout_height="wrap_content">
<TextView android:text="TextView" android:id="@+id/textView1"
android:layout_width="wrap_content" android:layout_height="wrap_content"></TextView>
<CheckBox android:focusable="false" android:layout_width="wrap_content" android:text="CheckBox"
android:layout_alignParentTop="true" android:layout_height="wrap_content"
android:id="@+id/checkBox1"></CheckBox>
</LinearLayout><Button android:text="Button" android:focusable="false" android:layout_width="wrap_content"
这样listview就可以获取到焦点了
android:layout_alignParentRight="true" android:id="@+id/button1"
android:layout_height="wrap_content"></Button>
</RelativeLayout>
现在又出现一个疑问,
我们先看一下一个 ListView绑定6行数据,每行数据上包括了三个控件:TextView,CheckBox,Button,运行效果如下图所示:
绑定代码:
ListView lstView = (ListView) this.findViewById(R.id.listView1);
List<HashMap<String, Object>> list = new ArrayList<HashMap<String, Object>>();
for (int i = 0; i < 6; i++) {
HashMap<String, Object> hashMap = new HashMap<String, Object>();
hashMap.put("t1", "name:" + i);
hashMap.put("c1", true);
hashMap.put("b1", "bttn" + i);
list.add(hashMap);
}
SimpleAdapter adapter = new SimpleAdapter(this, list,
R.layout.list_item, new String[] { "t1", "c1", "b1" },
new int[] { R.id.textView1, R.id.checkBox1, R.id.button1 });
lstView.setAdapter(adapter);再看看list_item的布局:
<?xml version="1.0" encoding="utf-8"?>
<RelativeLayout xmlns:android="http://schemas.android.com/apk/res/android"
android:layout_width="fill_parent" android:layout_height="fill_parent"
<LinearLayout android:layout_width="wrap_content"
android:orientation="vertical" android:layout_alignParentLeft="true"
android:layout_height="wrap_content">
<TextView android:text="TextView" android:id="@+id/textView1"
android:layout_width="wrap_content" android:layout_height="wrap_content"></TextView>
<CheckBox android:layout_width="wrap_content" android:text="CheckBox"
android:layout_alignParentTop="true" android:layout_height="wrap_content"
android:id="@+id/checkBox1"></CheckBox>
</LinearLayout><Button android:text="Button" android:layout_width="wrap_content"
android:layout_alignParentRight="true" android:id="@+id/button1"
android:layout_height="wrap_content"></Button>
</RelativeLayout>好了,绑定操作一切正常,我们现在运行本例子,点击一下操作试试,多次点击后,发现一个问题,ListView的项是不能点击的,但是Button,CheckBox是可以点击,细心的朋友会发现,如果不使用CheckBox或ButtonListView的项是可以点击,但为什么现在不可以 点击了呢,原因很简单 是因为list_item项无法获得focusable,也就是说listviw的每一项的布局获取不到焦点,那焦点都去哪了呢,原因是选项添加了CheckBox和Button,被这两个控件抢去了焦点。如果想实现点击 ListView的每一项,只有将这两个控件的焦点隐藏掉也就添加android:focusable="false"属性,修改完代码的选项布局文件如下:
<RelativeLayout xmlns:android="http://schemas.android.com/apk/res/android"
android:layout_width="fill_parent" android:layout_height="fill_parent"
>
<LinearLayout android:layout_width="wrap_content"
android:orientation="vertical" android:layout_alignParentLeft="true"
android:layout_height="wrap_content">
<TextView android:text="TextView" android:id="@+id/textView1"
android:layout_width="wrap_content" android:layout_height="wrap_content"></TextView>
<CheckBox android:focusable="false" android:layout_width="wrap_content" android:text="CheckBox"
android:layout_alignParentTop="true" android:layout_height="wrap_content"
android:id="@+id/checkBox1"></CheckBox>
</LinearLayout><Button android:text="Button" android:focusable="false" android:layout_width="wrap_content"
这样listview就可以获取到焦点了
android:layout_alignParentRight="true" android:id="@+id/button1"
android:layout_height="wrap_content"></Button>
</RelativeLayout>现在又出现一个疑问,


 1359
1359

 被折叠的 条评论
为什么被折叠?
被折叠的 条评论
为什么被折叠?
 到【灌水乐园】发言


