


一、怎么看mina的开源代码
1、首先要明白,一个代码、程序、或者框架,是用来解决用户实在的问题。而mina是一个能够帮助用户开发高性能和高伸缩性网络应用程序的框架
。
2、所有,针对mina,关键就是高性能、高伸缩、网络应用。所有,看mina源码就带着几个问题去看:
a、什么是网络编程,这个就需要了解socket、io、nio的知识。
b、高性能,在高并发的情况下高吞吐量,针对这种并发编程,mina用到了并发编程框架,所有要了解concurrent相关知识。
c、高伸缩性,就是框架在设计上,在架构上,在模式的运用上设计合理,这里就是要学习怎么样才能架构出高伸缩性的架构。
二、mina 入门《mina,hello world》和整体通信过程
这里默认你已经准备好了Eclipse和java等必要的开发环境。
新建一个project工程,导入mina必要包:mina-core等。
,最懒的方式就是讲lib包和dist包下的jar全部依赖在工程中。
代码参考:http://www.cnblogs.com/xuekyo/archive/2013/03/06/2945826.html
创建服务端
MinaTimeServer
:
import java.io.IOException;import java.net.InetSocketAddress;import java.nio.charset.Charset;import org.apache.mina.core.service.IoAcceptor;import org.apache.mina.core.session.IdleStatus;import org.apache.mina.filter.codec.ProtocolCodecFilter;import org.apache.mina.filter.codec.textline.TextLineCodecFactory;import org.apache.mina.filter.logging.LoggingFilter;import org.apache.mina.transport.socket.nio.NioSocketAcceptor;publicclassMinaTimeServer{// 定义监听端口privatestaticfinalint PORT =6488;publicstaticvoid main(String[] args)throwsIOException{// 创建服务端监控线程IoAcceptor acceptor =newNioSocketAcceptor();acceptor.getSessionConfig().setReadBufferSize(2048);acceptor.getSessionConfig().setIdleTime(IdleStatus.BOTH_IDLE,10);// 设置日志记录器acceptor.getFilterChain().addLast("logger",newLoggingFilter());// 设置编码过滤器acceptor.getFilterChain().addLast("codec",newProtocolCodecFilter(newTextLineCodecFactory(Charset.forName("UTF-8"))));// 指定业务逻辑处理器acceptor.setHandler(newTimeServerHandler());// 设置端口号acceptor.bind(newInetSocketAddress(PORT));// 启动监听线程acceptor.bind();}}
编写服务端handler
import org.apache.mina.core.service.IoHandlerAdapter;import org.apache.mina.core.session.IdleStatus;import org.apache.mina.core.session.IoSession;/*** 服务器端业务逻辑*/publicclassTimeServerHandlerextendsIoHandlerAdapter{/*** 连接创建事件*/@Overridepublicvoid sessionCreated(IoSession session){// 显示客户端的ip和端口System.out.println(session.getRemoteAddress().toString());}@Overridepublicvoid exceptionCaught(IoSession session,Throwable cause)throwsException{cause.printStackTrace();}/*** 消息接收事件*/@Overridepublicvoid messageReceived(IoSession session,Object message)throwsException{String strMsg = message.toString();if(strMsg.trim().equalsIgnoreCase("quit")){session.close(true);return;}// 返回消息字符串session.write("Hi Client!");// 打印客户端传来的消息内容System.out.println("Message written : "+ strMsg);}@Overridepublicvoid sessionIdle(IoSession session,IdleStatus status)throwsException{System.out.println("IDLE"+ session.getIdleCount(status));}}
构建客户端
import java.net.InetSocketAddress;import java.nio.charset.Charset;import org.apache.mina.core.future.ConnectFuture;import org.apache.mina.filter.codec.ProtocolCodecFilter;import org.apache.mina.filter.codec.textline.TextLineCodecFactory;import org.apache.mina.filter.logging.LoggingFilter;import org.apache.mina.transport.socket.nio.NioSocketConnector;publicclassMinaTimeClient{publicstaticvoid main(String[] args){// 创建客户端连接器.NioSocketConnector connector =newNioSocketConnector();connector.getFilterChain().addLast("logger",newLoggingFilter());connector.getFilterChain().addLast("codec",newProtocolCodecFilter(newTextLineCodecFactory(Charset.forName("UTF-8"))));// 设置连接超时检查时间connector.setConnectTimeoutCheckInterval(30);connector.setHandler(newTimeClientHandler());// 建立连接ConnectFuture cf = connector.connect(newInetSocketAddress("192.168.2.109",6488));// 等待连接创建完成cf.awaitUninterruptibly();cf.getSession().write("Hi Server!");cf.getSession().write("quit");// 等待连接断开cf.getSession().getCloseFuture().awaitUninterruptibly();// 释放连接connector.dispose();}}
编写客户端handler
import org.apache.mina.core.service.IoHandlerAdapter;import org.apache.mina.core.session.IoSession;publicclassTimeClientHandlerextendsIoHandlerAdapter{publicvoid messageReceived(IoSession session,Object message)throwsException{String content = message.toString();System.out.println("client receive a message is : "+ content);}publicvoid messageSent(IoSession session,Object message)throwsException{System.out.println("messageSent -> :"+ message);}}
主要接口体现
先说明下主要接口和包结构
Mina包的简介:
| org.apache.mina.core.buffer | 用于缓冲区的IoBuffer |
| org.apache.mina.core.service org.apache.mina.transport.* | 用于提供连接的service |
| org.apache.mina.core.session | 用于提供两端状态的session |
| org.apache.mina.core.filterchain org.apache.mina.filter.* | 用于拦截所有IO事件和请求的filter chain和各类拦截器(在IoService和IoHandler之间) |
| org.apache.mina.handler.* | 用于处理IO事件的handler |
| org.apache.mina.core.future | 用于实现异步IO操作的 future |
| org.apache.mina.core.polling | 用于实现IO轮询的的polling |
| org.apache.mina.proxy.* | 用于实现代理的proxy |
先介绍Mina几个重要接口:
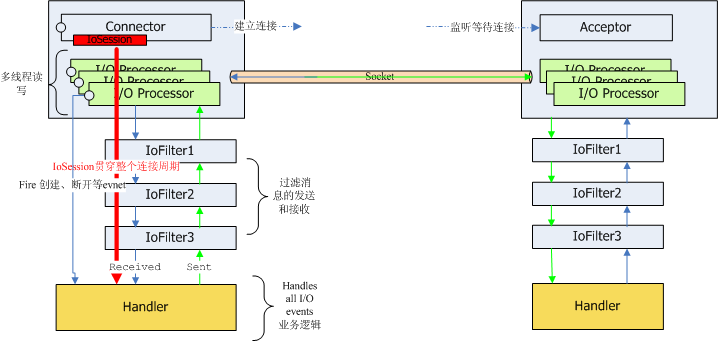
- IoServiece :这个接口在一个线程上负责套接字的建立,拥有自己的 Selector,监听是否有连接被建立。
- IoProcessor :这个接口在另一个线程上负责检查是否有数据在通道上读写,也就是说它也拥有自己的 Selector,这是与我们使用 JAVA NIO 编码时的一个不同之处,通常在 JAVA NIO 编码中,我们都是使用一个 Selector,也就是不区分 IoService与 IoProcessor 两个功能接口。另外,IoProcessor 负责调用注册在 IoService 上的过滤器,并在过滤器链之后调用 IoHandler。
- IoAccepter :相当于网络应用程序中的服务器端
- IoConnector :相当于客户端
- IoSession :当前客户端到服务器端的一个连接实例
- IoHandler :这个接口负责编写业务逻辑,也就是接收、发送数据的地方。这也是实际开发过程中需要用户自己编写的部分代码。
- IoFilter :过滤器用于悬接通讯层接口与业务层接口,这个接口定义一组拦截器,这些拦截器可以包括日志输出、黑名单过滤、数据的编码(write 方向)与解码(read 方向)等功能,其中数据的 encode与 decode是最为重要的、也是你在使用 Mina时最主要关注的地方。
这里需要了解的就是mina如何建立客户端连接请求和与客户端的数据交互 来了解各个接口的作用。
1、建立客户端请求:
我们看到,我们的MinaTimeServer中,new 了一个NioSocketAcceptor,我们来看看,这里发生了什么,先抛出,NioSocketAcceptor的相关继承关系如下:
所有,我们来先看看,new NioSocketAcceptor都做了什么事情
1、调用NioSocketAcceptor的构造函数,其实是调用了AbstractPollingIoAcceptor
publicNioSocketAcceptor(){super(newDefaultSocketSessionConfig(),NioProcessor.class);((DefaultSocketSessionConfig) getSessionConfig()).init(this);}
2、那我看下,AbstractPollingIoAcceptor又调用了super(),就是AbstartIoAcceptor,其中这个sessionConfig是默认实现,executor是null
privateAbstractPollingIoAcceptor(IoSessionConfig sessionConfig,Executor executor,IoProcessor<S> processor,boolean createdProcessor,SelectorProvider selectorProvider){super(sessionConfig, executor);if(processor ==null){thrownewIllegalArgumentException("processor");}this.processor = processor;this.createdProcessor = createdProcessor;try{// Initialize the selectorinit(selectorProvider);//初始化selector,也就是selector.open();// The selector is now ready, we can switch the// flag to true so that incoming connection can be acceptedselectable =true;}catch(RuntimeException e){throw e;}catch(Exception e){thrownewRuntimeIoException("Failed to initialize.", e);}finally{if(!selectable){try{destroy();}catch(Exception e){ExceptionMonitor.getInstance().exceptionCaught(e);}}}}
2.1、这里new的时候,生产了一个SimpleProcessor的实例,并告知已经创建了processor了。
3、我们在继续看,这个
AbstartIoAcceptor继续调用了AbstactIoService(),主要的工作就是初始化下listener,生成excutor为newCachedThreadPool模式,此对象还包括了filterChainBuilder和sessionDataStructureFactory
protectedAbstractIoService(IoSessionConfig sessionConfig,Executor executor){if(sessionConfig ==null){thrownewIllegalArgumentException("sessionConfig");}if(getTransportMetadata()==null){thrownewIllegalArgumentException("TransportMetadata");}if(!getTransportMetadata().getSessionConfigType().isAssignableFrom(sessionConfig.getClass())){thrownewIllegalArgumentException("sessionConfig type: "+ sessionConfig.getClass()+" (expected: "+ getTransportMetadata().getSessionConfigType()+")");}// Create the listeners, and add a first listener : a activation listener// for this service, which will give information on the service state.listeners =newIoServiceListenerSupport(this);listeners.add(serviceActivationListener);// Stores the given session configurationthis.sessionConfig = sessionConfig;// Make JVM load the exception monitor before some transports// change the thread context class loader.ExceptionMonitor.getInstance();if(executor ==null){this.executor =Executors.newCachedThreadPool();createdExecutor =true;}else{this.executor = executor;createdExecutor =false;}threadName = getClass().getSimpleName()+'-'+ id.incrementAndGet();}
至此,new NioSocketAcceptor实例过程完成,看起来只是初始化了下如下必要元素
selector,processor,listenList,IofilterChainBuilder,和线程相关的线程池execute
那我们继续看,我们的MinaTimeServer 设置了iofilter和业务处理handler。接下来调用了bind方法。其实是调用了AbstractIoAcceptor的bind,方法里面调用了AbstactPollingIoAcceptor中的bindInternal.
publicfinalvoid bind(Iterable<?extendsSocketAddress> localAddresses)throwsIOException{if(isDisposing()){thrownewIllegalStateException("The Accpetor disposed is being disposed.");}if(localAddresses ==null){thrownewIllegalArgumentException("localAddresses");}List<SocketAddress> localAddressesCopy =newArrayList<SocketAddress>();for(SocketAddress a : localAddresses){checkAddressType(a);localAddressesCopy.add(a);}if(localAddressesCopy.isEmpty()){thrownewIllegalArgumentException("localAddresses is empty.");}boolean activate =false;synchronized(bindLock){synchronized(boundAddresses){if(boundAddresses.isEmpty()){activate =true;}}if(getHandler()==null){thrownewIllegalStateException("handler is not set.");}try{Set<SocketAddress> addresses = bindInternal(localAddressesCopy);//synchronized(boundAddresses){boundAddresses.addAll(addresses);}}catch(IOException e){throw e;}catch(RuntimeException e){throw e;}catch(Exception e){thrownewRuntimeIoException("Failed to bind to: "+ getLocalAddresses(), e);}}if(activate){getListeners().fireServiceActivated();}}
bindInternal,这里研究下future,这个current包中的模式。。
@OverrideprotectedfinalSet<SocketAddress> bindInternal(List<?extendsSocketAddress> localAddresses)throwsException{//创建一个future并放在注册队列中,当selector处理完后,将通知这个future做其他事情AcceptorOperationFuture request =newAcceptorOperationFuture(localAddresses);registerQueue.add(request);// 创建一个Acceptor(内部类),并放在execute中启动监听线程。- startupAcceptor();
// 为了处理刚才这个绑定请求,我们暂且不阻塞selector方法//As we just started the acceptor, we have to unblock the select()// in order to process the bind request we just have added to the// registerQueue.try{lock.acquire();// Wait a bit to give a chance to the Acceptor thread to do the select()Thread.sleep(10);wakeup();}finally{lock.release();}// Now, we wait until this request is completed.request.awaitUninterruptibly();if(request.getException()!=null){throw request.getException();}// Update the local addresses.// setLocalAddresses() shouldn't be called from the worker thread// because of deadlock.Set<SocketAddress> newLocalAddresses =newHashSet<SocketAddress>();for(H handle : boundHandles.values()){newLocalAddresses.add(localAddress(handle));}return newLocalAddresses;}
startupAcceptor
privatevoid startupAcceptor()throwsInterruptedException{// If the acceptor is not ready, clear the queues// TODO : they should already be clean : do we have to do that ?if(!selectable){registerQueue.clear();cancelQueue.clear();}// start the acceptor if not already startedAcceptor acceptor = acceptorRef.get();//获取线程中是否有Acceptor了。if(acceptor ==null){//没有,则实例化一个,并在exeutrWorker中启动,调用他的run方法lock.acquire();acceptor =newAcceptor();if(acceptorRef.compareAndSet(null, acceptor)){executeWorker(acceptor);}else{lock.release();}}}
我们继续看看Acceptor的run方法,其实就是开始执行select()阻塞方法了。
publicvoid run(){assert(acceptorRef.get()==this);int nHandles =0;// Release the locklock.release();while(selectable){try{// Detect if we have some keys ready to be processed// The select() will be woke up if some new connection// have occurred, or if the selector has been explicitly// woke upint selected = select();// this actually sets the selector to OP_ACCEPT,// and binds to the port on which this class will// listen onnHandles += registerHandles();// Now, if the number of registred handles is 0, we can// quit the loop: we don't have any socket listening// for incoming connection.if(nHandles ==0){acceptorRef.set(null);if(registerQueue.isEmpty()&& cancelQueue.isEmpty()){assert(acceptorRef.get()!=this);break;}if(!acceptorRef.compareAndSet(null,this)){assert(acceptorRef.get()!=this);break;}assert(acceptorRef.get()==this);}if(selected >0){// We have some connection request, let's process// them here.processHandles(selectedHandles());}// check to see if any cancellation request has been made.nHandles -= unregisterHandles();}catch(ClosedSelectorException cse){// If the selector has been closed, we can exit the loopExceptionMonitor.getInstance().exceptionCaught(cse);break;}catch(Exception e){ExceptionMonitor.getInstance().exceptionCaught(e);try{Thread.sleep(1000);}catch(InterruptedException e1){ExceptionMonitor.getInstance().exceptionCaught(e1);}}}// Cleanup all the processors, and shutdown the acceptor.if(selectable && isDisposing()){selectable =false;try{if(createdProcessor){processor.dispose();}}finally{try{synchronized(disposalLock){if(isDisposing()){destroy();}}}catch(Exception e){ExceptionMonitor.getInstance().exceptionCaught(e);}finally{disposalFuture.setDone();}}}}
其中registerHandler就是实力ServerSocket的端口监听,能看到我们熟悉的NIO代码端口bind和 channel.register(selector, SelectionKey.OP_ACCEPT);
,在
registerHandler调用了NioSocketAcceptor中的open
@OverrideprotectedServerSocketChannel open(SocketAddress localAddress)throwsException{// Creates the listening ServerSocketServerSocketChannel channel =null;if(selectorProvider !=null){channel = selectorProvider.openServerSocketChannel();}else{channel =ServerSocketChannel.open();}boolean success =false;try{// This is a non blocking socket channelchannel.configureBlocking(false);// Configure the server socket,ServerSocket socket = channel.socket();// Set the reuseAddress flag accordingly with the settingsocket.setReuseAddress(isReuseAddress());// and bind.try{socket.bind(localAddress, getBacklog());}catch(IOException ioe){// Add some info regarding the address we try to bind to the// messageString newMessage ="Error while binding on "+ localAddress +"\n"+"original message : "+ ioe.getMessage();Exception e =newIOException(newMessage);e.initCause(ioe.getCause());// And close the channelchannel.close();throw e;}// Register the channel within the selector for ACCEPT eventchannel.register(selector,SelectionKey.OP_ACCEPT);success =true;}finally{if(!success){close(channel);}}return channel;}
注册后,那我们就等待客户端的连接吧,如果客户端执行了socket.connect(iPaddr),那我们这里的selector.select()会>0.此时会处理这个客户端的请求Acceptor.processHandles(new ServerSocketChannelIterator(selector.selectedKeys()));是不是感觉这个代码在自己编写的NIO代码中很类似?这里,accept()方法,将processor和这个ServerSocketChannel作处理,
其实是生产一个session,并将socketChannel,processor等做关联
。并初始化和准备一个客户端和服务端连接和交互过程整个生命周期的session了。最后session.getProcessor.add(session)很隐晦的开始了processor的流程。。
privatevoid processHandles(Iterator<H> handles)throwsException{while(handles.hasNext()){H handle = handles.next();handles.remove();// Associates a new created connection to a processor,// and get back a sessionS session = accept(processor, handle);if(session ==null){continue;}initSession(session,null,null);// add the session to the SocketIoProcessorsession.getProcessor().add(session);}}
我们来看看NioSocketAcceptor.accept()
protectedNioSession accept(IoProcessor<NioSession> processor,ServerSocketChannel handle)throwsException{SelectionKey key =null;if(handle !=null){key = handle.keyFor(selector);}if((key ==null)||(!key.isValid())||(!key.isAcceptable())){returnnull;}// accept the connection from the clientSocketChannel ch = handle.accept();if(ch ==null){returnnull;}returnnewNioSocketSession(this, processor, ch);}
刚我们说到很隐晦的
session.getProcessor.add(session)。为什么说很隐晦,应该这里正是开始了processor处理这个session后续请求的。
上面在实例化的时候,实例的是SimpleProcessor首先看看SimpleProcessor.add(){getProcessor.add()}//整个就是多个processor的体现
@SuppressWarnings("unchecked")privateIoProcessor<S> getProcessor(S session){IoProcessor<S> processor =(IoProcessor<S>) session.getAttribute(PROCESSOR);if(processor ==null){if(disposed || disposing){thrownewIllegalStateException("A disposed processor cannot be accessed.");}processor = pool[Math.abs((int) session.getId())% pool.length];if(processor ==null){thrownewIllegalStateException("A disposed processor cannot be accessed.");}session.setAttributeIfAbsent(PROCESSOR, processor);}return processor;}
AbstractPollingIoProcessor.add()
publicfinalvoid add(S session){if(disposed || disposing){thrownewIllegalStateException("Already disposed.");}// Adds the session to the newSession queue and starts the workernewSessions.add(session);startupProcessor();}
privatevoid startupProcessor(){Processor processor = processorRef.get();if(processor ==null){processor =newProcessor();if(processorRef.compareAndSet(null, processor)){executor.execute(newNamePreservingRunnable(processor, threadName));}}// 注意这个wakeup。wakeup();}
publicvoid run(){assert(processorRef.get()==this);int nSessions =0;lastIdleCheckTime =System.currentTimeMillis();for(;;){try{// This select has a timeout so that we can manage// idle session when we get out of the select every// second. (note : this is a hack to avoid creating// a dedicated thread).long t0 =System.currentTimeMillis();int selected = select(SELECT_TIMEOUT);long t1 =System.currentTimeMillis();long delta =(t1 - t0);if(!wakeupCalled.getAndSet(false)&&(selected ==0)&&(delta <100)){// Last chance : the select() may have been// interrupted because we have had an closed channel.if(isBrokenConnection()){LOG.warn("Broken connection");}else{LOG.warn("Create a new selector. Selected is 0, delta = "+(t1 - t0));// 这里搞不太懂为什么要注册过新的。registerNewSelector();}}// 先处理这个心的sessoin。其实就是做了socket在processor线程上的selector的注册nSessions += handleNewSessions();updateTrafficMask();// Now, if we have had some incoming or outgoing events,// deal with themif(selected >0){// LOG.debug("Processing ..."); // This log hurts one of// the MDCFilter test...process();}// Write the pending requestslong currentTime =System.currentTimeMillis();flush(currentTime);// And manage removed sessionsnSessions -= removeSessions();// Last, not least, send Idle events to the idle sessionsnotifyIdleSessions(currentTime);// Get a chance to exit the infinite loop if there are no// more sessions on this Processorif(nSessions ==0){processorRef.set(null);if(newSessions.isEmpty()&& isSelectorEmpty()){// newSessions.add() precedes startupProcessorassert(processorRef.get()!=this);break;}assert(processorRef.get()!=this);if(!processorRef.compareAndSet(null,this)){// startupProcessor won race, so must exit processorassert(processorRef.get()!=this);break;}assert(processorRef.get()==this);}// Disconnect all sessions immediately if disposal has been// requested so that we exit this loop eventually.if(isDisposing()){boolean hasKeys =false;for(Iterator<S> i = allSessions(); i.hasNext();){IoSession session = i.next();if(session.isActive()){scheduleRemove((S)session);hasKeys =true;}}if(hasKeys){wakeup();}}}catch(ClosedSelectorException cse){// If the selector has been closed, we can exit the loop// But first, dump a stack traceExceptionMonitor.getInstance().exceptionCaught(cse);break;}catch(Exception e){ExceptionMonitor.getInstance().exceptionCaught(e);try{Thread.sleep(1000);}catch(InterruptedException e1){ExceptionMonitor.getInstance().exceptionCaught(e1);}}}try{synchronized(disposalLock){if(disposing){doDispose();}}}catch(Exception e){ExceptionMonitor.getInstance().exceptionCaught(e);}finally{disposalFuture.setValue(true);}}
handlerNewSession做了几件事情,
1、将这个socketChannel注册在processor线程上的selector上,具体看NioProcessor的init().
2、构建iofilter的chain,并发出session被创建的事件。
很快,我们就能看到,一个请求过来后,如何读写的了。这里就是靠processor的中的process(),很熟悉。哈哈
privatevoid process(S session){// Process Readsif(isReadable(session)&&!session.isReadSuspended()){read(session);}// Process writesif(isWritable(session)&&!session.isWriteSuspended()){// add the session to the queue, if it's not already thereif(session.setScheduledForFlush(true)){flushingSessions.add(session);}}}
那我们最后看看read()
privatevoid read(S session){IoSessionConfig config = session.getConfig();int bufferSize = config.getReadBufferSize();IoBuffer buf =IoBuffer.allocate(bufferSize);finalboolean hasFragmentation = session.getTransportMetadata().hasFragmentation();try{int readBytes =0;int ret;try{if(hasFragmentation){while((ret = read(session, buf))>0){readBytes += ret;if(!buf.hasRemaining()){break;}}}else{ret = read(session, buf);if(ret >0){readBytes = ret;}}}finally{buf.flip();}if(readBytes >0){IoFilterChain filterChain = session.getFilterChain();filterChain.fireMessageReceived(buf);buf =null;if(hasFragmentation){if(readBytes <<1< config.getReadBufferSize()){session.decreaseReadBufferSize();}elseif(readBytes == config.getReadBufferSize()){session.increaseReadBufferSize();}}}if(ret <0){// scheduleRemove(session);IoFilterChain filterChain = session.getFilterChain();filterChain.fireInputClosed();}}catch(Exception e){if(e instanceofIOException){if(!(e instanceofPortUnreachableException)||!AbstractDatagramSessionConfig.class.isAssignableFrom(config.getClass())||((AbstractDatagramSessionConfig) config).isCloseOnPortUnreachable()){scheduleRemove(session);}}IoFilterChain filterChain = session.getFilterChain();filterChain.fireExceptionCaught(e);}}
除了读写Iobuffer外,filterChain.fireMessageReceived(buf);这里就到了我们一序列的iofitler,并在这个chain中,有一个tailFilter,这个TailFilter就是调用了我们的自己编写的Handler了。
整个流程的代码就这么。很多细节后续再补充,如:IoBuffer读写;穿插在整个系统中的事件。
二、mina 如何使用nio
1、nio要素:selector,buffer,channel,这里推荐一个文章,链接为:
三、mina 如何使用concurrent
这个也是我们学习mina中能对concurrent中的一些应用做 个了解的。
四、mina 主要UML图和
五、mina 总结
主要接口:IoService,包括了IoAcceptor,IoProcessor和在客户端使用的Ioconnector
IoFilter,很好第体现了面向对象中的开闭原则(软件实体应当对扩展开放,对修改关闭),对于整个处理流程的修改是关闭,在对于个性化的处理流程中用户需要关心的业务相关的拓展进行了开放。
IOSession,讲一个连接封装成session,后续用到的请求数据,处理器,相关配置等关联到这里。理解了session的整个生命周期,就明白了Acceptor,processor的是怎么分别处理客户端连接请求和数据处理过程了。
IoHandler,业务处理的中心,用户根据自己的业务需求,在这里编写业务代码
IO


 167
167

 被折叠的 条评论
为什么被折叠?
被折叠的 条评论
为什么被折叠?
 到【灌水乐园】发言


